
By Design Bundles
Affinity Tutorials14 min
How to Add Multiple Strokes to Text in Affinity Designer
Text can be built up with layers of colors for contrasting projects. You can even use it for subtle shading. Affinity Designer doesn't have a quick tool for adding multiple strokes to text. While this may be a slight drawback, there are workarounds. We will be using a grouping method to get a quicker result.
For this tutorial we are using a quirky handwritten font and pastel color swatches. You can use any cute font from our excellent font selection.
The pastel swatches contain a .ase file that can easily be installed in Affinity Designer. We have a great in depth tutorial on using color palettes in Affinity Designer to help you along.
We will be using the Artistic Text tool to create our text object. The text stroke color and width will also be set up. If you have never used the text tools before, check out our tutorial on adding text in Affinity Designer.
Open Affinity Designer then select New document. Once you have selected your settings click Create. On the left hand side click on the Artistic Text tool. Click anywhere on the document and type out your words. The font can be changed top left of the screen. The color palette has already been installed. It will be available under the Swatches panel on the right hand side.
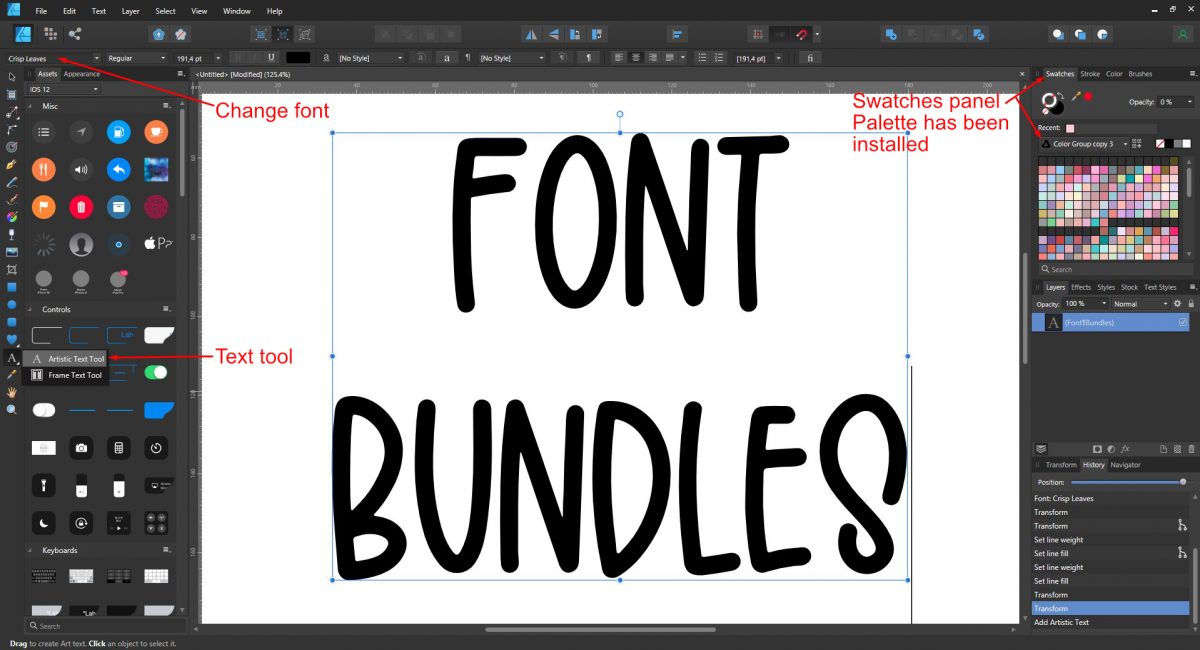
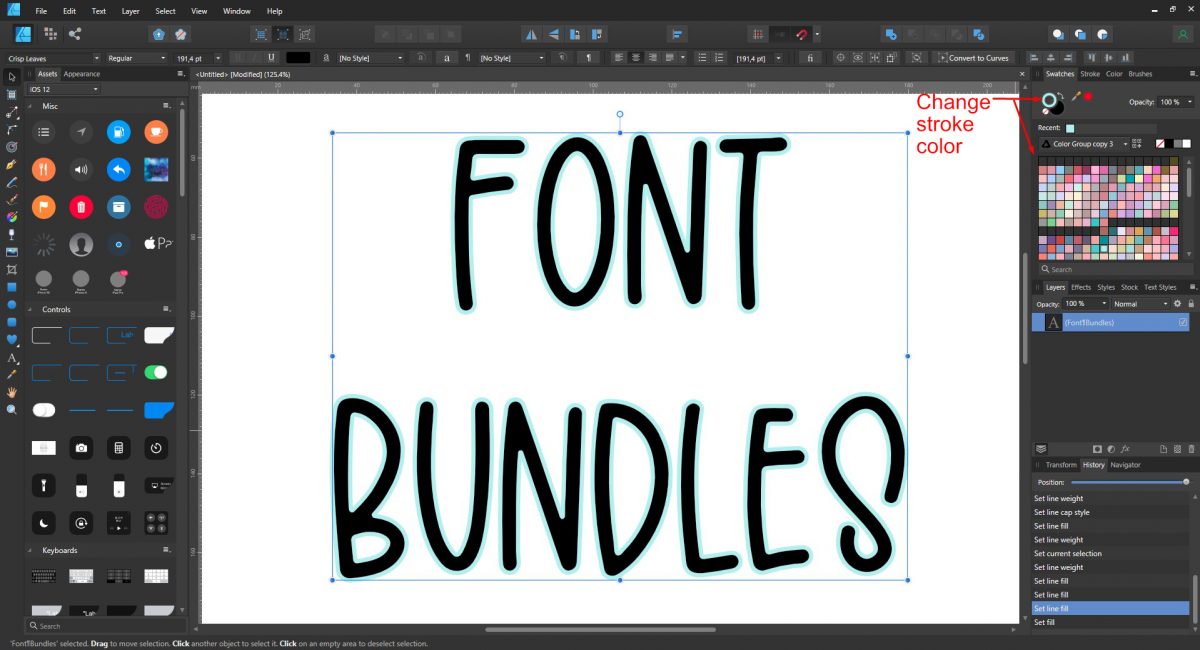
The stroke color is shown as a circle with an outline under the Swatches Panel. At the moment no stroke is applied so there is red line through the circle. With the text selected, click on the circle outline then choose a color from the color palette.
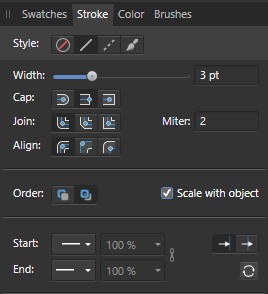
Now click on the Stroke Panel next to the Swatches Panel. Change the Width to 3 pt. You can choose a Cap shape, which will round or square off the edges. In this case it doesn't have an effect on the font so we left it as is. Be sure to tick the box next to Scale with object. This will keep the stroke proportional when resizing.
The base text is set up with the first stroke. We can now add multiple strokes of varying shades or contrasting colors. To do this we will be creating groups and applying the strokes to each one.
The method we are going to use is fairly quick while a little odd. Normally a group consists of more than one layer. But in this case, the text layer will grouped on its own. Under the Layer's Panel on the right hand side, right click on the text layer and select Group. When you click on the arrow next to the group layer, it will open to show the text layer.
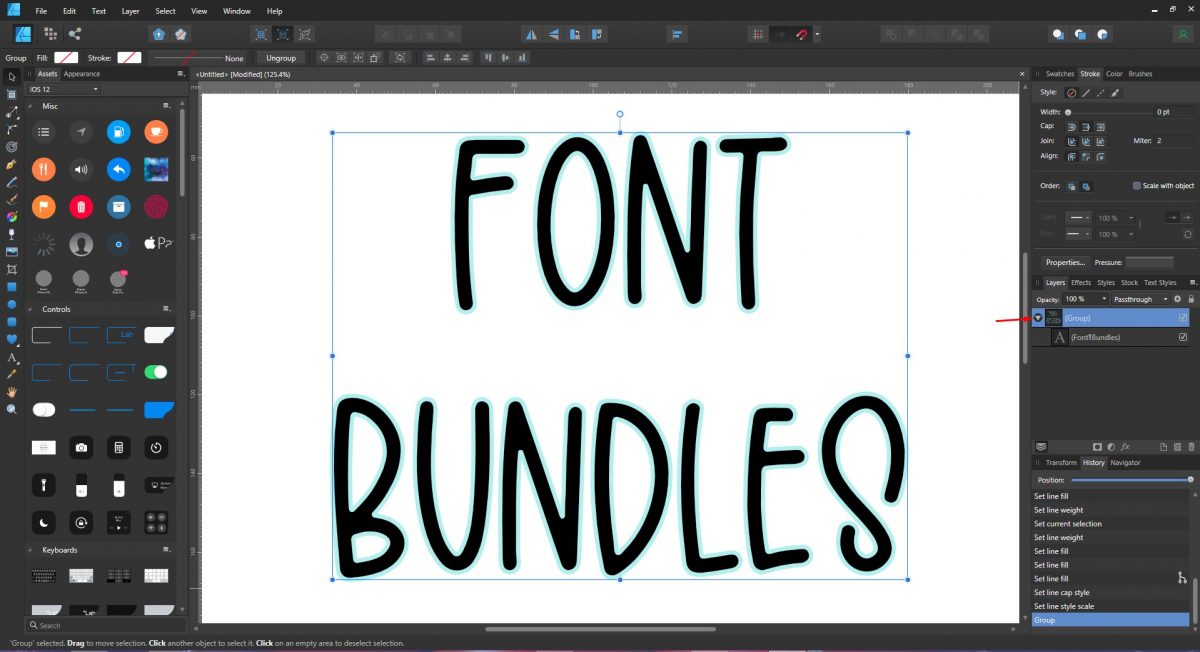
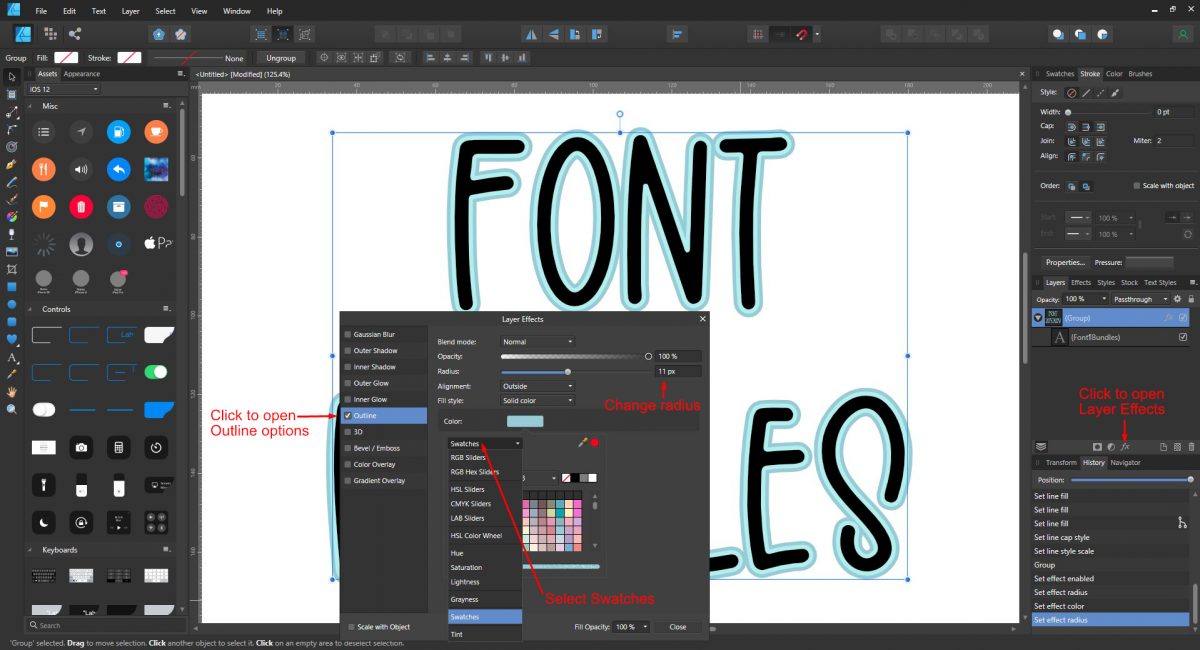
The Group layer should be highlighted in blue to show as selected. Go to the bottom of the Layer's Panel and click on the fx symbol. The Layer Effects panel will open. On the left side, click on the Outline to open the options. Tick the box next to Outline to make it active.
Change the Radius to 11 px. Beneath Color you will see HSL Sliders with a white arrow next to it. Click this arrow to open the menu and choose Swatches. Your installed swatches that show on the right will show here. Choose a color then click Close.
As before, we are going to group all of these layers in order to add another stroke. Go to the Layers Panel, click to the select the Group Layer then right click and select Group. You should now have a main Group Layer, with a Group layer beneath containing the text layer.
Once again, with the main Group layer selected, click on the fx symbol. Follow Step 2 above to add an Outline, adjust the Radius to 17 and change the color. When you close out of the Layers Effects panel, you will see an fx symbol next to both Group layers. Clicking on the symbol will open the Layer Effects where you can make changes at any time.
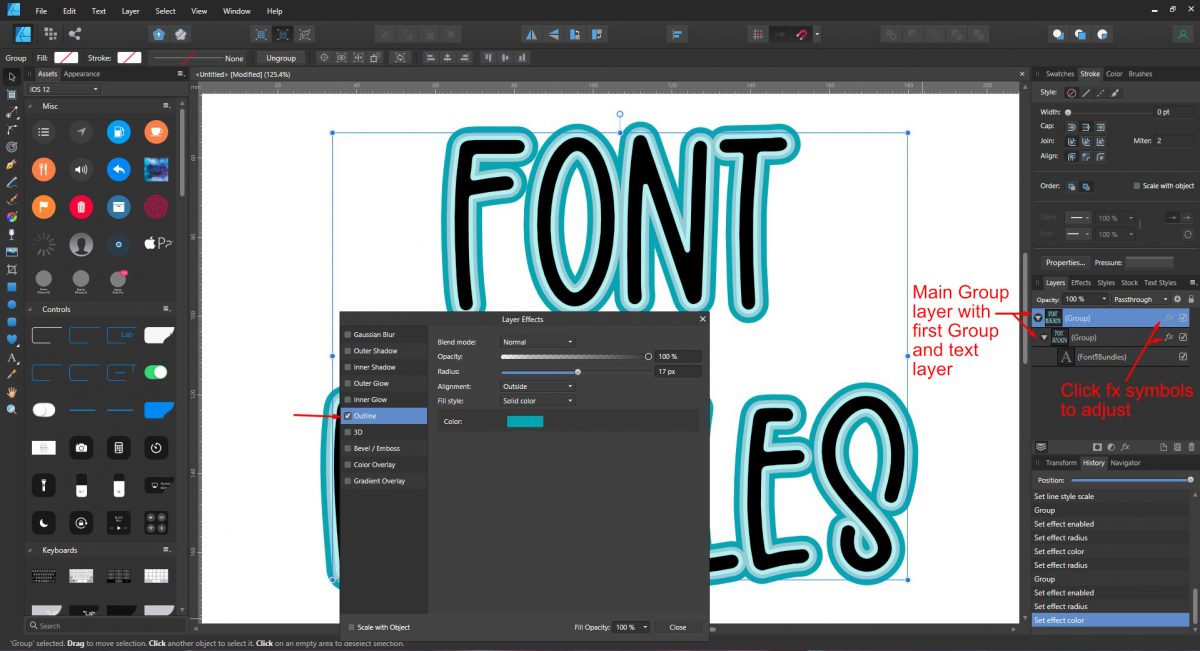
Carry on creating groups and adding strokes to each one as needed. As the Layer Effects Panel is non-destructive you can change the color and Radius without a problem. Just click on the fx symbol next to each Group layer. Even the stroke color and width for the text layer can still be adjusted. A retro style can be created with just a few changes.
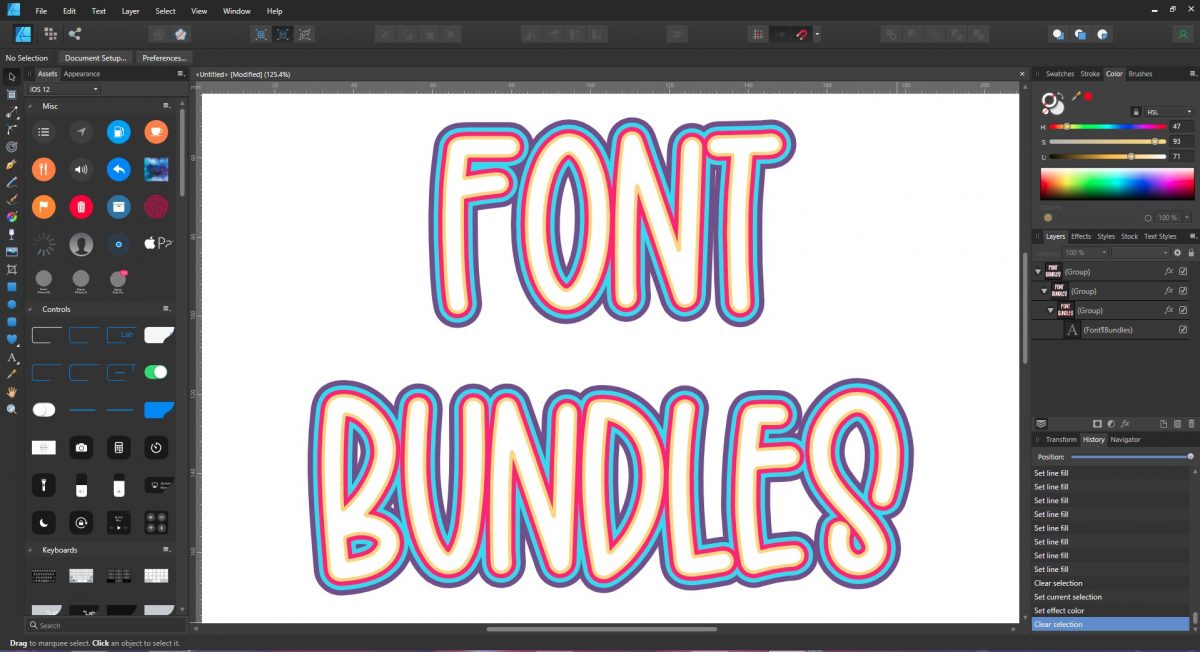
Varying the width of the strokes can create impact for logos and designs.
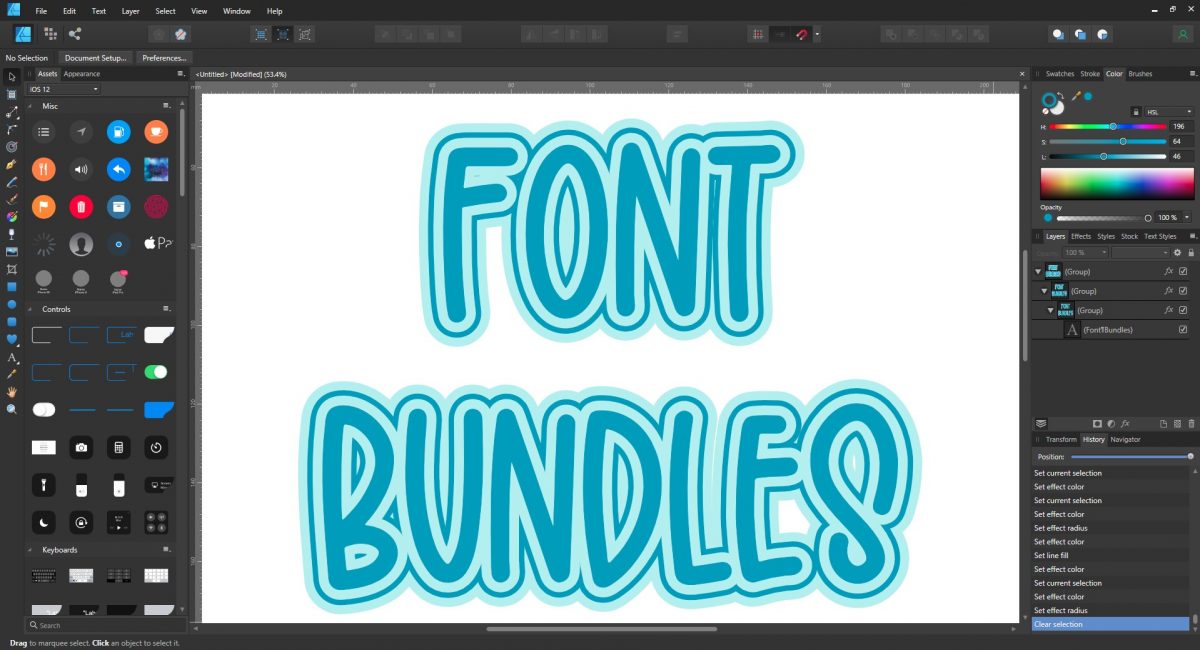
Varying color and stroke width creates many opportunities for your projects. Next up check out our tutorials on creating a texture fill, creating a paper cut effect, and making Affinity Designer brushes.
For this tutorial we are using a quirky handwritten font and pastel color swatches. You can use any cute font from our excellent font selection.
The pastel swatches contain a .ase file that can easily be installed in Affinity Designer. We have a great in depth tutorial on using color palettes in Affinity Designer to help you along.
Create the text object and change the stroke
We will be using the Artistic Text tool to create our text object. The text stroke color and width will also be set up. If you have never used the text tools before, check out our tutorial on adding text in Affinity Designer.
Step 1 - Type out your text and change the font
Open Affinity Designer then select New document. Once you have selected your settings click Create. On the left hand side click on the Artistic Text tool. Click anywhere on the document and type out your words. The font can be changed top left of the screen. The color palette has already been installed. It will be available under the Swatches panel on the right hand side.
Step 2 - Change the font color and width
The stroke color is shown as a circle with an outline under the Swatches Panel. At the moment no stroke is applied so there is red line through the circle. With the text selected, click on the circle outline then choose a color from the color palette.
Now click on the Stroke Panel next to the Swatches Panel. Change the Width to 3 pt. You can choose a Cap shape, which will round or square off the edges. In this case it doesn't have an effect on the font so we left it as is. Be sure to tick the box next to Scale with object. This will keep the stroke proportional when resizing.
Add multiple strokes to the text
The base text is set up with the first stroke. We can now add multiple strokes of varying shades or contrasting colors. To do this we will be creating groups and applying the strokes to each one.
Step 1 - Create the first group and add a new stroke
The method we are going to use is fairly quick while a little odd. Normally a group consists of more than one layer. But in this case, the text layer will grouped on its own. Under the Layer's Panel on the right hand side, right click on the text layer and select Group. When you click on the arrow next to the group layer, it will open to show the text layer.
Step 2 - Add an Outline with Layer Effects
The Group layer should be highlighted in blue to show as selected. Go to the bottom of the Layer's Panel and click on the fx symbol. The Layer Effects panel will open. On the left side, click on the Outline to open the options. Tick the box next to Outline to make it active.
Change the Radius to 11 px. Beneath Color you will see HSL Sliders with a white arrow next to it. Click this arrow to open the menu and choose Swatches. Your installed swatches that show on the right will show here. Choose a color then click Close.
Step 3 - Group all layers and add another stroke
As before, we are going to group all of these layers in order to add another stroke. Go to the Layers Panel, click to the select the Group Layer then right click and select Group. You should now have a main Group Layer, with a Group layer beneath containing the text layer.
Once again, with the main Group layer selected, click on the fx symbol. Follow Step 2 above to add an Outline, adjust the Radius to 17 and change the color. When you close out of the Layers Effects panel, you will see an fx symbol next to both Group layers. Clicking on the symbol will open the Layer Effects where you can make changes at any time.
Build up the text with multiple strokes
Carry on creating groups and adding strokes to each one as needed. As the Layer Effects Panel is non-destructive you can change the color and Radius without a problem. Just click on the fx symbol next to each Group layer. Even the stroke color and width for the text layer can still be adjusted. A retro style can be created with just a few changes.
Varying the width of the strokes can create impact for logos and designs.
Varying color and stroke width creates many opportunities for your projects. Next up check out our tutorials on creating a texture fill, creating a paper cut effect, and making Affinity Designer brushes.
Related Tutorials
Affinity Tutorials
How to Curve Text in Affinity Designer
In this tutorial learn how to curve text in Affinity Designer in only 5 steps!
Affinity Tutorials
How to Warp Text in Affinity Designer
In this step by step tutorial we will learn how to warp text in Affinity Designer.
Affinity Tutorials
How to Add Text in Affinity Photo
Learn how to Add Text in Affinity Photo with this step by step tutorial.
Affinity Tutorials
How to Convert Text to Path in Affinity Designer
Converting text to path in Affinity Designer takes only a few steps.
Affinity Tutorials
How to Add Fonts to Affinity Designer on iPad
Learn how to add fonts to the Affinity Designer app on iPad with this step by step tutorial.
Affinity Tutorials
Text basics in Affinity Designer
Learn the text basics in Affinity Designer with this beginner tutorial.