By Design Bundles
Affinity Tutorials12 min
How to Use Color Palettes in Affinity Designer
Learn how to use color palettes in this Affinity Designer tutorial.
Affinity Designer features a Swatches panel for preloaded or custom color palettes. These palettes can contain solid or gradient fill swatches. Custom palettescan also be imported including ASE and AI file types. In this tutorial you will learn how to create, import and use color palettes in Affinity Designer.
To get started we will be using asummer color palette, but there are a lot of greatcolor palettesavailable on Design Bundles to choose from.
Klaviyo Form will appear here
Open Affinity Designer and click on New Document. Adjust your settings if needed and click Create.
Step 1 - Create a Color Palette from Photo
Photos provide a colorful playground for palettes. You are able to create a swatch with a range of colors specific to that photo. The color palette can then be applied to any design. We can create a color palette either manually or allow Affinity Designer to choose the colors.
Choose palette colors manually from an Image
Drag and drop an image onto the new document and resize. Click on the Rectangle Tool on the left side panel then Shift + Click and drag out a rectangle. Duplicate this another four times and align them next to each other.
These rectangles will form our color palette. You are not restricted to five colors so create as many as you need.
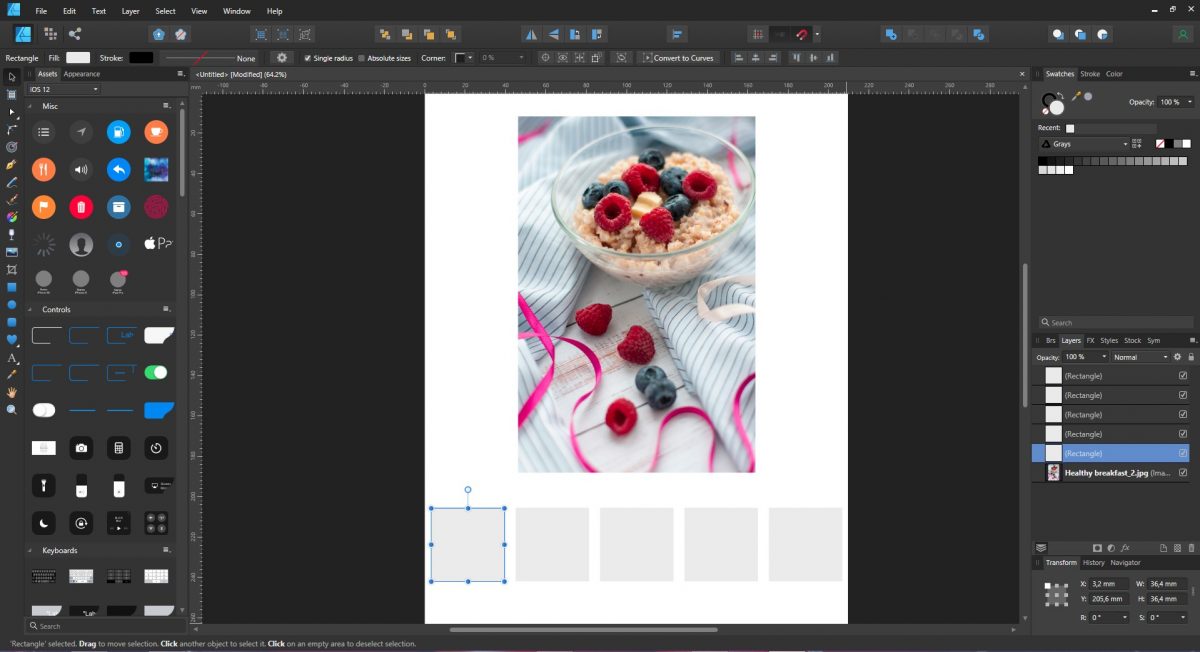
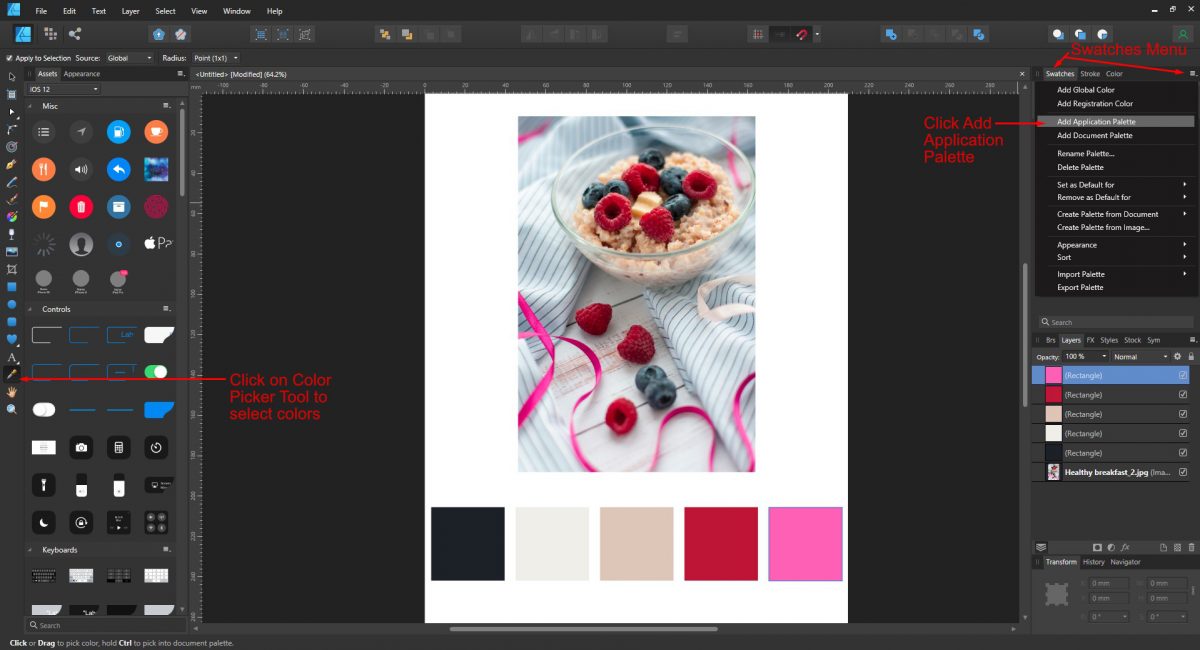
Select a rectangle then click on the Color Picker tool on the left side panel. Find the darkest area and click to fill the rectangle. Repeat this for the lightest color. Fill the remaining rectangles with dominant colors.
Click on the Swatches panel on the right hand side then click on the three lines. We will refer to these three lines as the Swatches menu. Under the menu select Add Application Palette. The Application option will allow us to use the Palette with other documents.
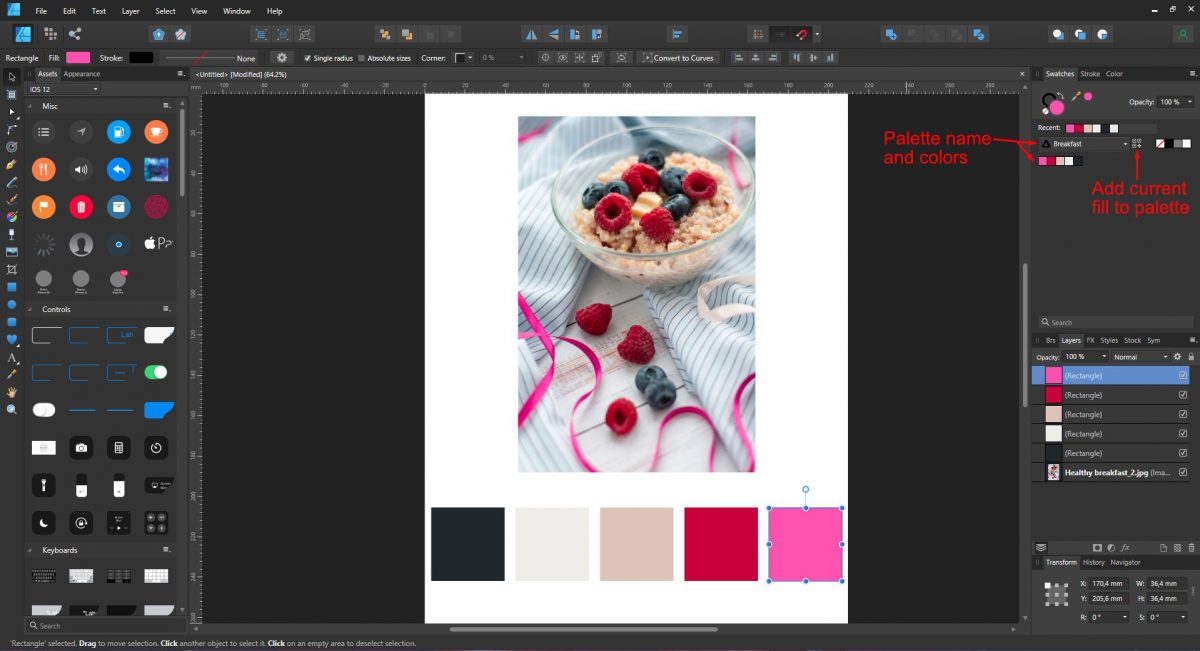
Click the Swatches menu again and choose Rename Palette. Give your palette a name and click OK. Select the first color rectangle then click the icon next to the Palette name. The icon is called Add current fill to palette. When clicked, the color of the selected rectangle is added to the palette. Repeat this for the remaining colors.
Create Palette from Image
If you don't want to manually create a palette, Affinity Designer can do it for you. You don't have control over the colors chosen but it's a good starting point. Once created you can add further colors. We will create a palette from a breakfast stock photo created by Watercolor Digital Photo by Anna Zubkova.
Click on the Swatches Panel then click the Swatches menu. Next, click on Create Palette from Image.
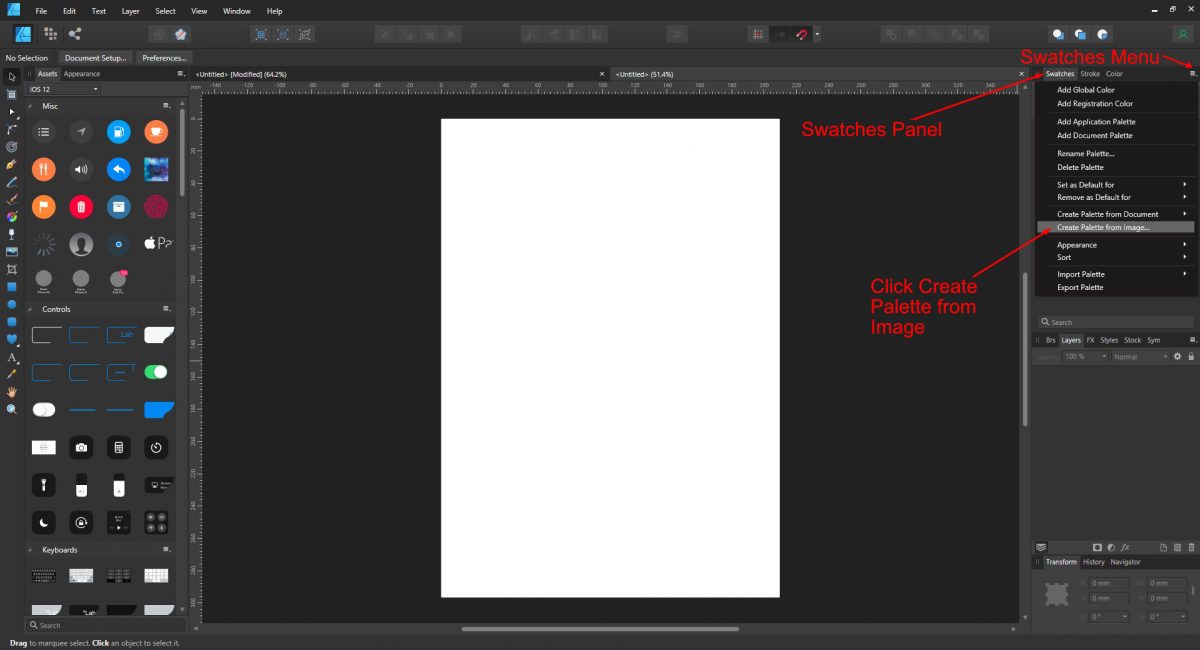
Next, click on Select Image and choose your photo. The photo will load and beneath it will be five boxes containing auto selected colors. Five colors is the default selection but the number of colors can be increased.
Click on Location and choose Application then click Create. A new palette will be created under the Swatches panel. Additional colors can be added with the Add current fill to palette.
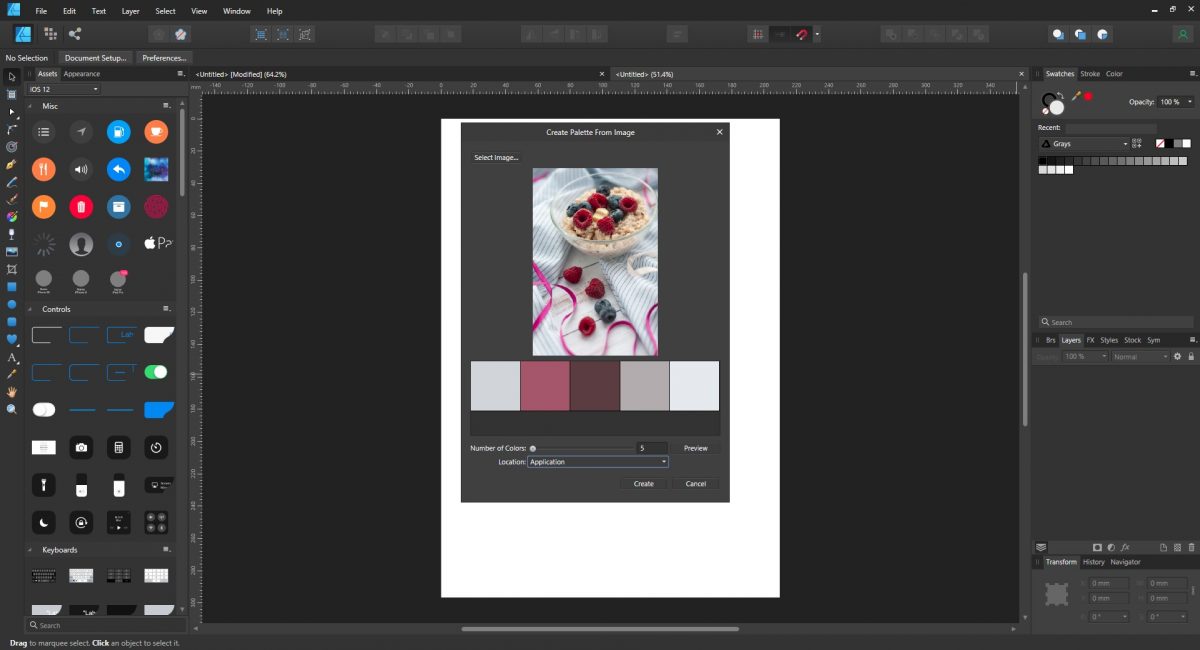
The three options under Location are Application, Document and Currently selected palette. Application allows the palette to be saved and used across your system. Document saves the palette only for that current document. Currently selected palette will save to the palette that is currently open under the Swatches panel.
Step 2 - Import a Color Palette in Affinity Designer
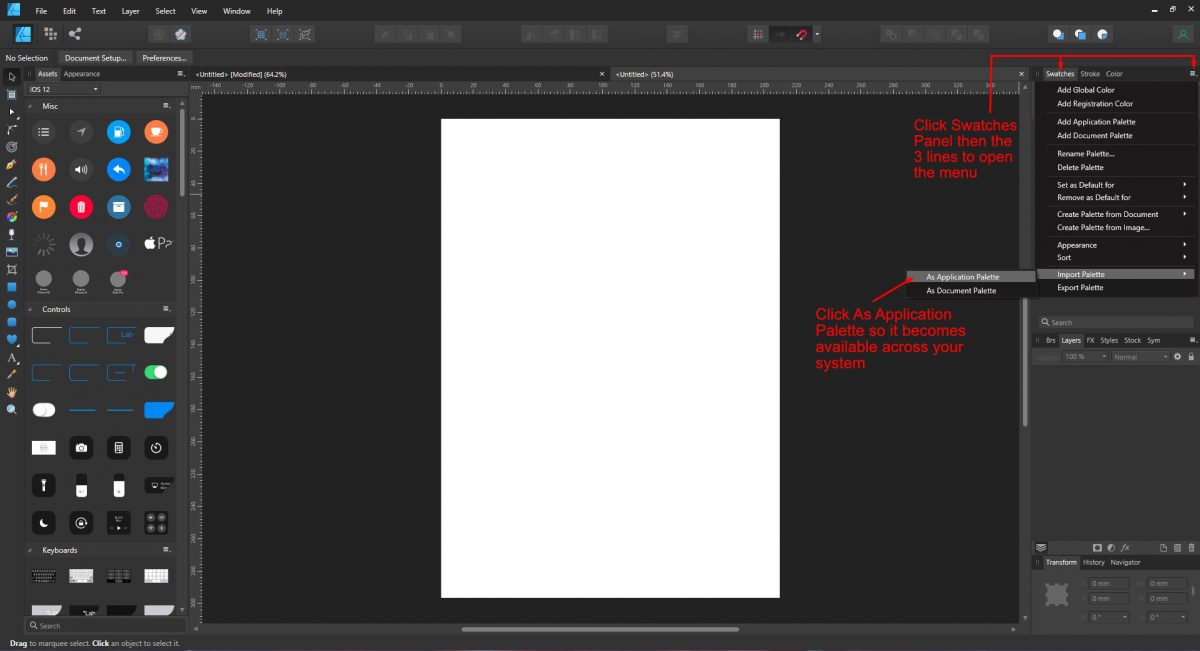
Importing palettes is not restricted to those specifically designed for Affinity Designer. Palettes created for Illustrator can also be used. Click on the Swatches menu to open. Click on Import Palette and then As Application Palette. This will make the palette available across your system.
Locate your palette and click Open. This process works the same for both Affinity Designer and Adobe palettes.
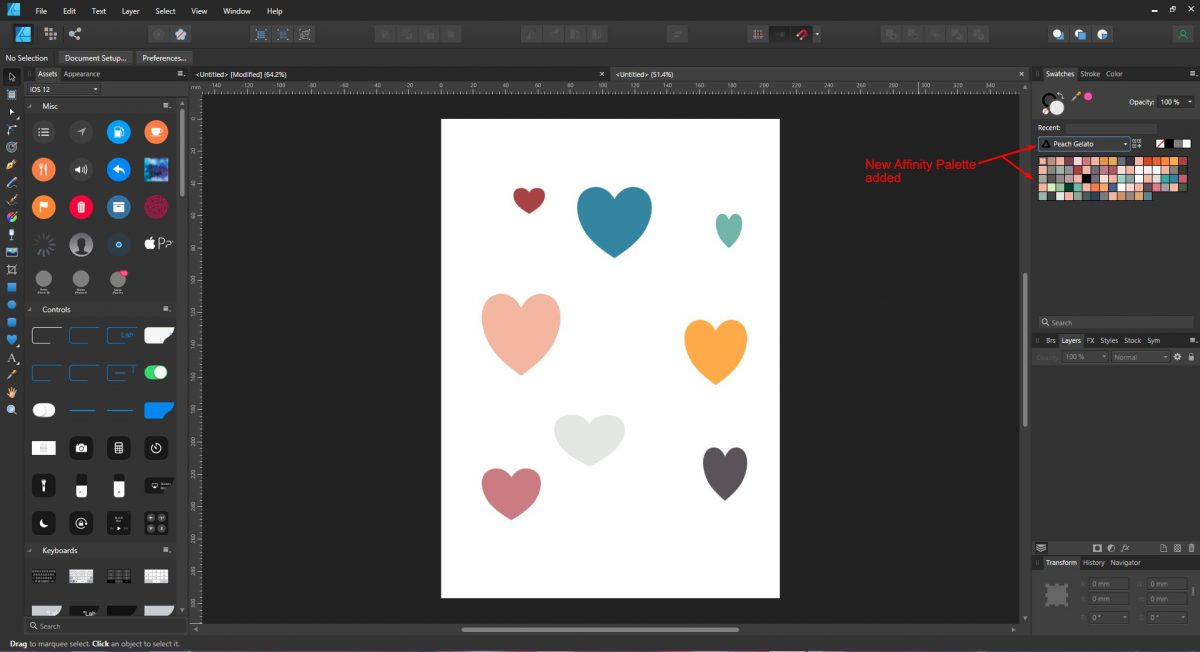
The new palette will appear under the Swatches Panel. Apply to an object or text by clicking on any color swatch on the palette.
If you no longer want the palette, for whatever reason, you can delete it. With the palette still active click on the Swatches menu then click Delete Palette.
To Export a palette, in case you want to make it available to customers, click on the Swatches menu and choose Export Palette.
If you liked this tutorial we also have guides on how to use a gradient, mockups in Affinity, and how to use fonts in Affinity.
Related Tutorials
Affinity Tutorials
How To Use the Color Picker Tool in Affinity Designer
Learn how to quickly use the color picker tool in Affinity Designer with this beginner tutorial.
Affinity Tutorials
How to Use Clipping Masks in Affinity Designer
In this Step-by-Step tutorial learn how to use clipping masks in Affinity Designer.
Affinity Tutorials
How to Use the Layers Panel in Affinity Designer
In this tutorial, discover how to effectively use the Affinity Designer Layers Panel.
Affinity Tutorials
How to Use the Node Tool in Affinity Designer
In this tutorial discover how to use the Node Tool and its powerful features in Affinity Designer.
Affinity Tutorials
How To Use Mock Ups In Affinity Designer
In this tutorial we will show you how to use both JPG and PSD Mockups in Affinity Designer.
Affinity Tutorials
How to Use the Shape Tools in Affinity Designer
In this step by step tutorial learn how to use and edit the shape tools in Affinity Designer.