By Design Bundles
How to Use Text Layer Effects in Affinity Designer
In Affinity Designer text can be enhanced using the Layer Effects panel. The panel is loaded with options for blurring, bevel, 3D and more. The Layer Effects panel works non-destructively and can be edited at any point. We will show you how to apply Layer Effects to text in Affinity Designer.
For this tutorial we will be using a handwritten calligraphy font by baldam. You can also use any modern calligraphy font from our excellent selection on Design Bundles.
Once you have opened Affinity Designer, click New Document. Choose your document settings then click Create.
Step 1 - Locate the Layer Effects panel
The Layer Effects panel can be accessed in two ways. You can open it directly from the bottom of the Layers Panel where you see the fx symbol. When you click on the fx a new window will open. You will find all of the effects and their options under this panel.
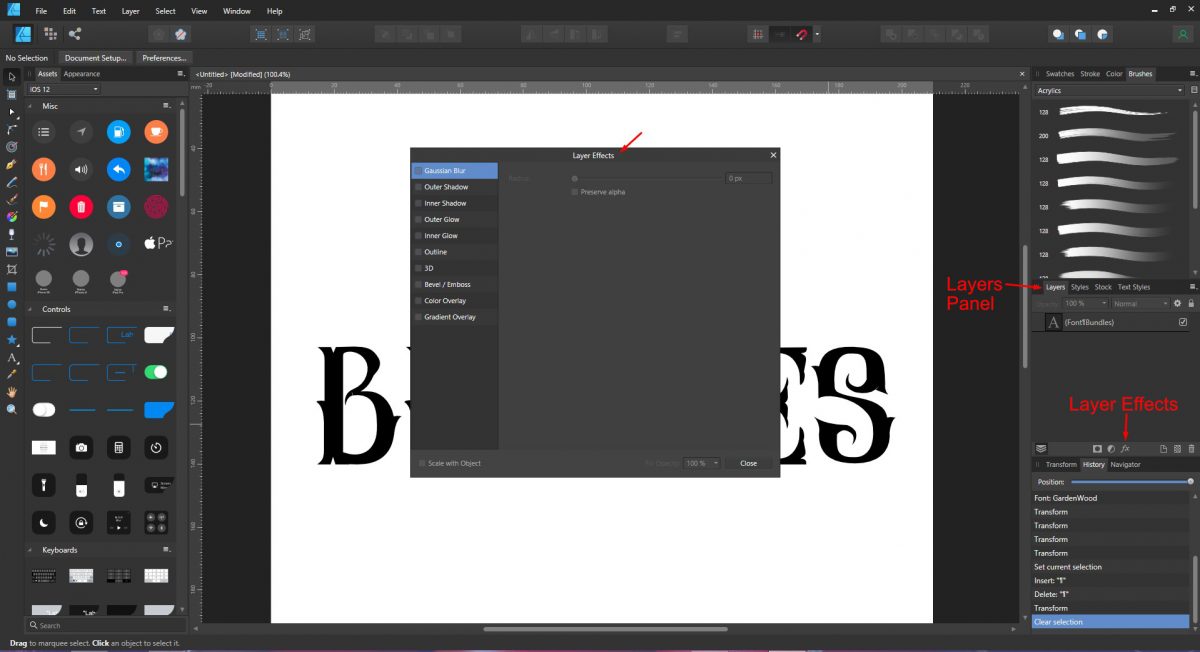
The second way to find the Effects Panel is usually next to the Layers Panel. It will show as 'Effects' but if you can't find it, click on the View menu at the top of the screen. Next, click Studio and select Effects. It will open as a floating window. You can leave as is or drag and drop it next to the Layers panel.

During this tutorial we will use the fx symbol at the bottom of the Layers Panel. The menu is easier to see and navigate this way.
Step 2 - Type out text and apply an effect
Applying an effect from the Layer Effects can be done with just a few clicks. First we need to type out our text. Select the Artistic text tool on the left side panel, click anywhere on the canvas and type out your text. Affinity Designer will automatically add a layer for the font. Adjust the font from the Font Family top left of the screen.
If you need some help, check out our tutorial on how to use the text tool in Affinity Designer.
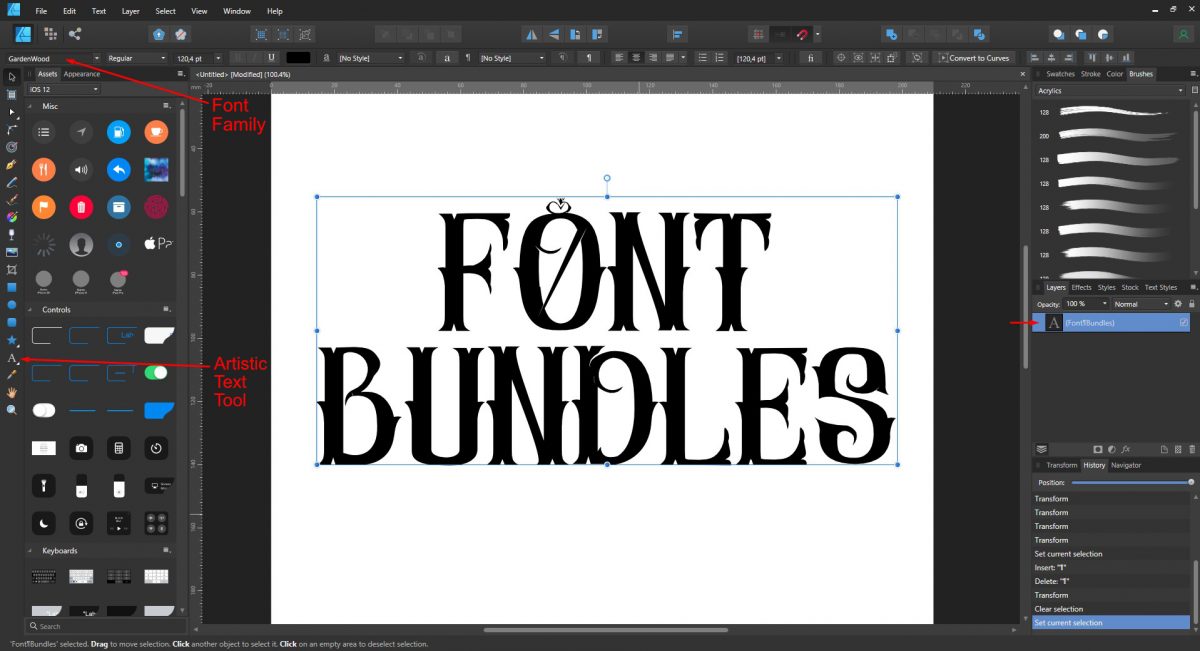
Change the color of the text if needed under the Color Panel on the top right hand side. For this example a duplicate has been made to show the difference. You don't need to create a duplicate.
At the bottom of the Layers Panel, click the fx symbol to open the Layer Effects panel. You can add multiple effects to this layer. Since this is a non-destructive action, you can edit whenever you want.
Ticking the boxes next to the effects will activate them. You also need to select the effect to open the options and edit. This is done by clicking on the effect so it's highlighted in blue.
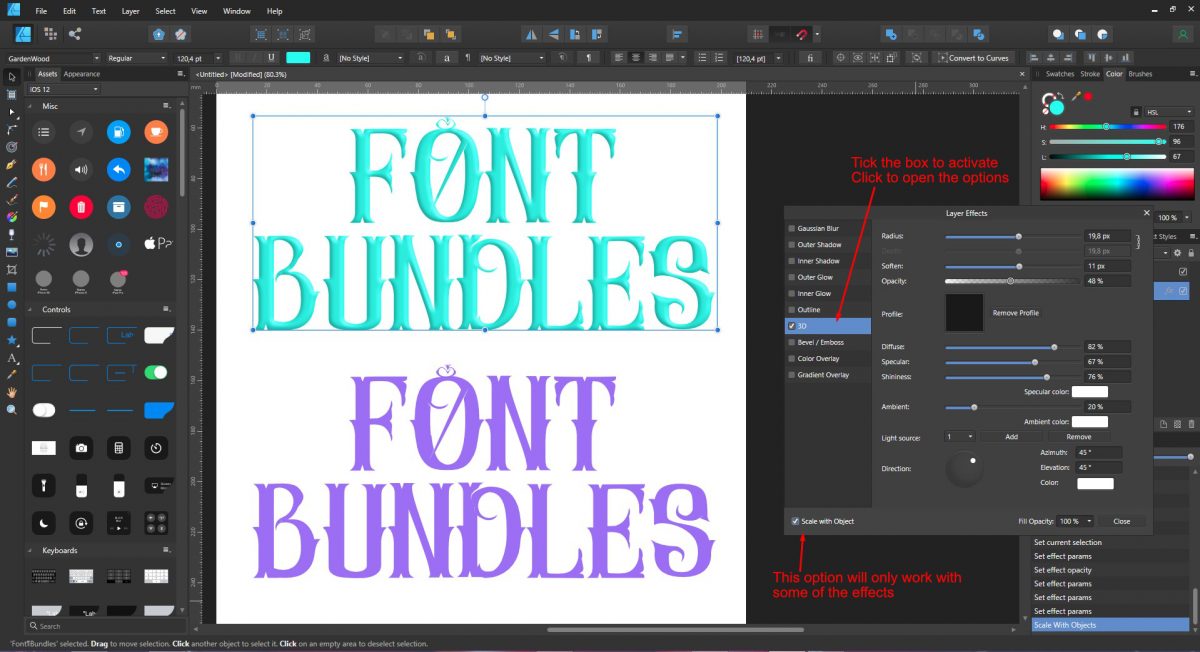
Experiment with the options available to see what results you get. Keep in mind, this is not set and can be changed at any time.
At the bottom of the panel is Scale with Object. While you are working with effects you can freely scale and move the text. The problem you may face with some of the effects is how they react when the size is adjusted. This is where the Scale with Object comes in. If the box is ticked, the effect with adjust with the object or text when resized.
Step 3 - A quick look at the Layers Effects
Accessing and applying a layer effect is simple and quick to do. Now that you know how, let us take a quick look at the effects available.
Gaussian Blur
A blur isapplied to the entire object including any effects that have been added. This can have a strange result with effects like Outline.
Outer Shadow
A shadow is added behind the object. The distance of the shadow can be adjusted with the Radius and Offset. The angle and color can also be changed.
Inner Shadow
A shadow is added inside the edge of the object. The editing options are similar to Outer Shadow.
Outer Glow
A glow is added starting from the outer part of the object. The Opacity, Radius and Density as well as Color can be adjusted here.
Inner Glow
Inner Glow is the opposite to Outer Glow where the glow starts from inside the object.
Outline
An outline is added to the edge of the object. This effect has an awesome feature that allows you to add a gradient.
3D
A 3D effect is applied with the use of lighting. This effect has quite a few options that can provide many creative possibilities.
Bevel/Emboss
This option uses highlights and shadows to create a bevel or embossed effect. The highlight and shadow colors can be adjusted.
Color Overlay
Color Overlay adds a solid color to the object. This would be the same as changing the color under the Color Panel. However, once you have ticked the box under Layer Effects the color can't be changed under the Color Panel.
Gradient Overlay
A linear gradient is applied to the object where color stops can be added and adjusted.
At the bottom of the Layer Effects panel you will find the Fill Opacity option. This affects the fill color and stroke without changing the applied effect.
Step 4 - Experiment with multiple Layer Effects
Experimenting with the various Layer Effects can produce a variety of creative results. Under most of the effect settings you will also get a Direction option.
Direction adjusts where the light source, shadow or gradient is positioned. It is shown as a grey circle with a small white circle inside. The white circle can be moved in any direction including towards the middle or outer edge.

For the example above, the Outer Shadow, Outline, 3D and Bevel/Emboss effects were applied. Once you are happy with the result, close out of the Layer Effects panel by clicking on Close.
Now take a look at the layer that you edited with the Layer Effects. It will have a fx symbol like the one at the bottom of the Layers Panel. When working on your project, if you want to change anything just click once on the fx. The Layer Effects panel will open with all the effects still in place. You can then go ahead and adjust if needed.

Adding multiple effects to text is as easy as that. Next up, check out our tutorials on how to create a neon text effect, make a texture fill, and how to create stacked text in Affinity Designer.