By Design Bundles
How to Print in Canva
When you design for print, there are several things to consider. From choosing the right size of the canvas before the design process, to the color format, to matters of bleeding and crop marks and so on. It’s quite a broad topic so we won’t be discussing everything here. In this tutorial, we’re just going to go over the ways on how to prepare your Canva file for print.
Step 1 - Create or Open an Existing Design
We're going to use this thank you for your order template design from the Design Bundles Plus Membership that we have also used in our How to Use Canva Templates on iOS Device tutorial.

Step 2 - Prepare your Canva File to Print
When you're preparing a file for print, you need to account for the bleed area and make sure that all of your important elements fit within what is called the safety area.
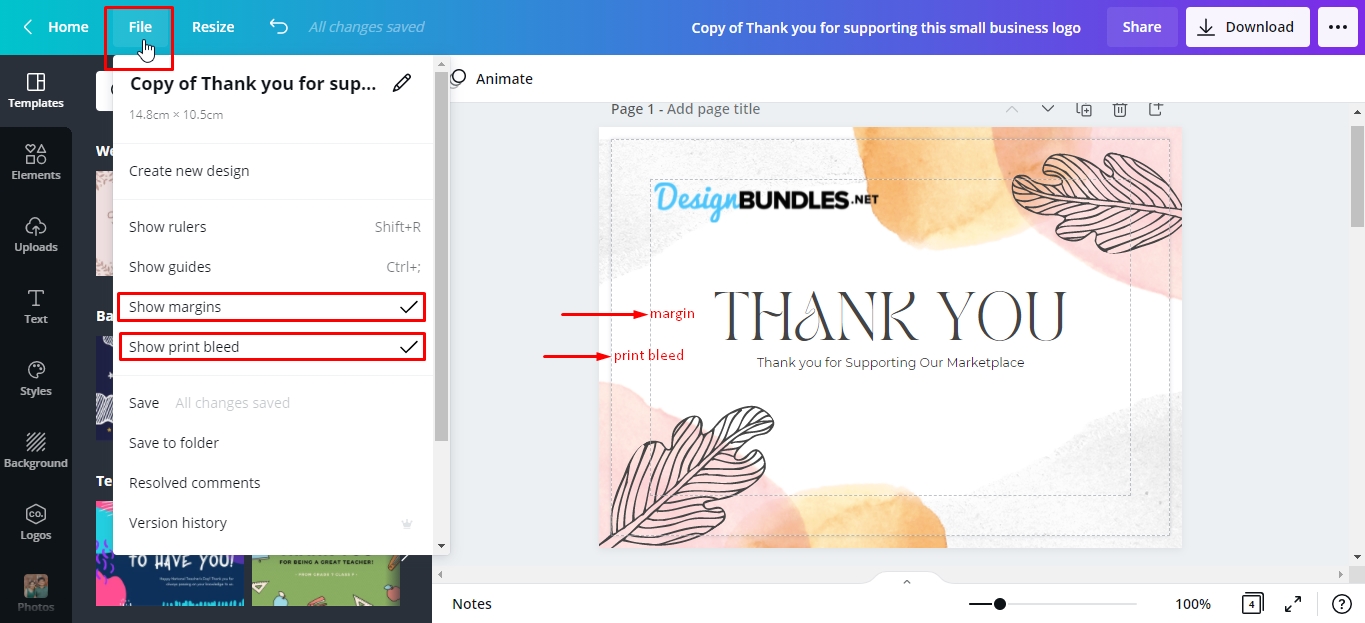
So head over to the menu bar and click file> show margins. The design inside the margin is your safety area. Make sure that all of your text is within the safety line. It's ok if you don't have all the graphics or elements in the safety line but you want to make sure that everything you don't want to be cut off, especially the texts and logo is within the safety line.
After that, you're going to want to show your print bleed. A bleed is the border of broken lines that appear close to the edges of your design. Again, click file> show print bleed.
The bleed ensures that your print material doesn't print with a white line if you have a color background. Canva automatically extends the background beyond the dashed line when you click "show print bleed." So when your printer cuts the design, the bleed helps to account for the slight inaccuracies in printing.
Step 3 - Download Print Design
If you're now ready to down load your print design, click the download icon in the upper right of the menu bar, click on the dropdown arrow to scroll through the different file types. Make sure that you select PDF print.

Next, click the checkbox for crop mark and bleed > download.

Once the download button is clicked, the download will start. A notification will appear telling you that you've successfully saved/exported your design. Click on the Show in Folder button to access your design.

Step 4 - Print your design
Locate your downloaded PDF from your computer. Open it by double-clicking the thumbnail.
Click the printer button on your PDF viewer. You can also press Ctrl+P (Windows) or Command+P (Mac)on your keyboard.

Next, Select your personal printer’s model from the options and change your preferred print settings, then click print.

There you have it. Printing professional designs with your Canva designs with your home printer is easy-peasy. If you love creating social media graphics with Canva, you can created business to match.
We have tons of great Canva tutorials, make sure you don’t miss our guides on how to save design as a Canva Template and how to download Canva Files.