By Design Bundles
Illustrator Tutorials14 min
Chocolate Text in Illustrator
For this tutorial, we will use the image of the “Chocolate Bunny in Photoshop” created in a previous tutorial as the “Background” and the Free Font “Happy Popcorn” by DMletterstudio.
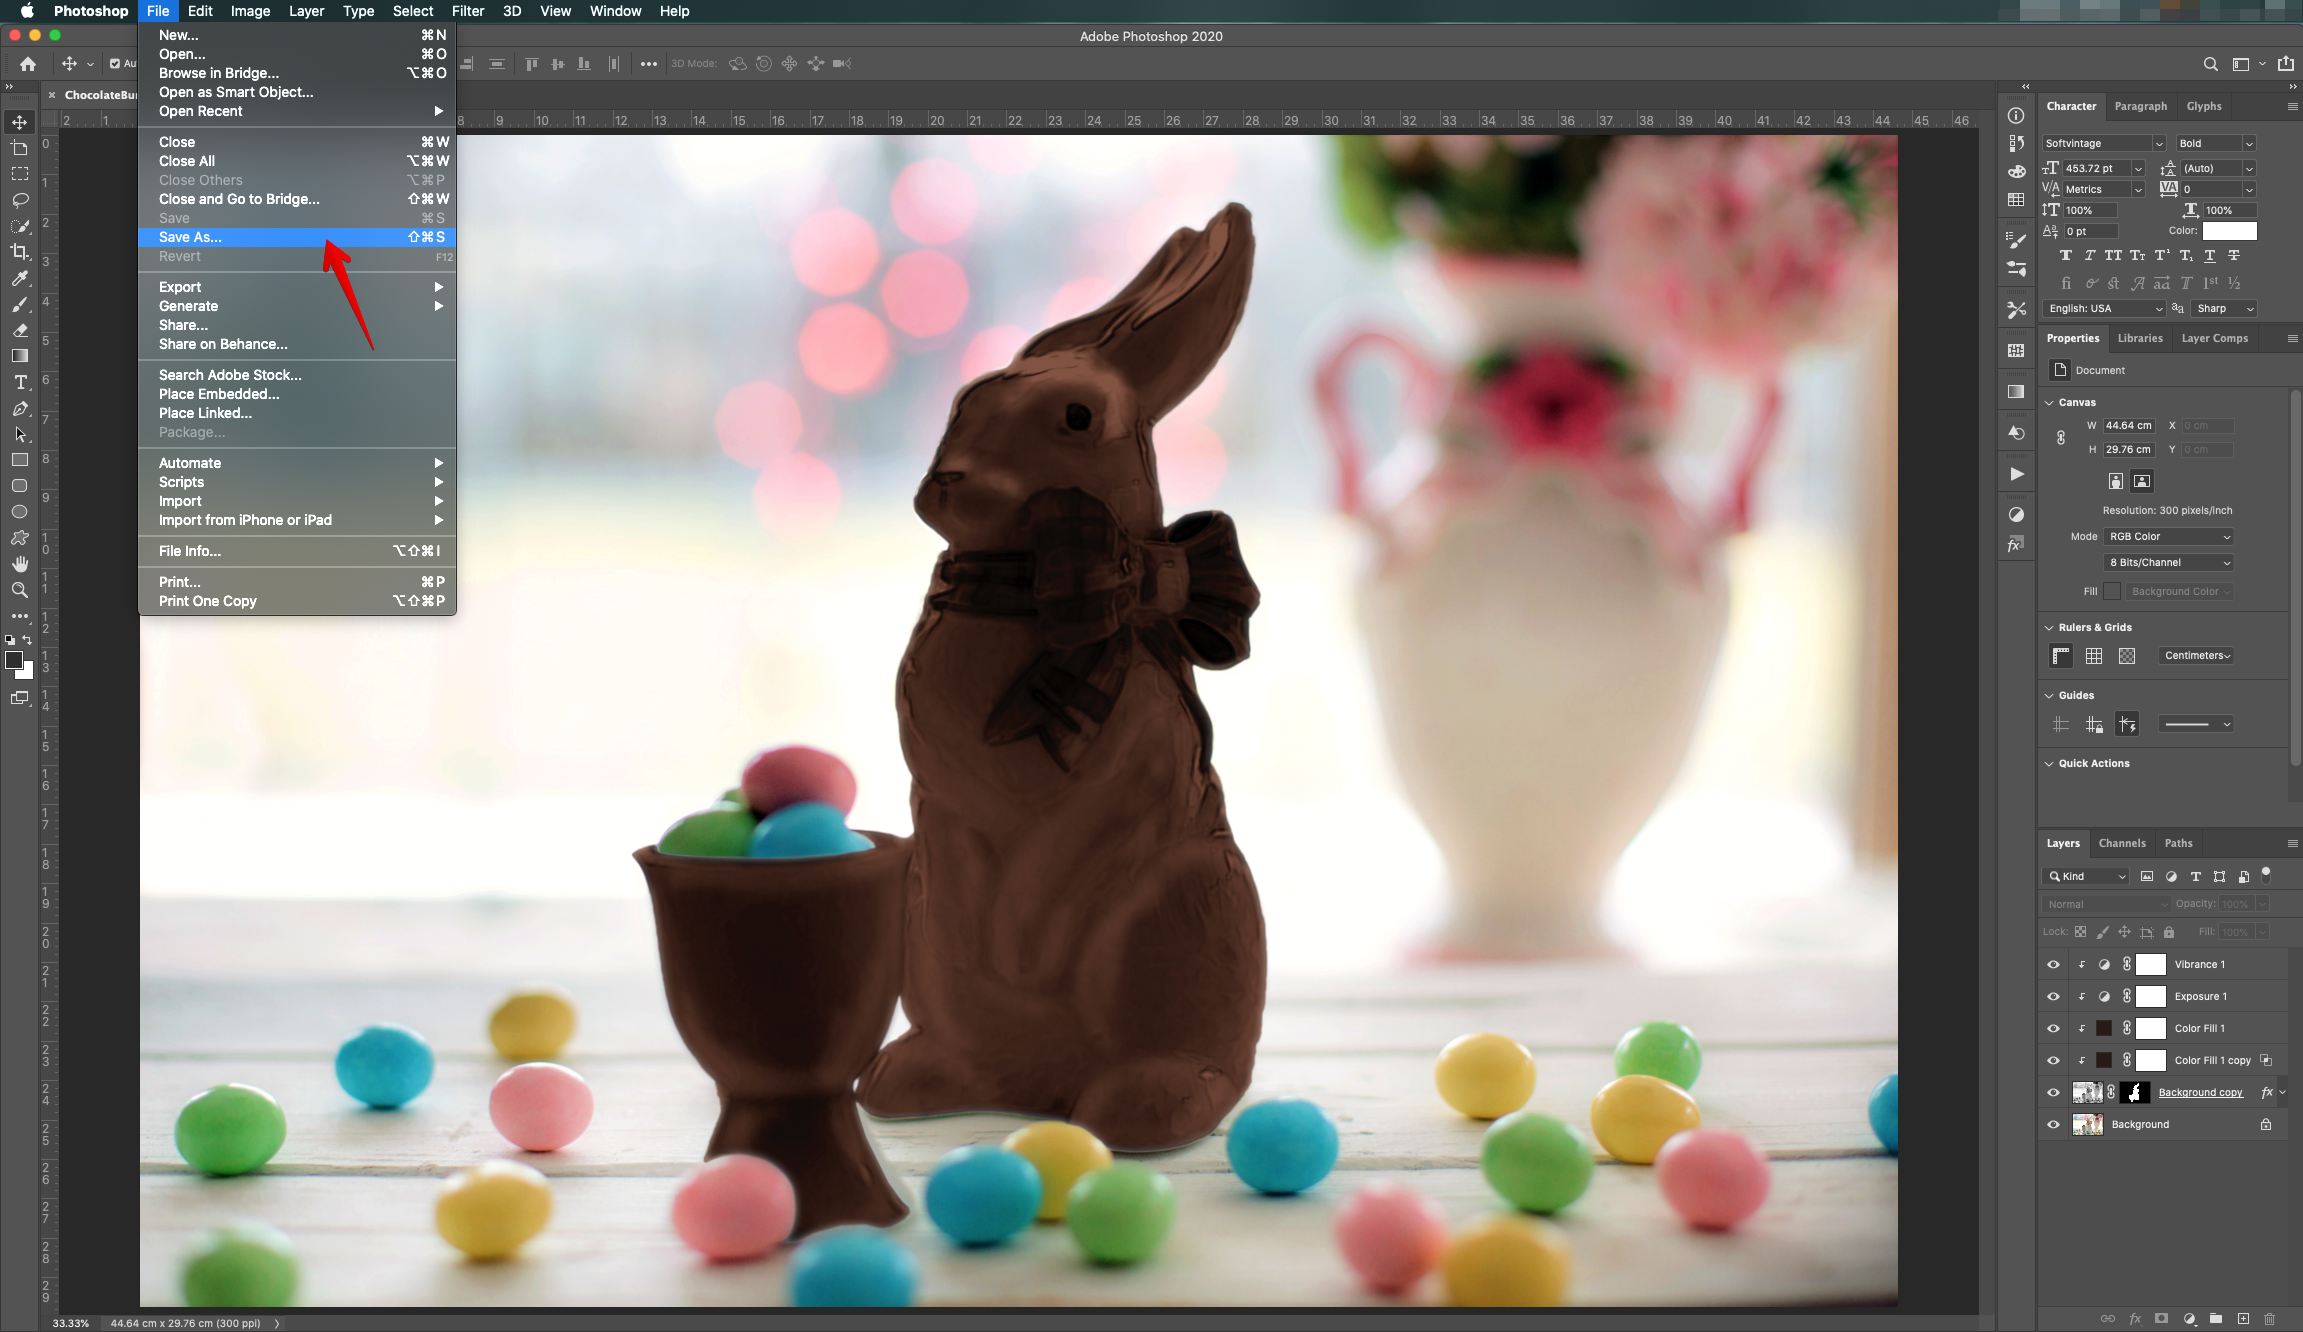
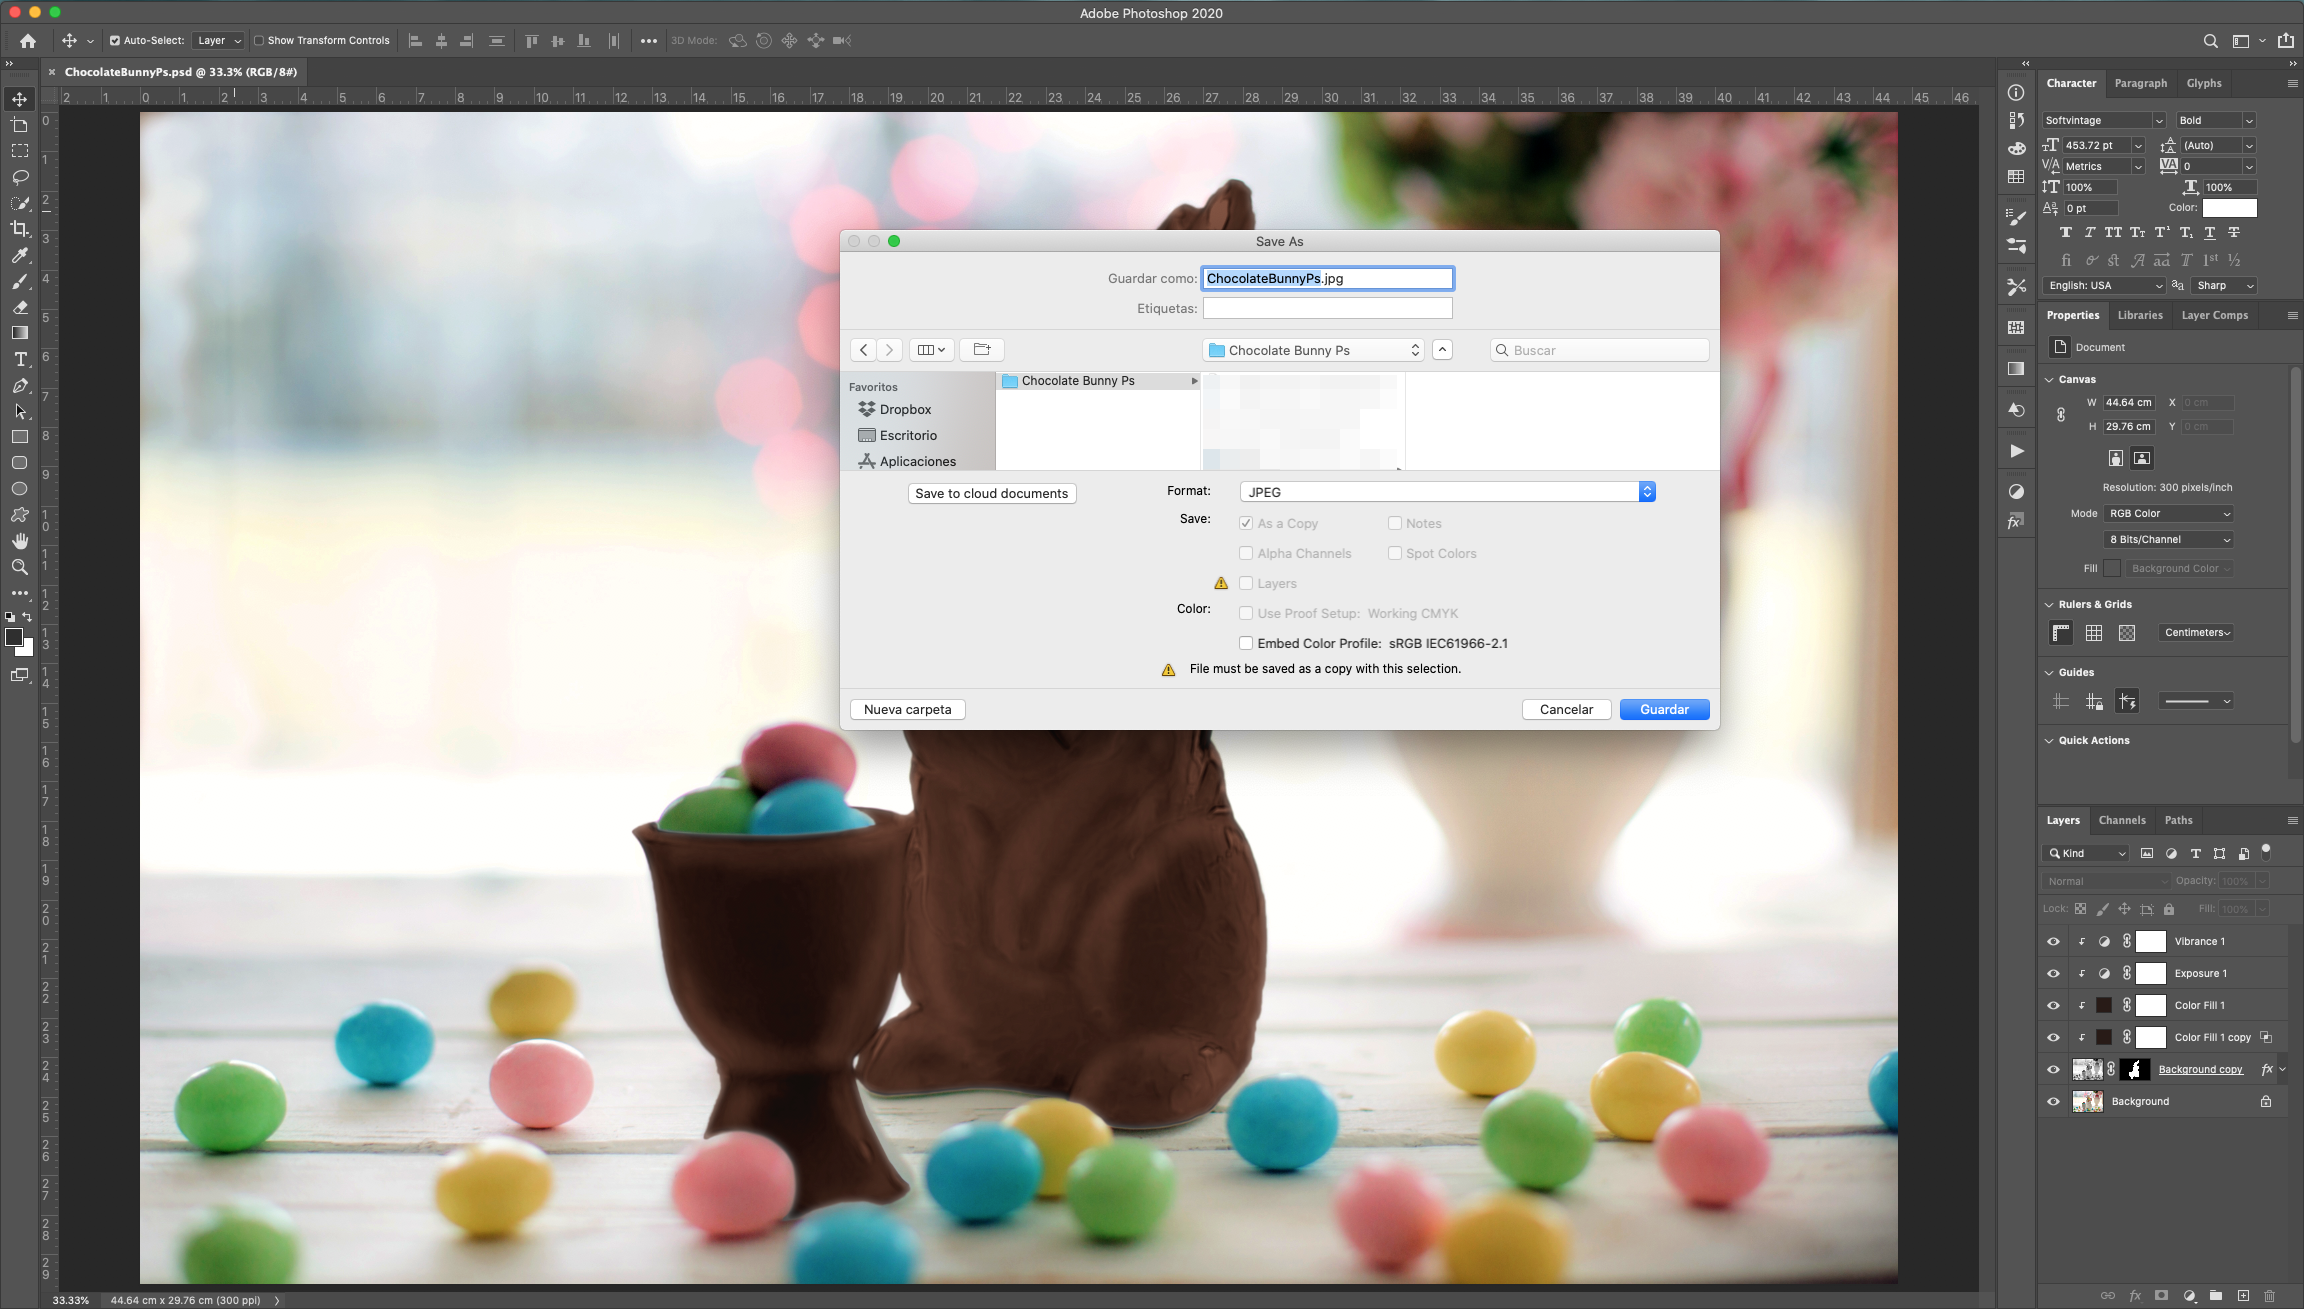
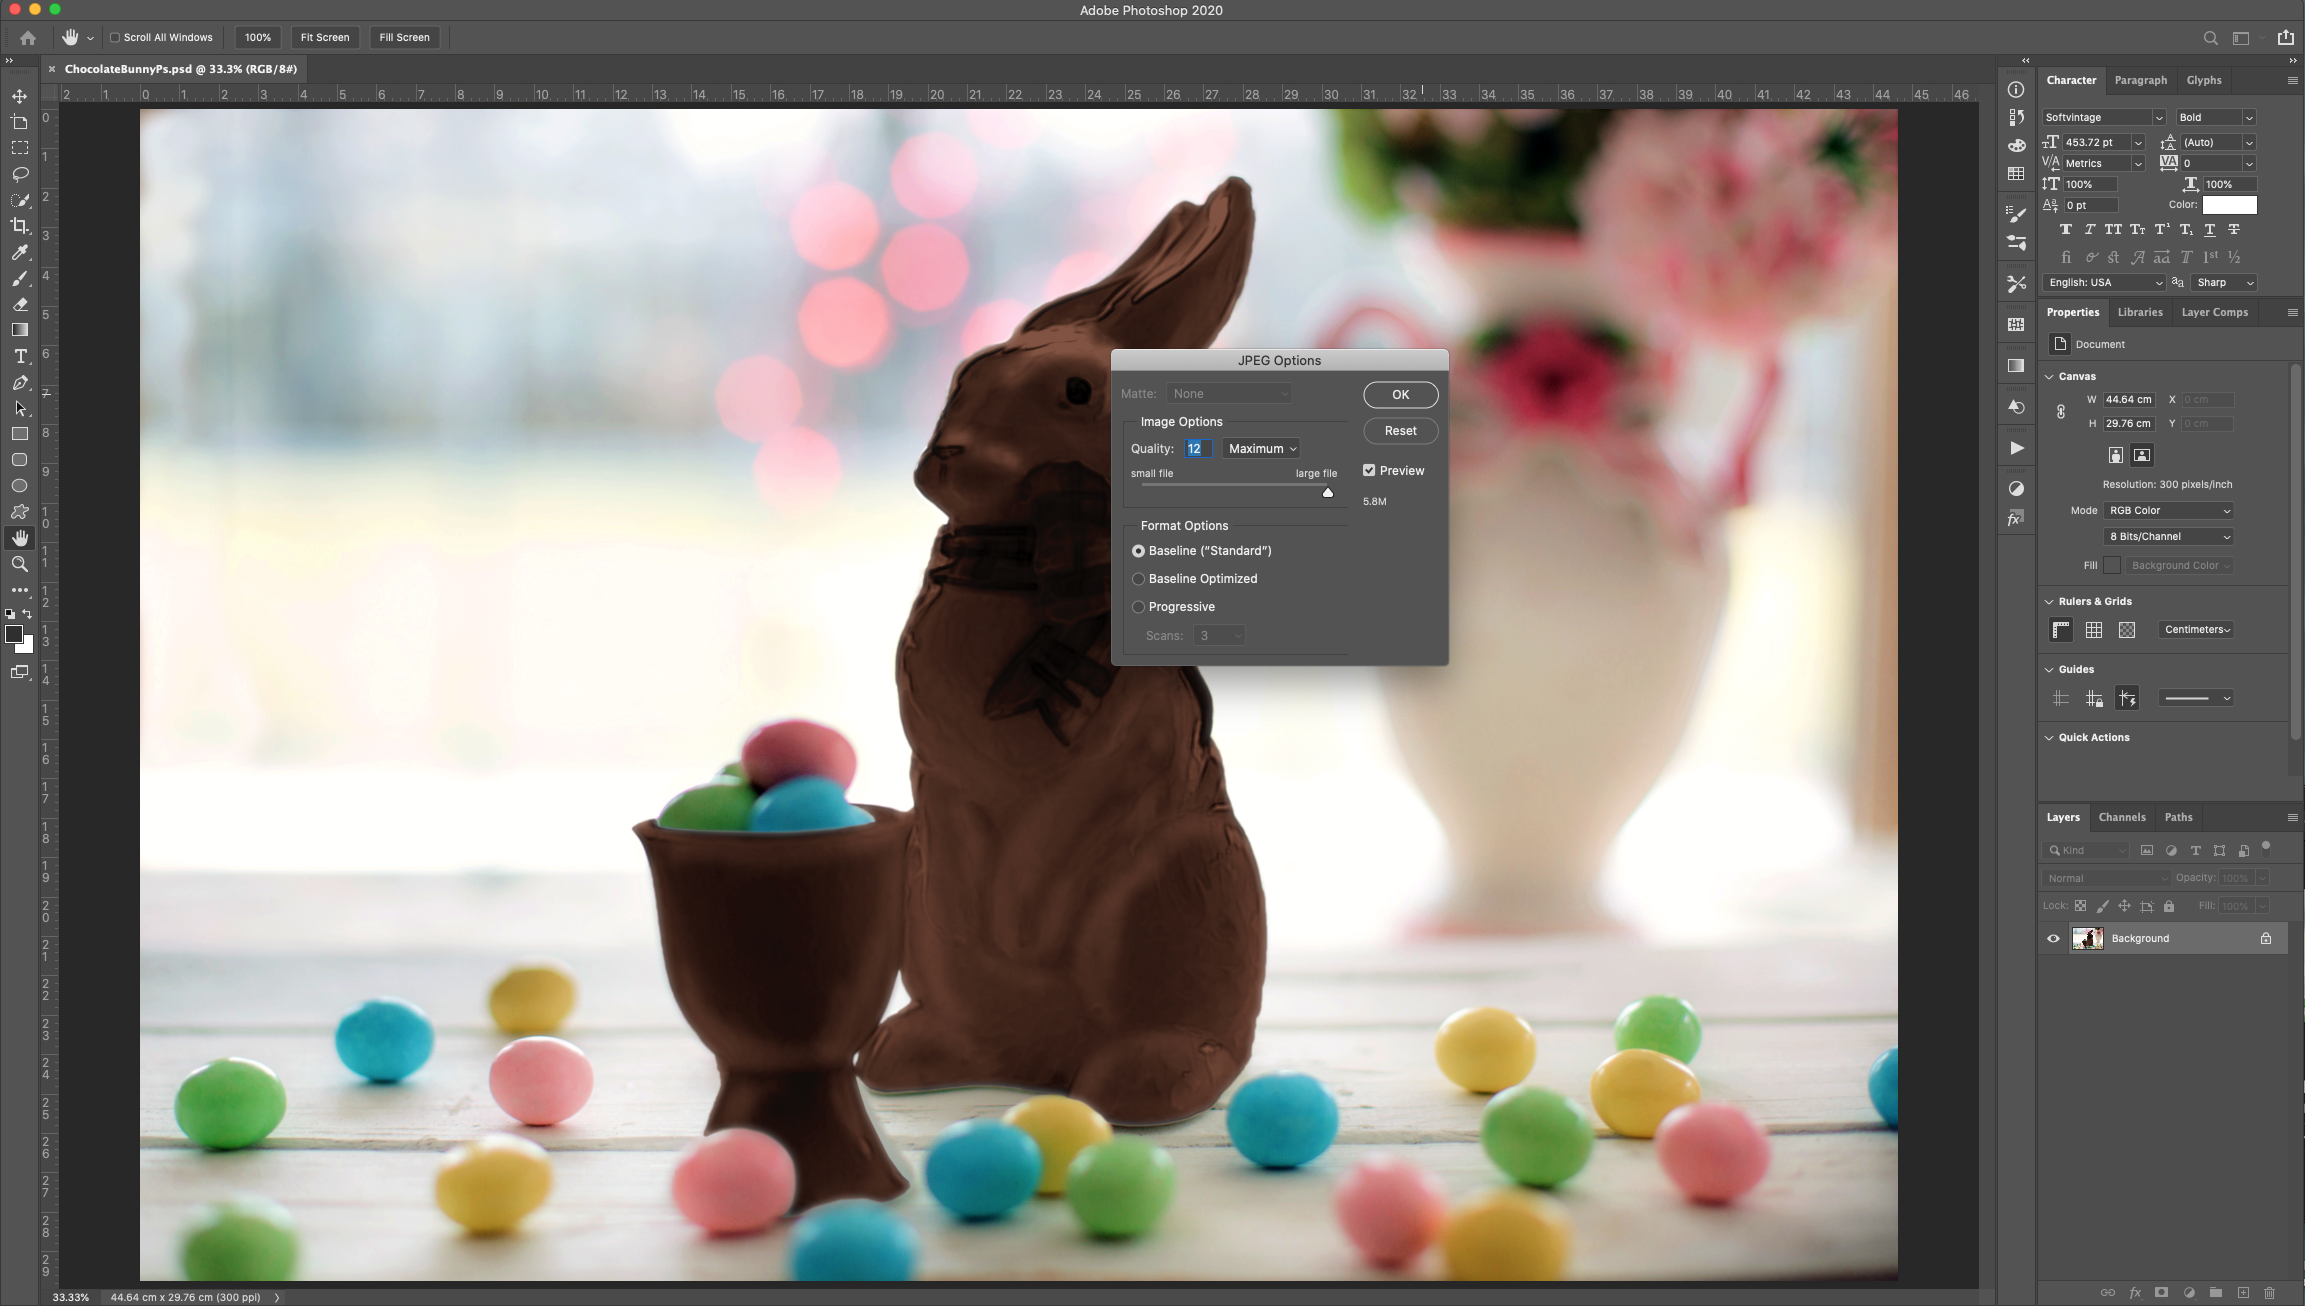
1 - In Photoshop, open the file you created with the “Chocolate Bunny in Photoshop” tutorial, go to File > Save As and choose “JPEG” as format so your file won’t be so heavy. You can skip this step and choose any image you want as “Background”. Or you can just work in a blank “Illustrator” document.
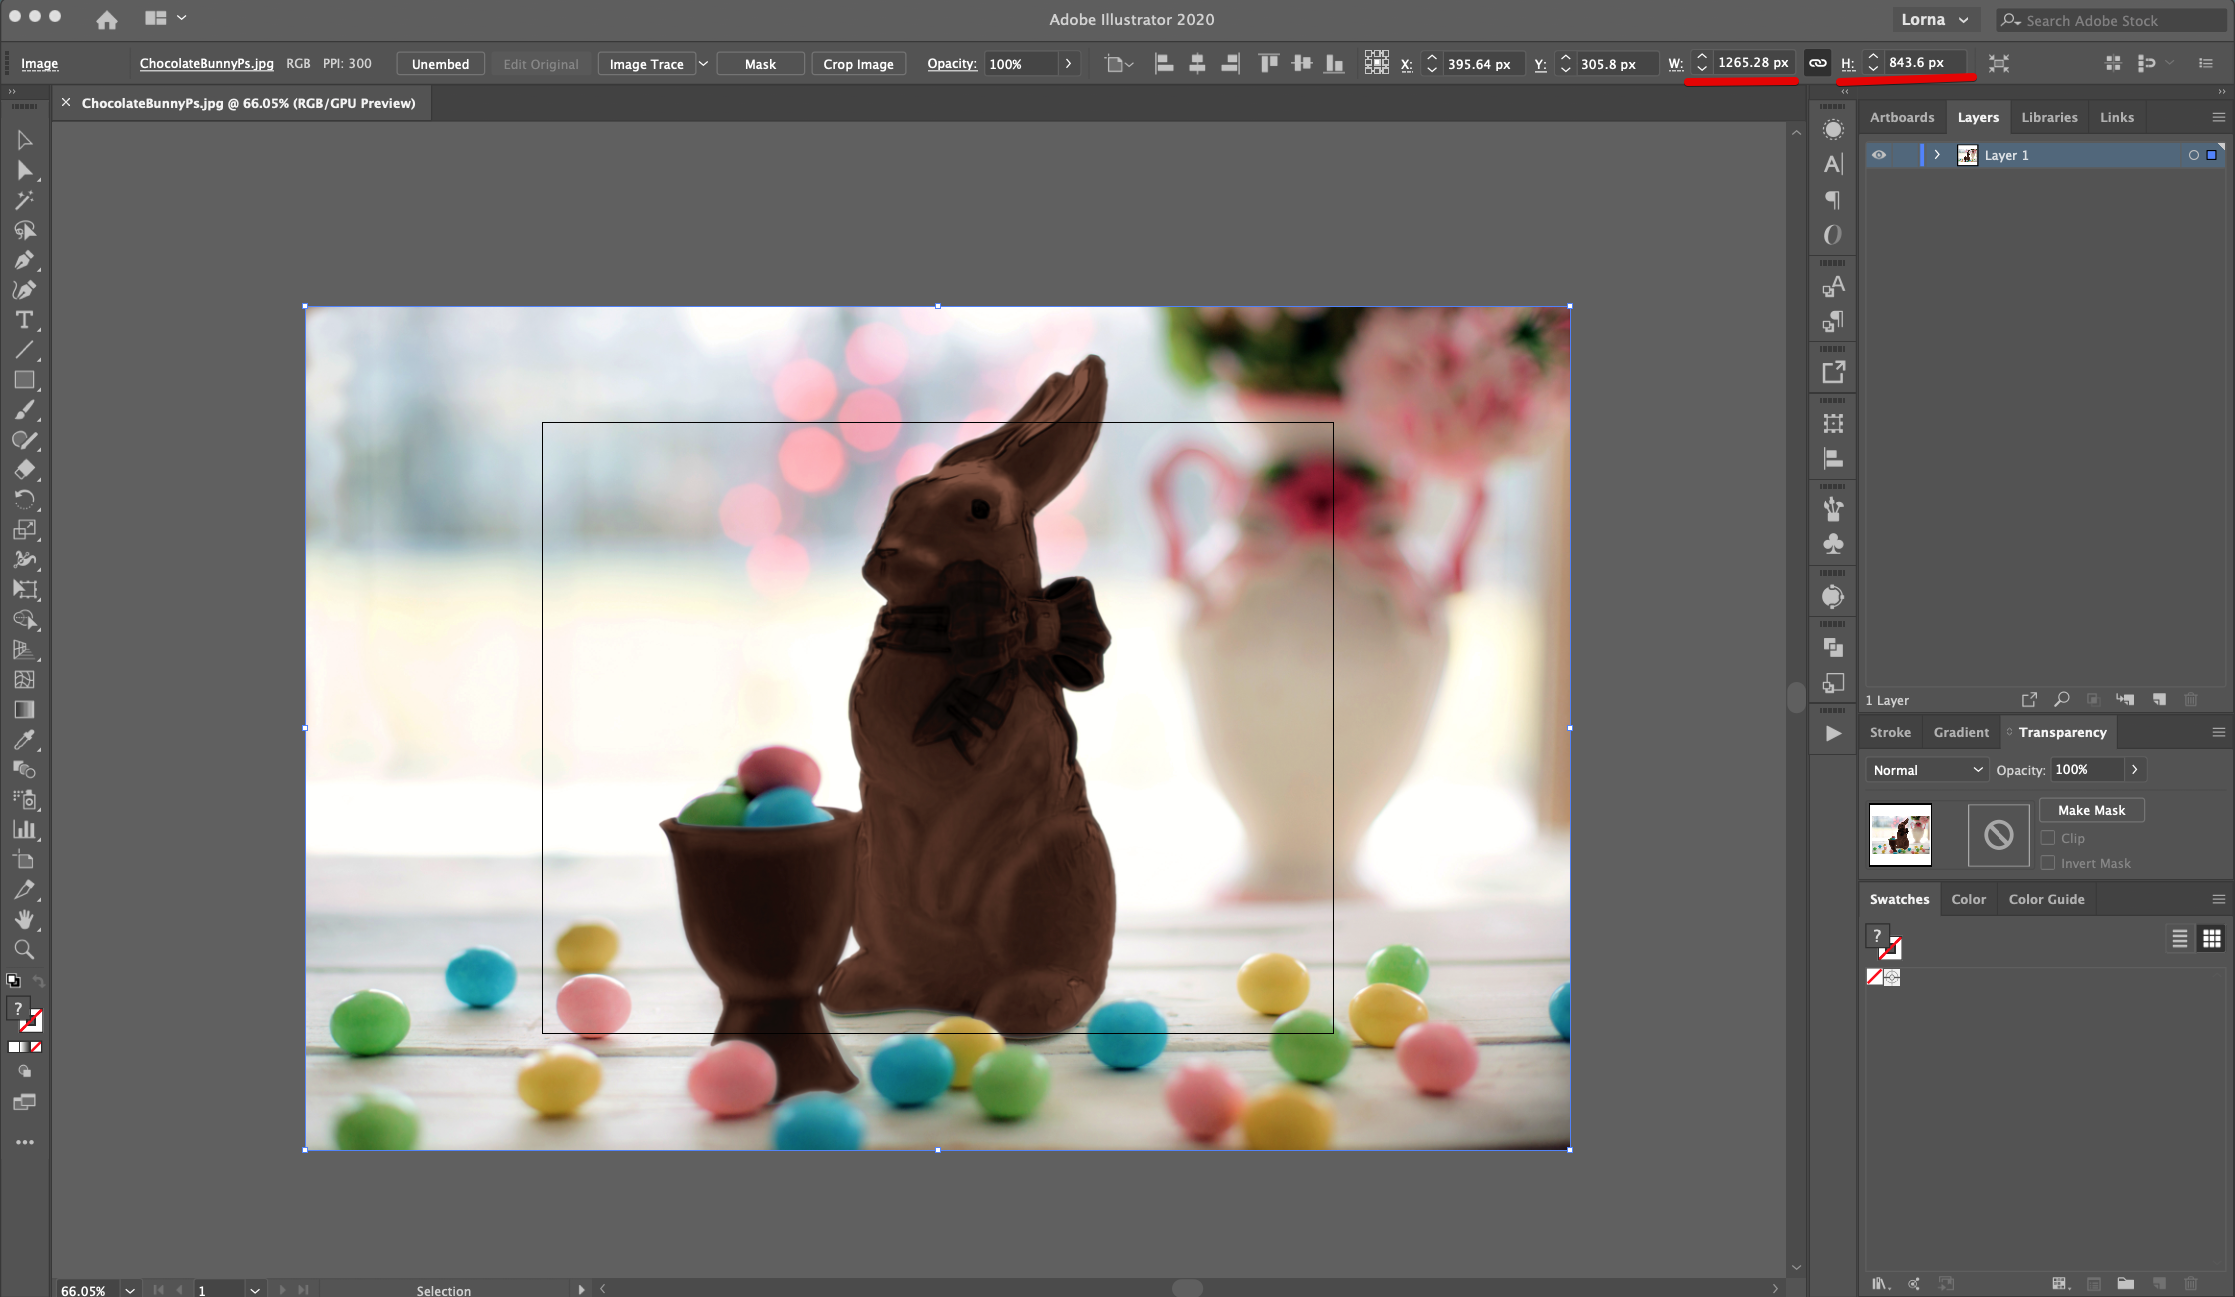
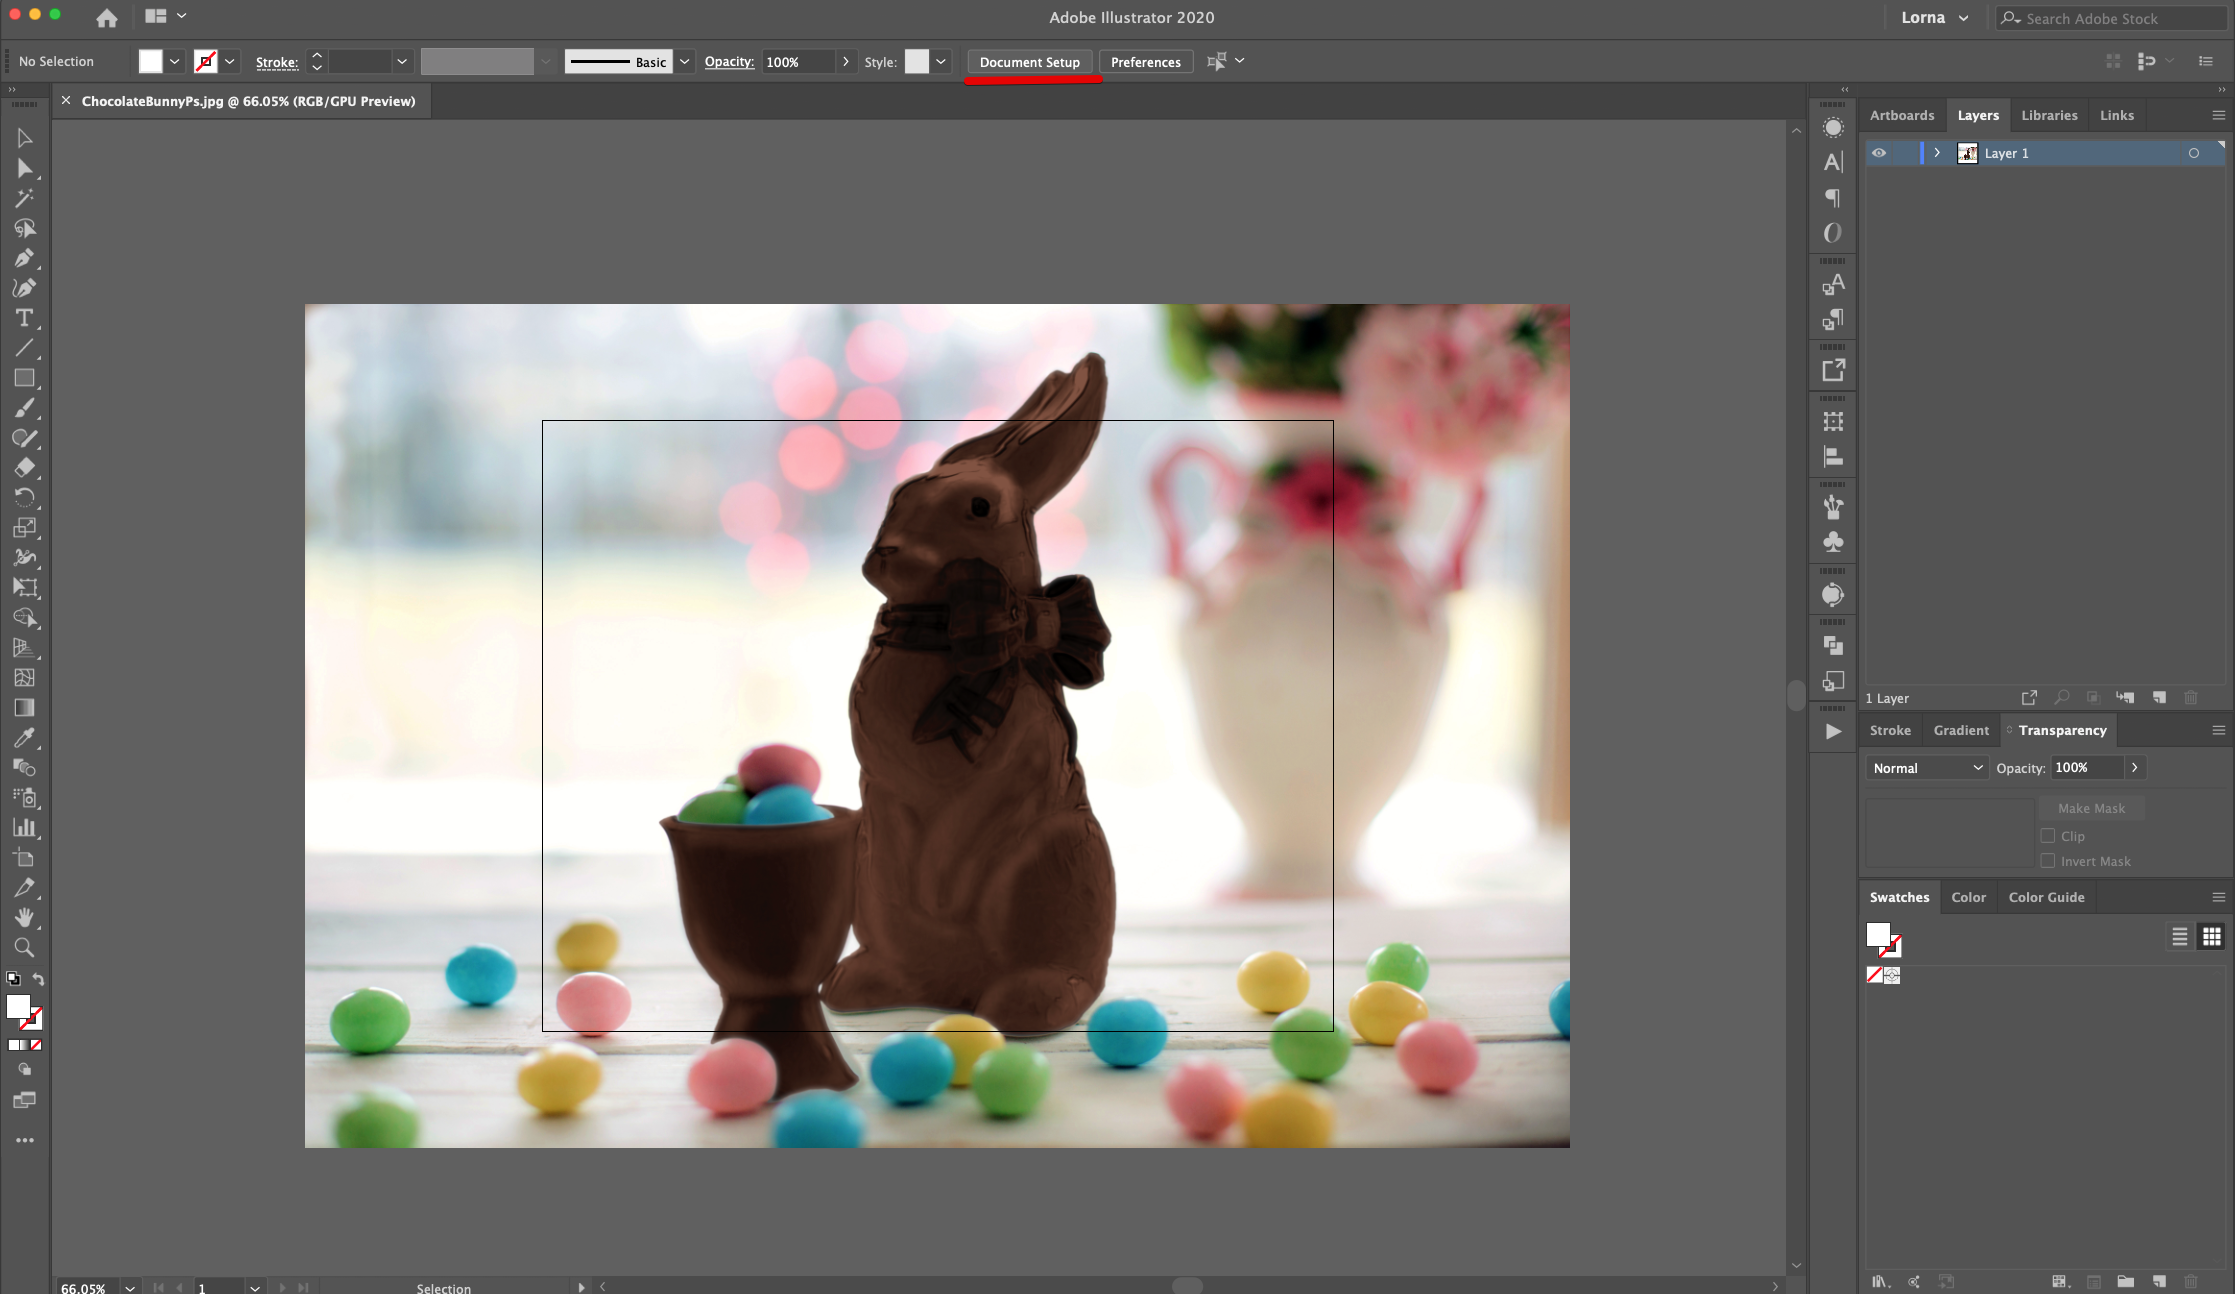
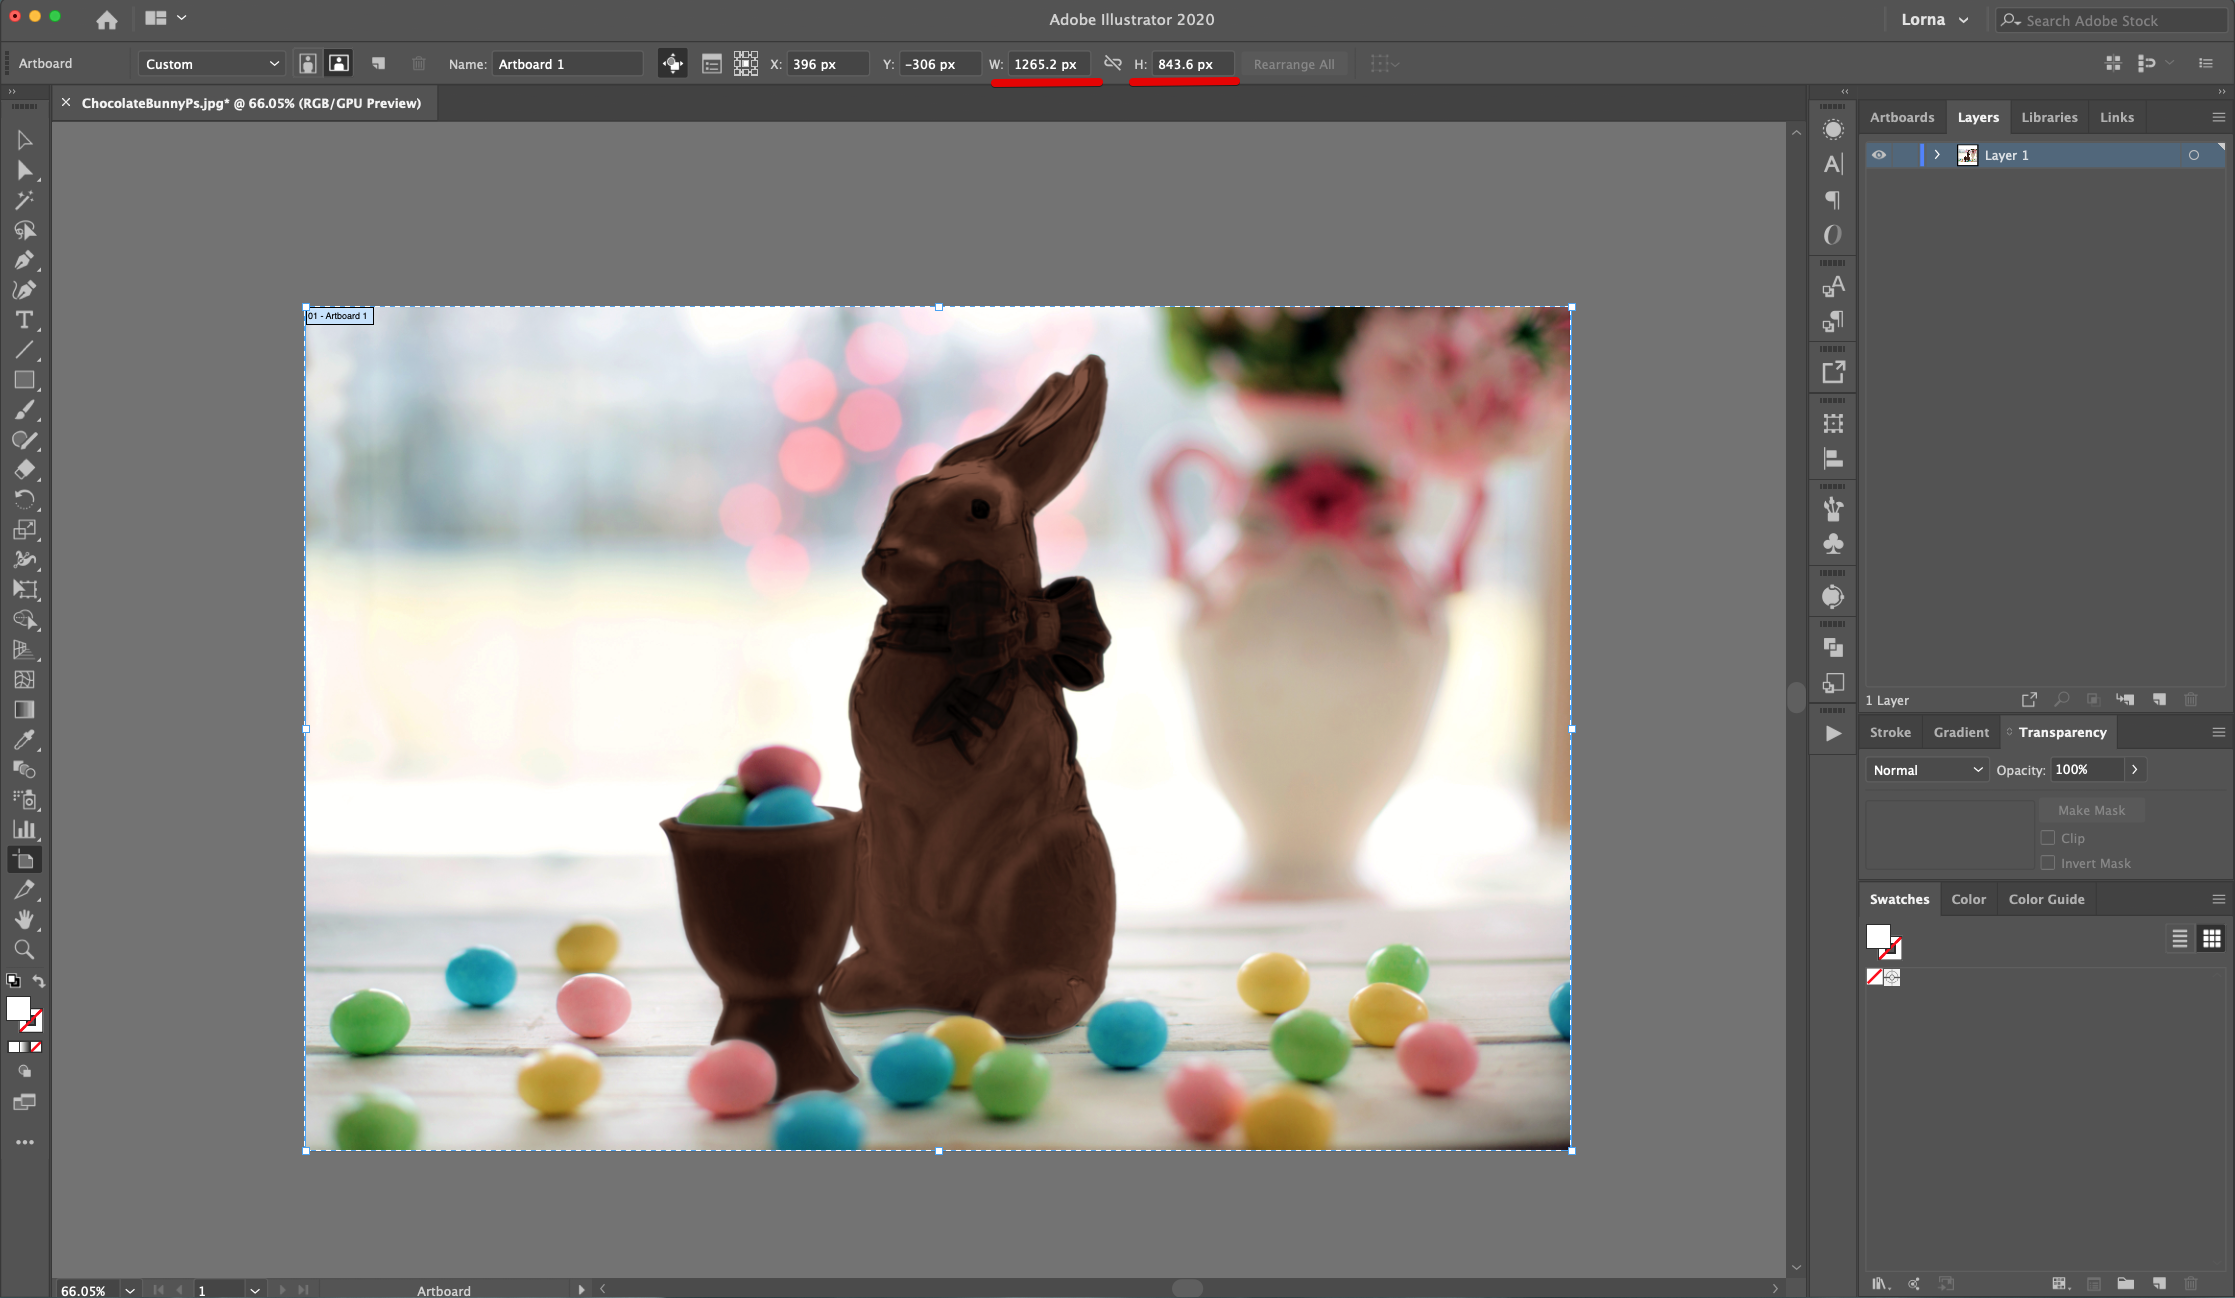
2 - Open the image in Illustrator. If the size of the image is larger than the default “Artboard”, select it and write down the “Width” and “Height” values.
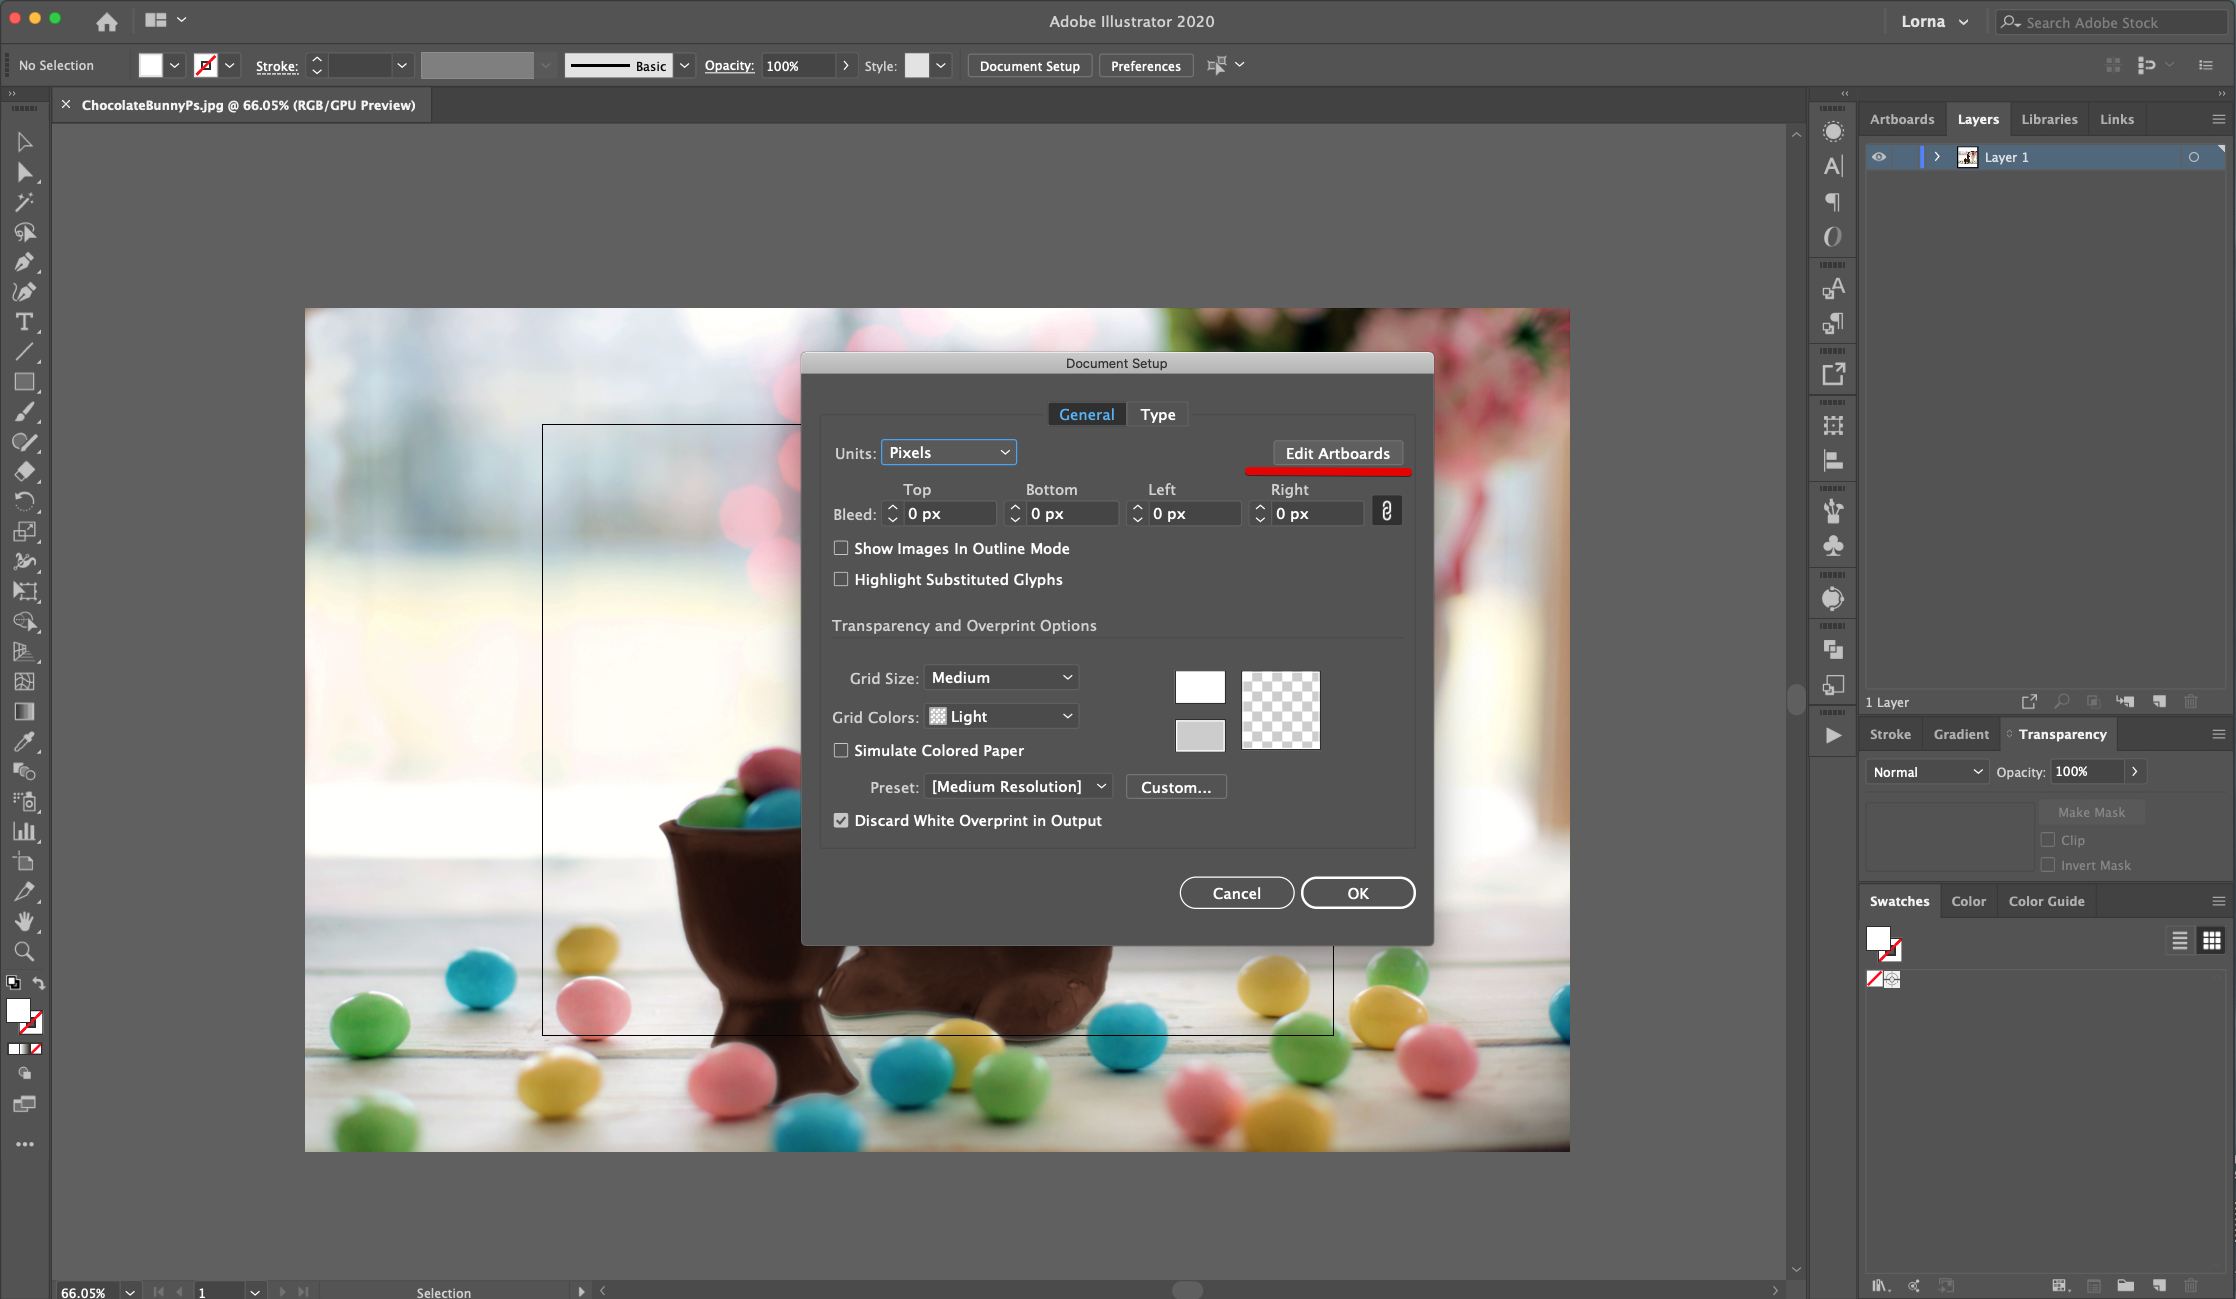
3 - Deselect the image and click on the “Document Setup” button on the Top Menu then, click the “Edit Artboards” button in the “Document Setup” Pop Up and change the “Width” and “Height” values to match the ones from the image.
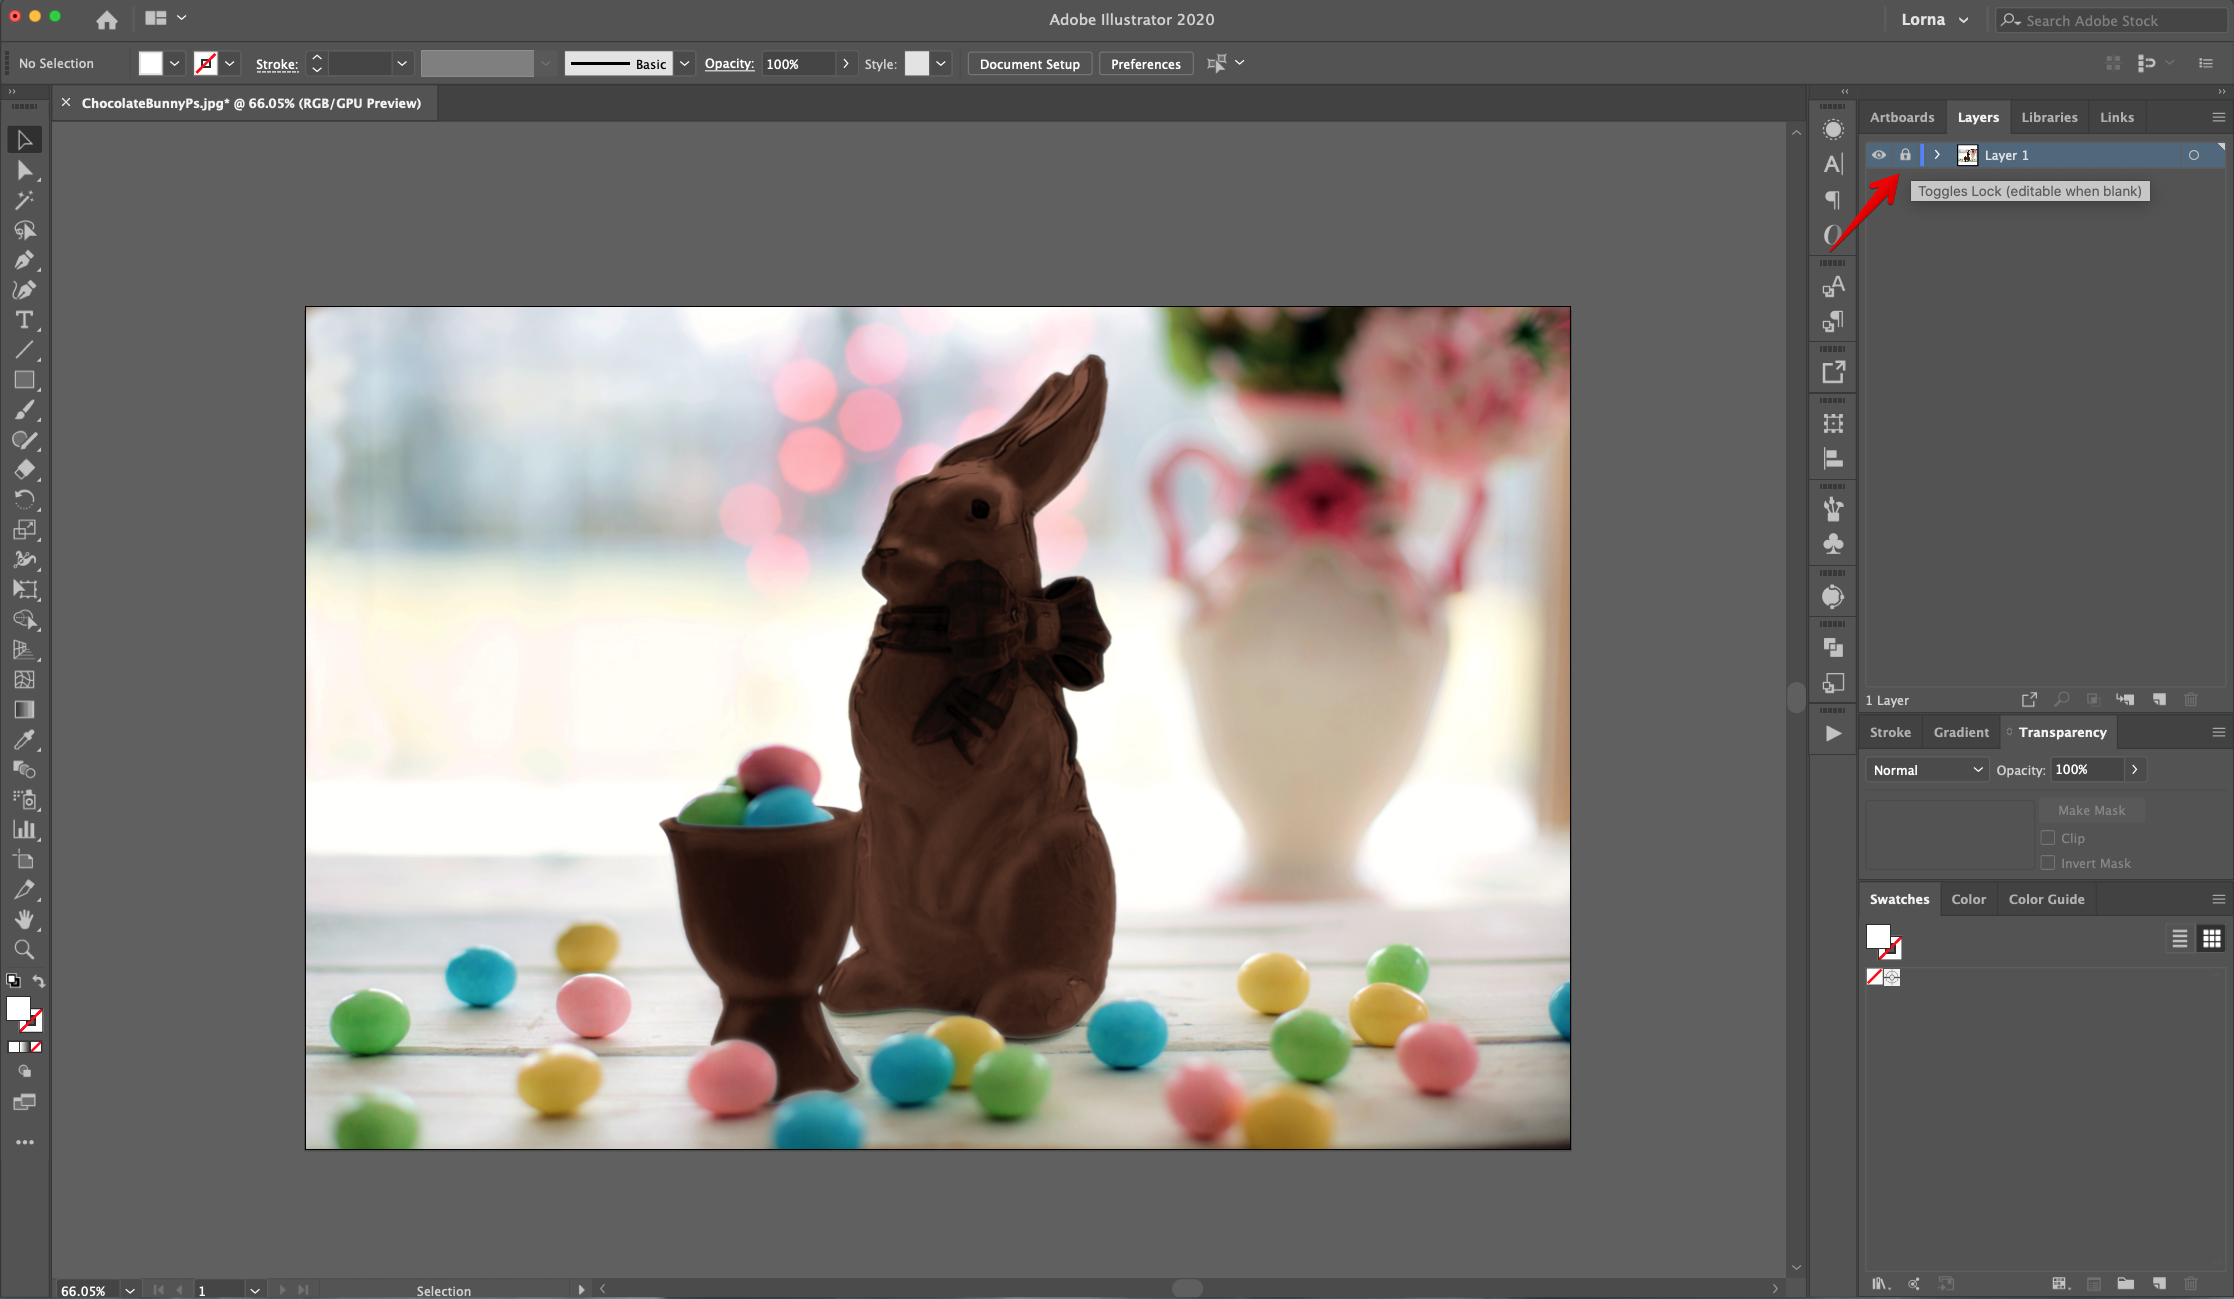
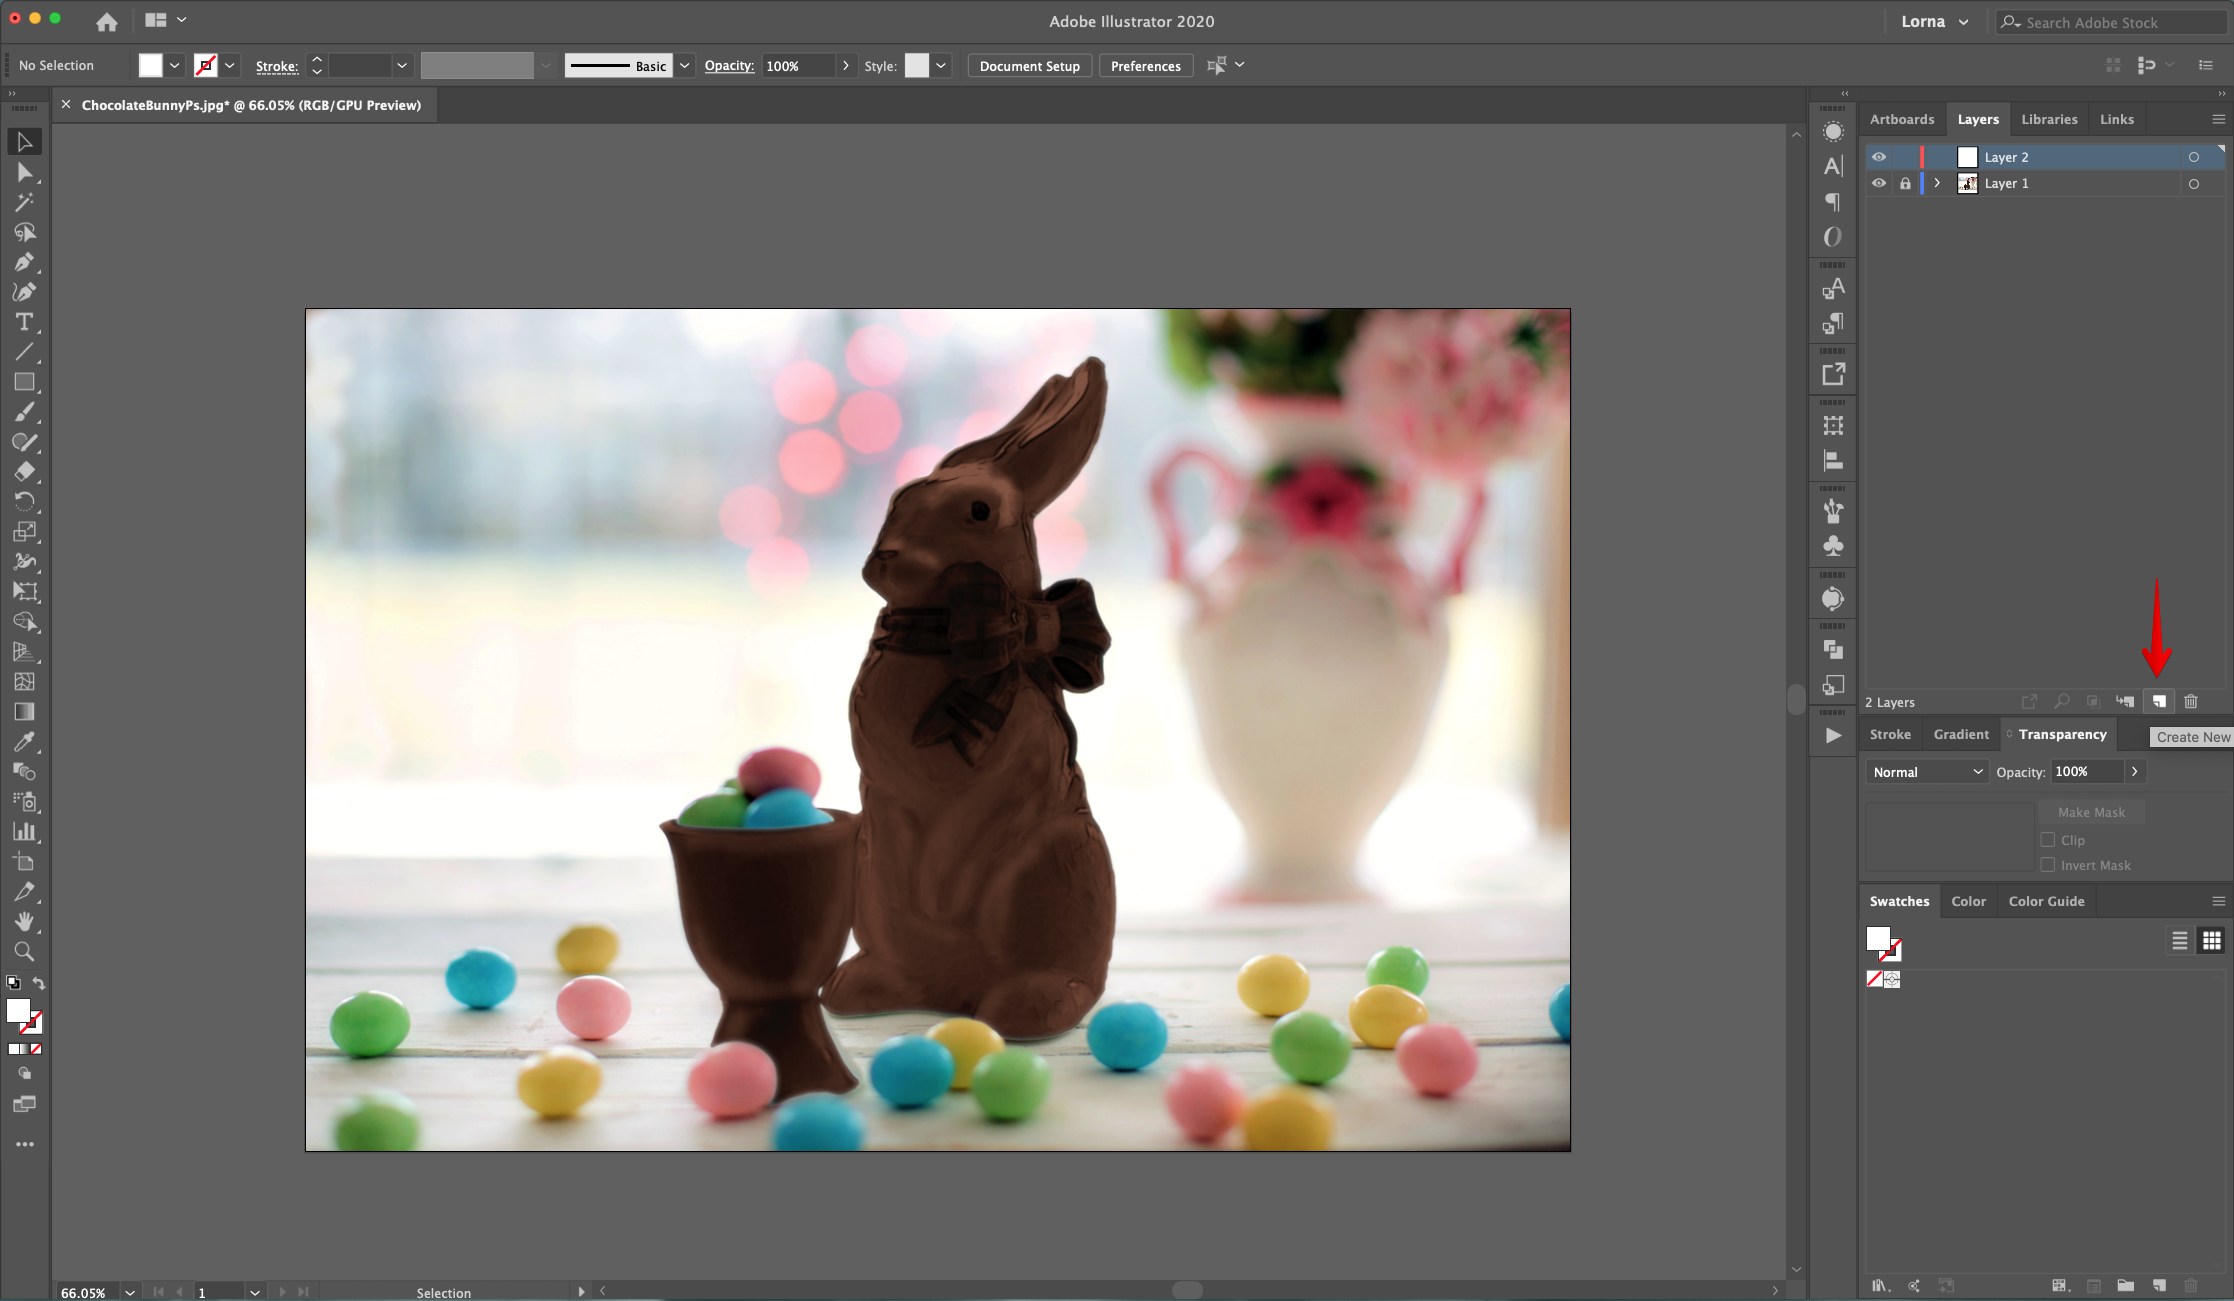
4 - Lock the “Background” Layer by clicking on the small “Padlock” on the left side of its Thumbnail and “Create a New Layer” by clicking on the small button at the bottom of the “Layers Panel”.
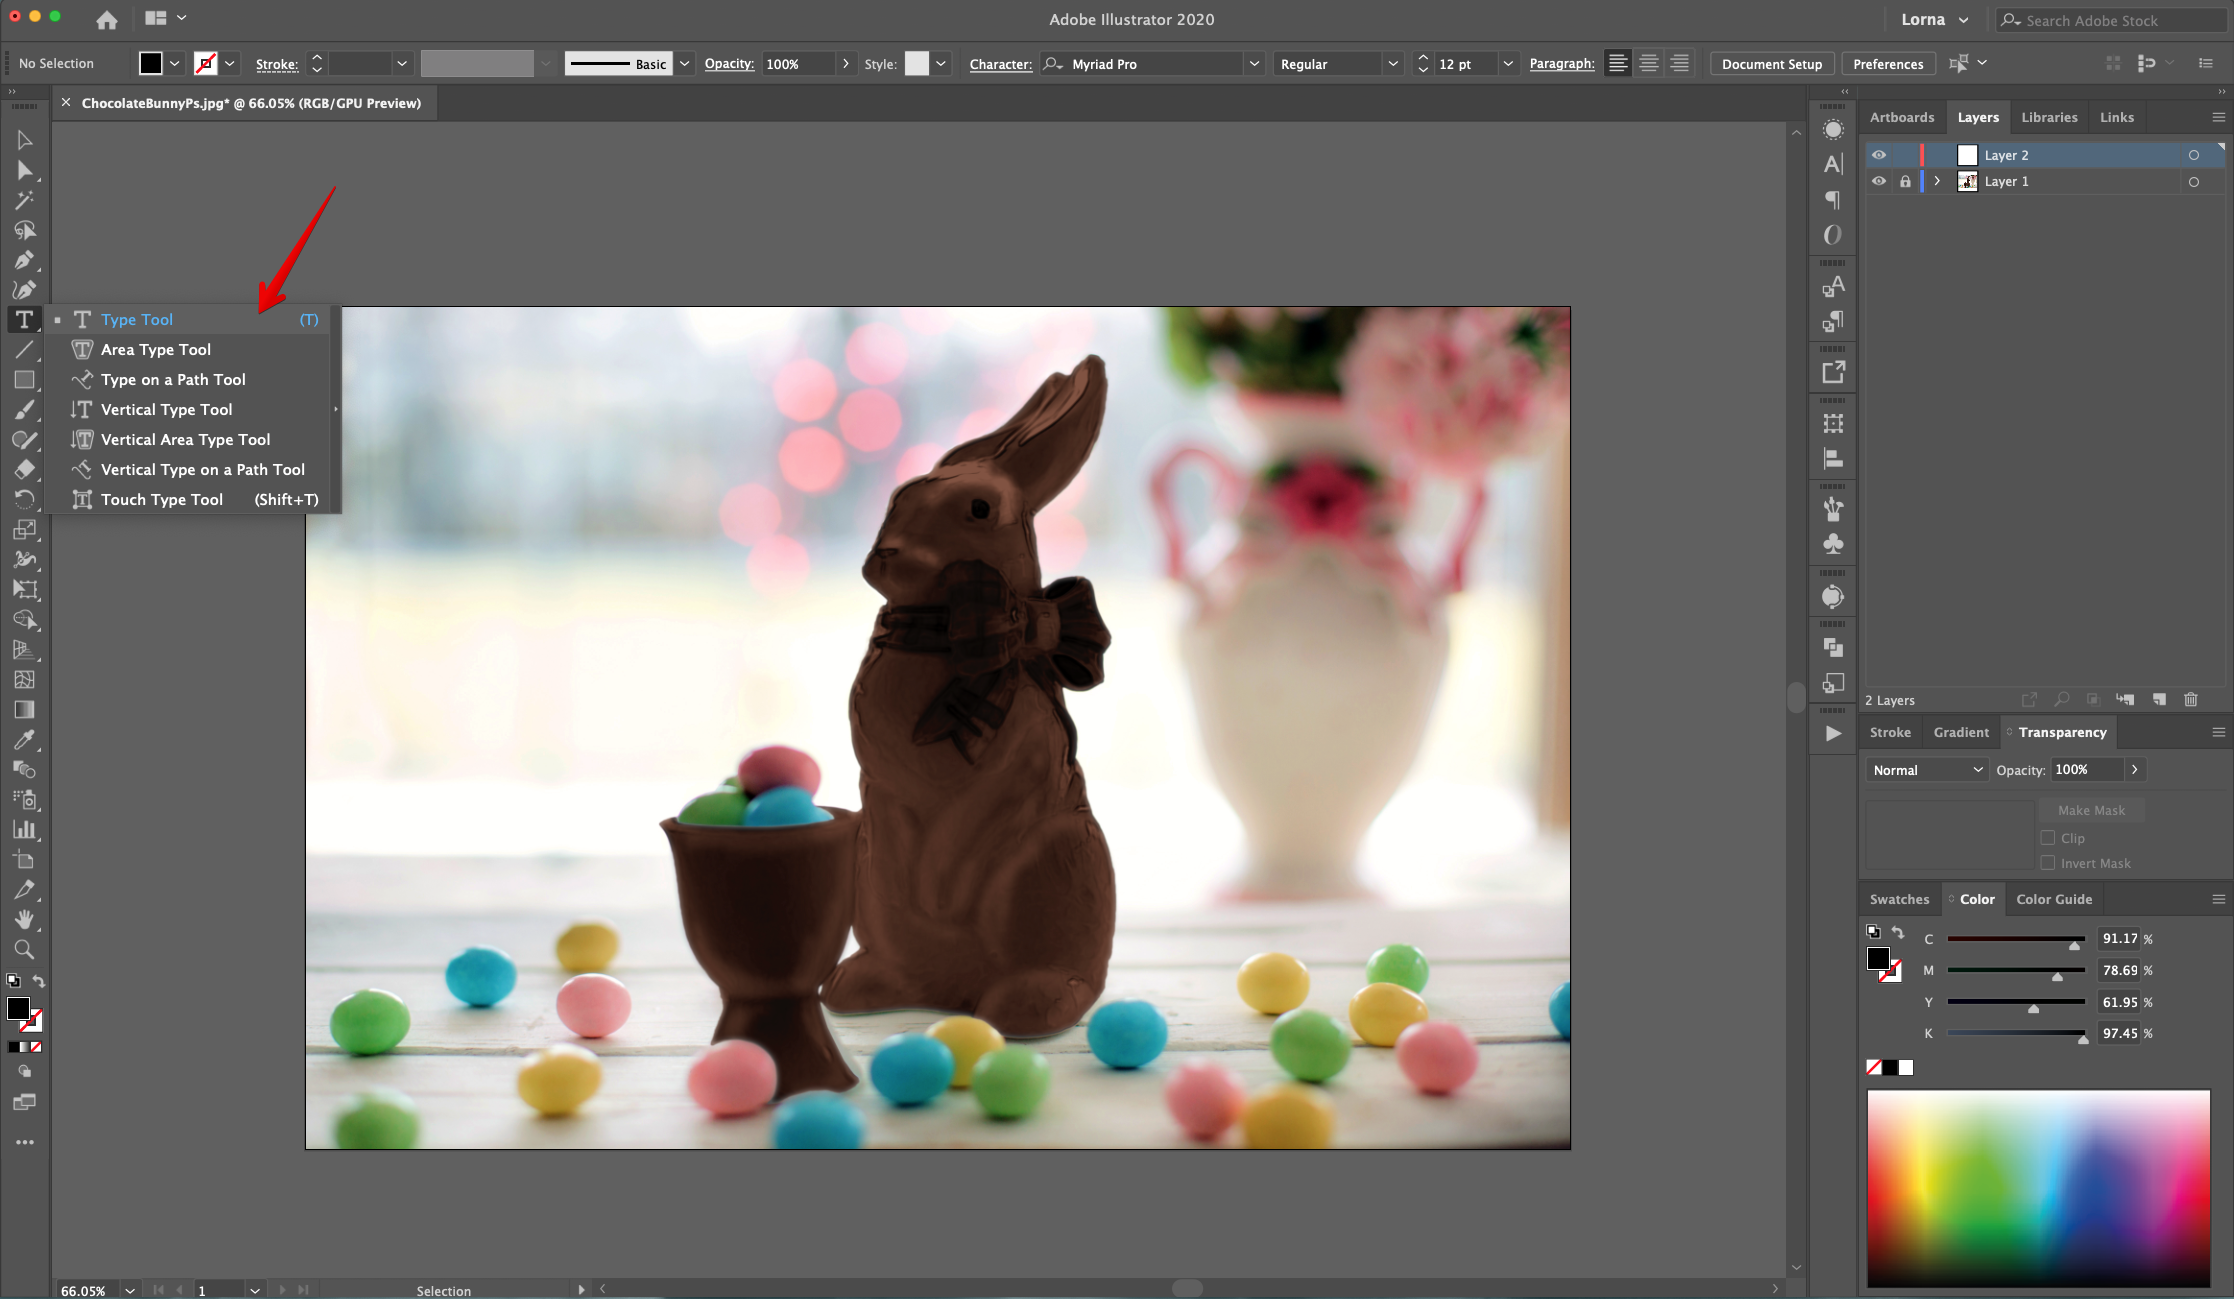
5 - Select the “Type Tool” (T), choose your font and type your text. The size will depend on the word/s you chose. We used “Happy Popcorn”.
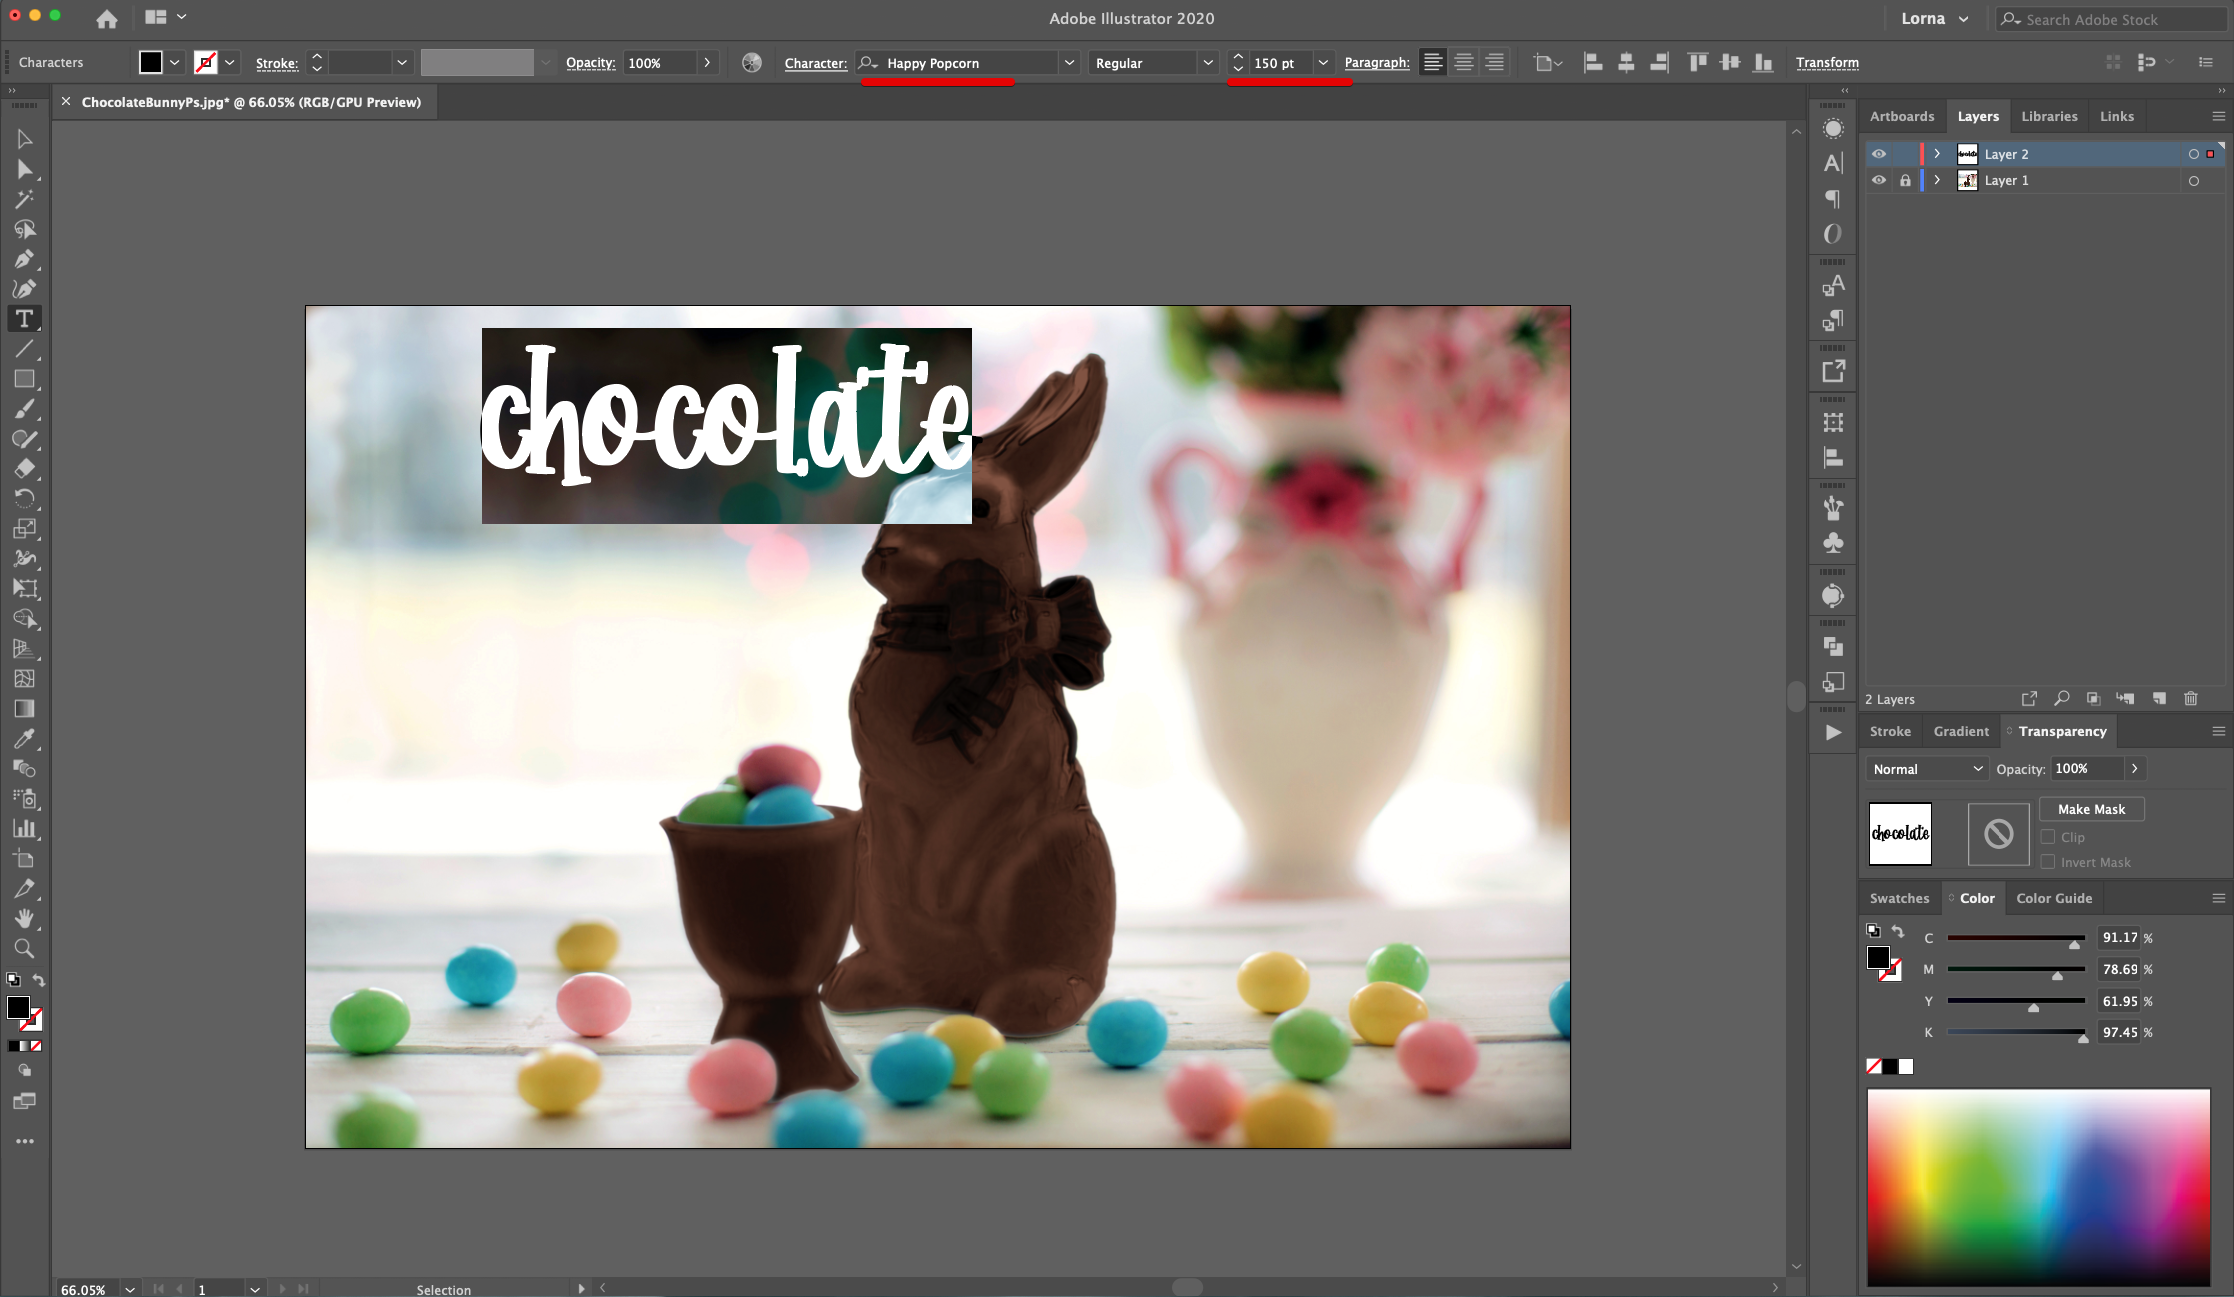
6 - Depending on your “Background” image you may need or want to “Rotate” the text. Use the “Selection Tool” to do it.
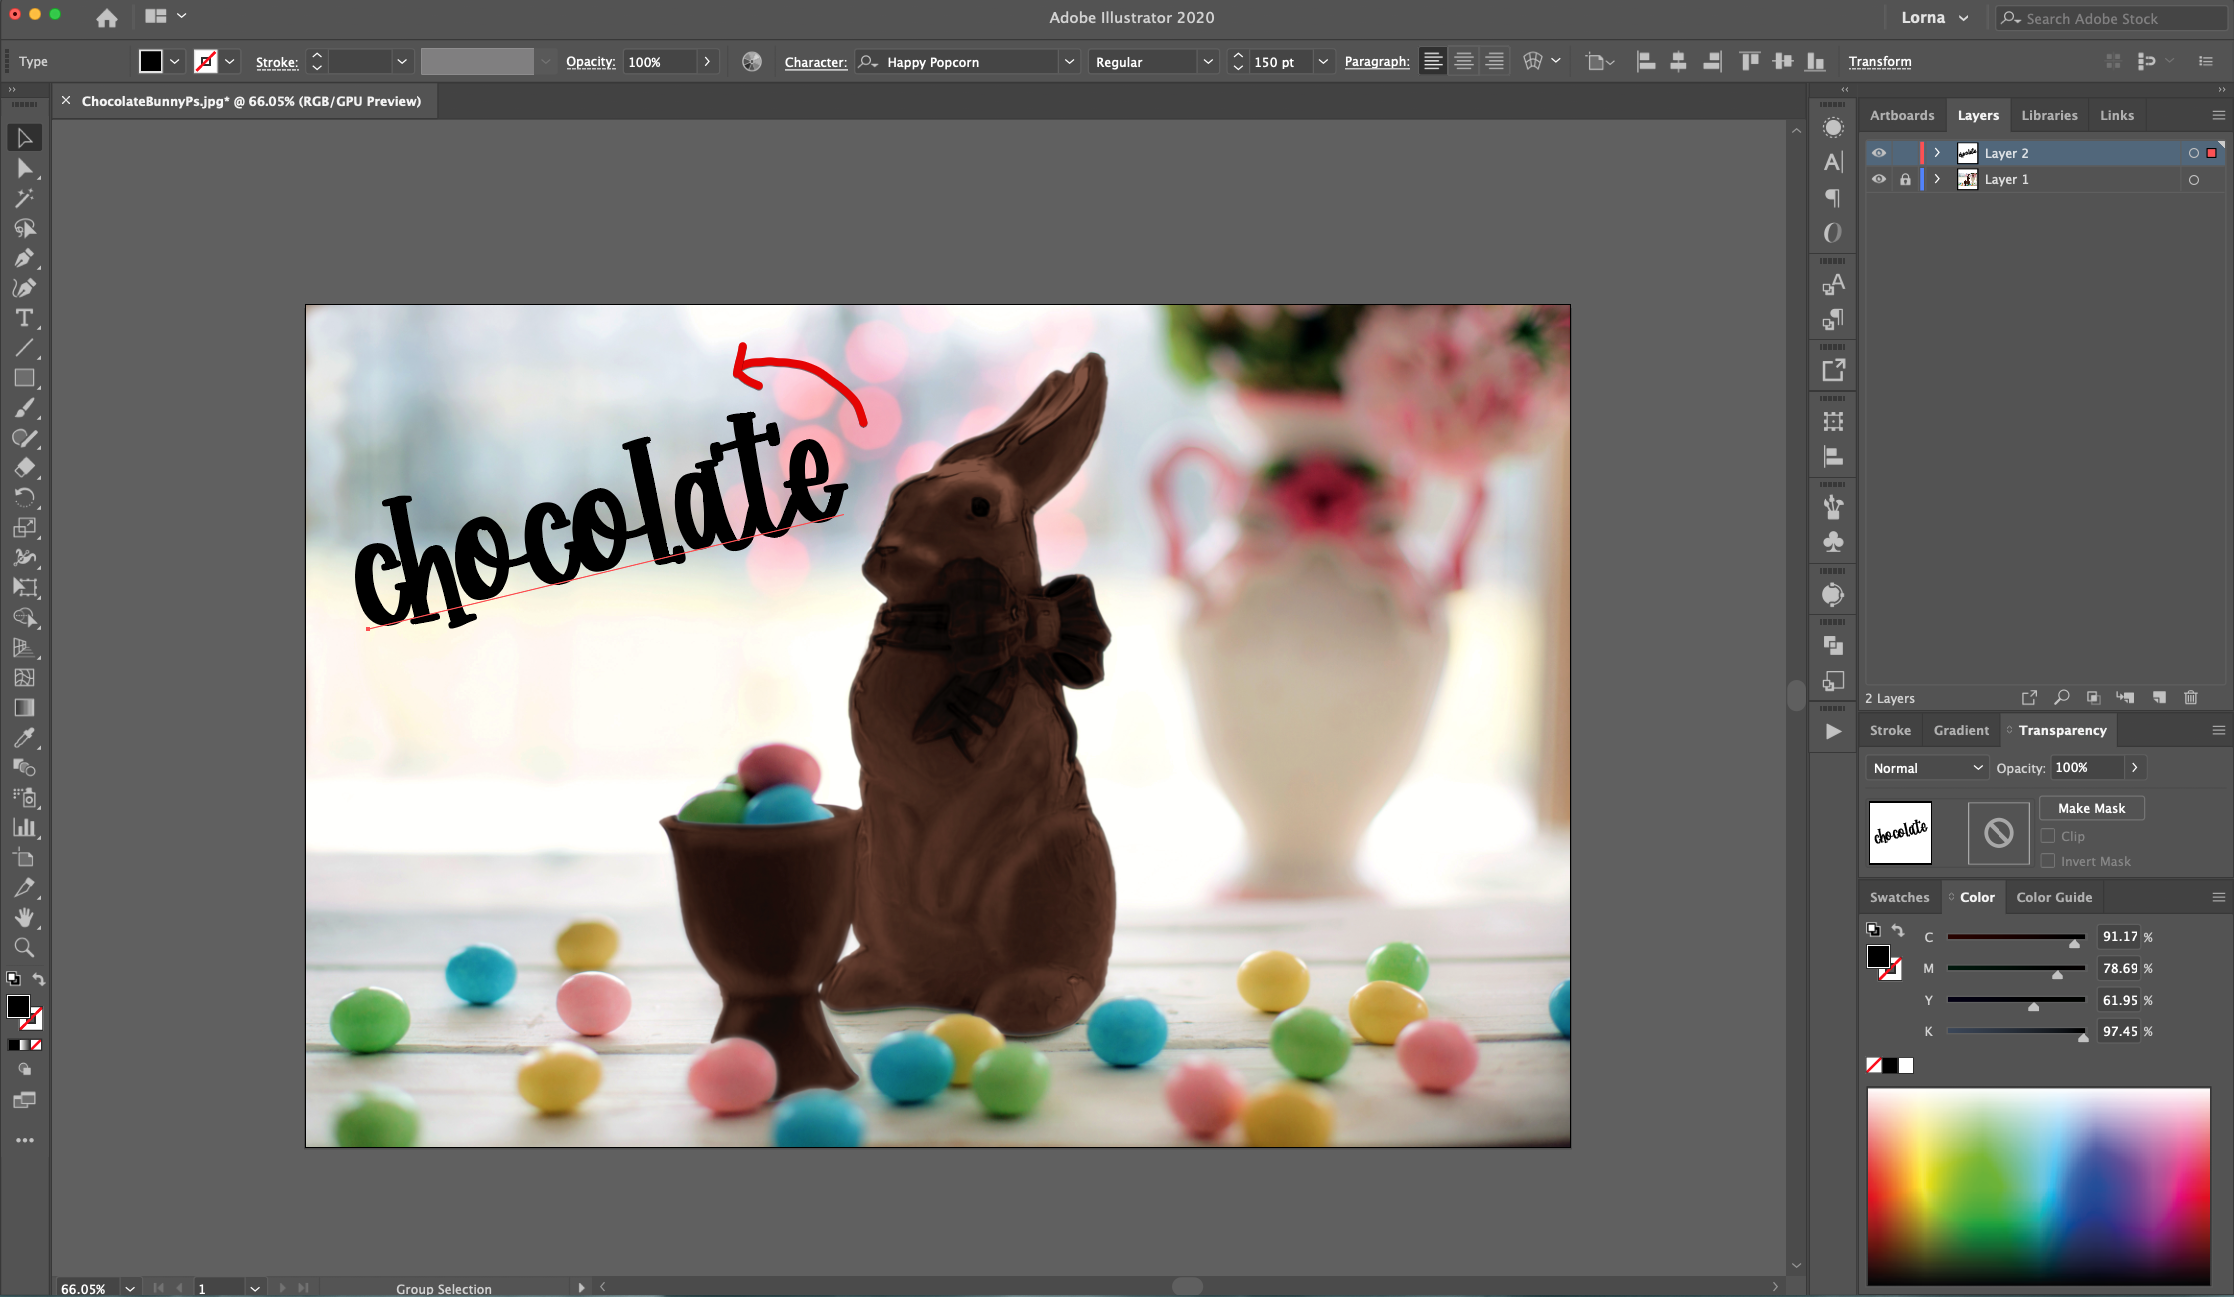
7 - With the text selected change the “Fill” color to “None”.
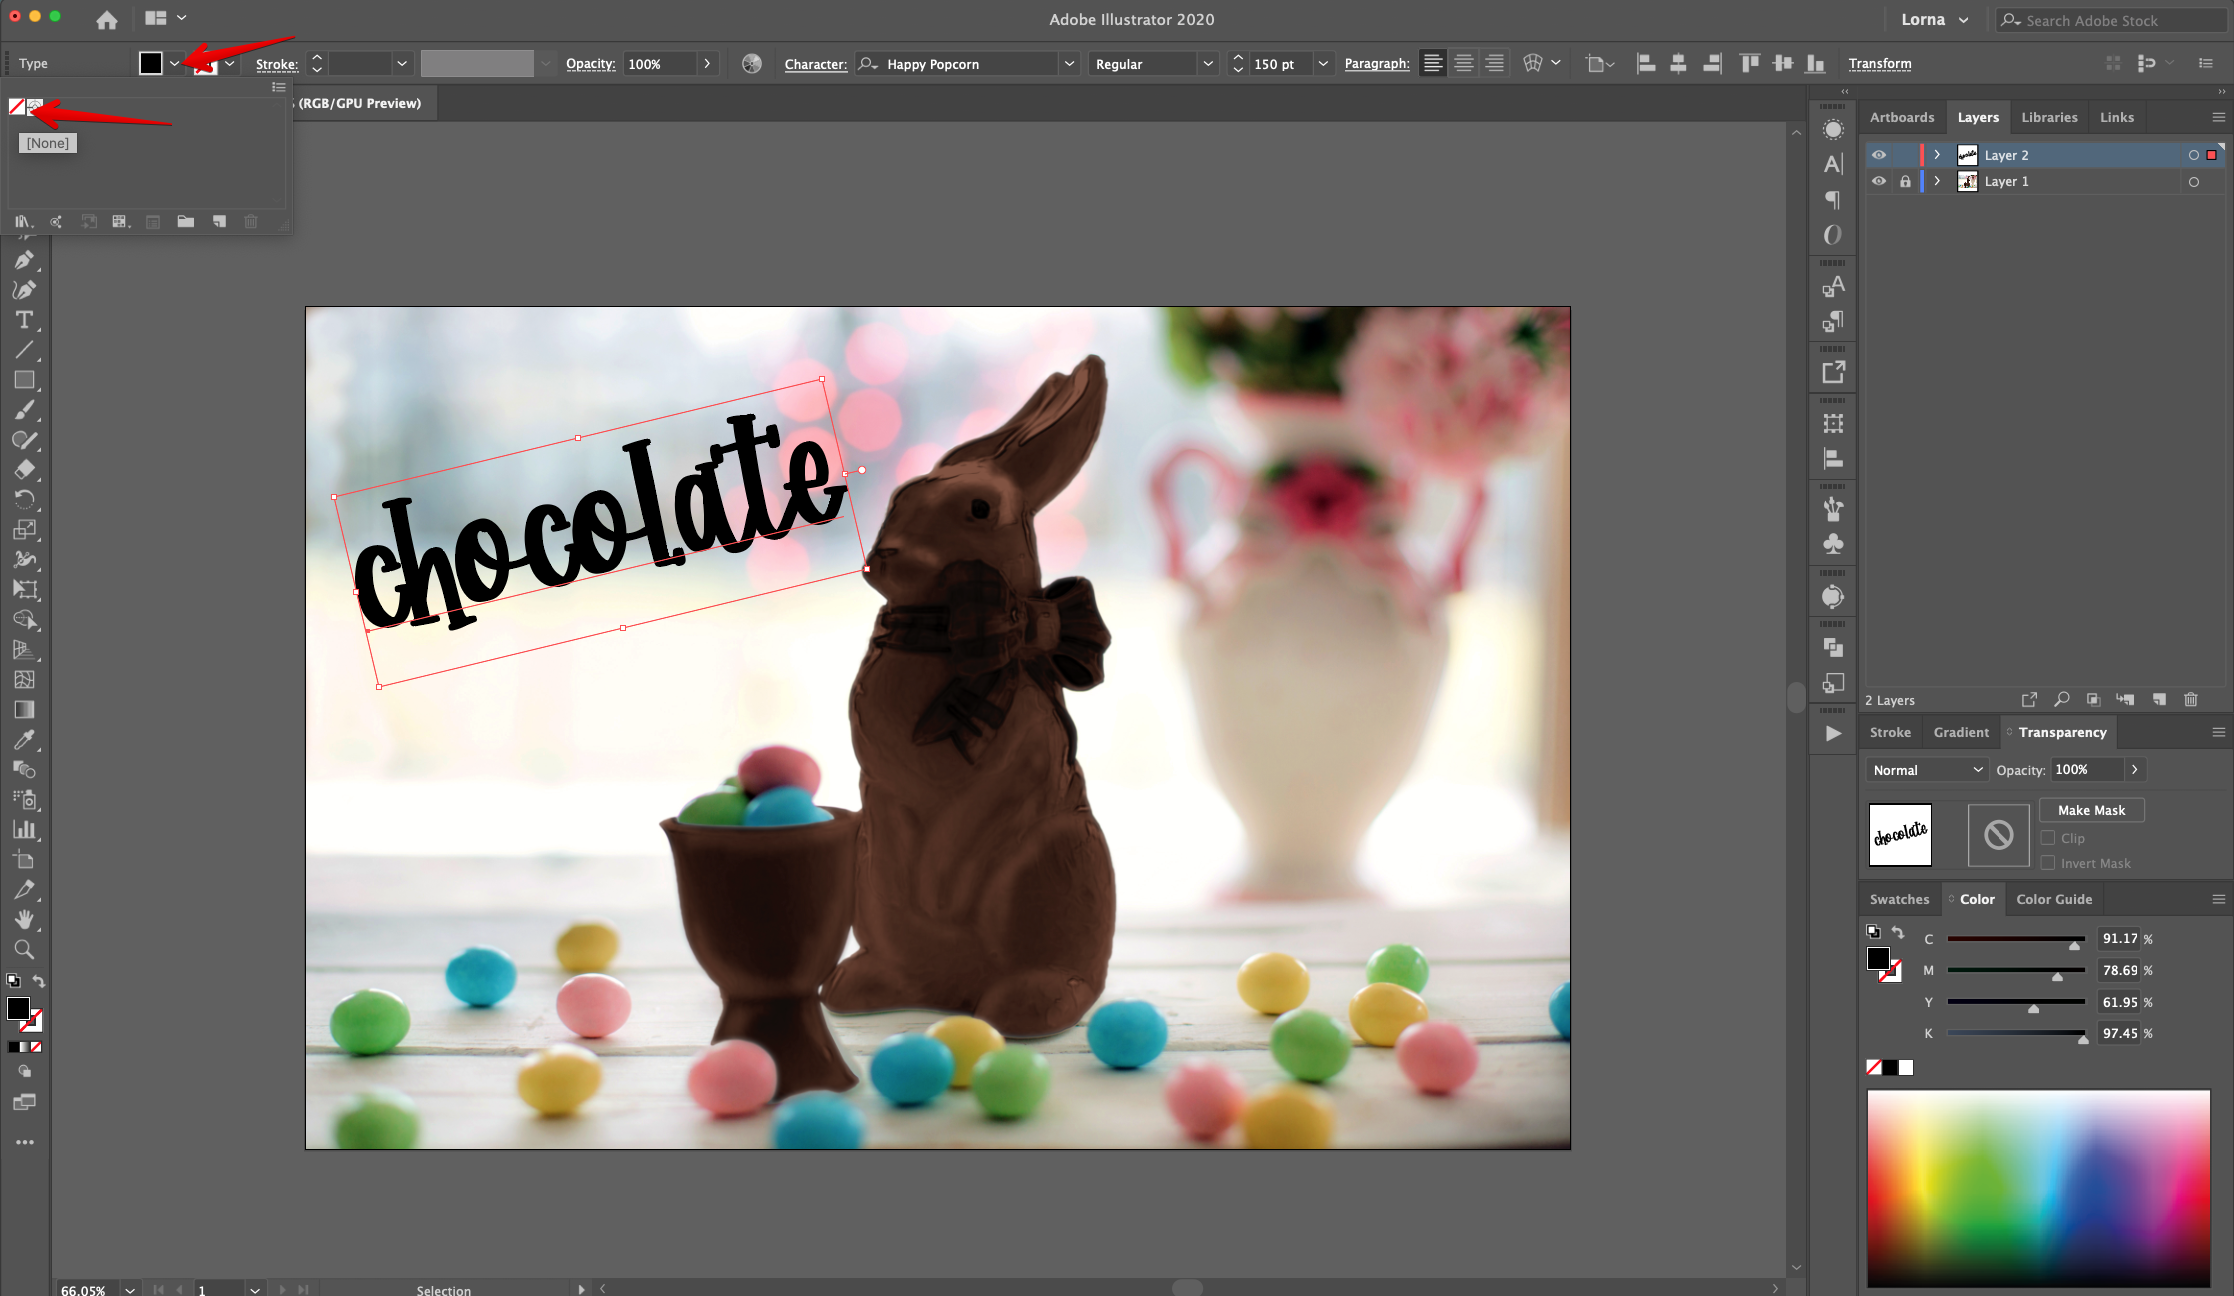
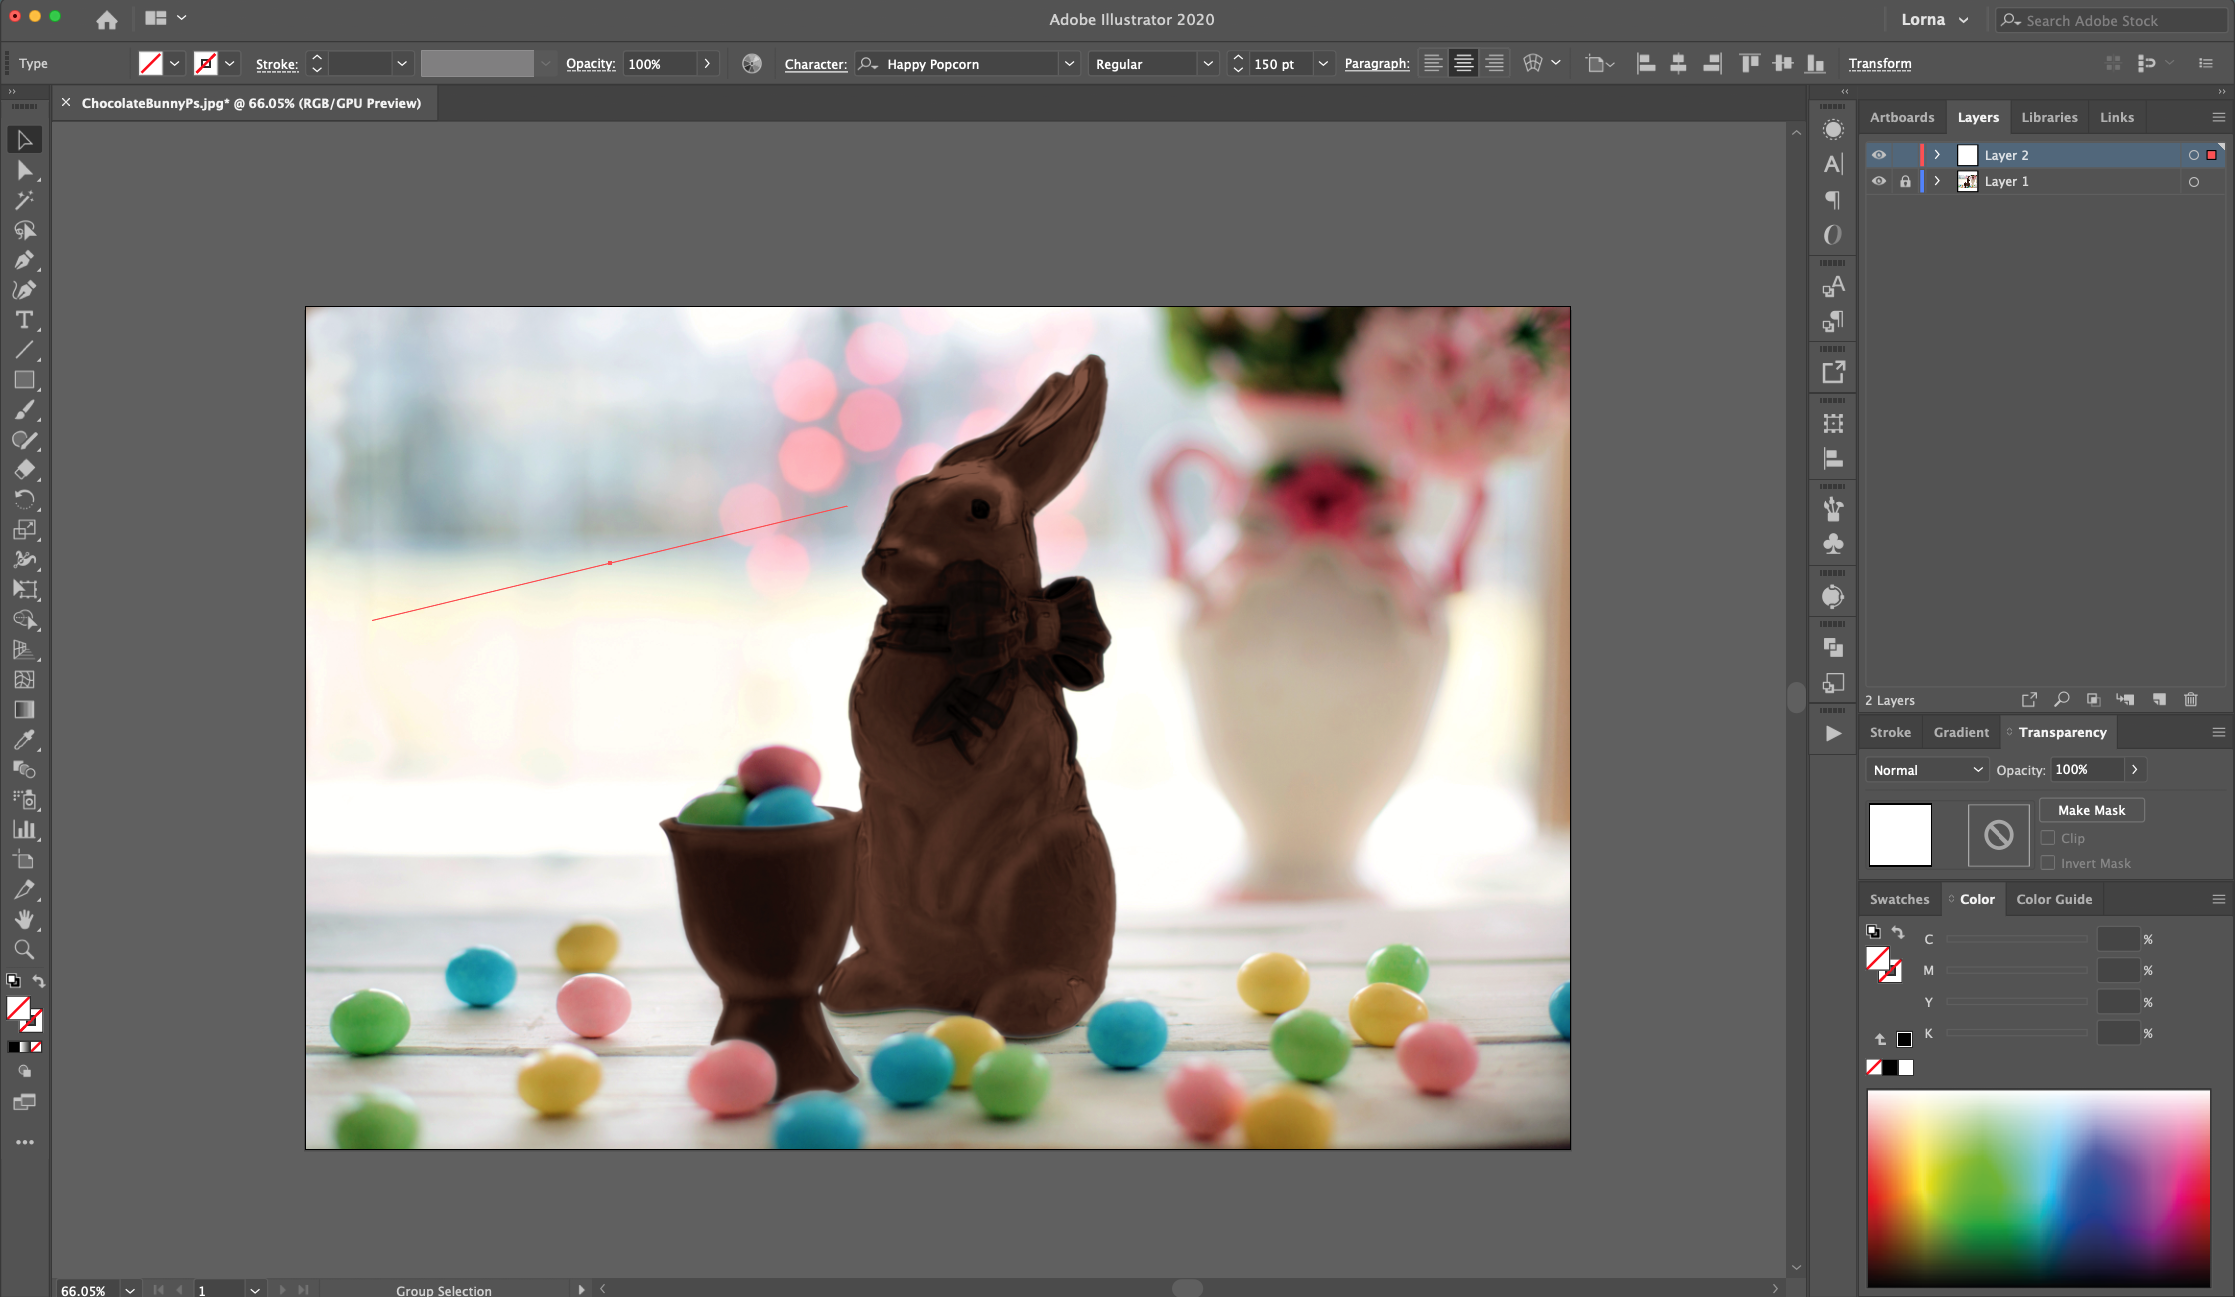
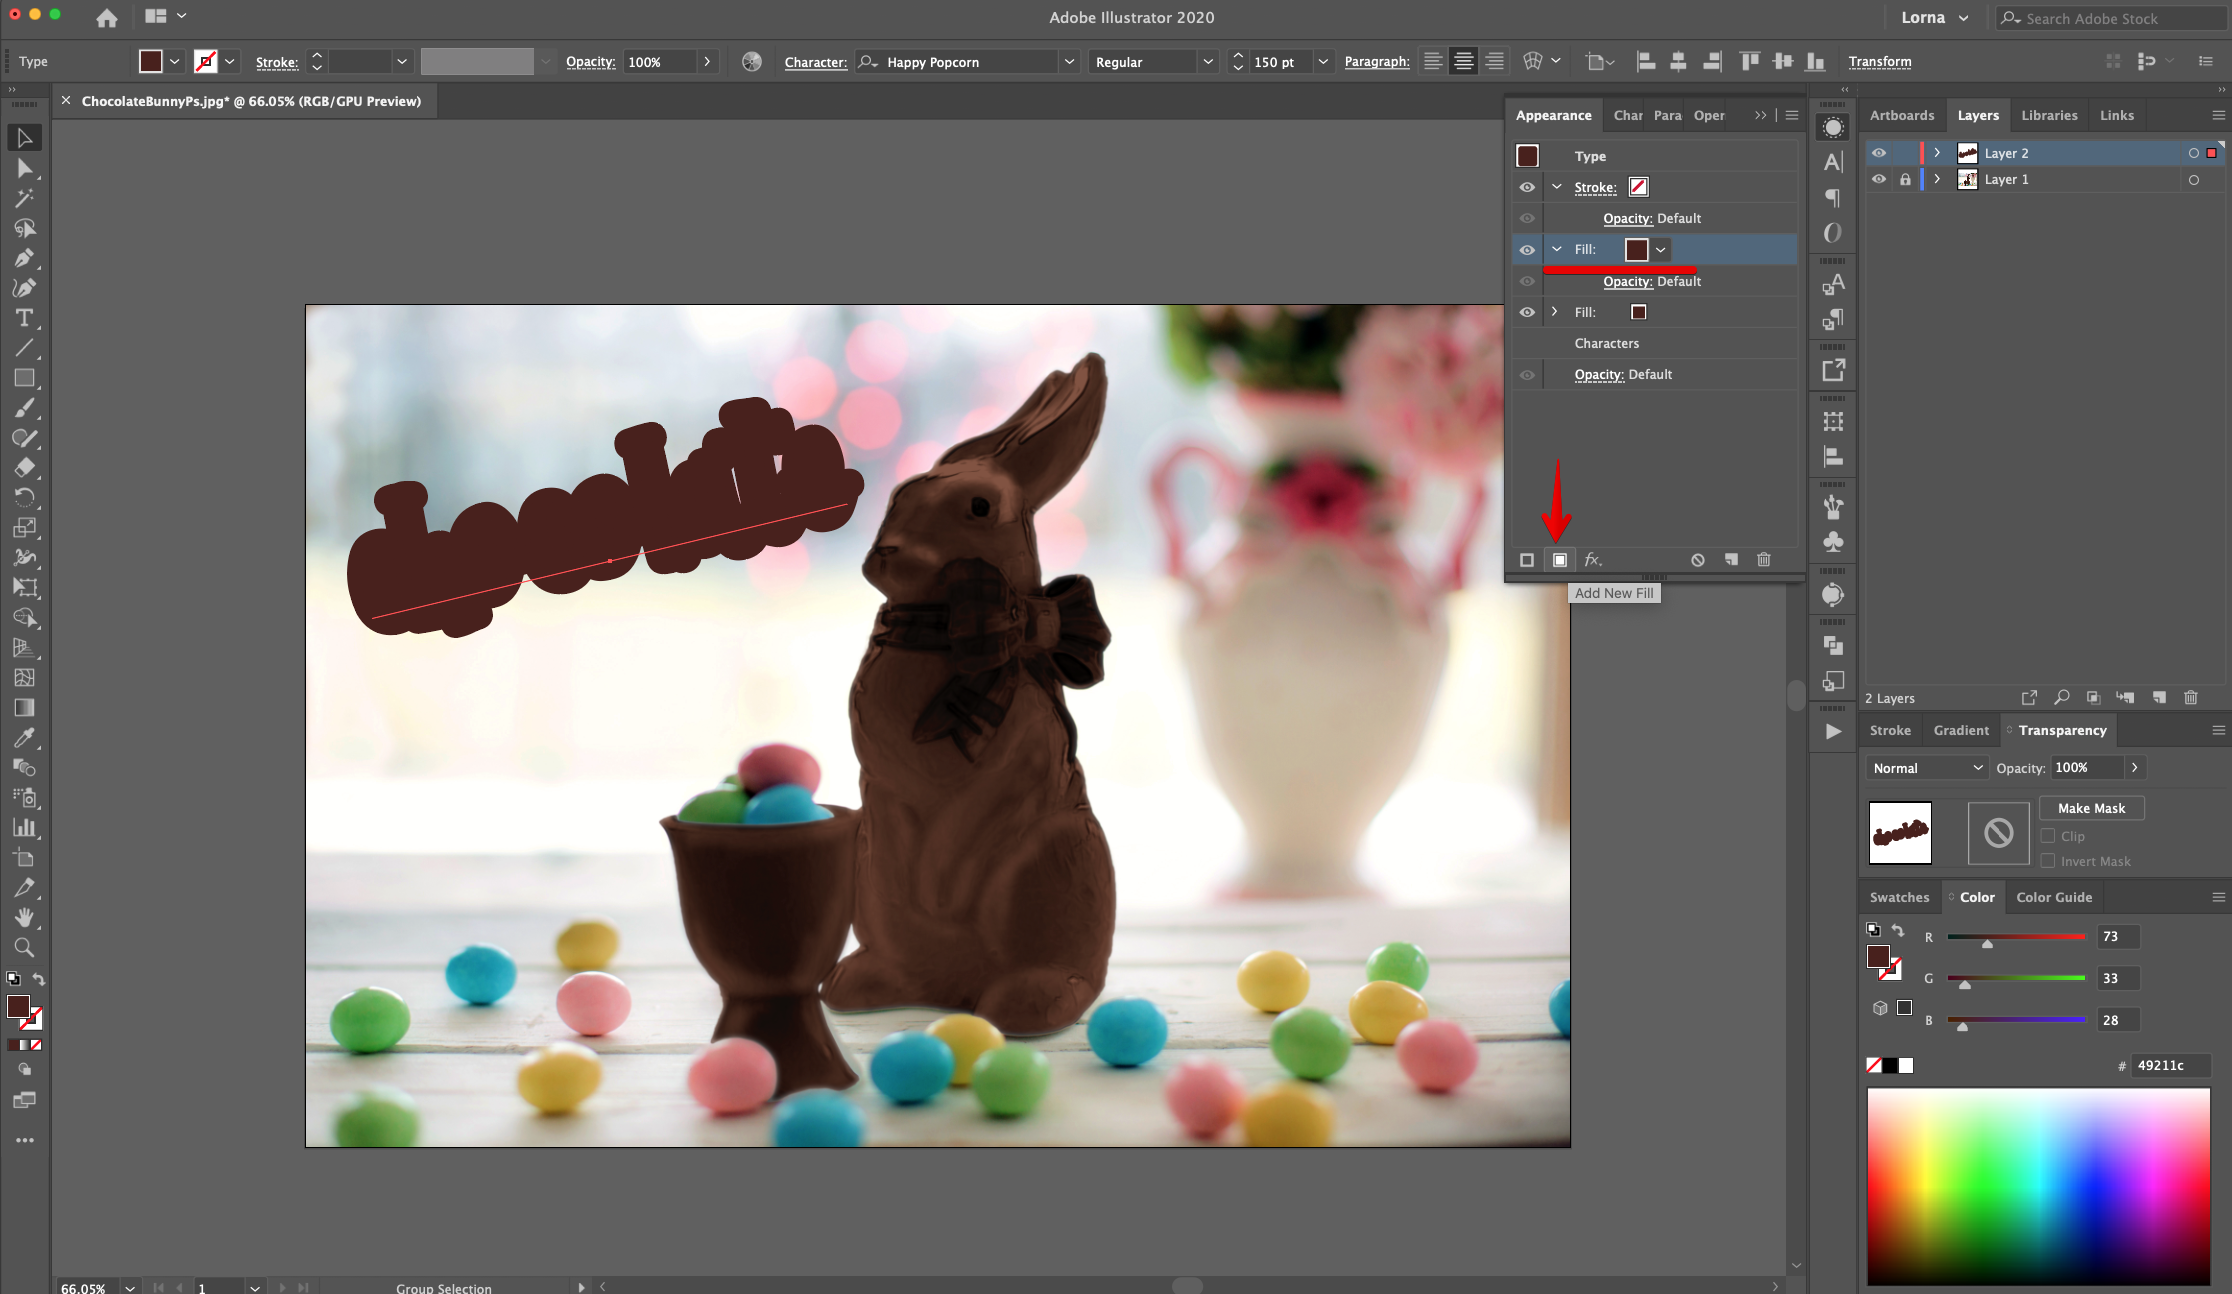
8 - With the text still selected, head to the “Appearance Panel”, click on the “Add New Fill” button at the bottom of the panel and use a deep Brown shade (#49211c).
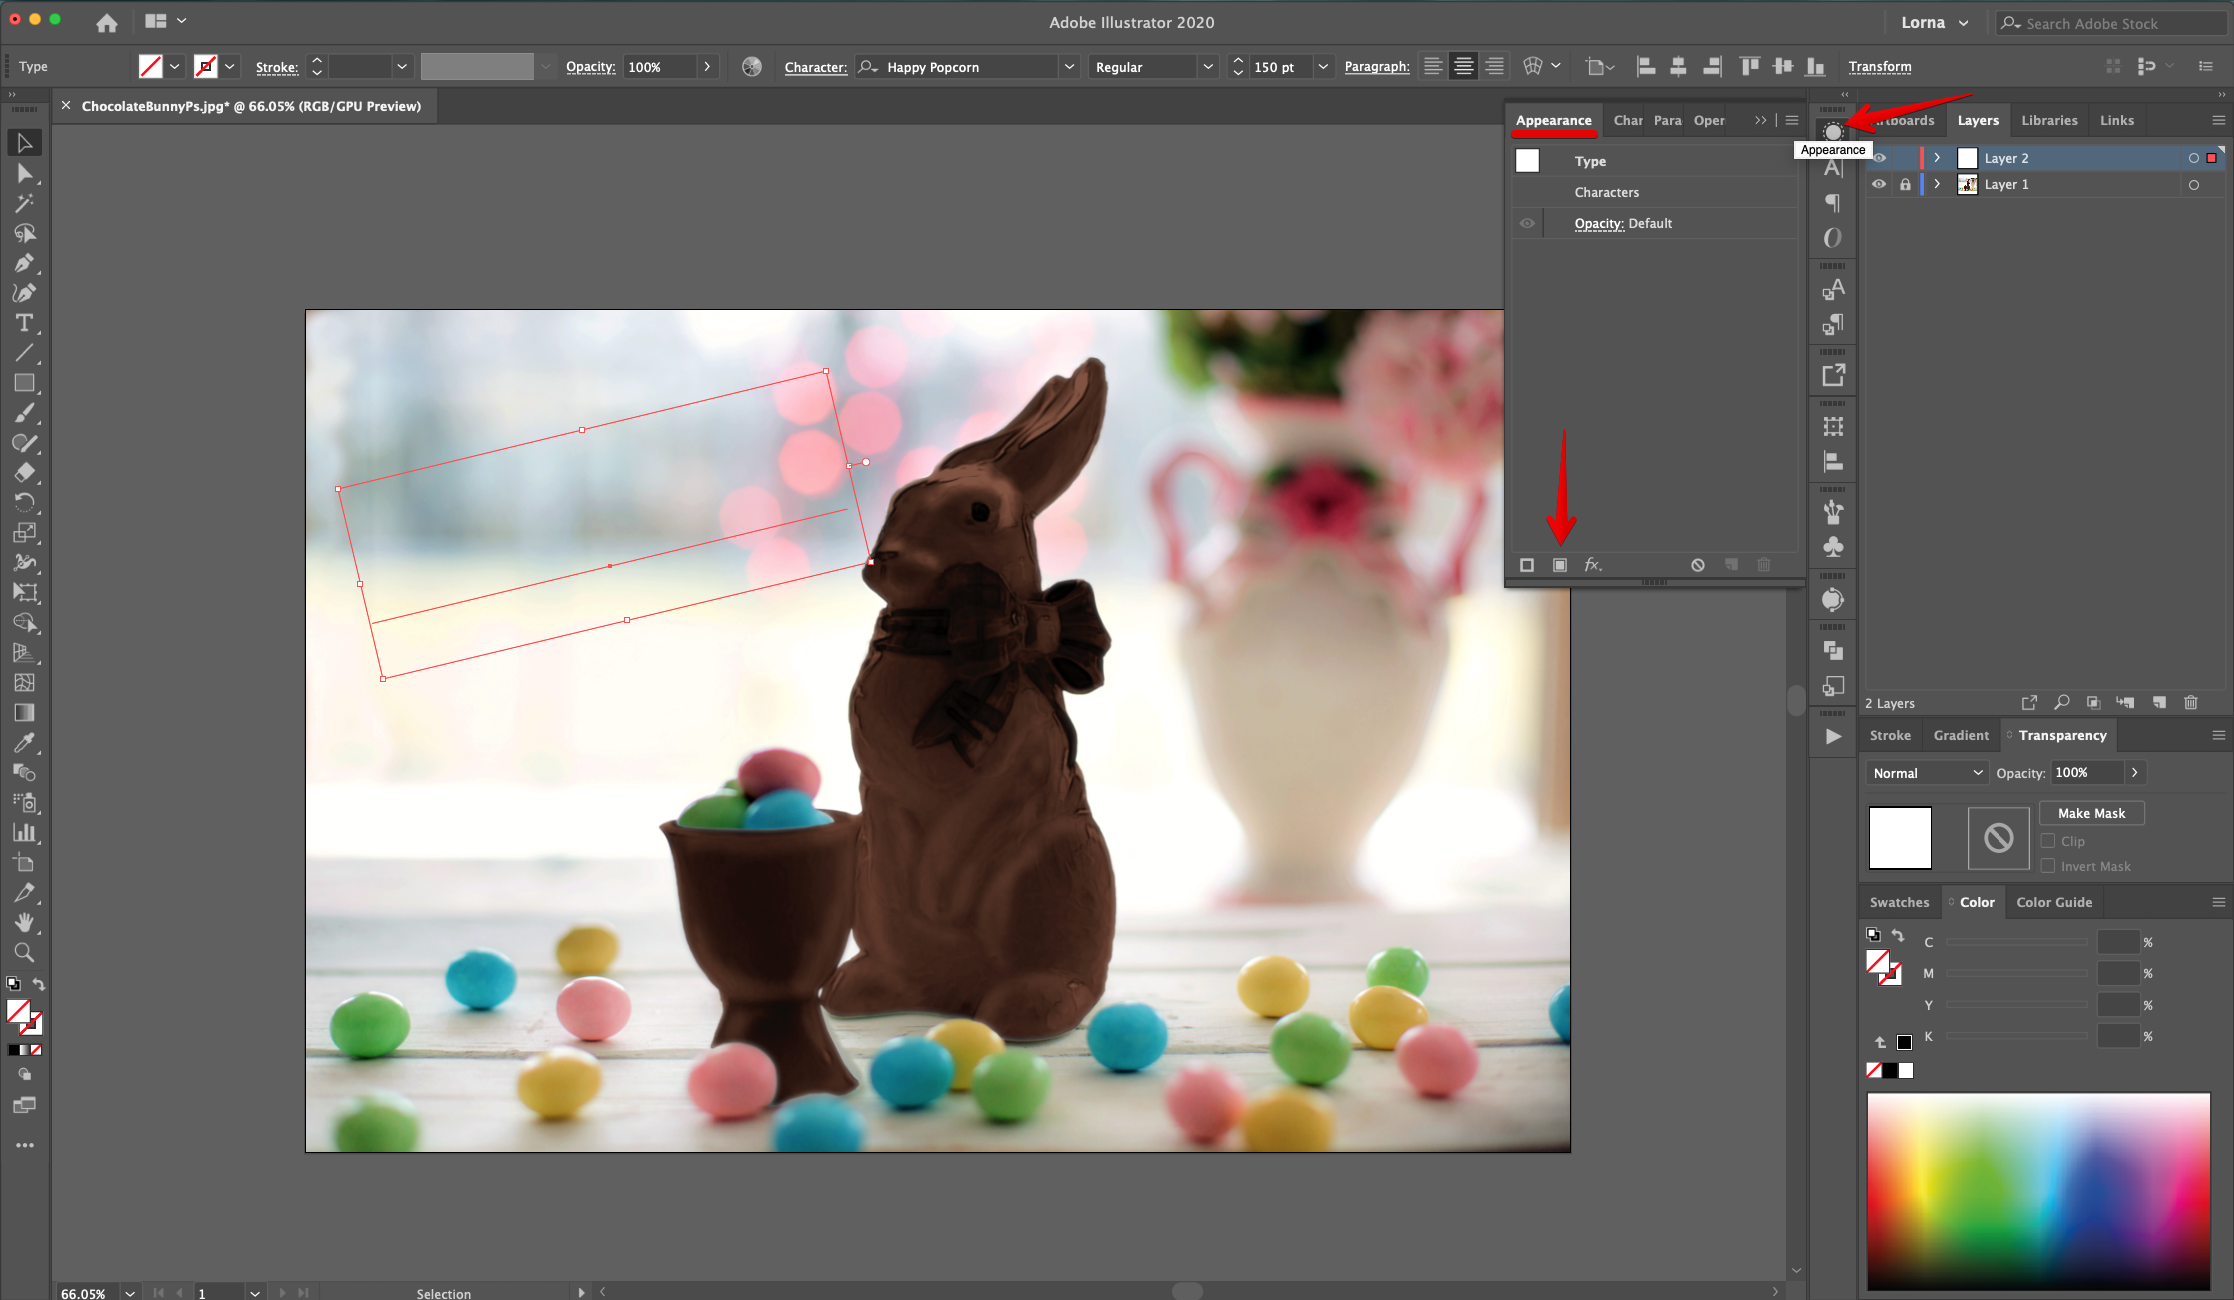
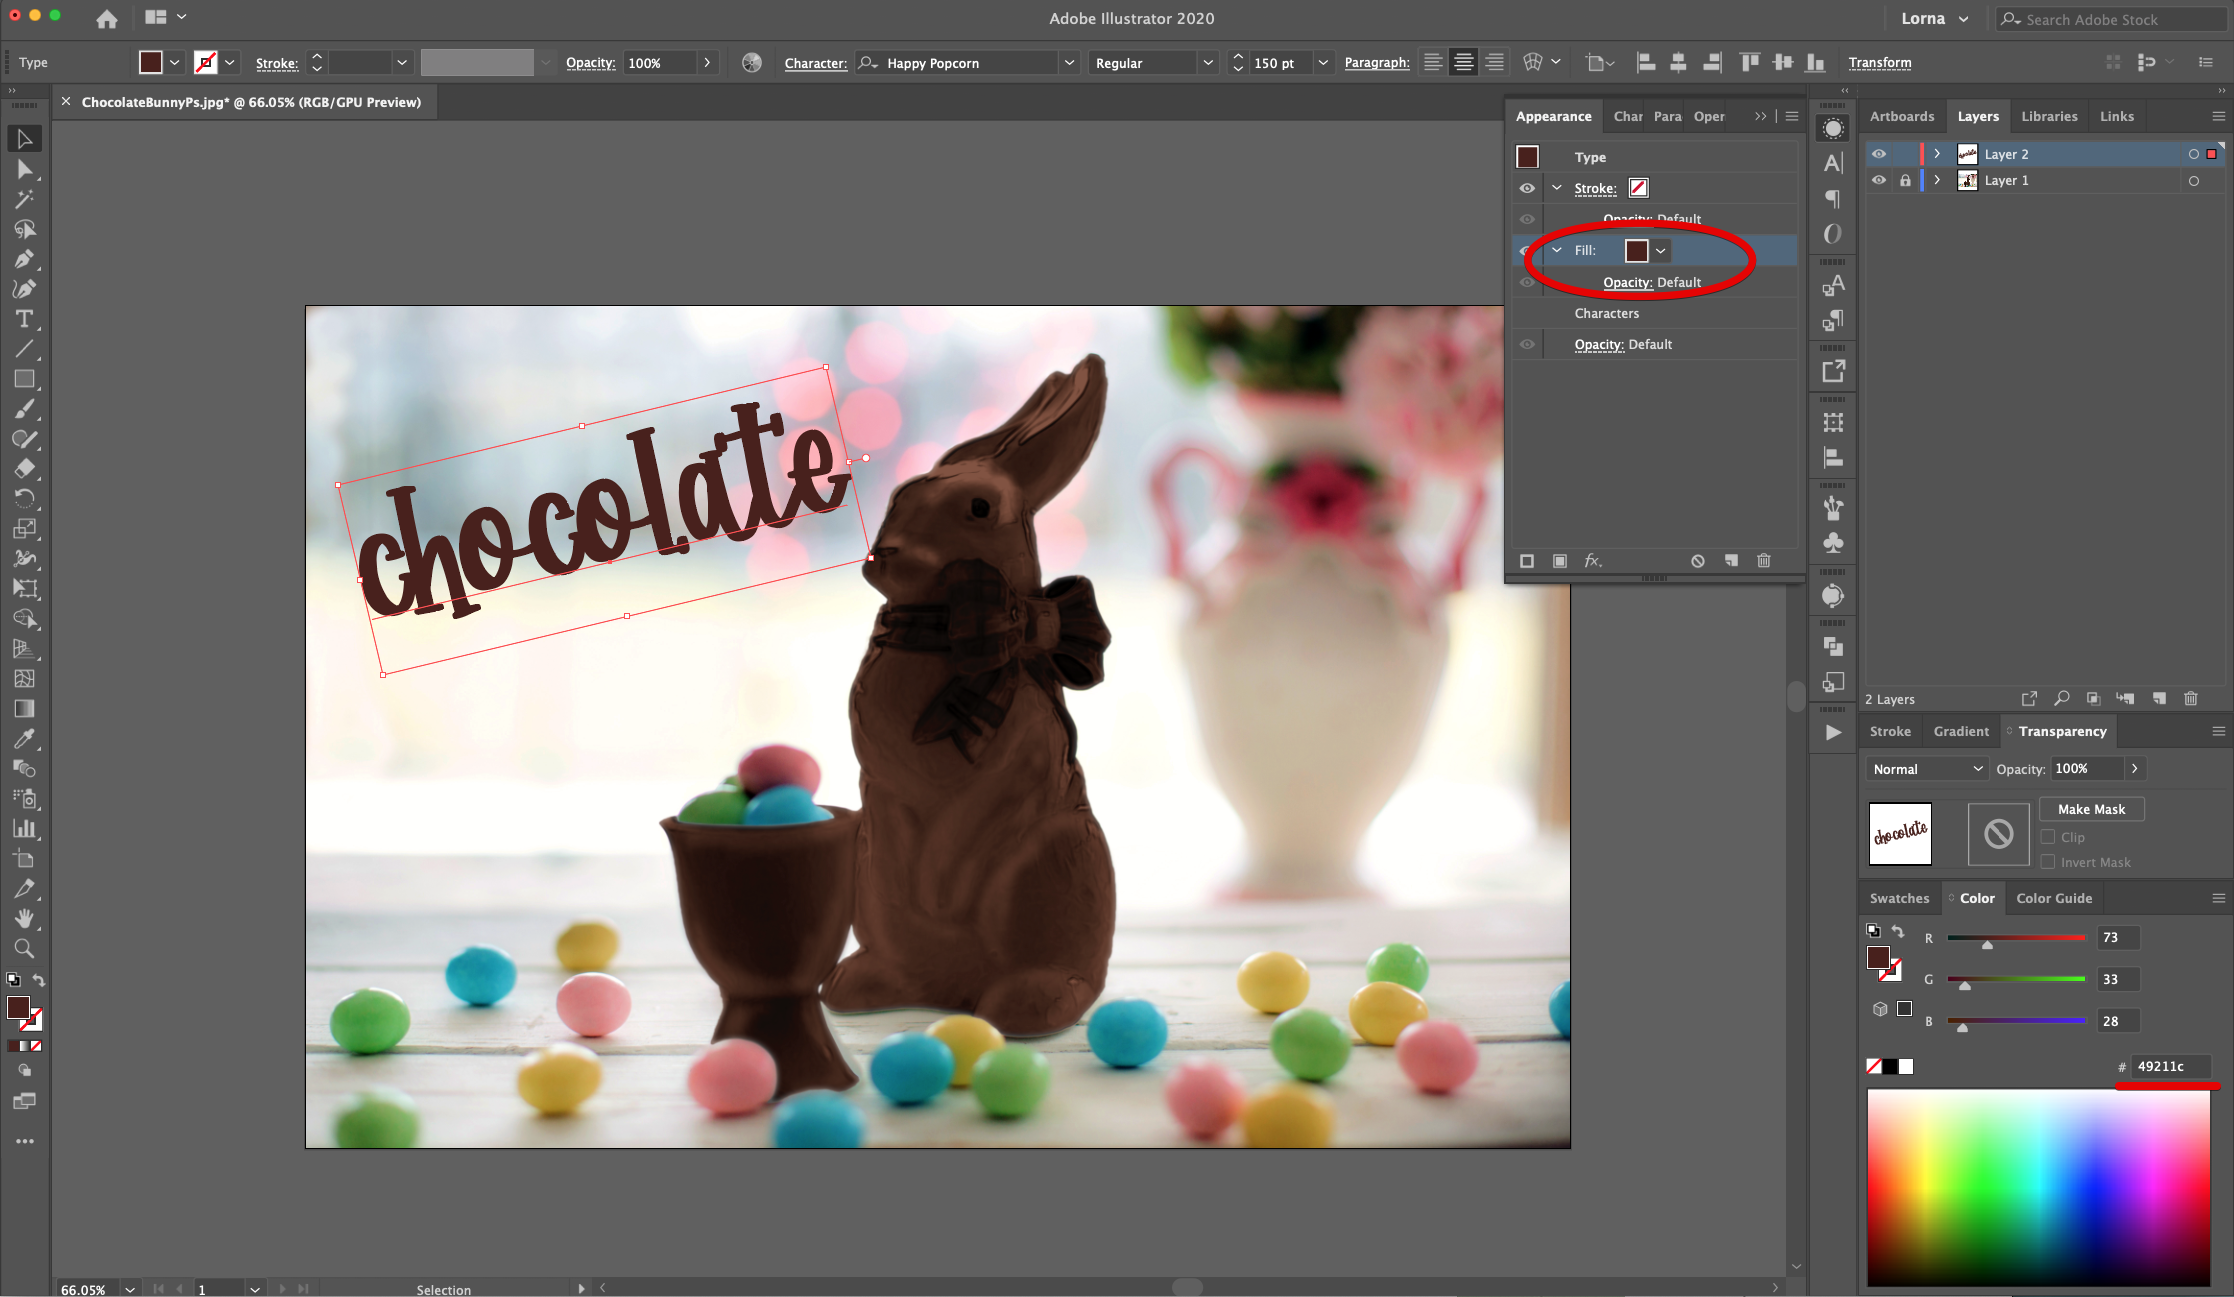
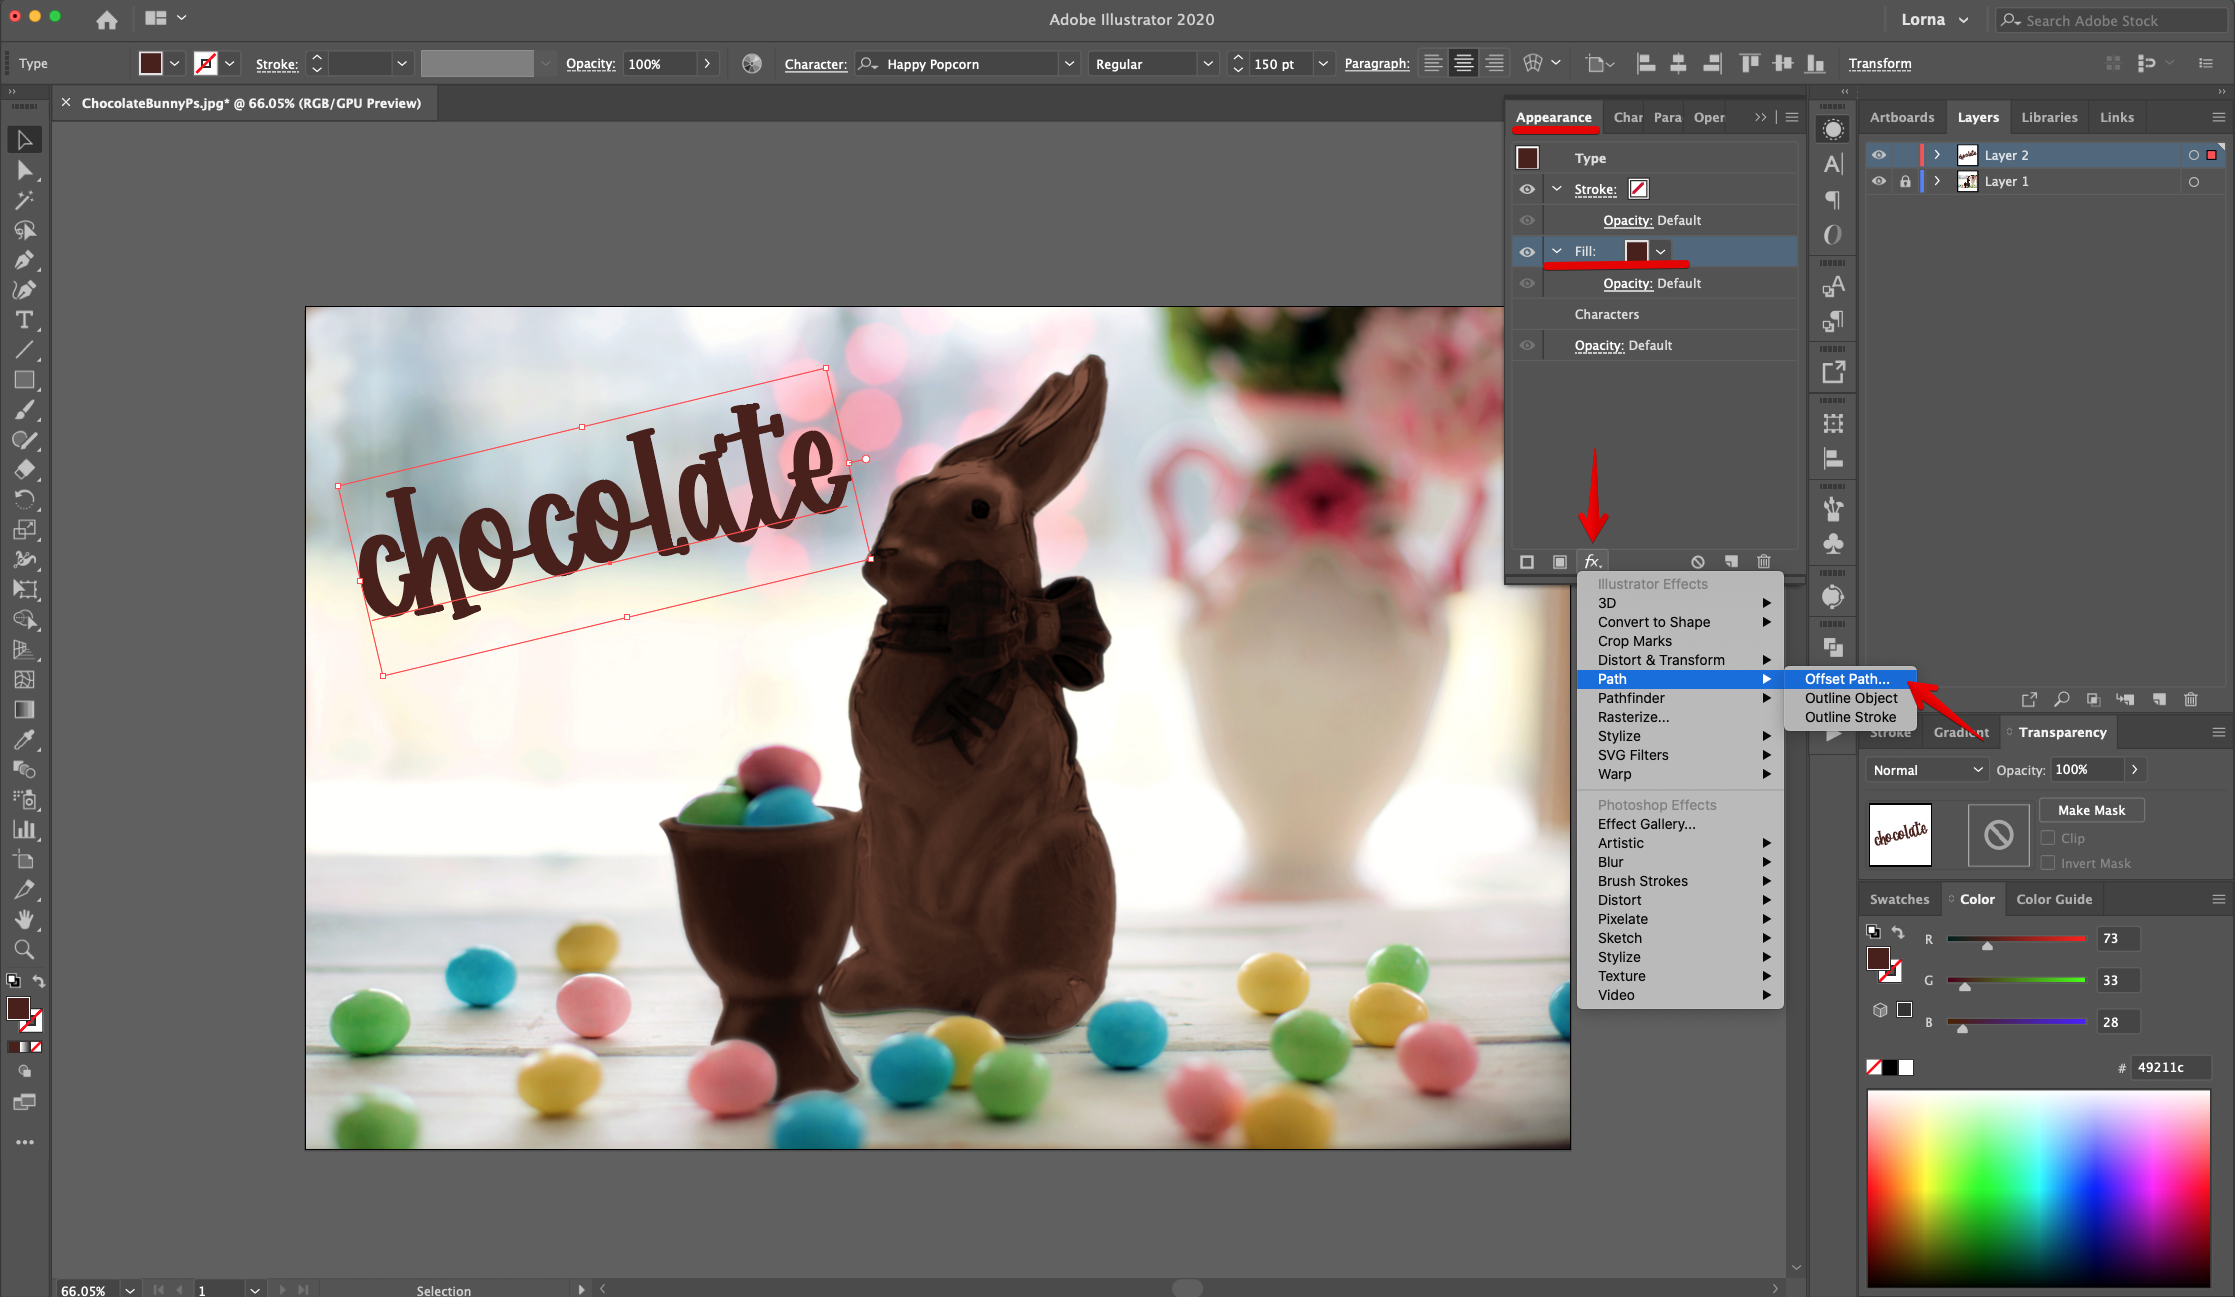
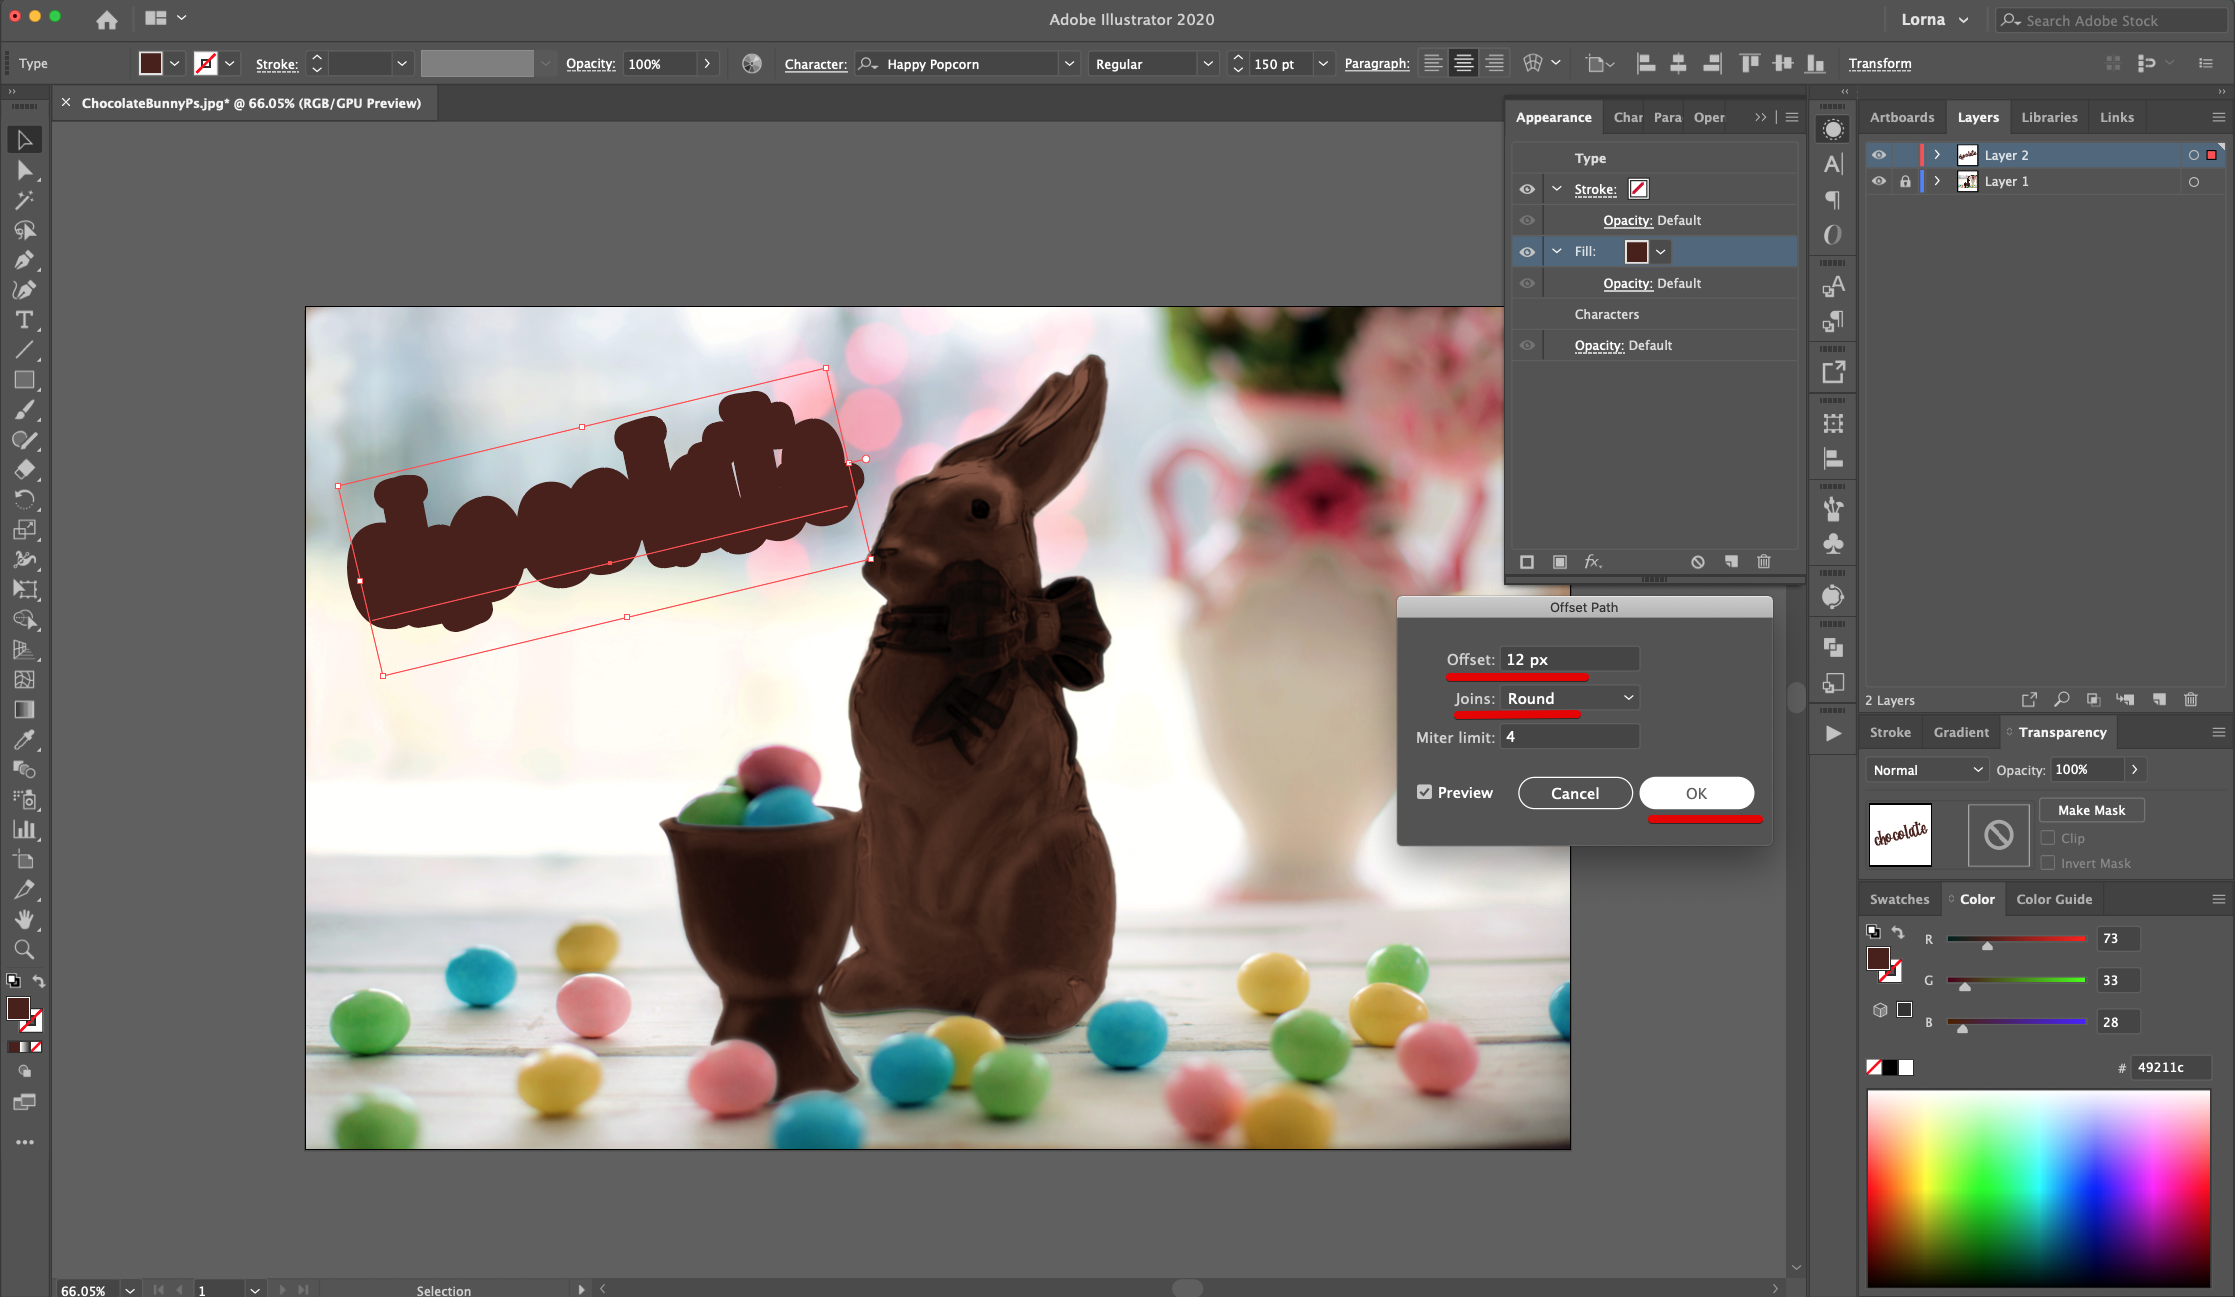
9 - With the “Fill” still selected, in the “Appearance Panel”, click on the “Effects Menu” on the bottom left side, navigate to Path > Offset Path and use an “Offset” of 12 px and “Round Joins”. Click “OK”.
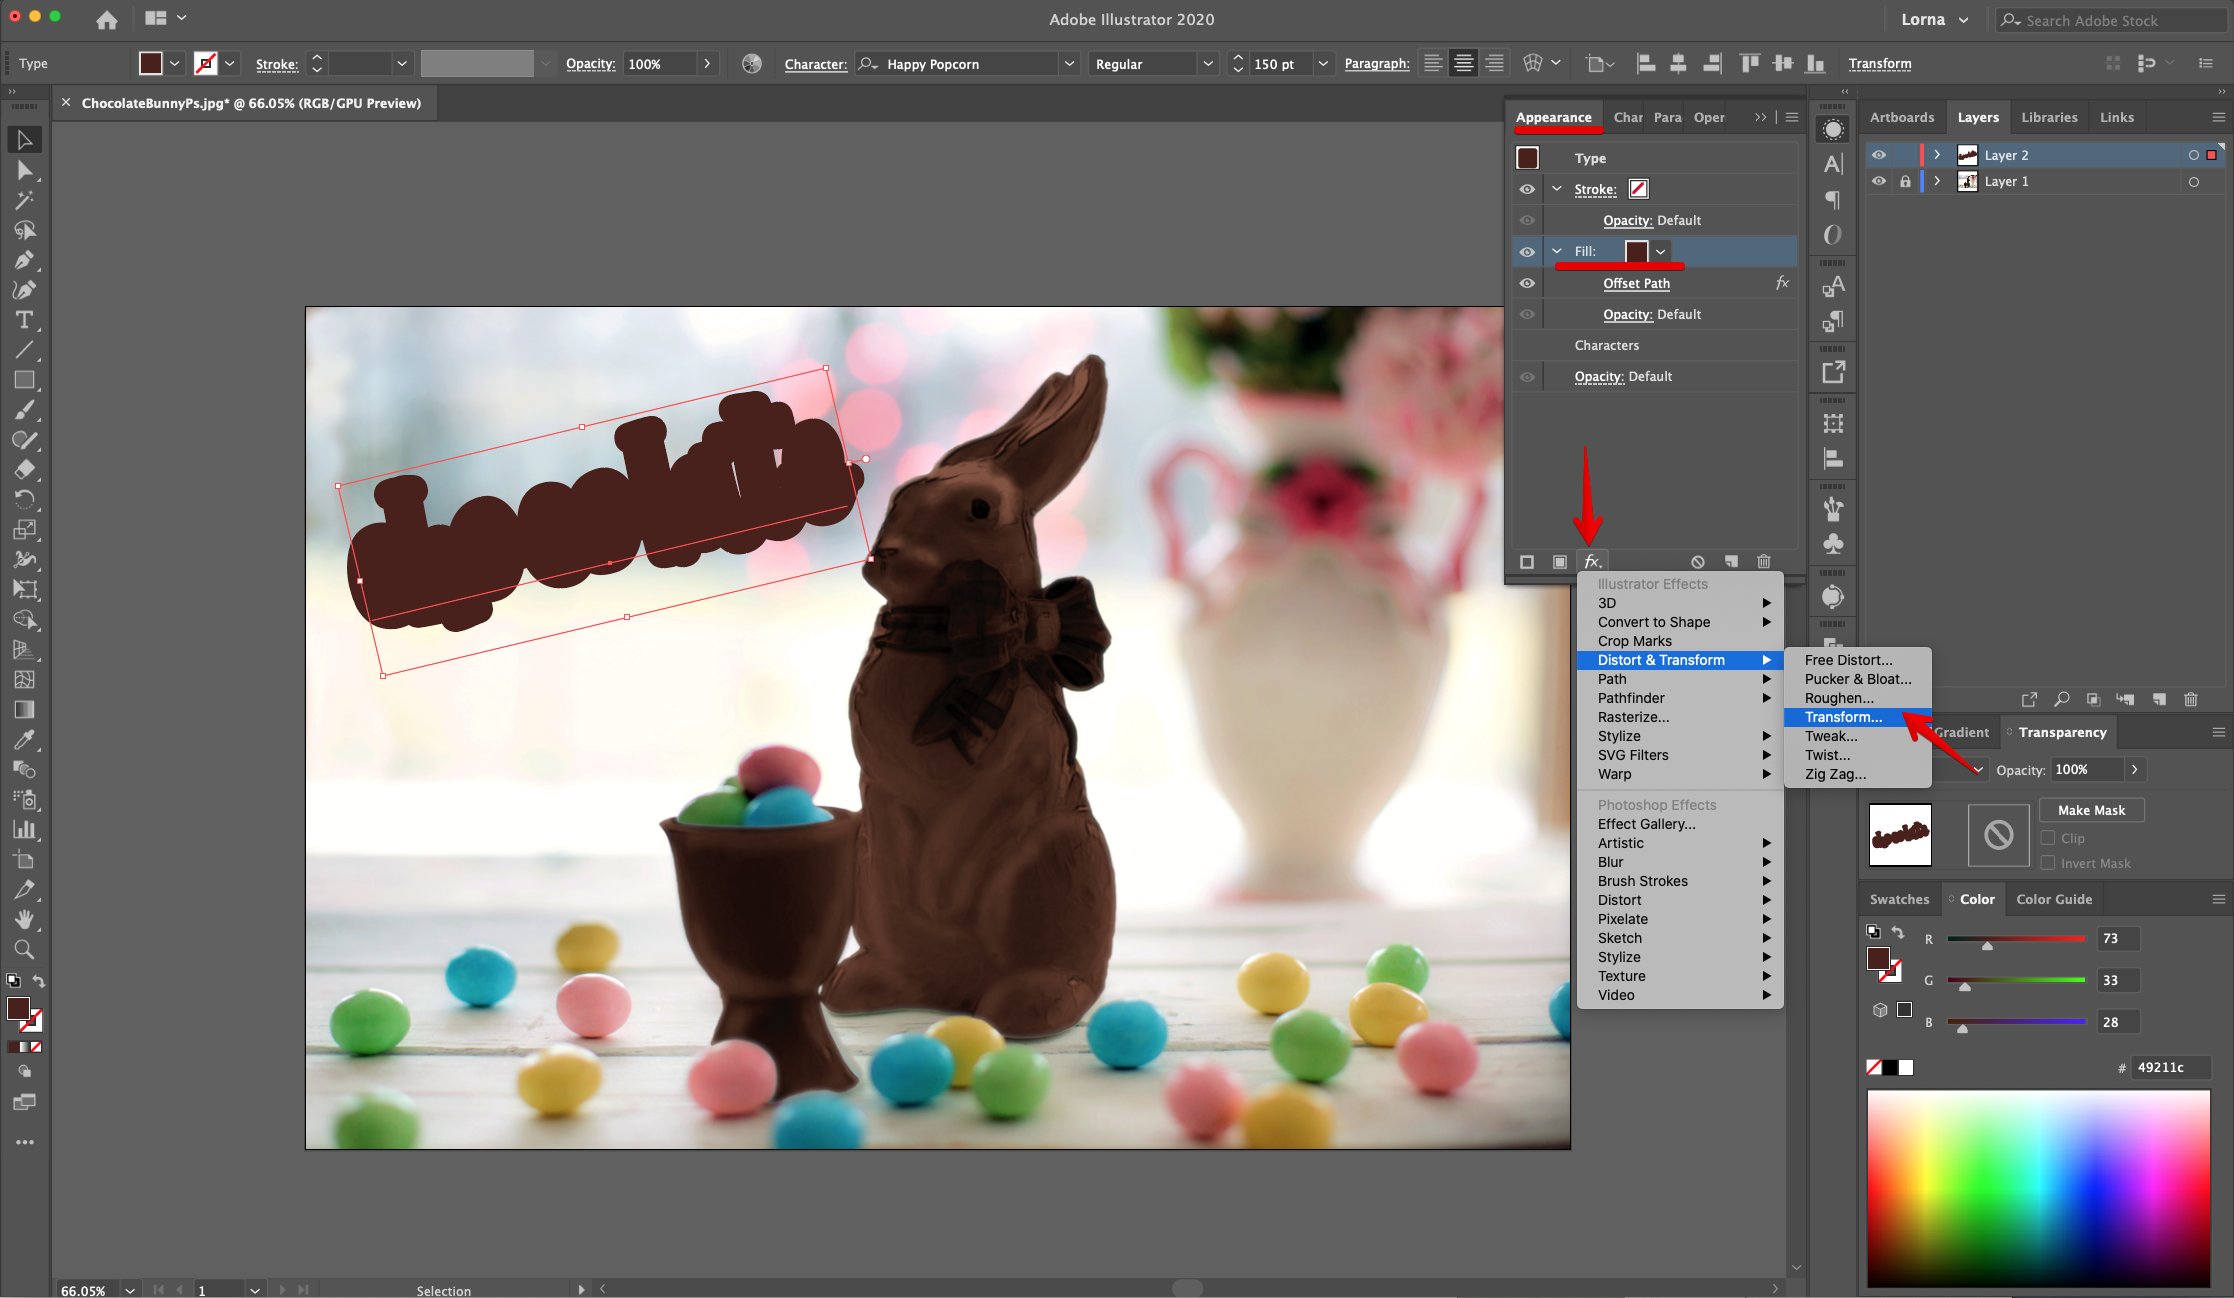
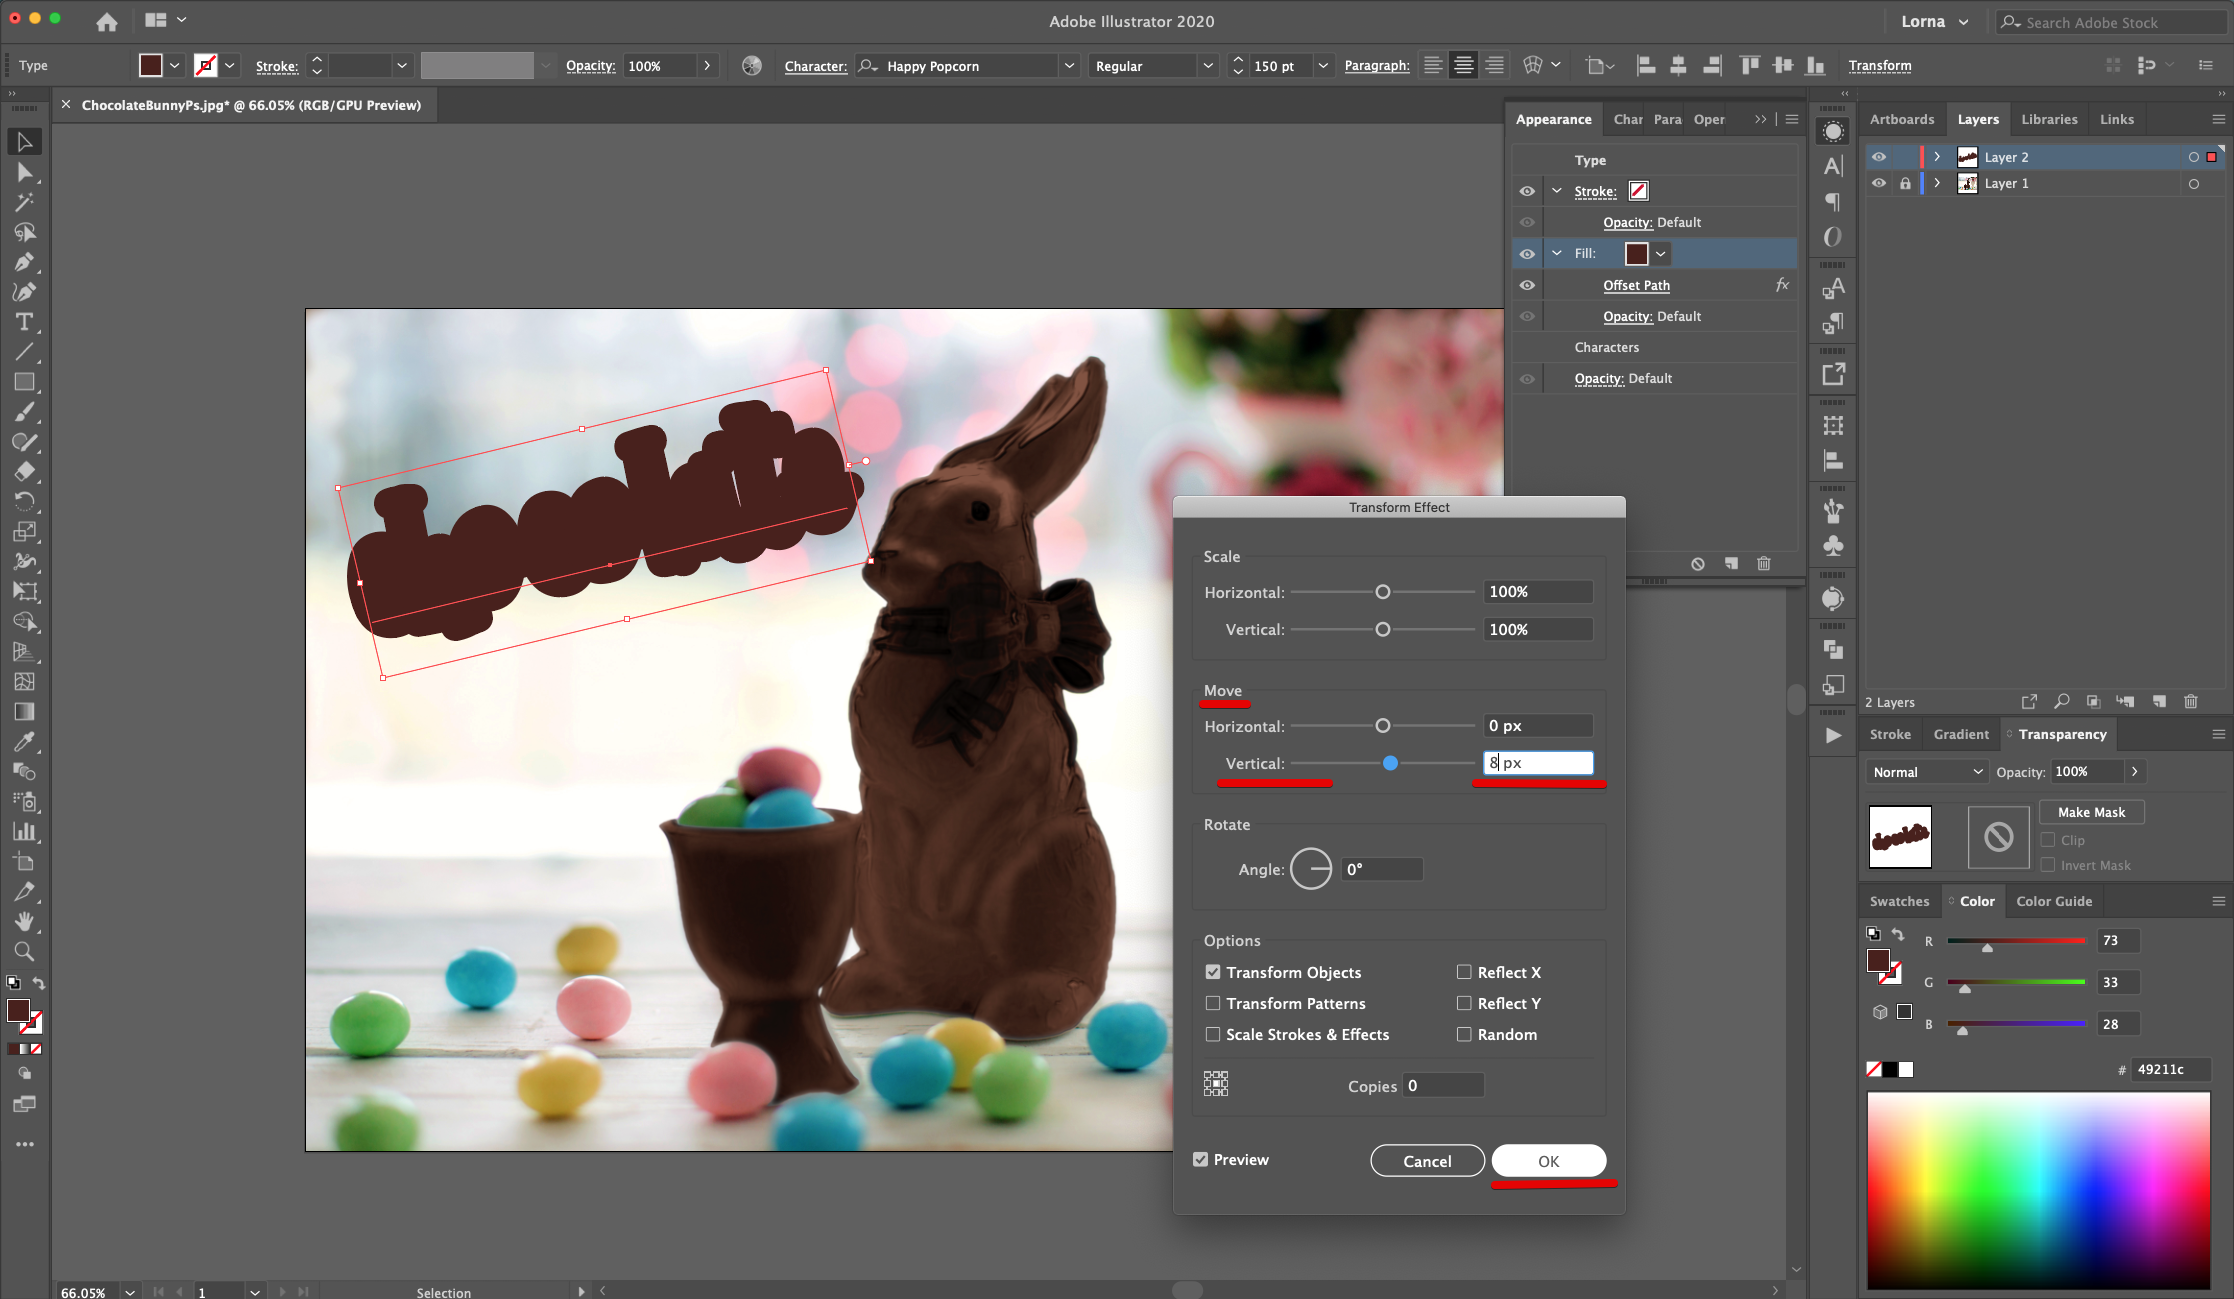
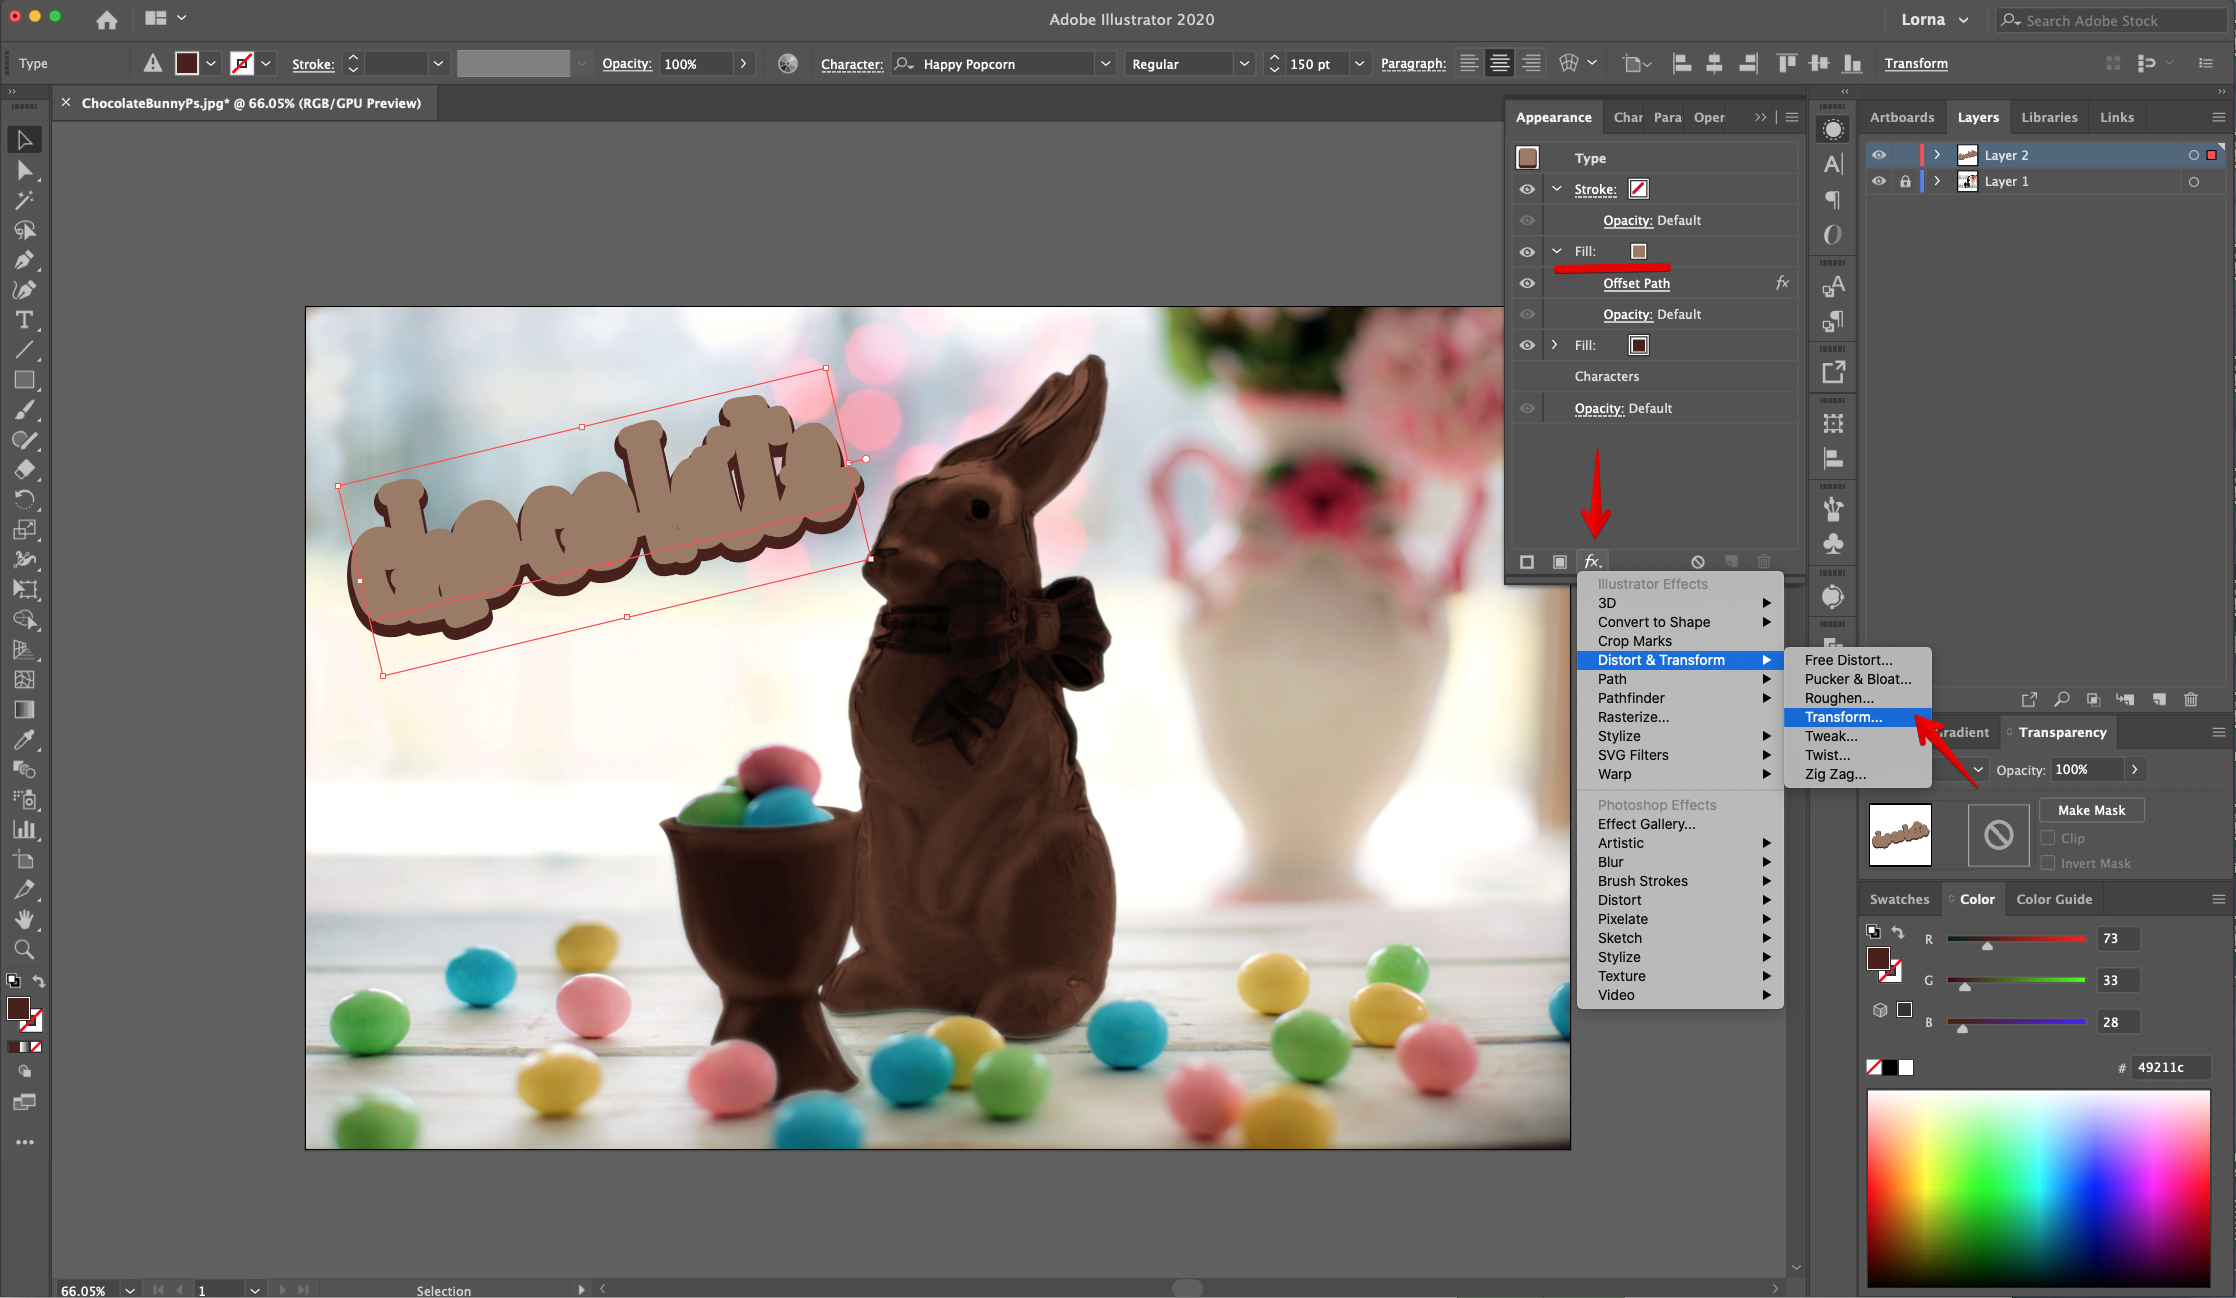
10 - With the “Fill” still selected, in the “Appearance Panel”, click on the “Effects Menu” but now choose Distort & Transform > Transform and use a “Vertical Move” of 8 px. Click “OK”.
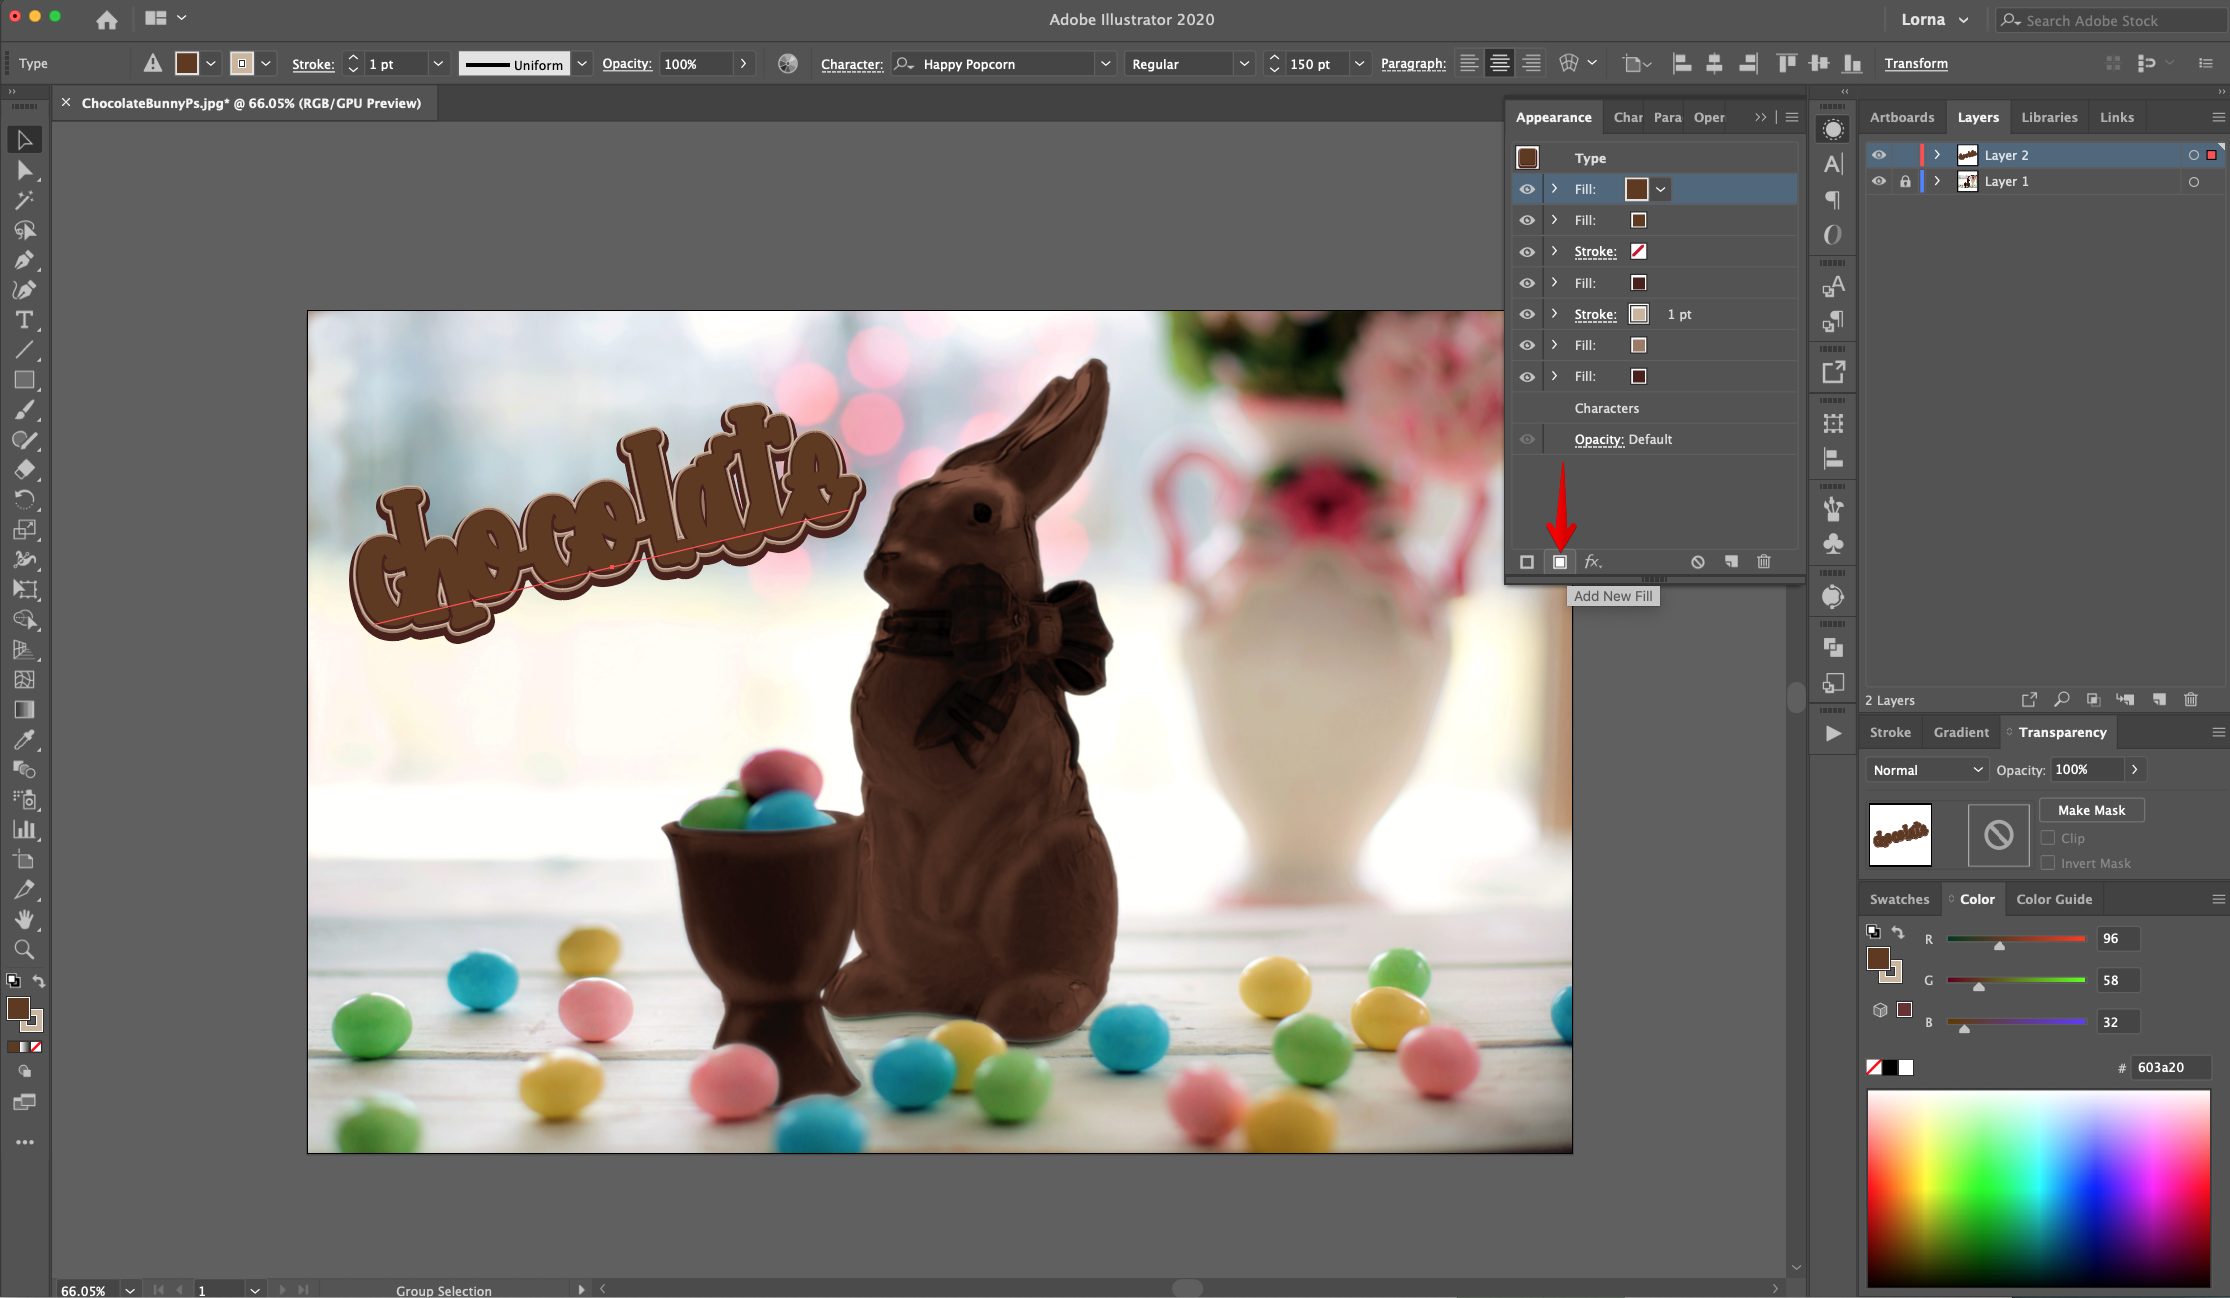
11 - Head to the “Appearance Panel” again, click on the “Add New Fill” button at the bottom of the panel and use a medium Brown shade (#9b7b65). The “New Fill” should be on top of the darker one.
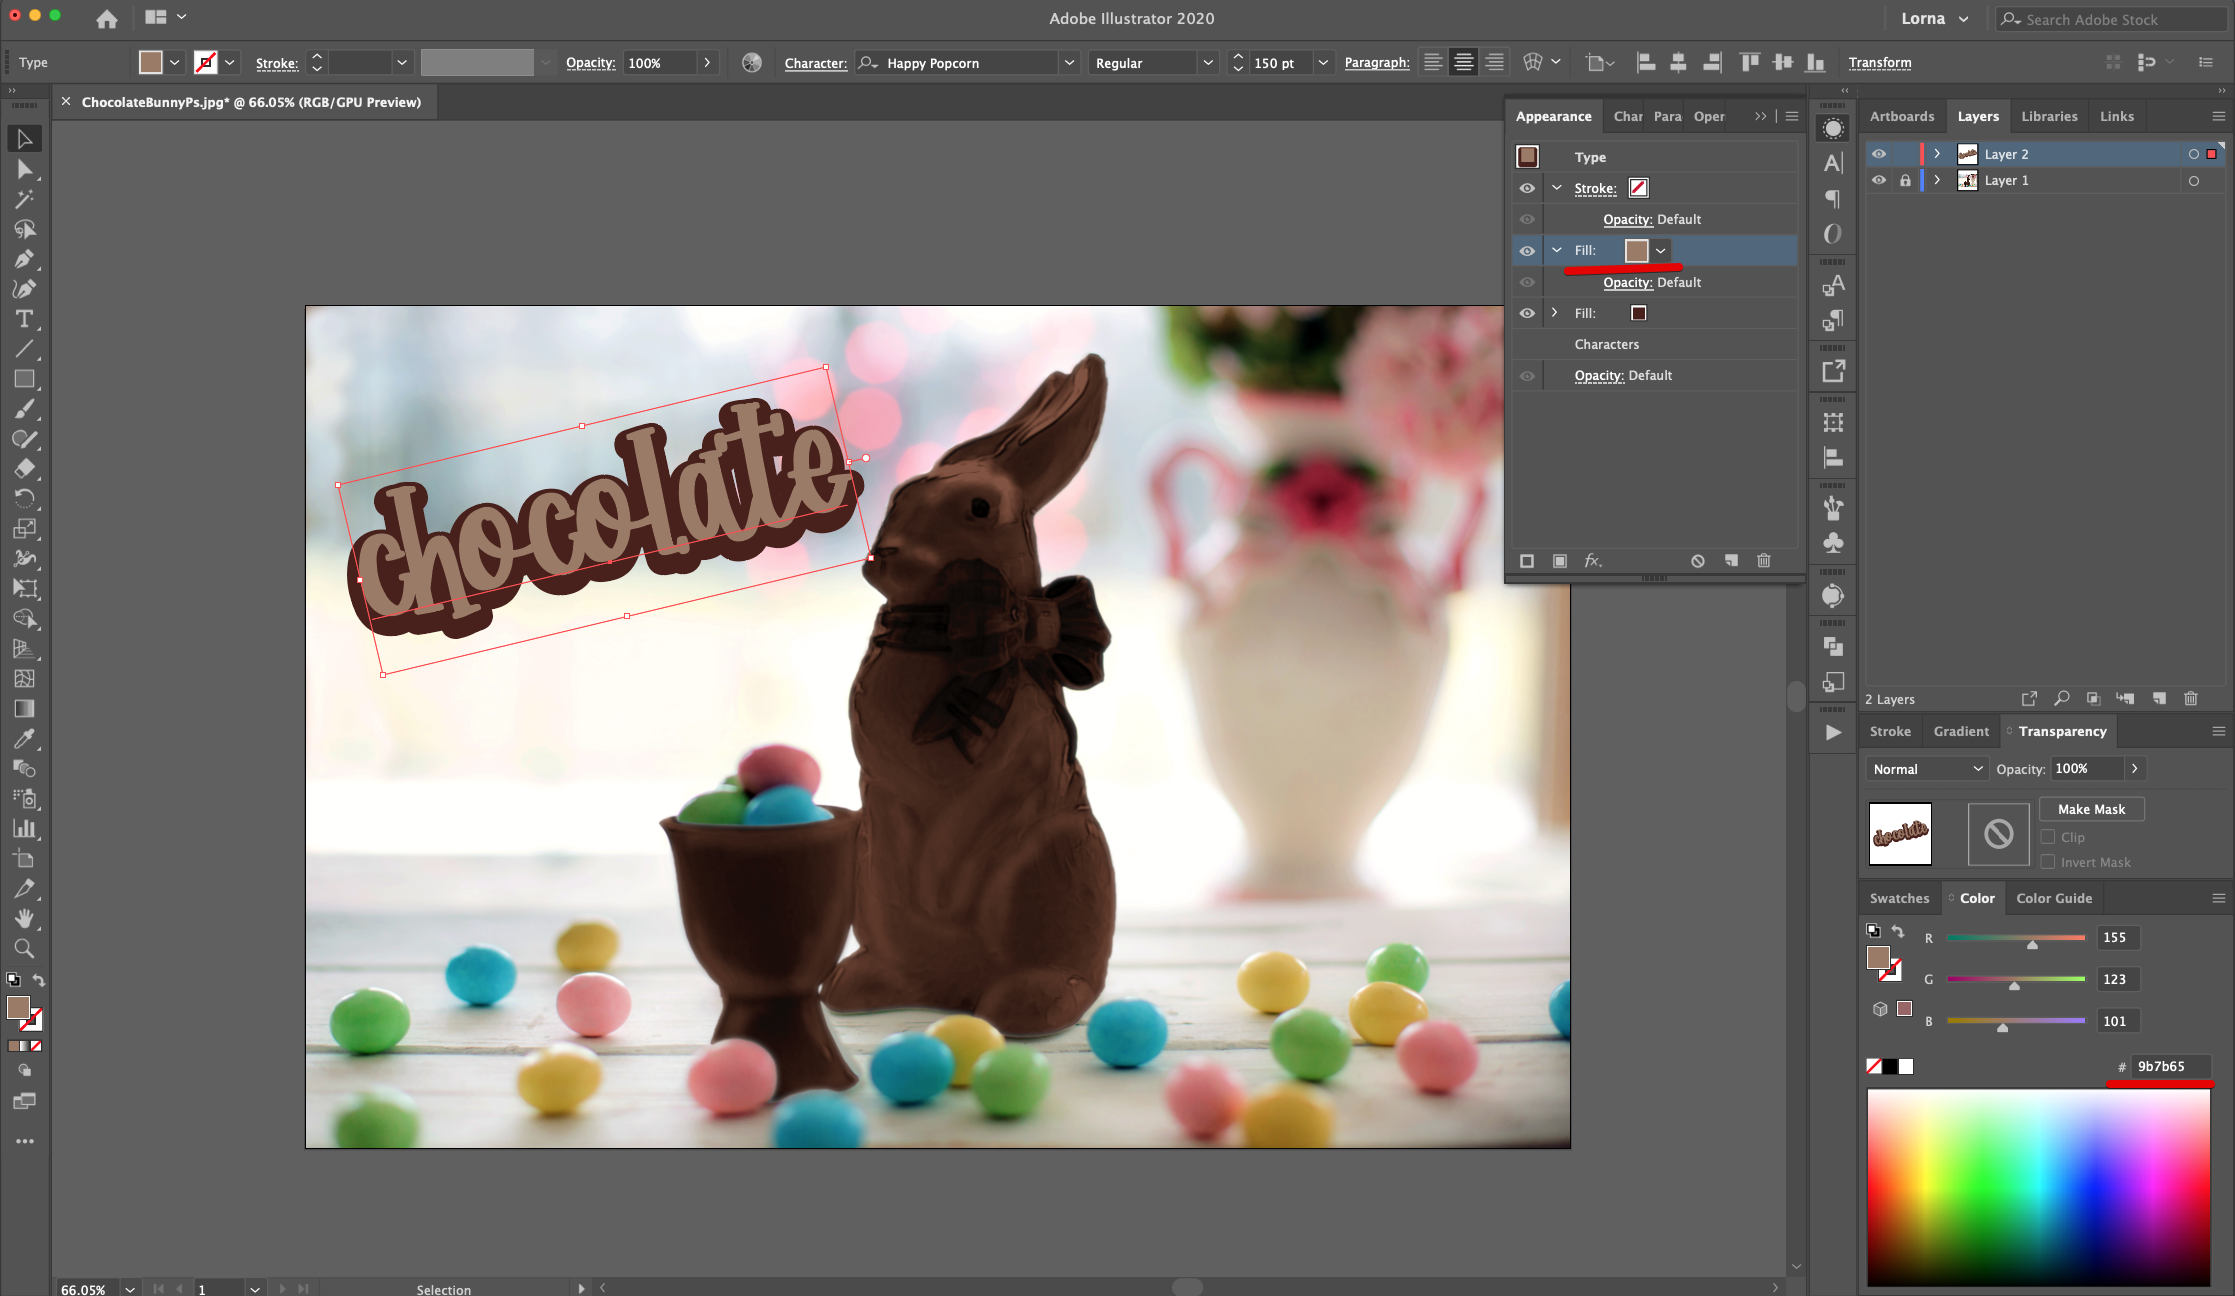
12 - With the “Fill” still selected, in the “Appearance Panel”, click on the “Effects Menu” on the bottom left side, navigate to Path > Offset Path and use an “Offset” of 8 px and “Round Joins”. Click “OK”.
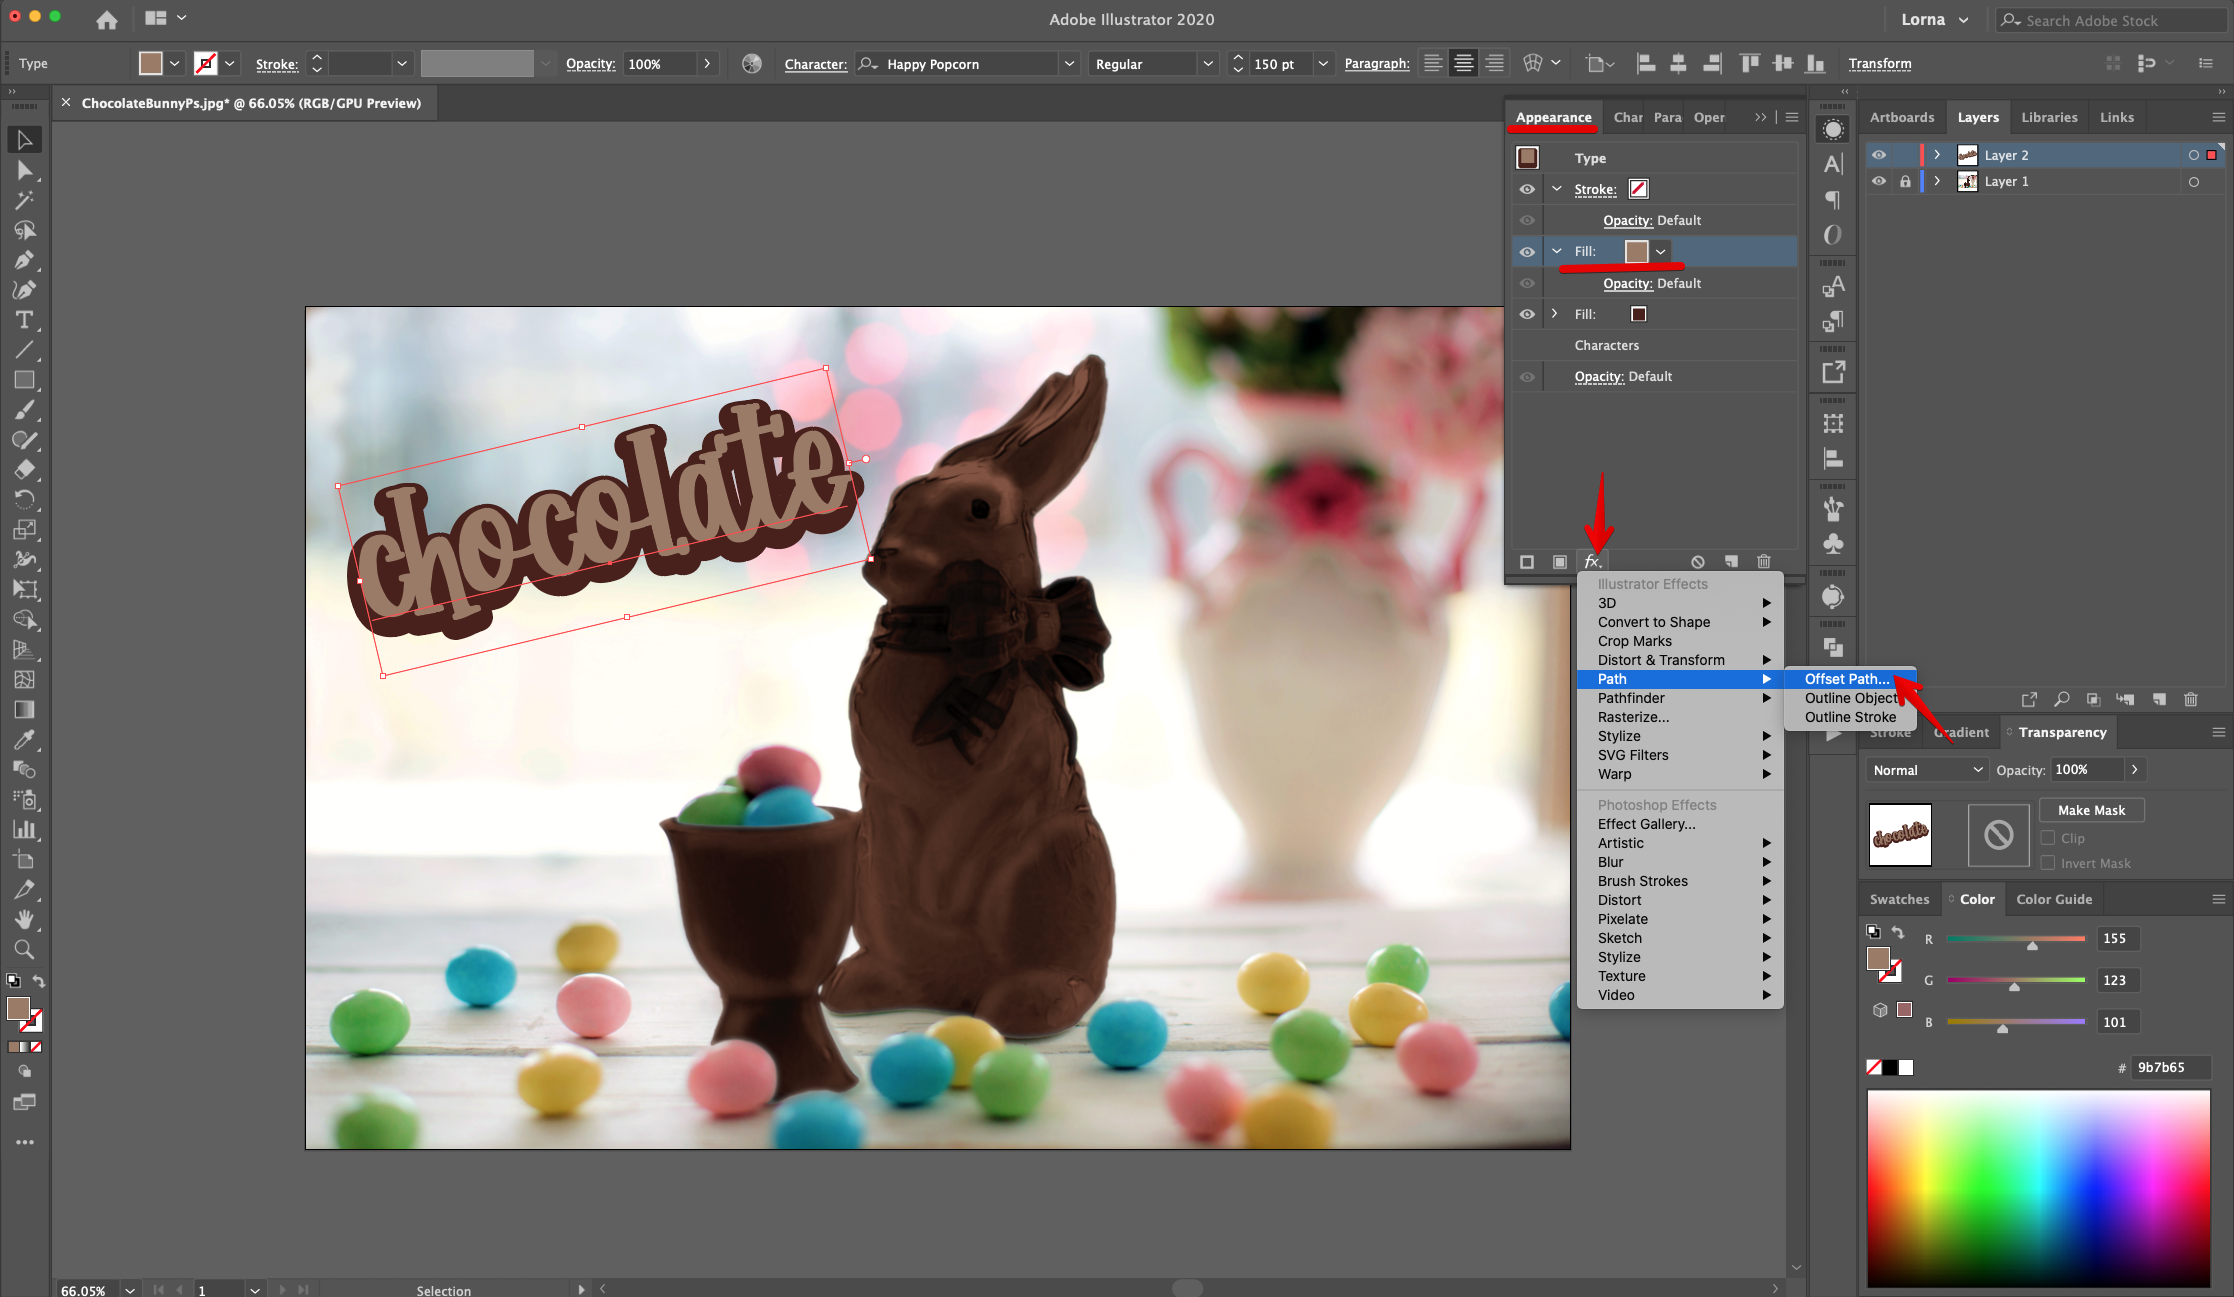
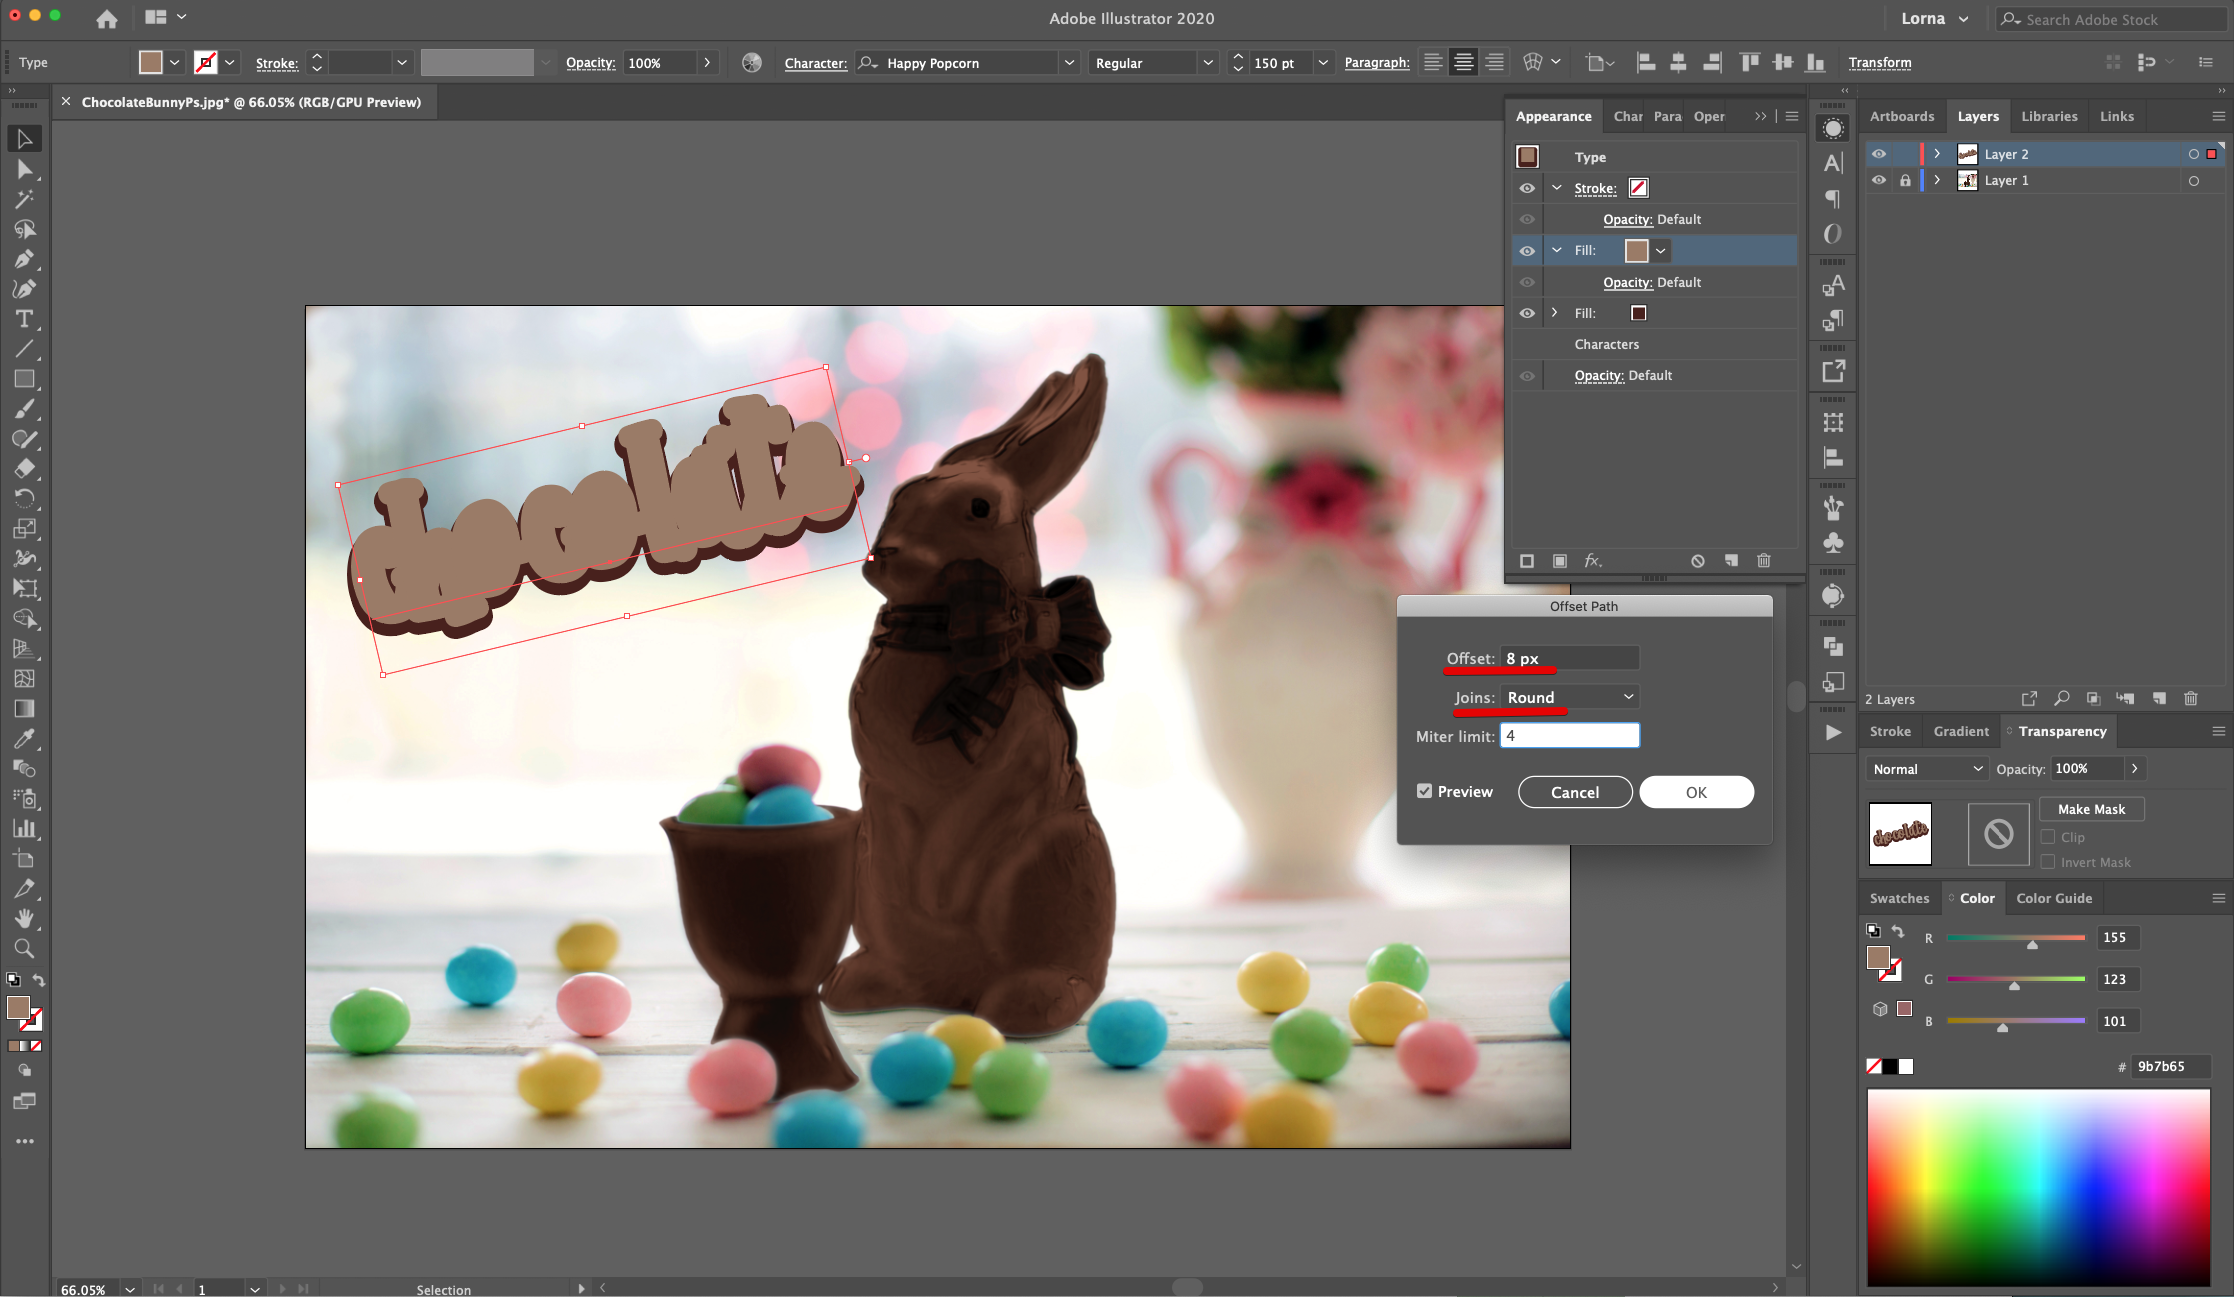
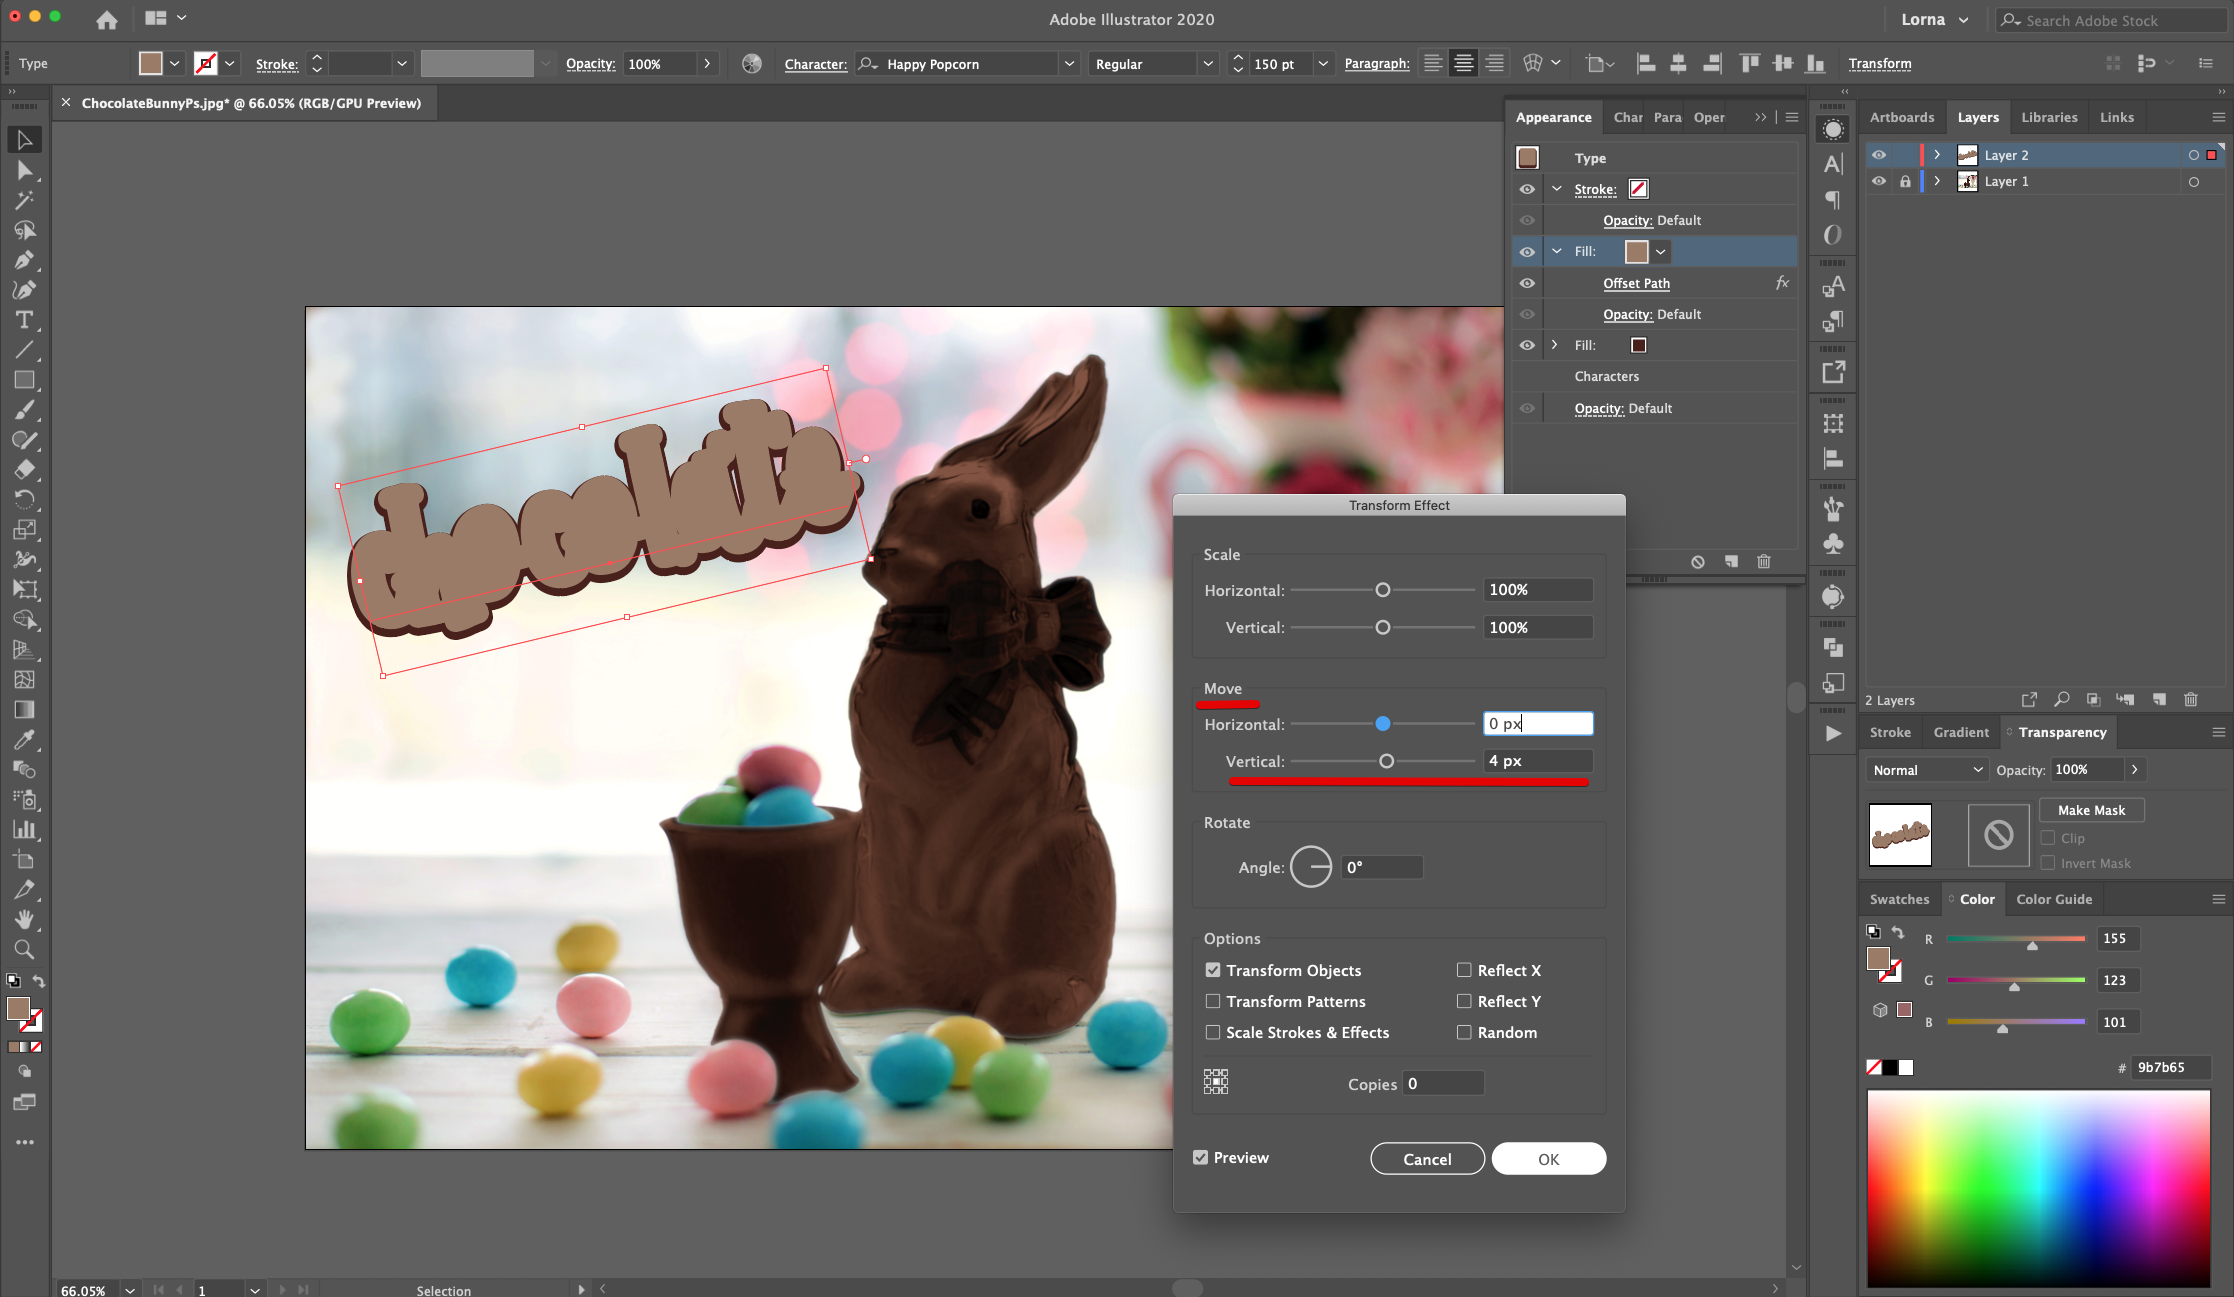
13 - With the “Fill” still selected, in the “Appearance Panel”, click on the “Effects Menu” but now choose Distort & Transform > Transform and use a “Vertical Move” of 4 px. Click “OK”.
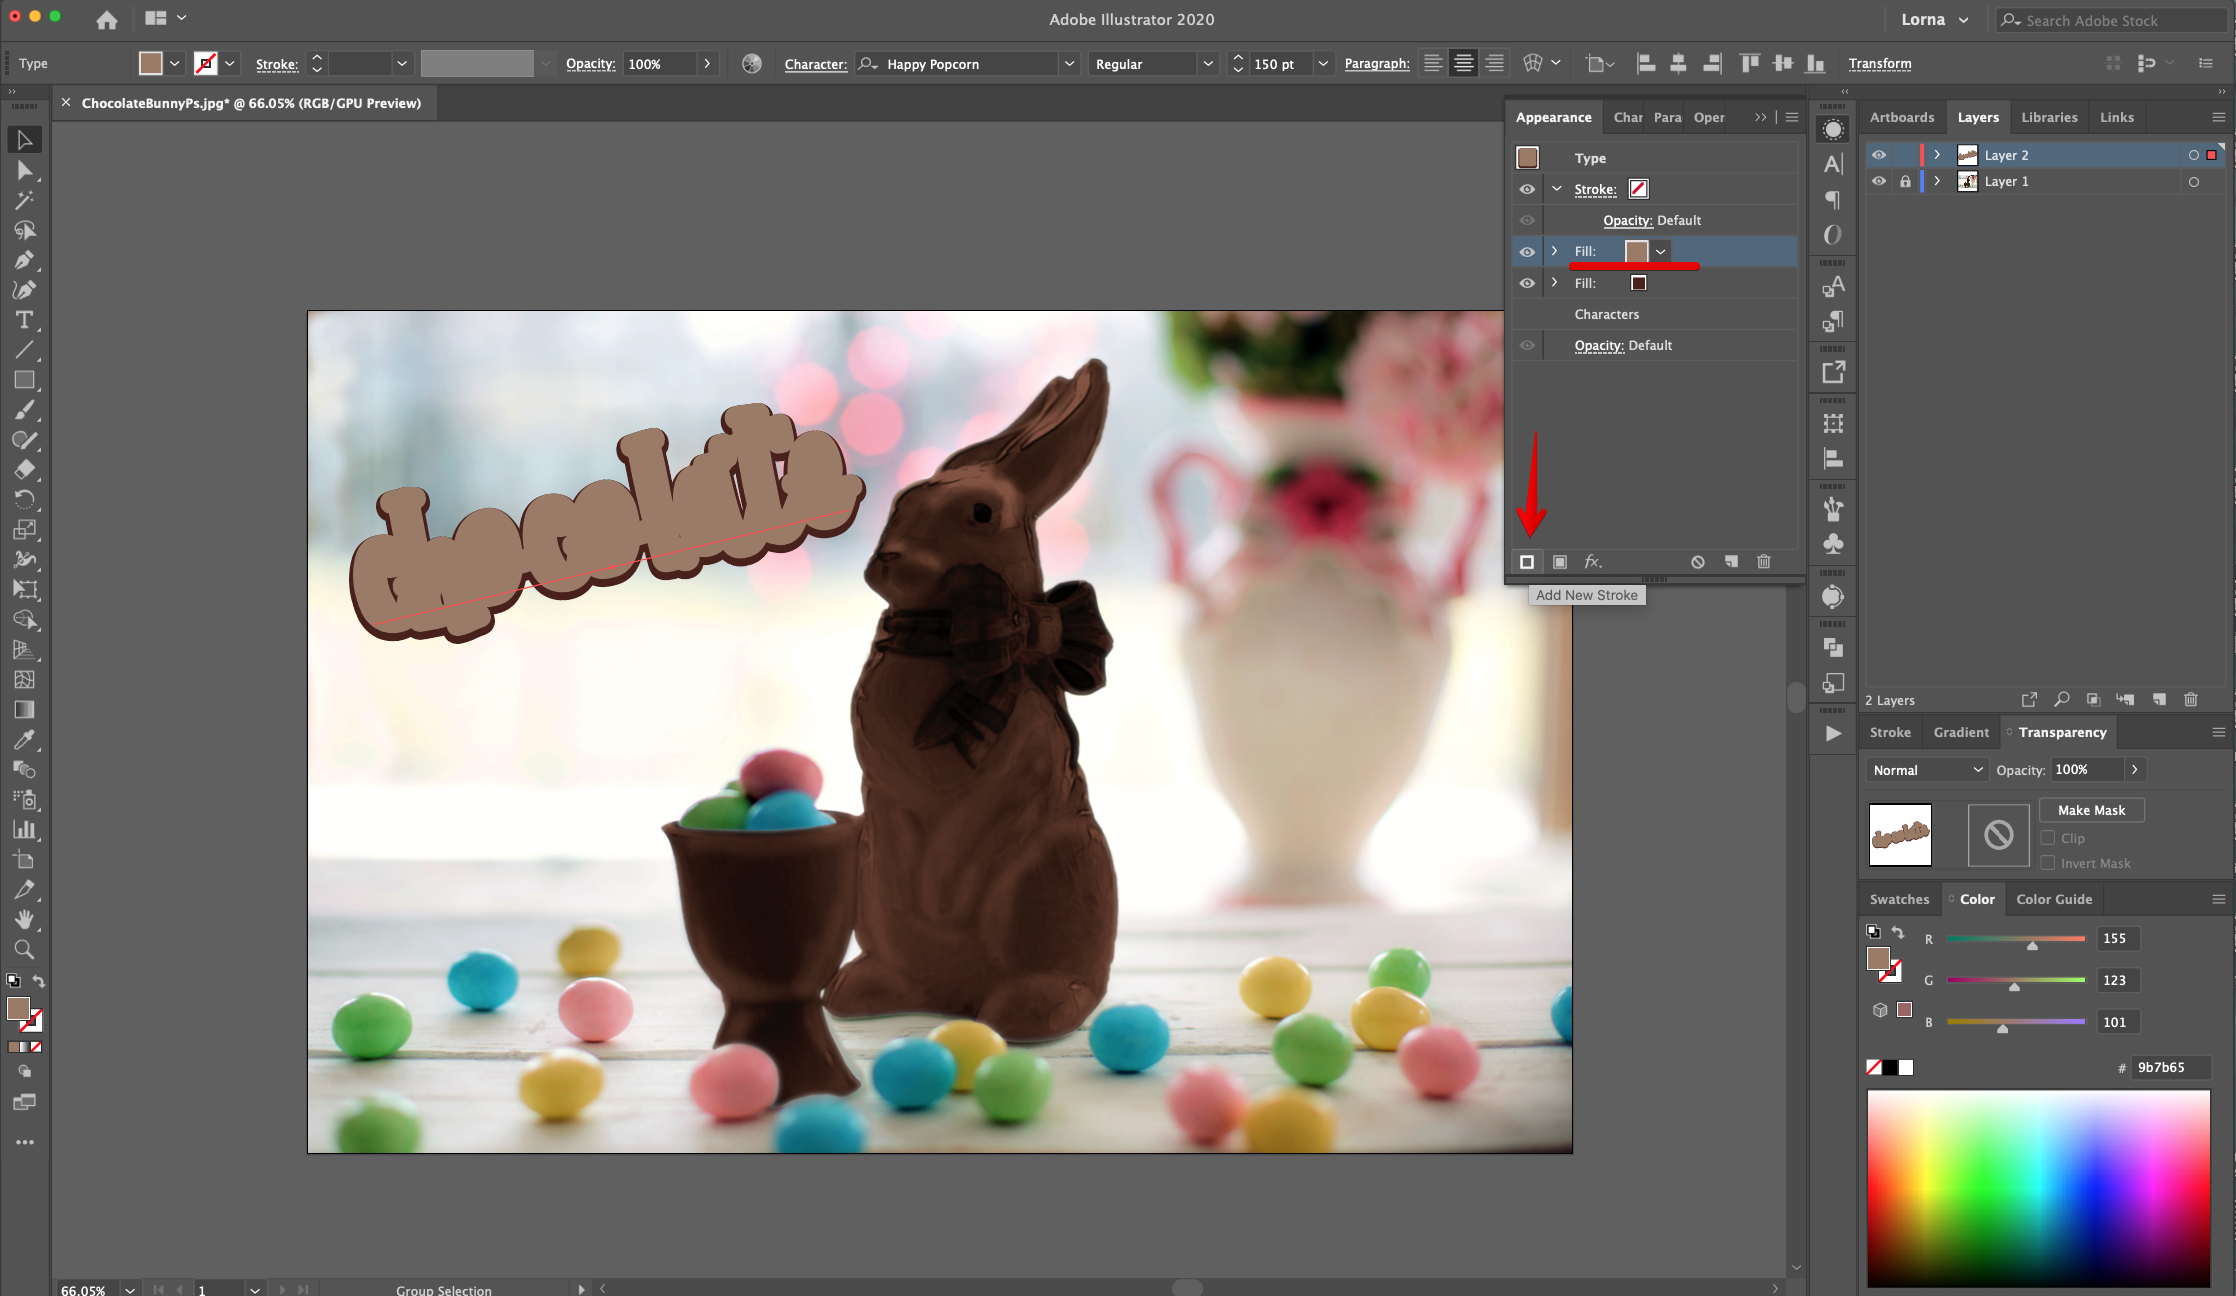
14 - Head to the “Appearance Panel” again and click on the “Add New Stroke” button at the bottom of the panel, use a light Brown shade (#ccb59e) and make it 1 pt.
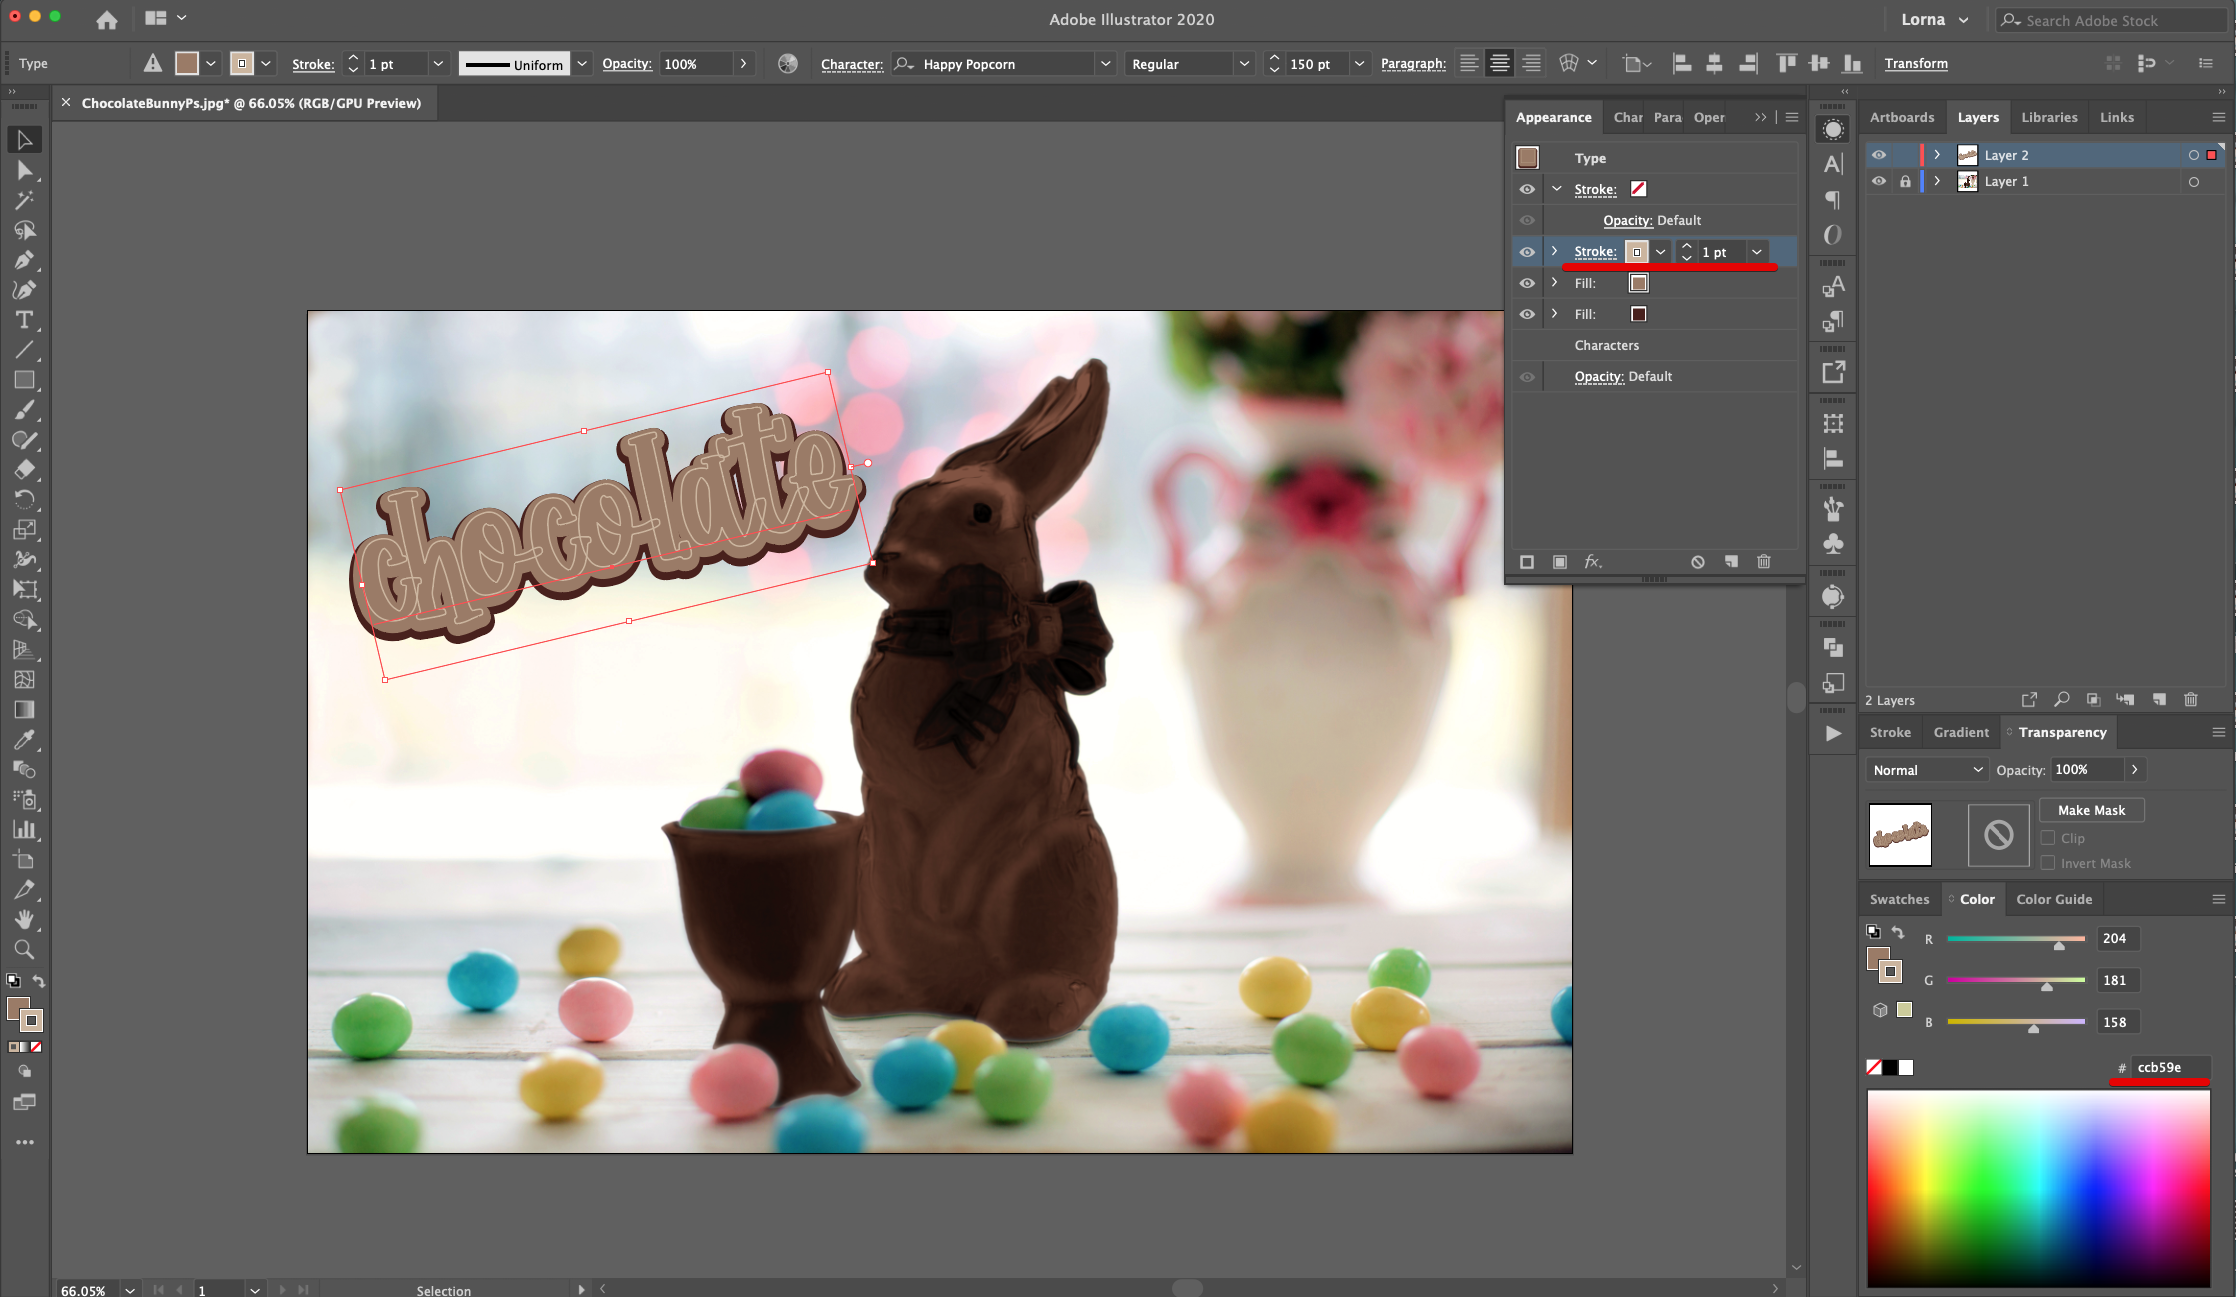
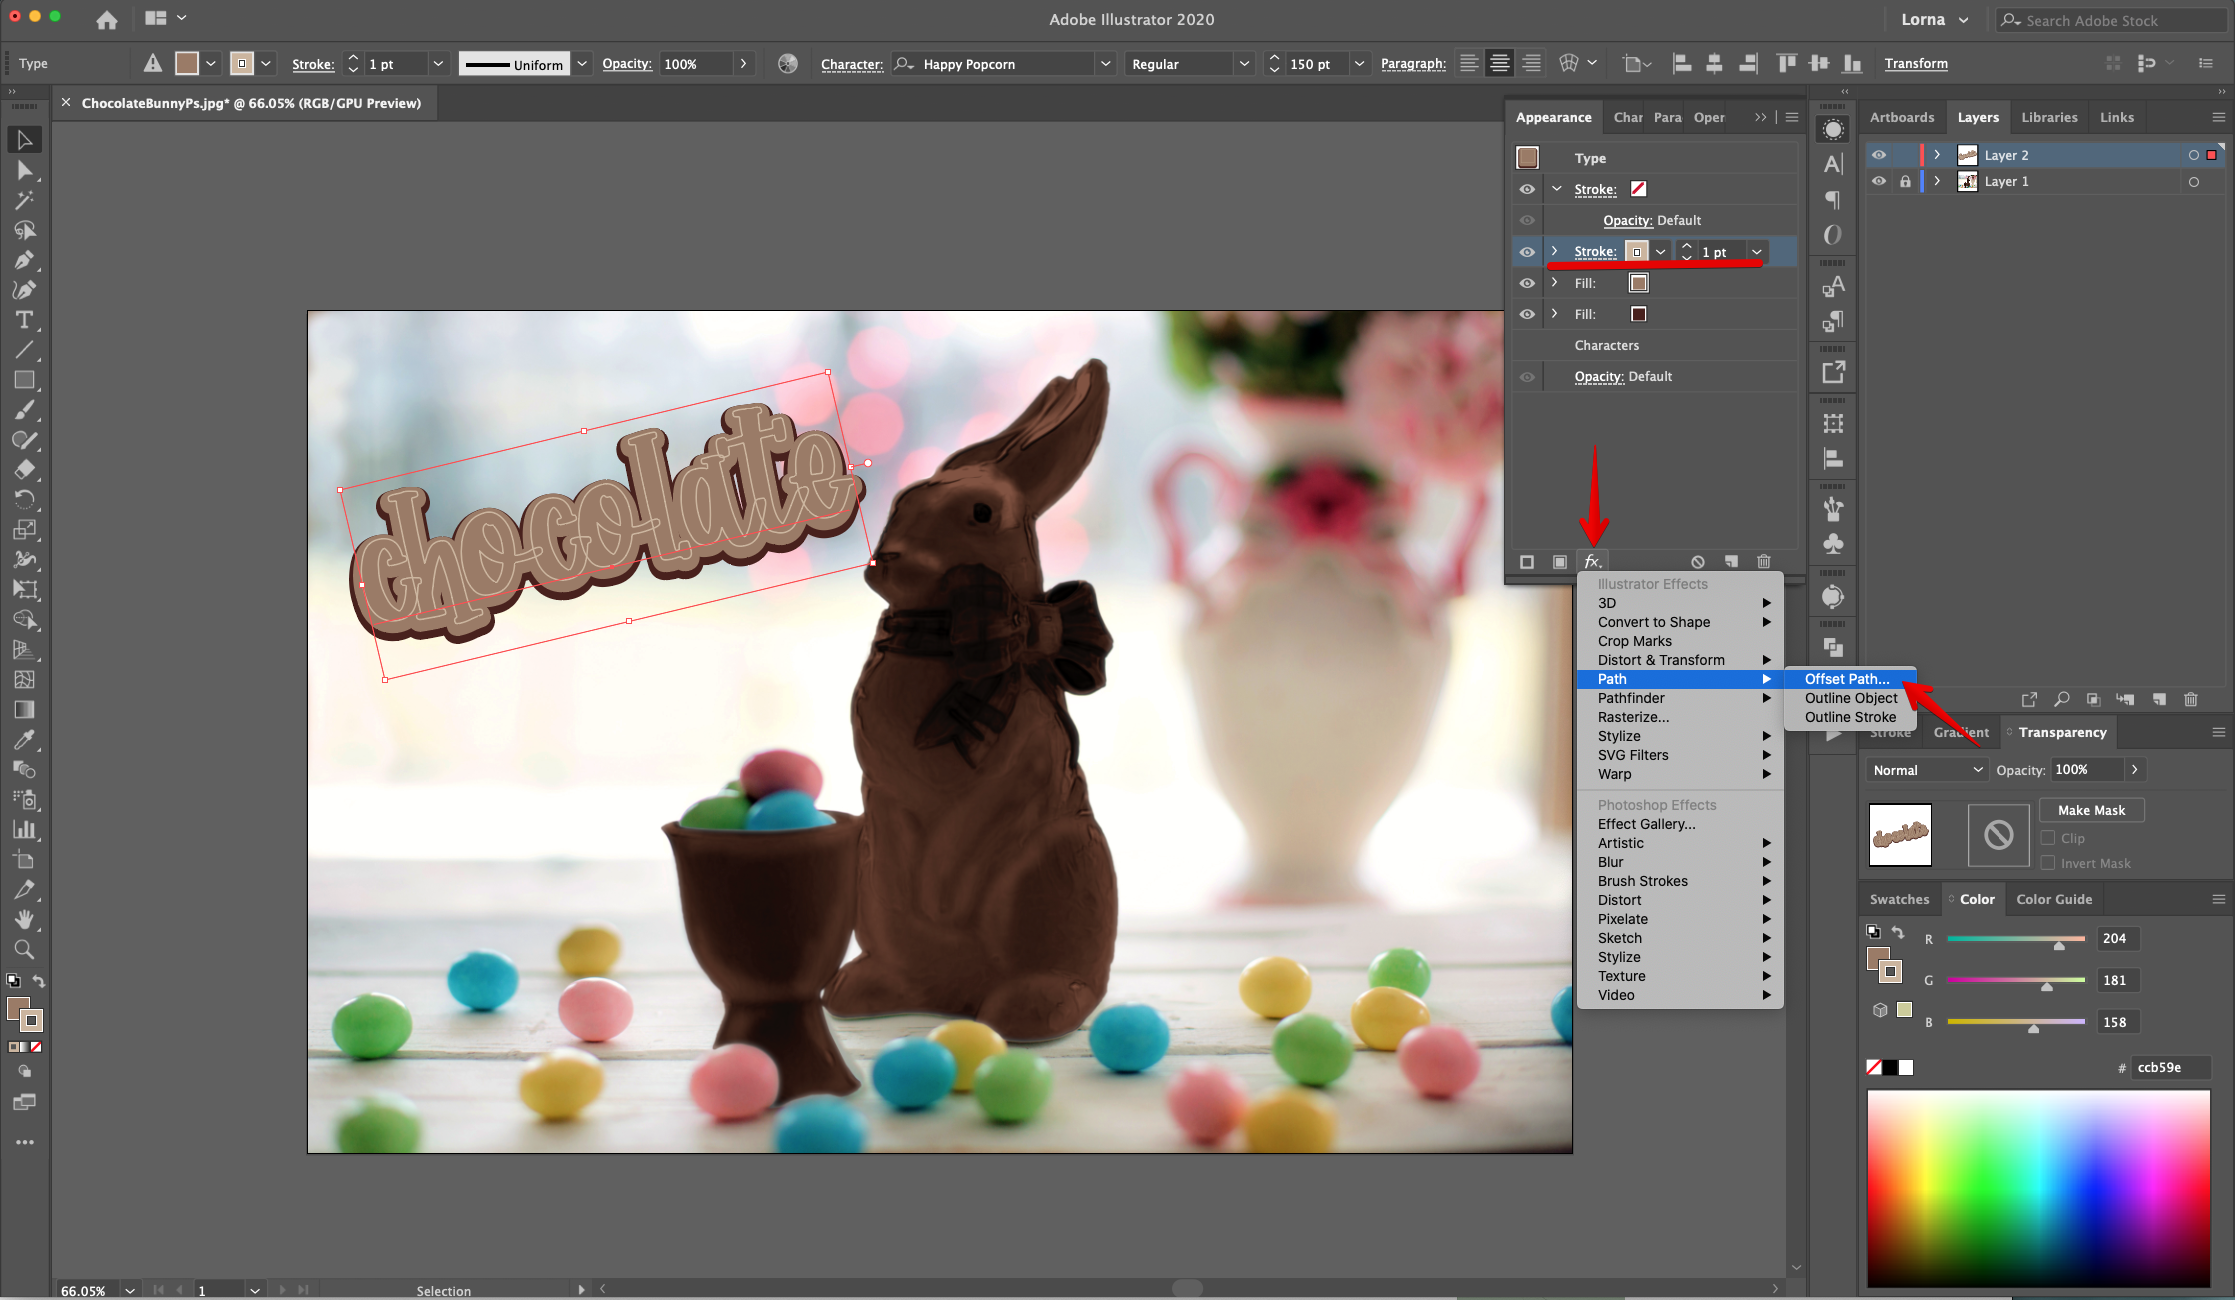
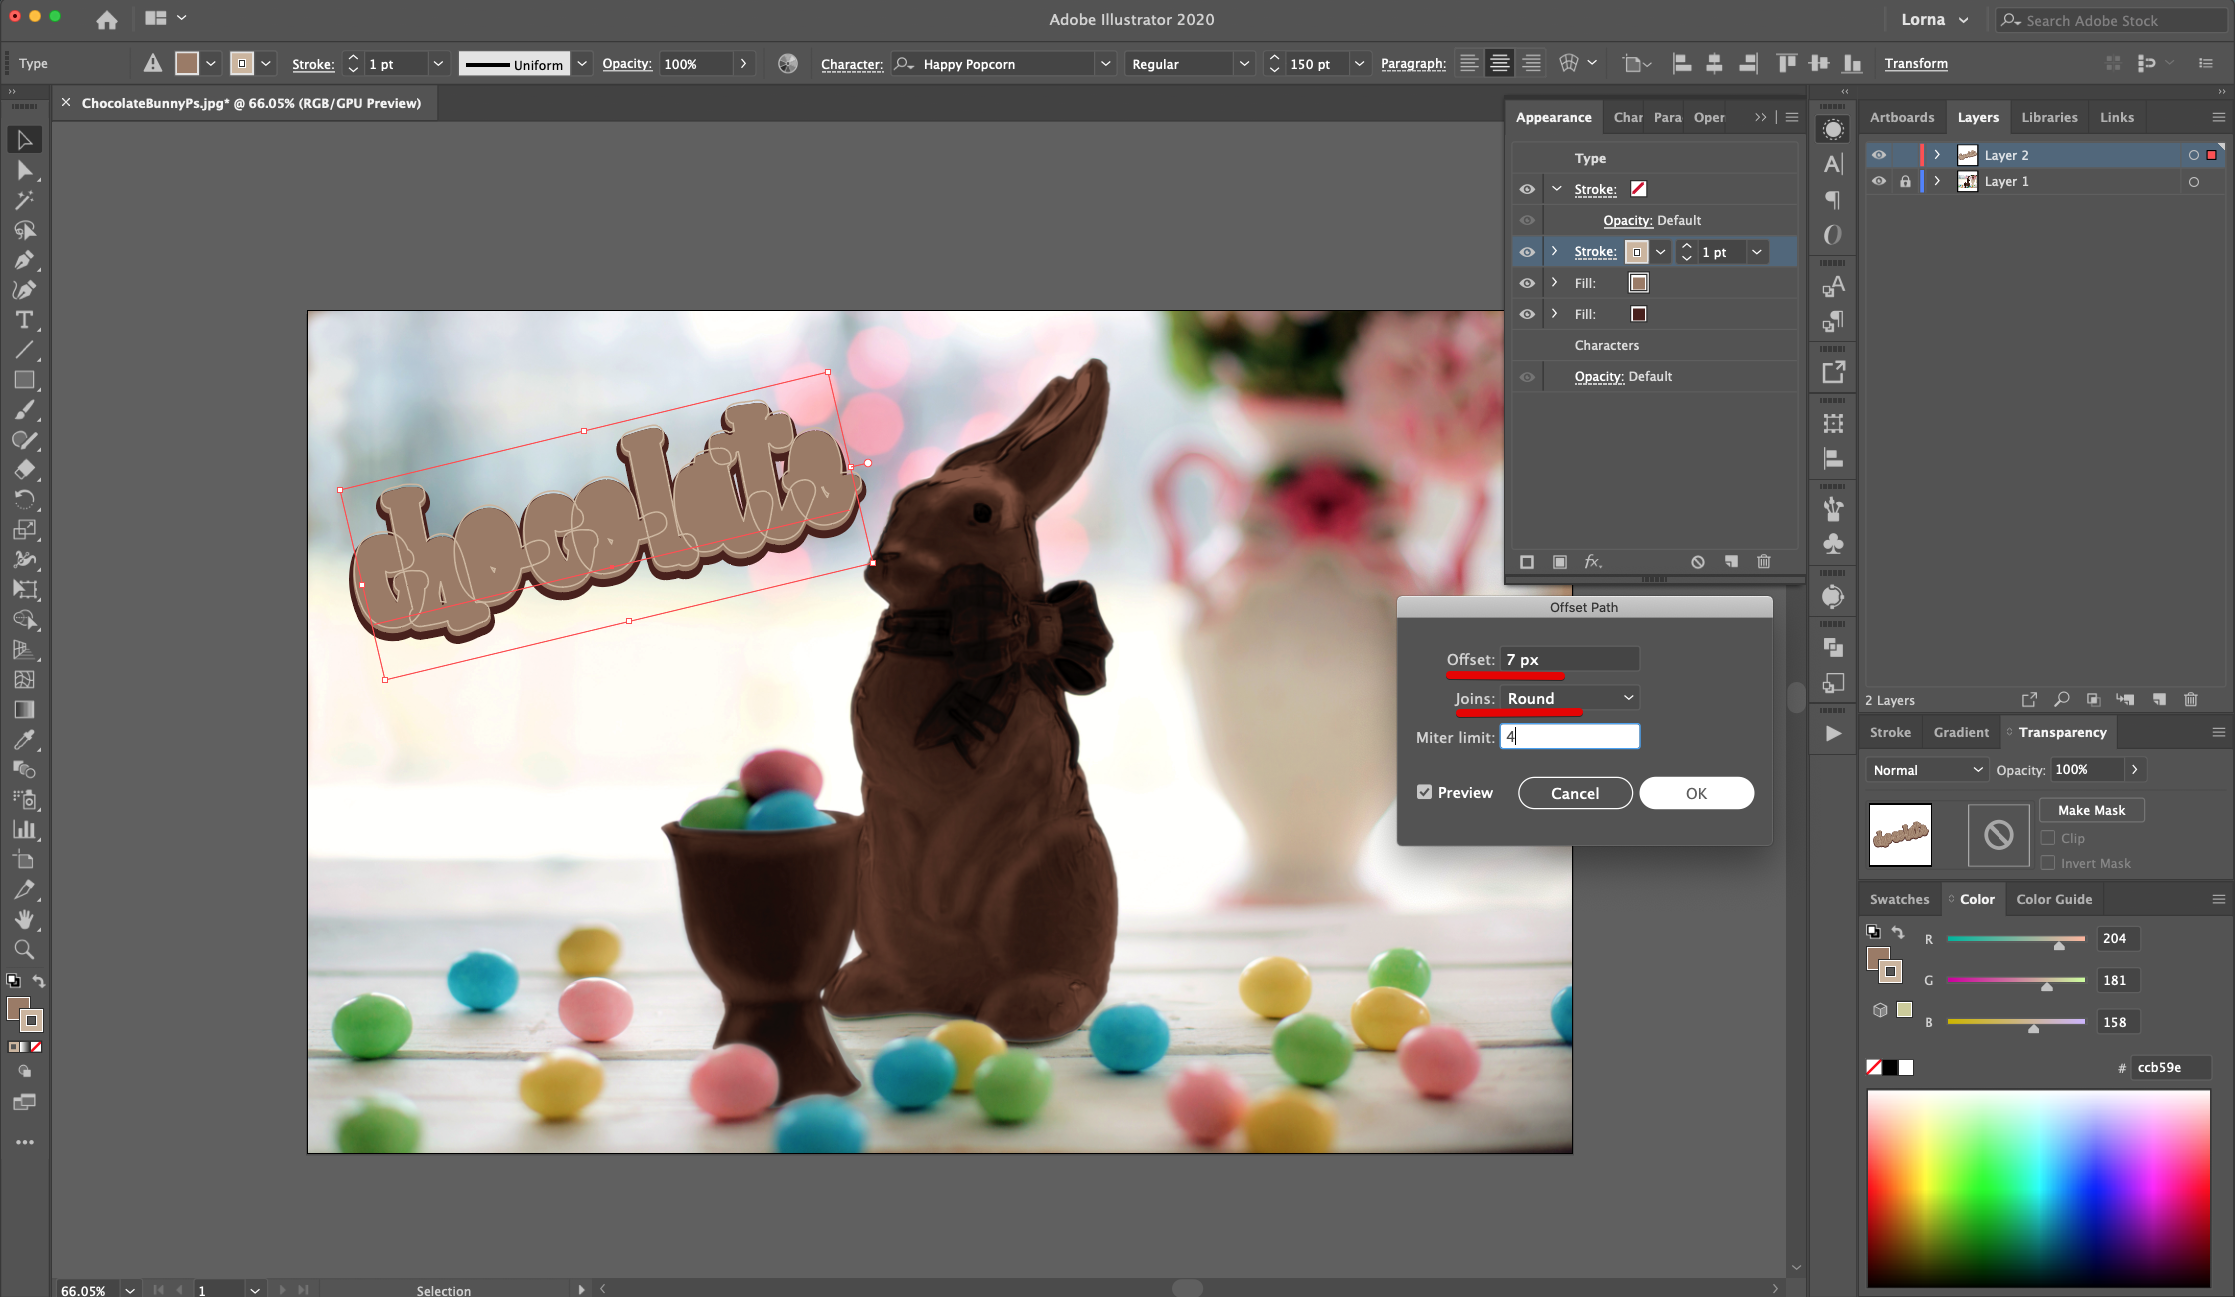
15 - With the “Stroke still selected, in the “Appearance Panel”, click on the “Effects Menu” on the bottom left side, navigate to Path > Offset Path and use an “Offset” of 7 px and “Round Joins”. Click “OK”.
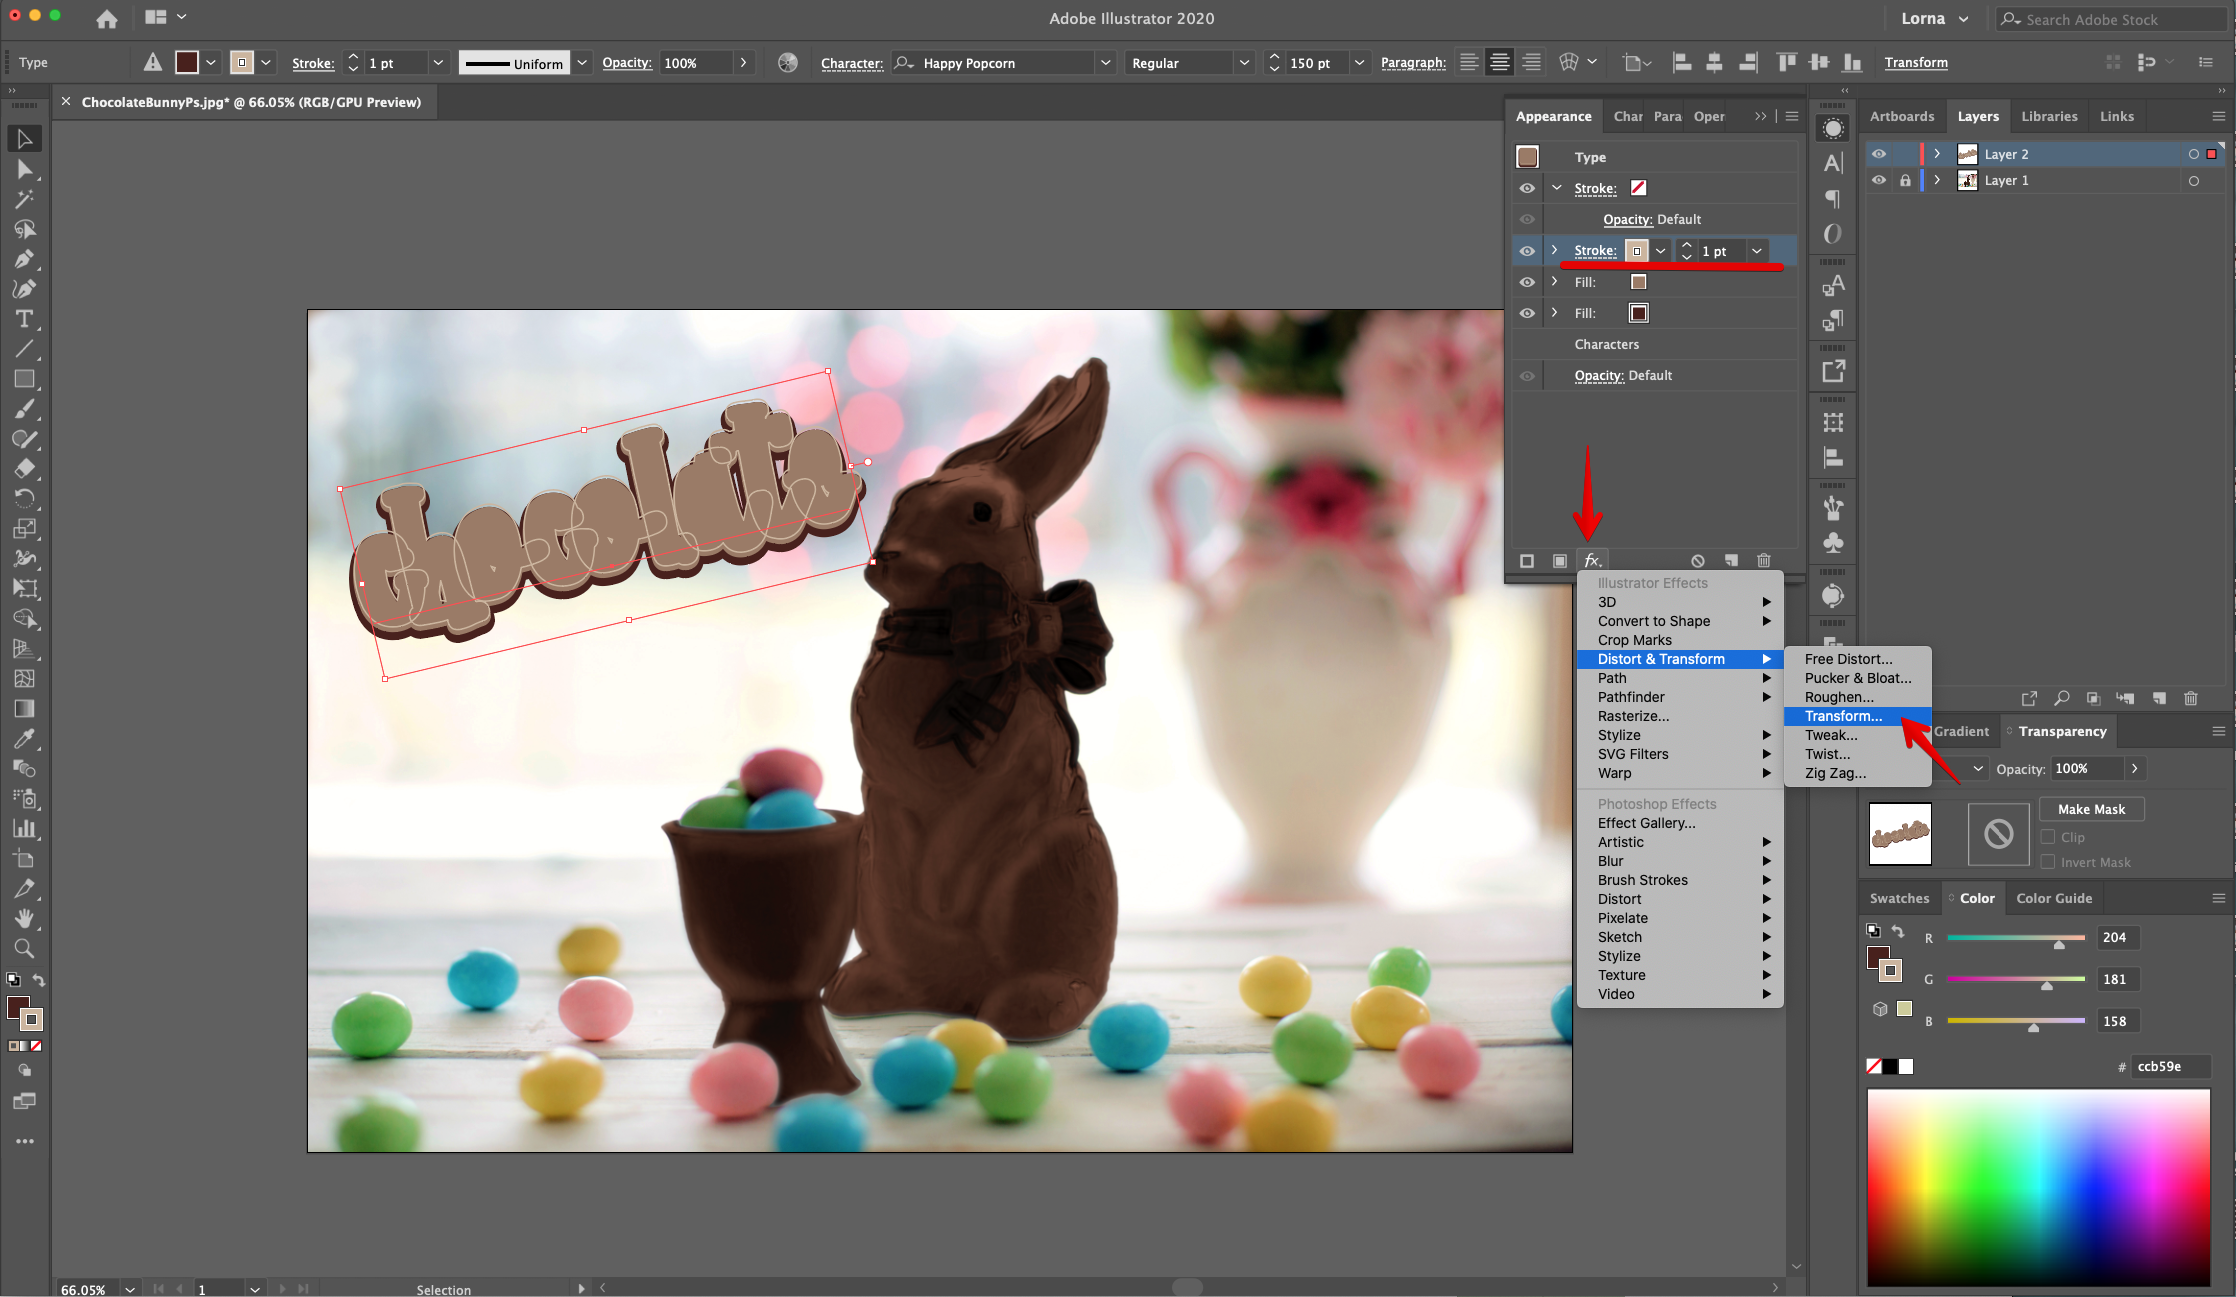
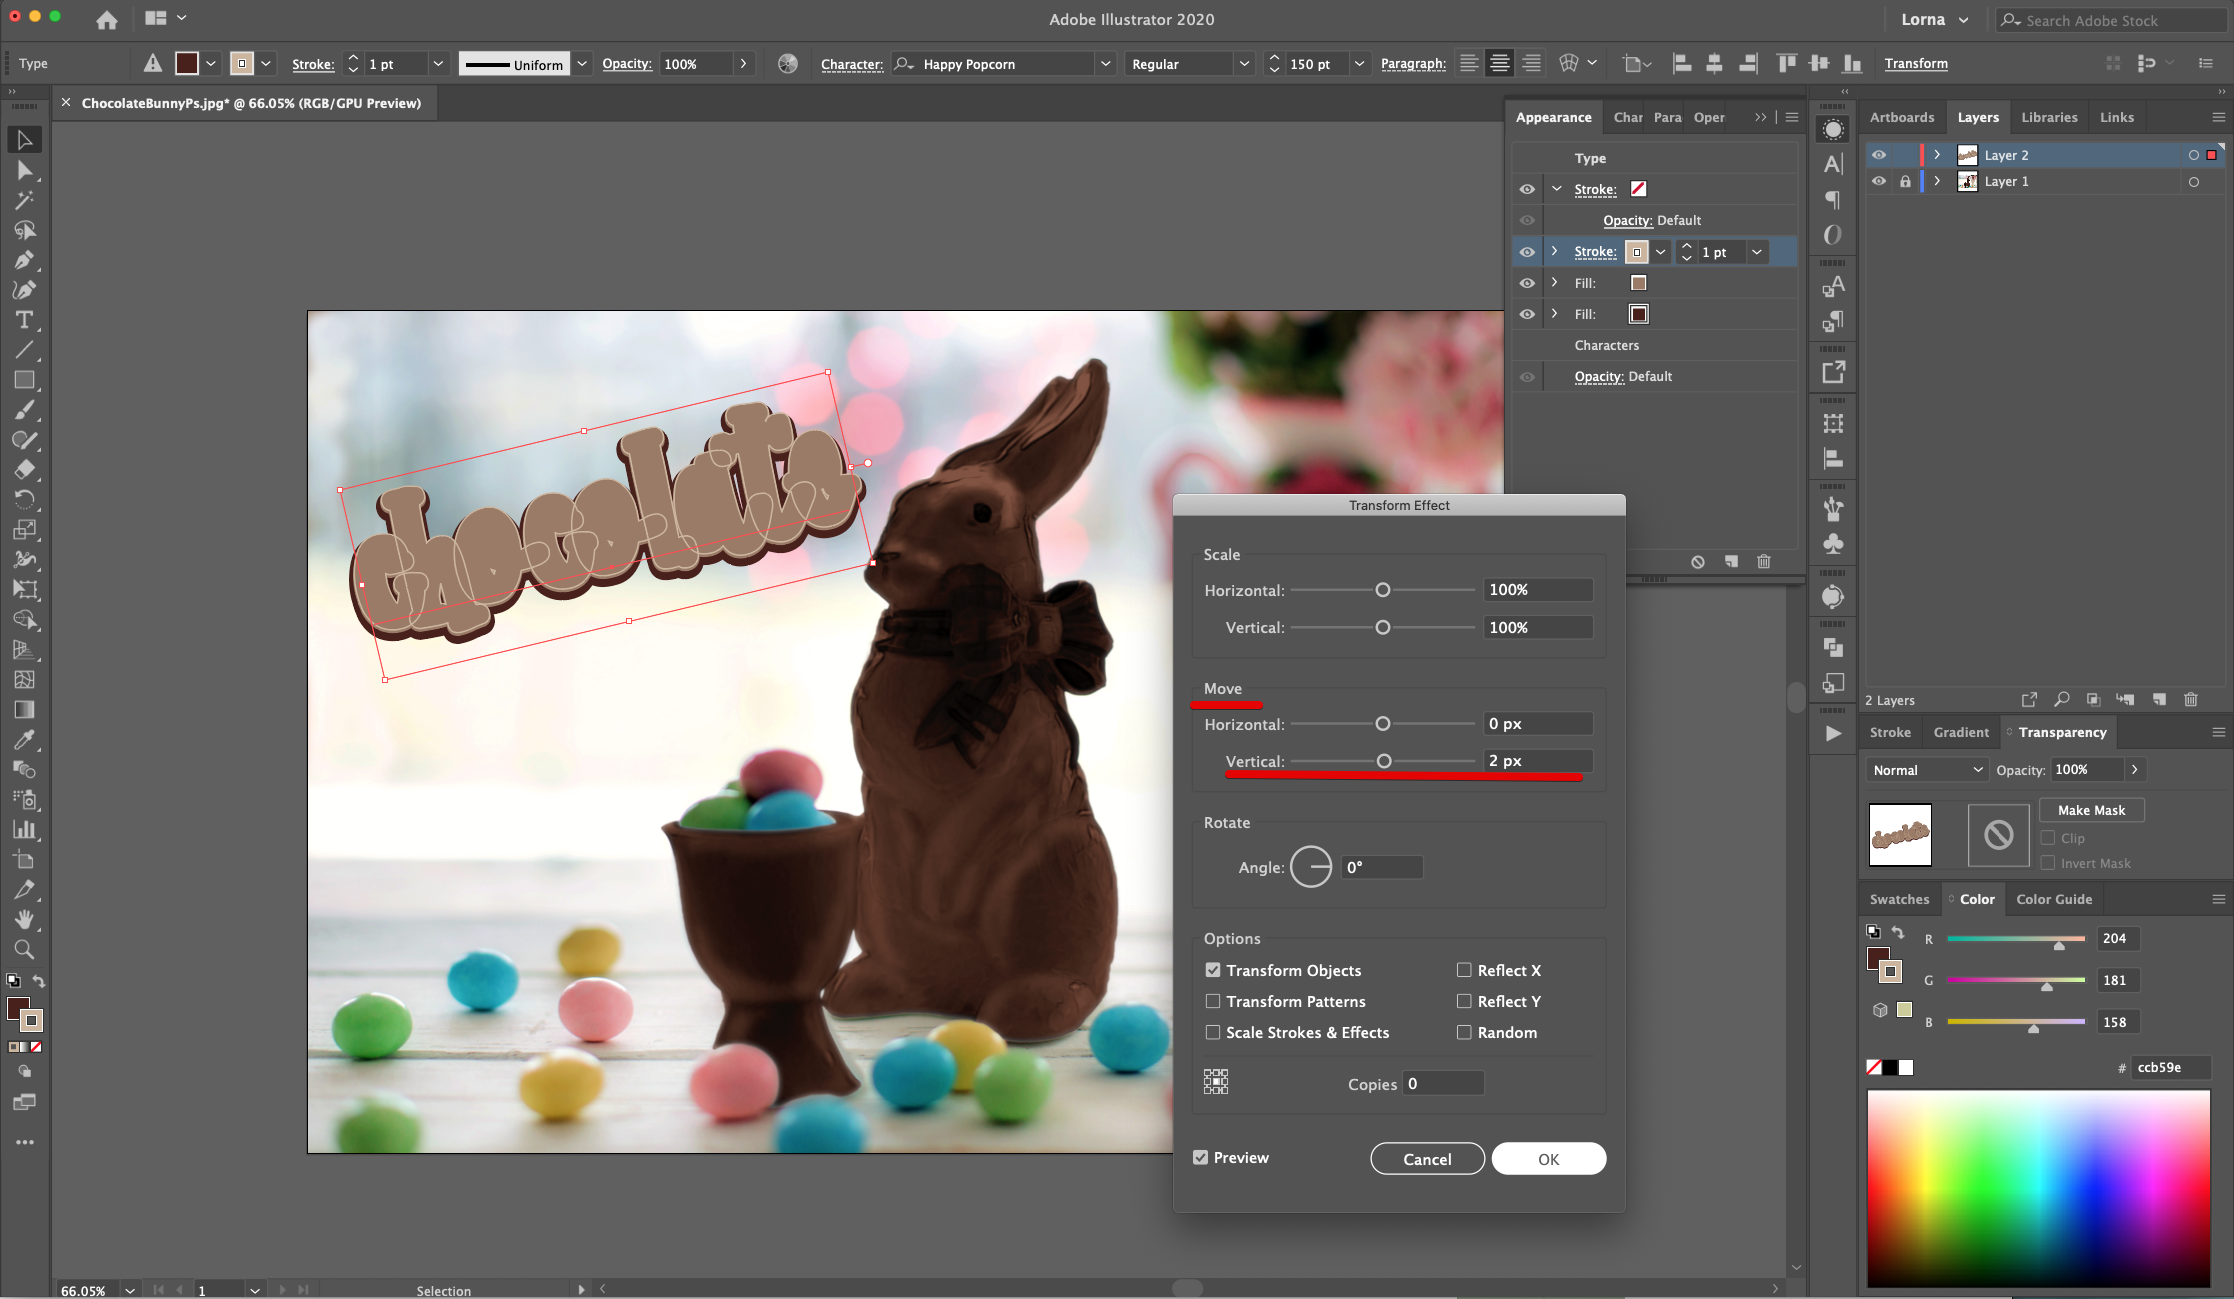
16 - With the “Stroke” still selected, in the “Appearance Panel”, click on the “Effects Menu” but now choose Distort & Transform > Transform and use a “Vertical Move” of 2 px. Click “OK”.
17 - Head to the “Appearance Panel” again, click on the “Add New Fill” button at the bottom of the panel and use a deep Brown shade (#49211c). The “New Fill” should be on top of everything.
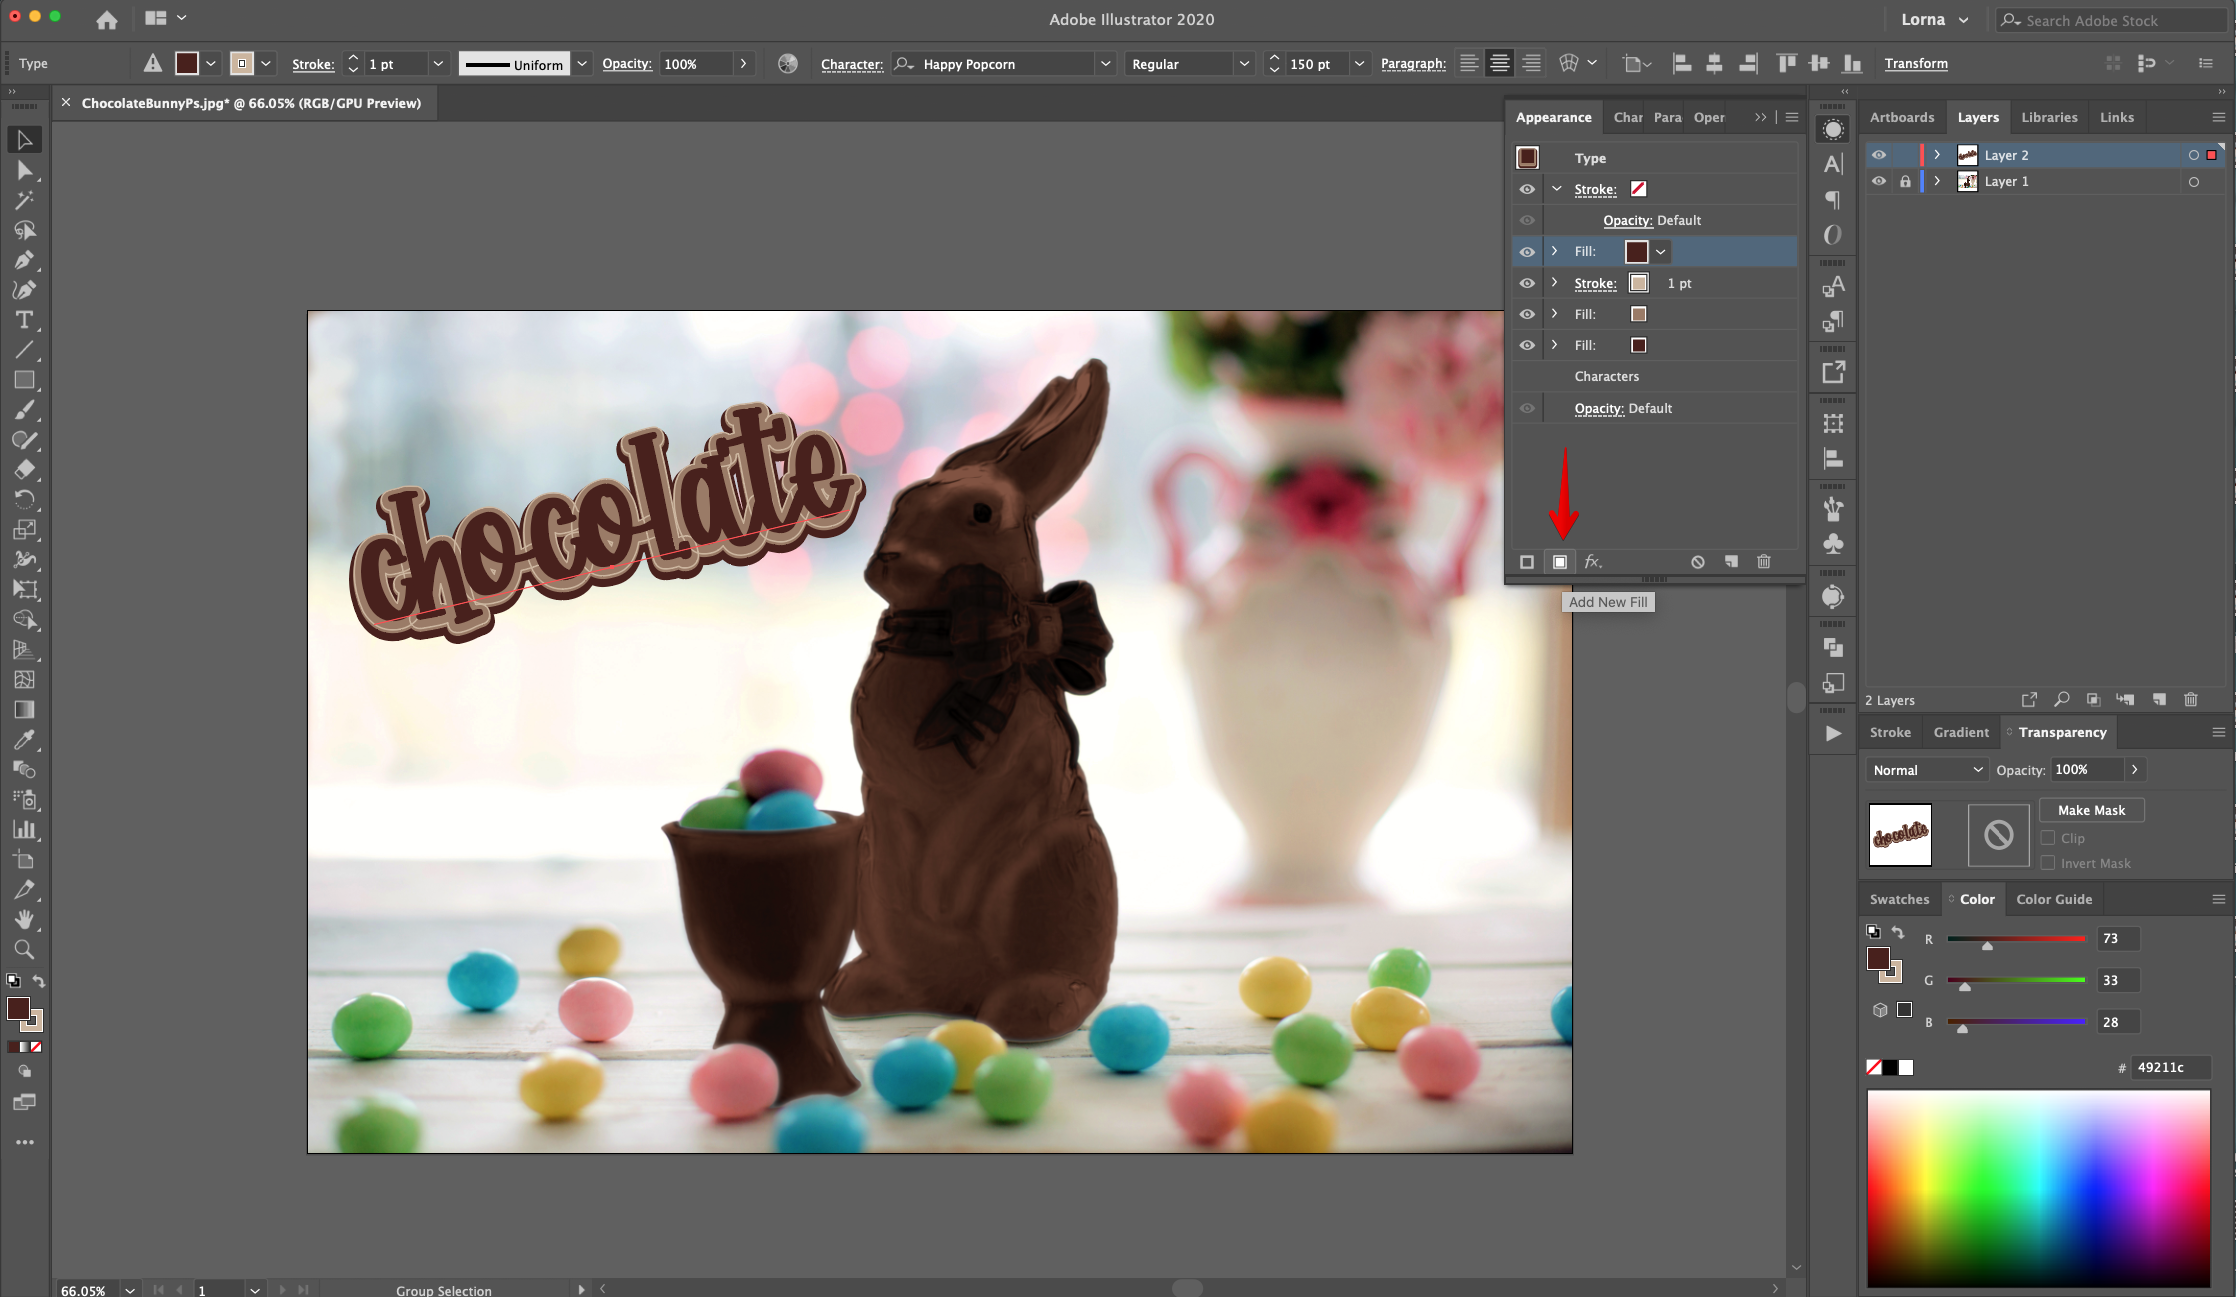
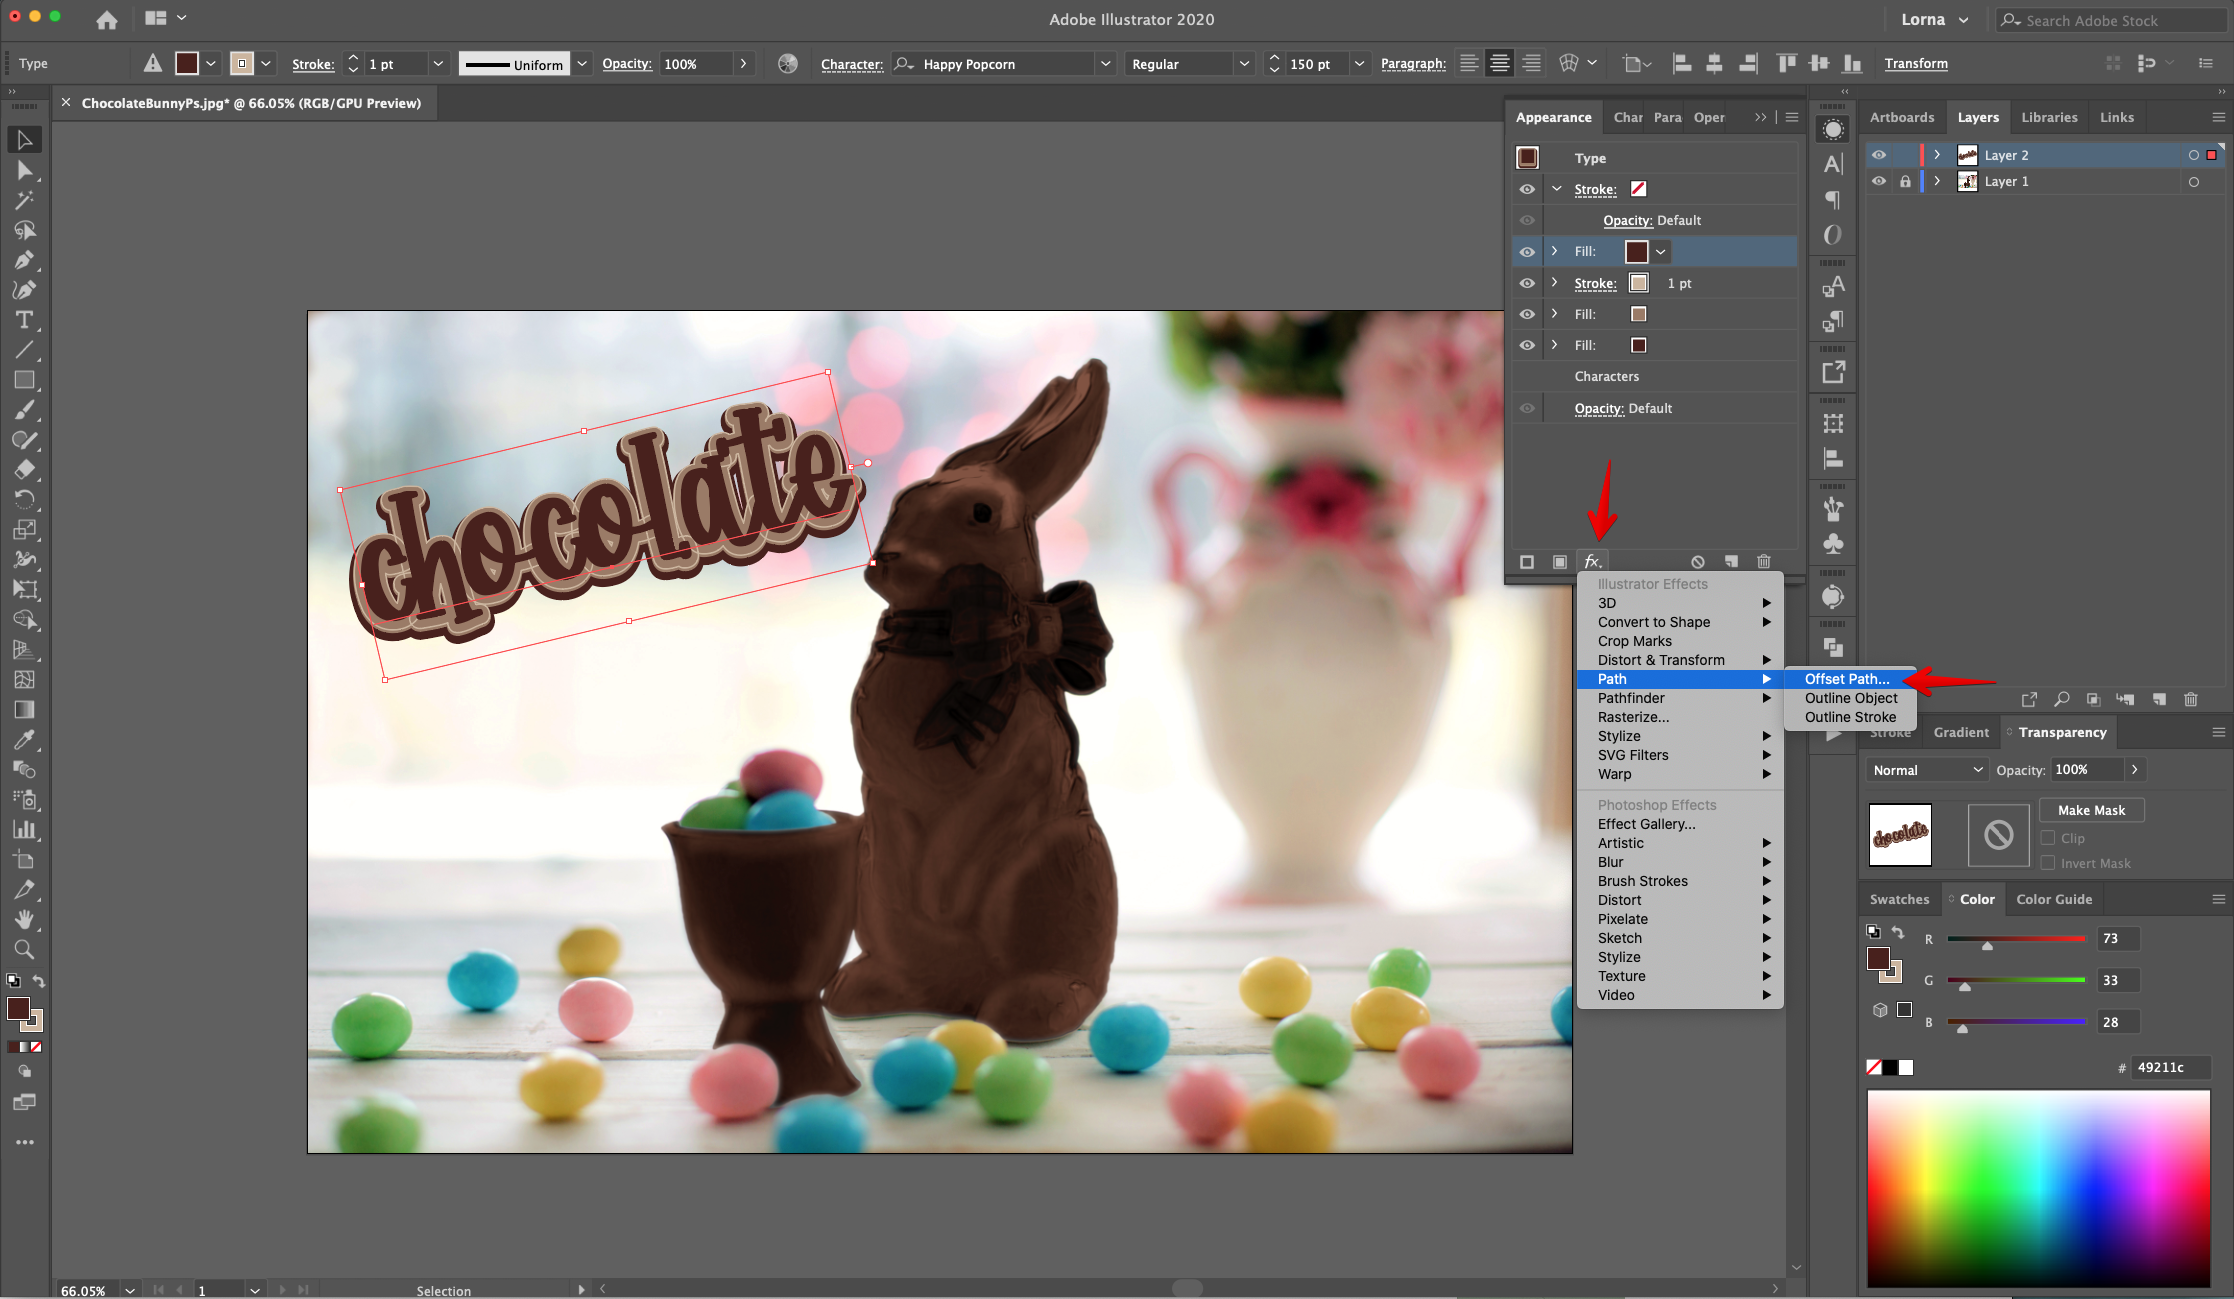
18 - With the “Fill” still selected, in the “Appearance Panel”, click on the “Effects Menu” on the bottom left side, navigate to Path > Offset Path and use an “Offset” of 5 px and “Round Joins”. Click “OK”.
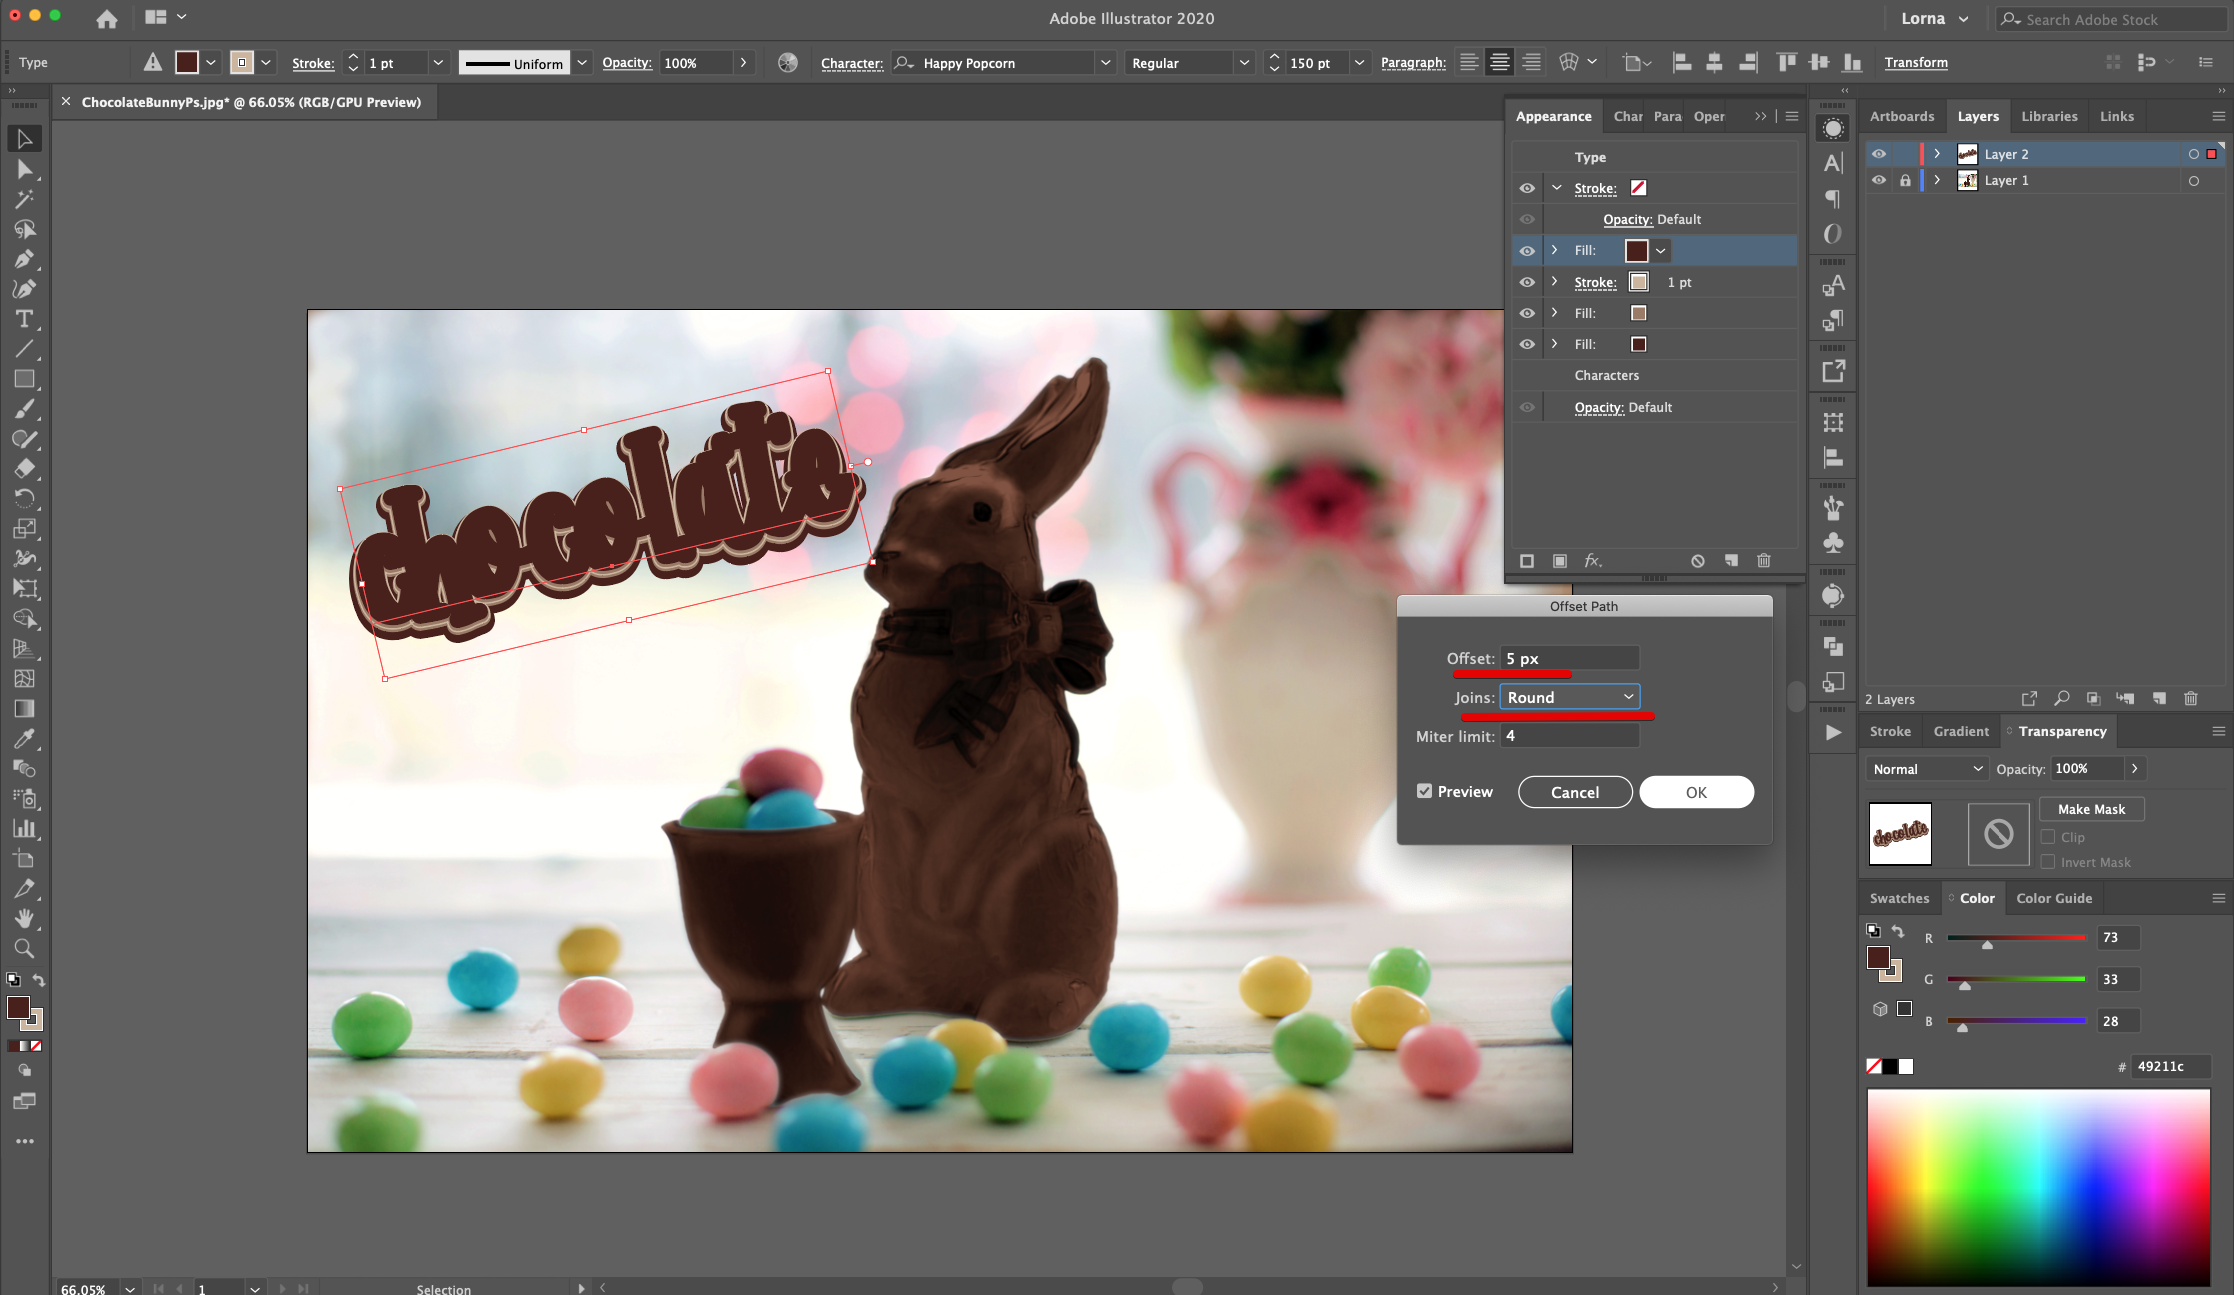
19 - With the “Fill” still selected, in the “Appearance Panel”, click on the “Effects Menu” but now choose Distort & Transform > Transform and use a “Vertical Move” of 3 px. Click “OK”.
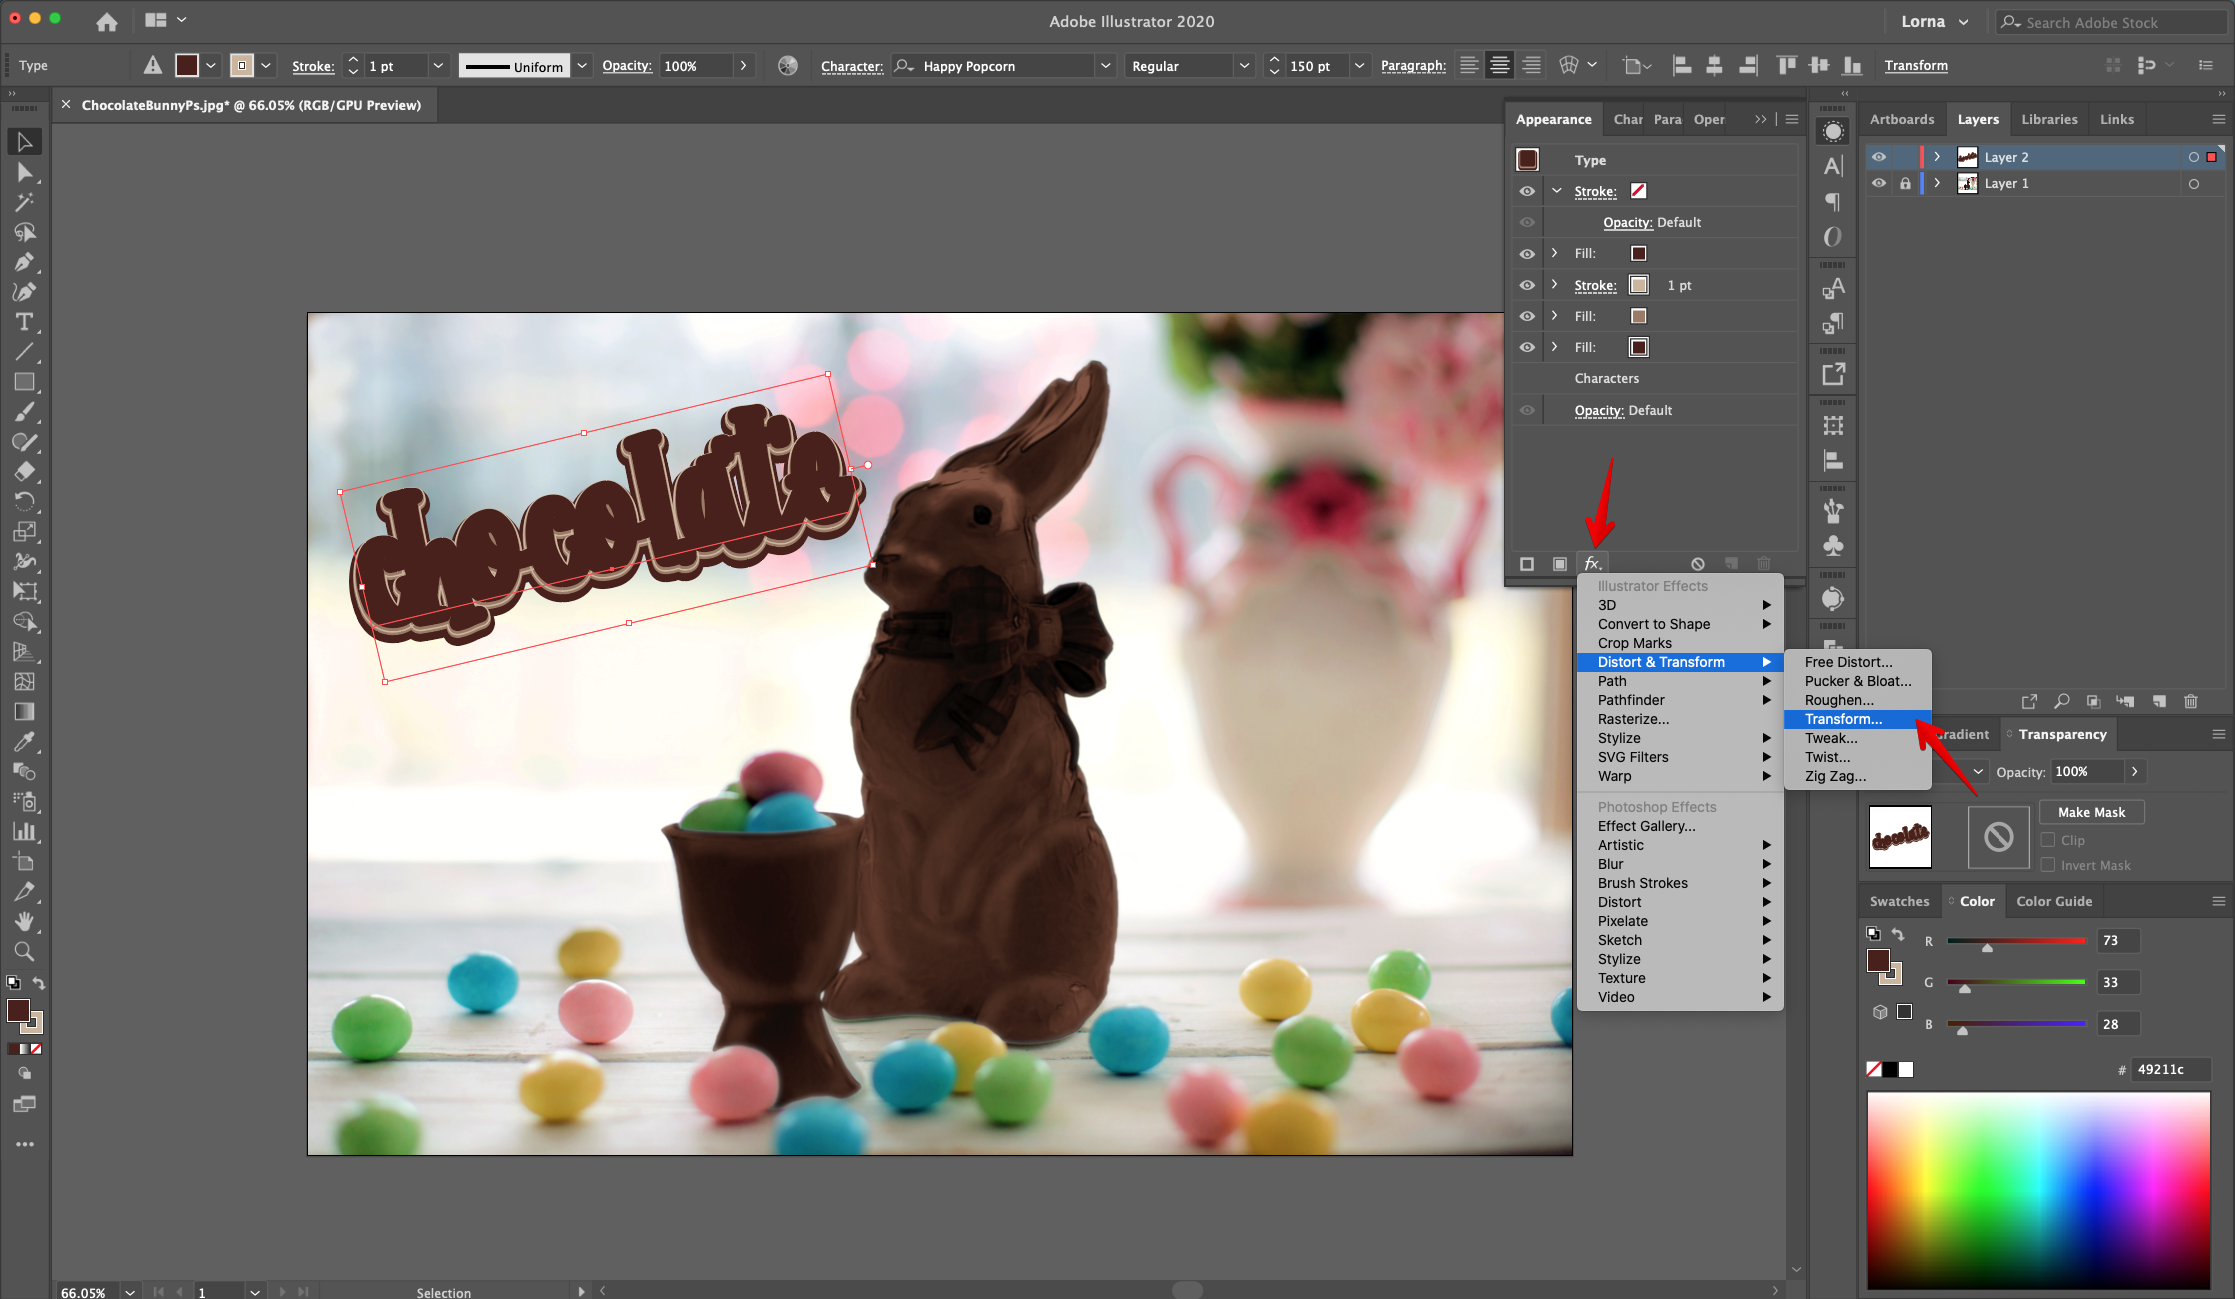
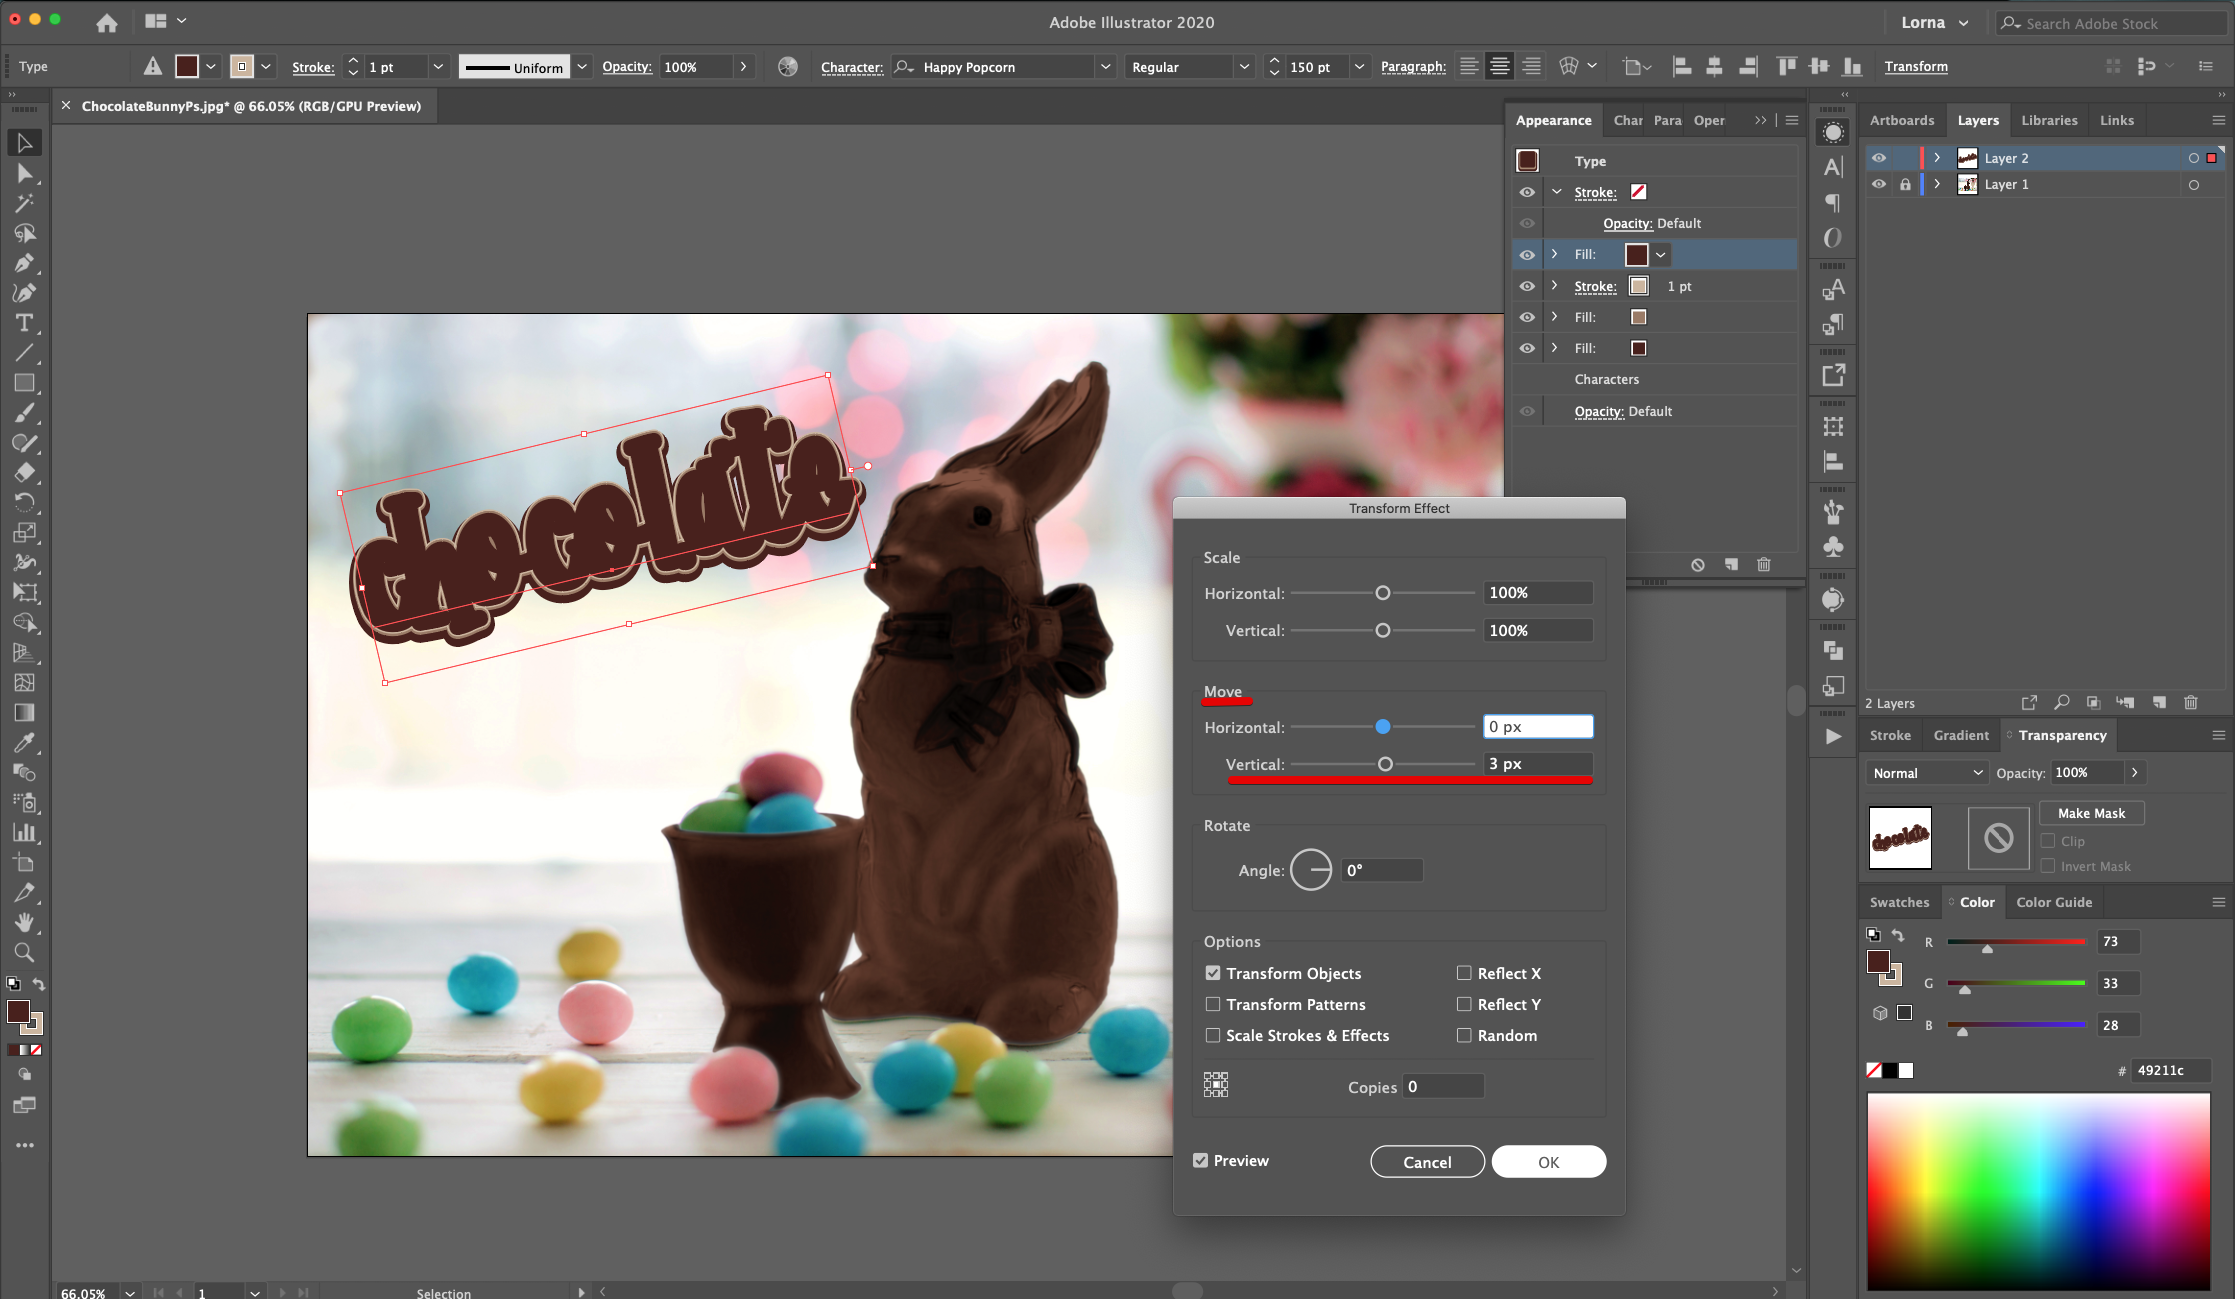
20 - Head to the “Appearance Panel” again, click on the “Add New Fill” button at the bottom of the panel and use a medium Brown shade (#603a20). The “New Fill” should be on top of everything. With the “Fill” still selected, in the “Appearance Panel”, click on the “Effects Menu” on the bottom left side, navigate to Path > Offset Path and use an “Offset” of 3 px and “Round Joins”. Click “OK”. With the “Fill” still selected, in the “Appearance Panel”, click on the “Effects Menu” but now choose Distort & Transform > Transform and use a “Vertical Move” of 1.5 px. Click “OK”.
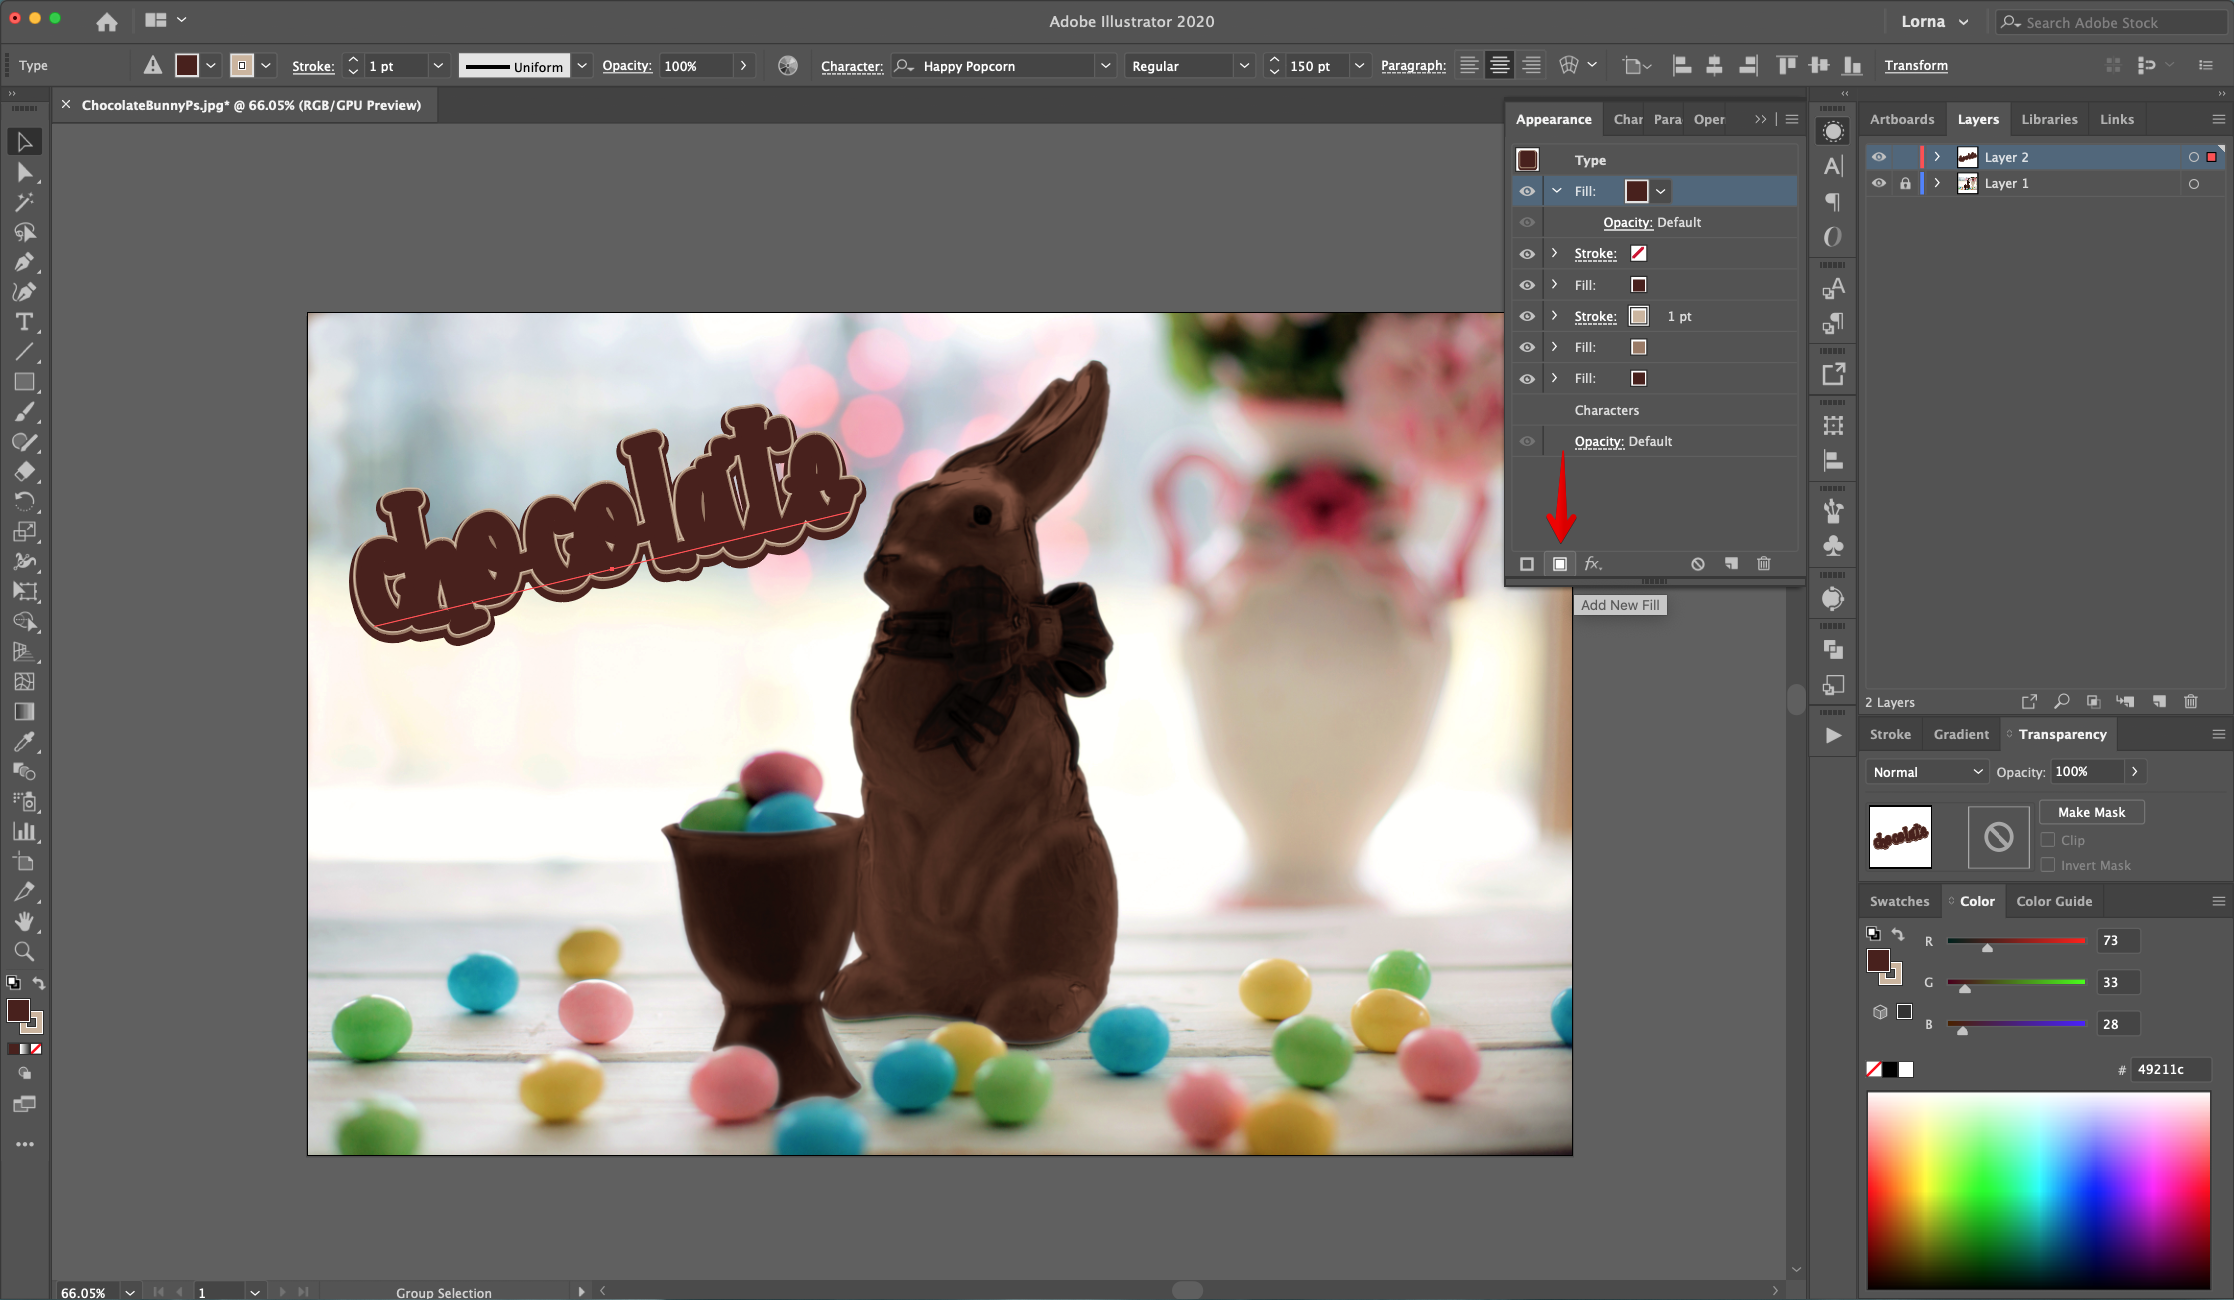
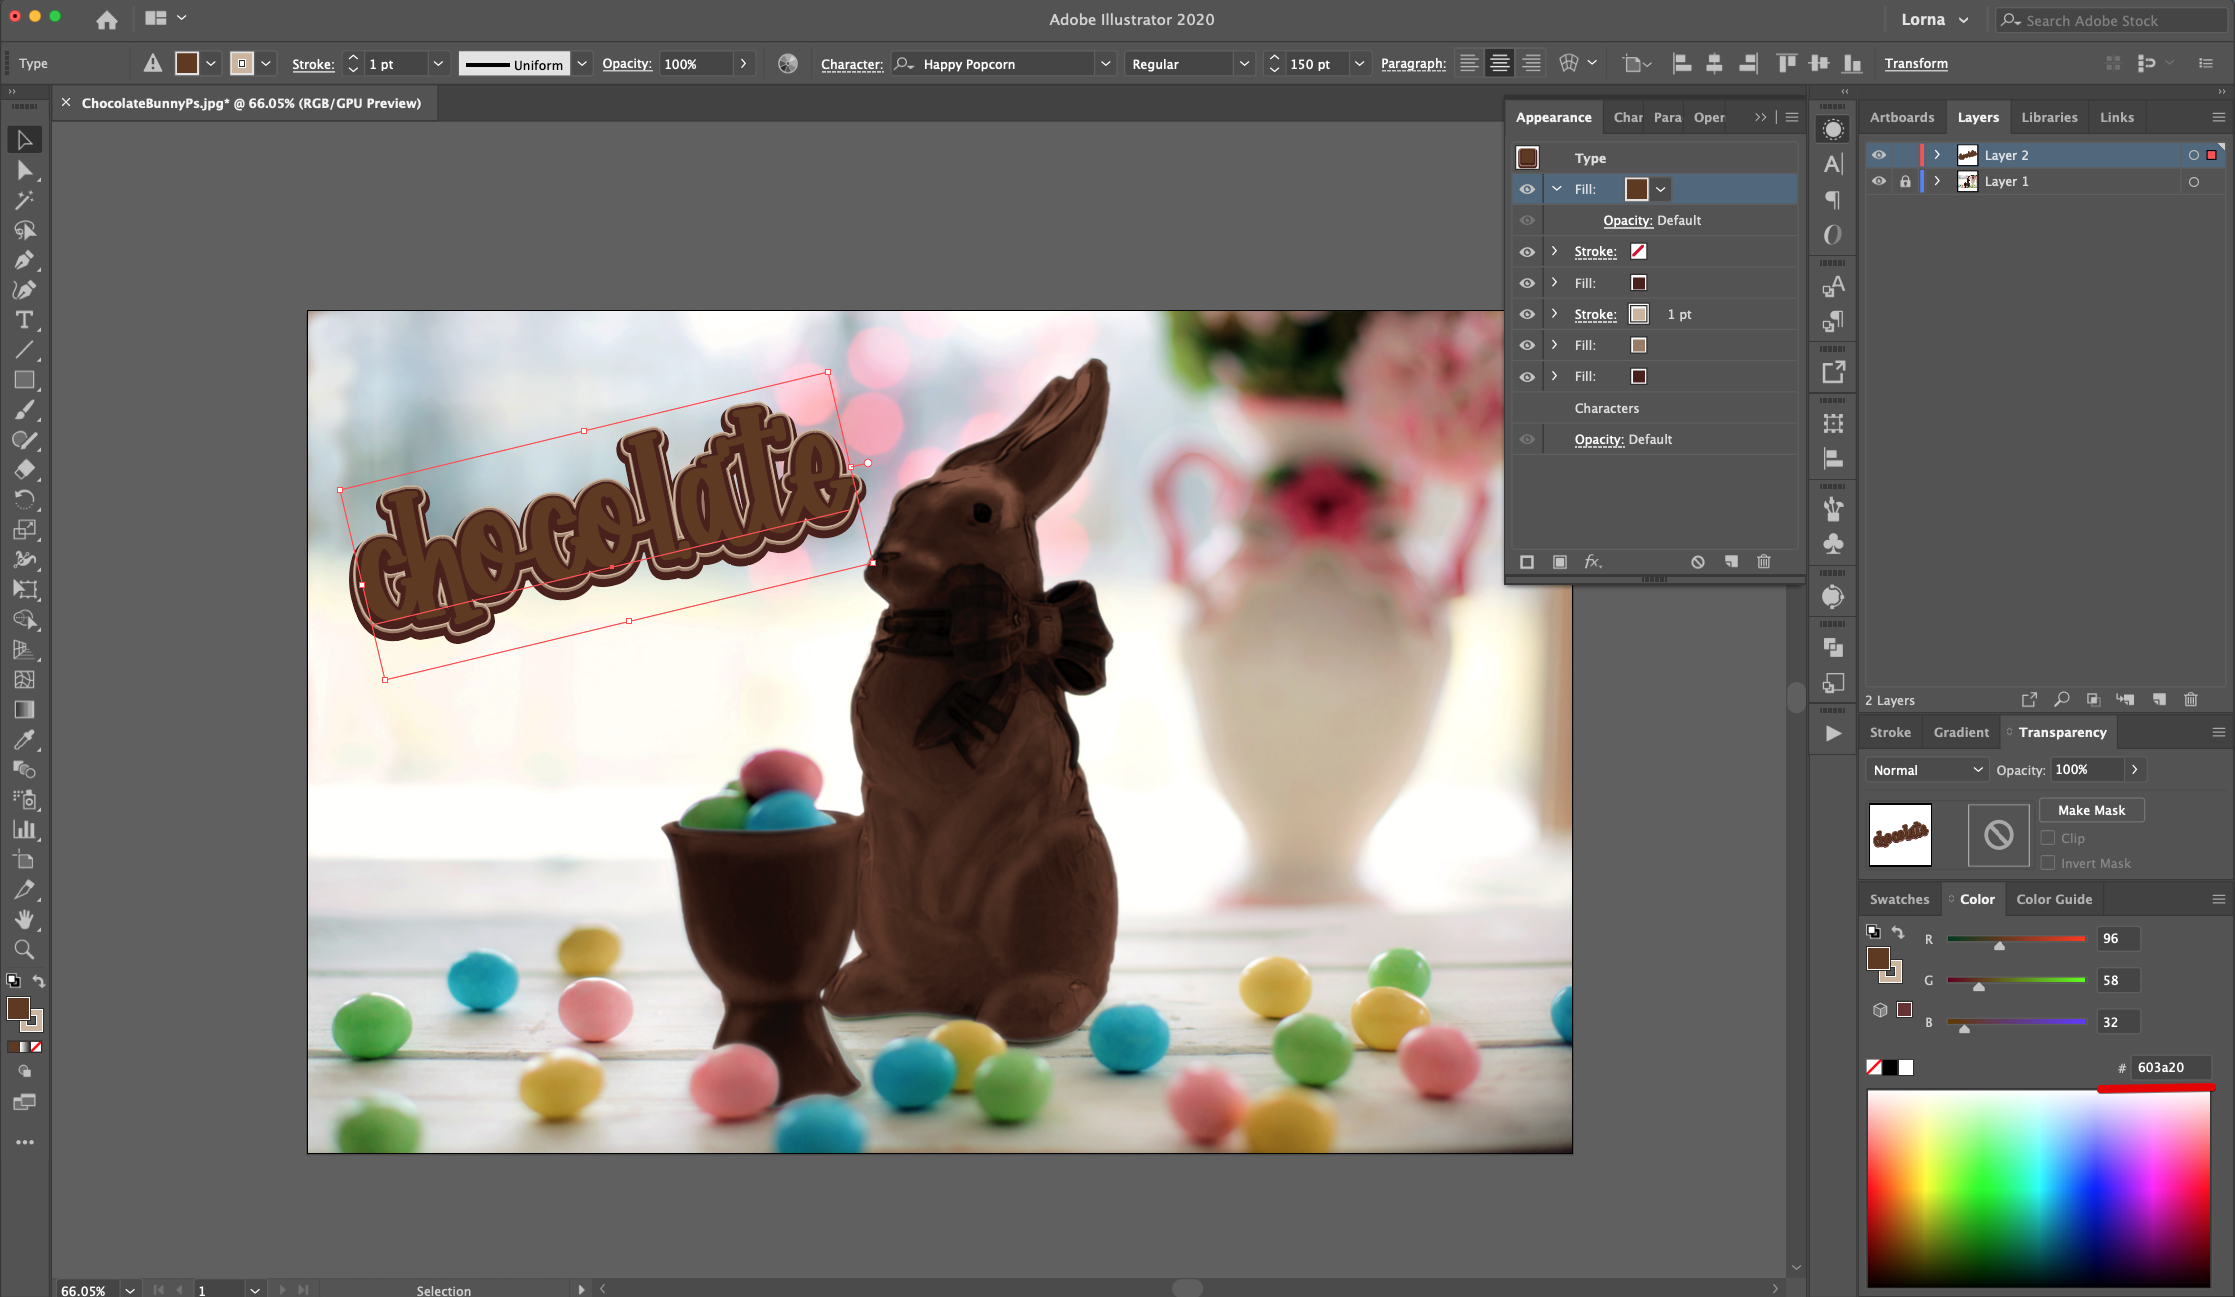
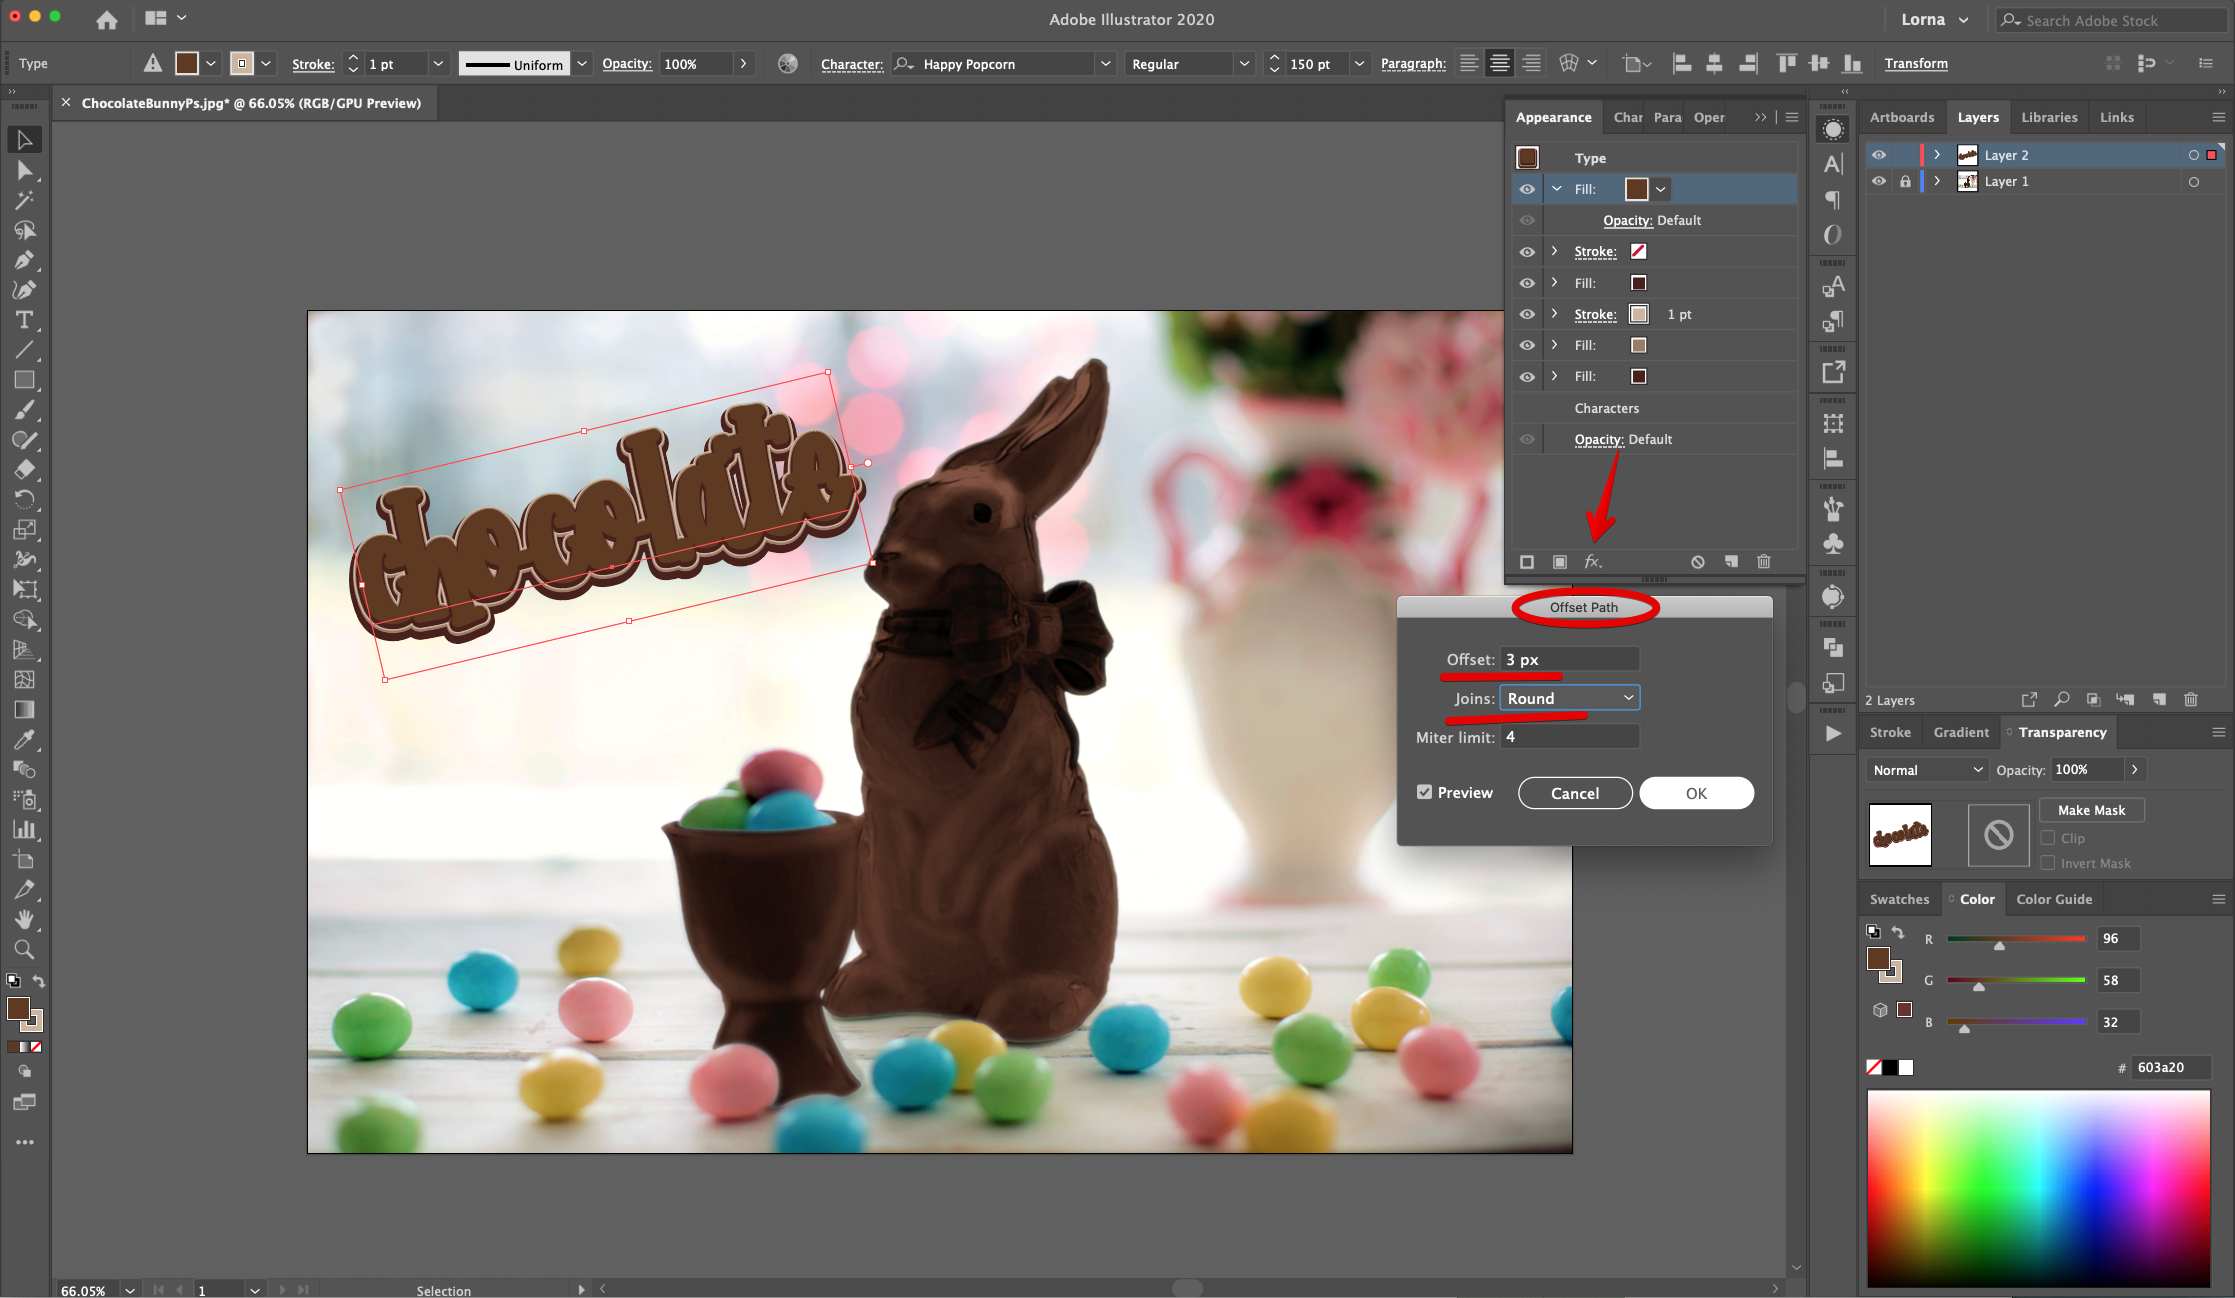
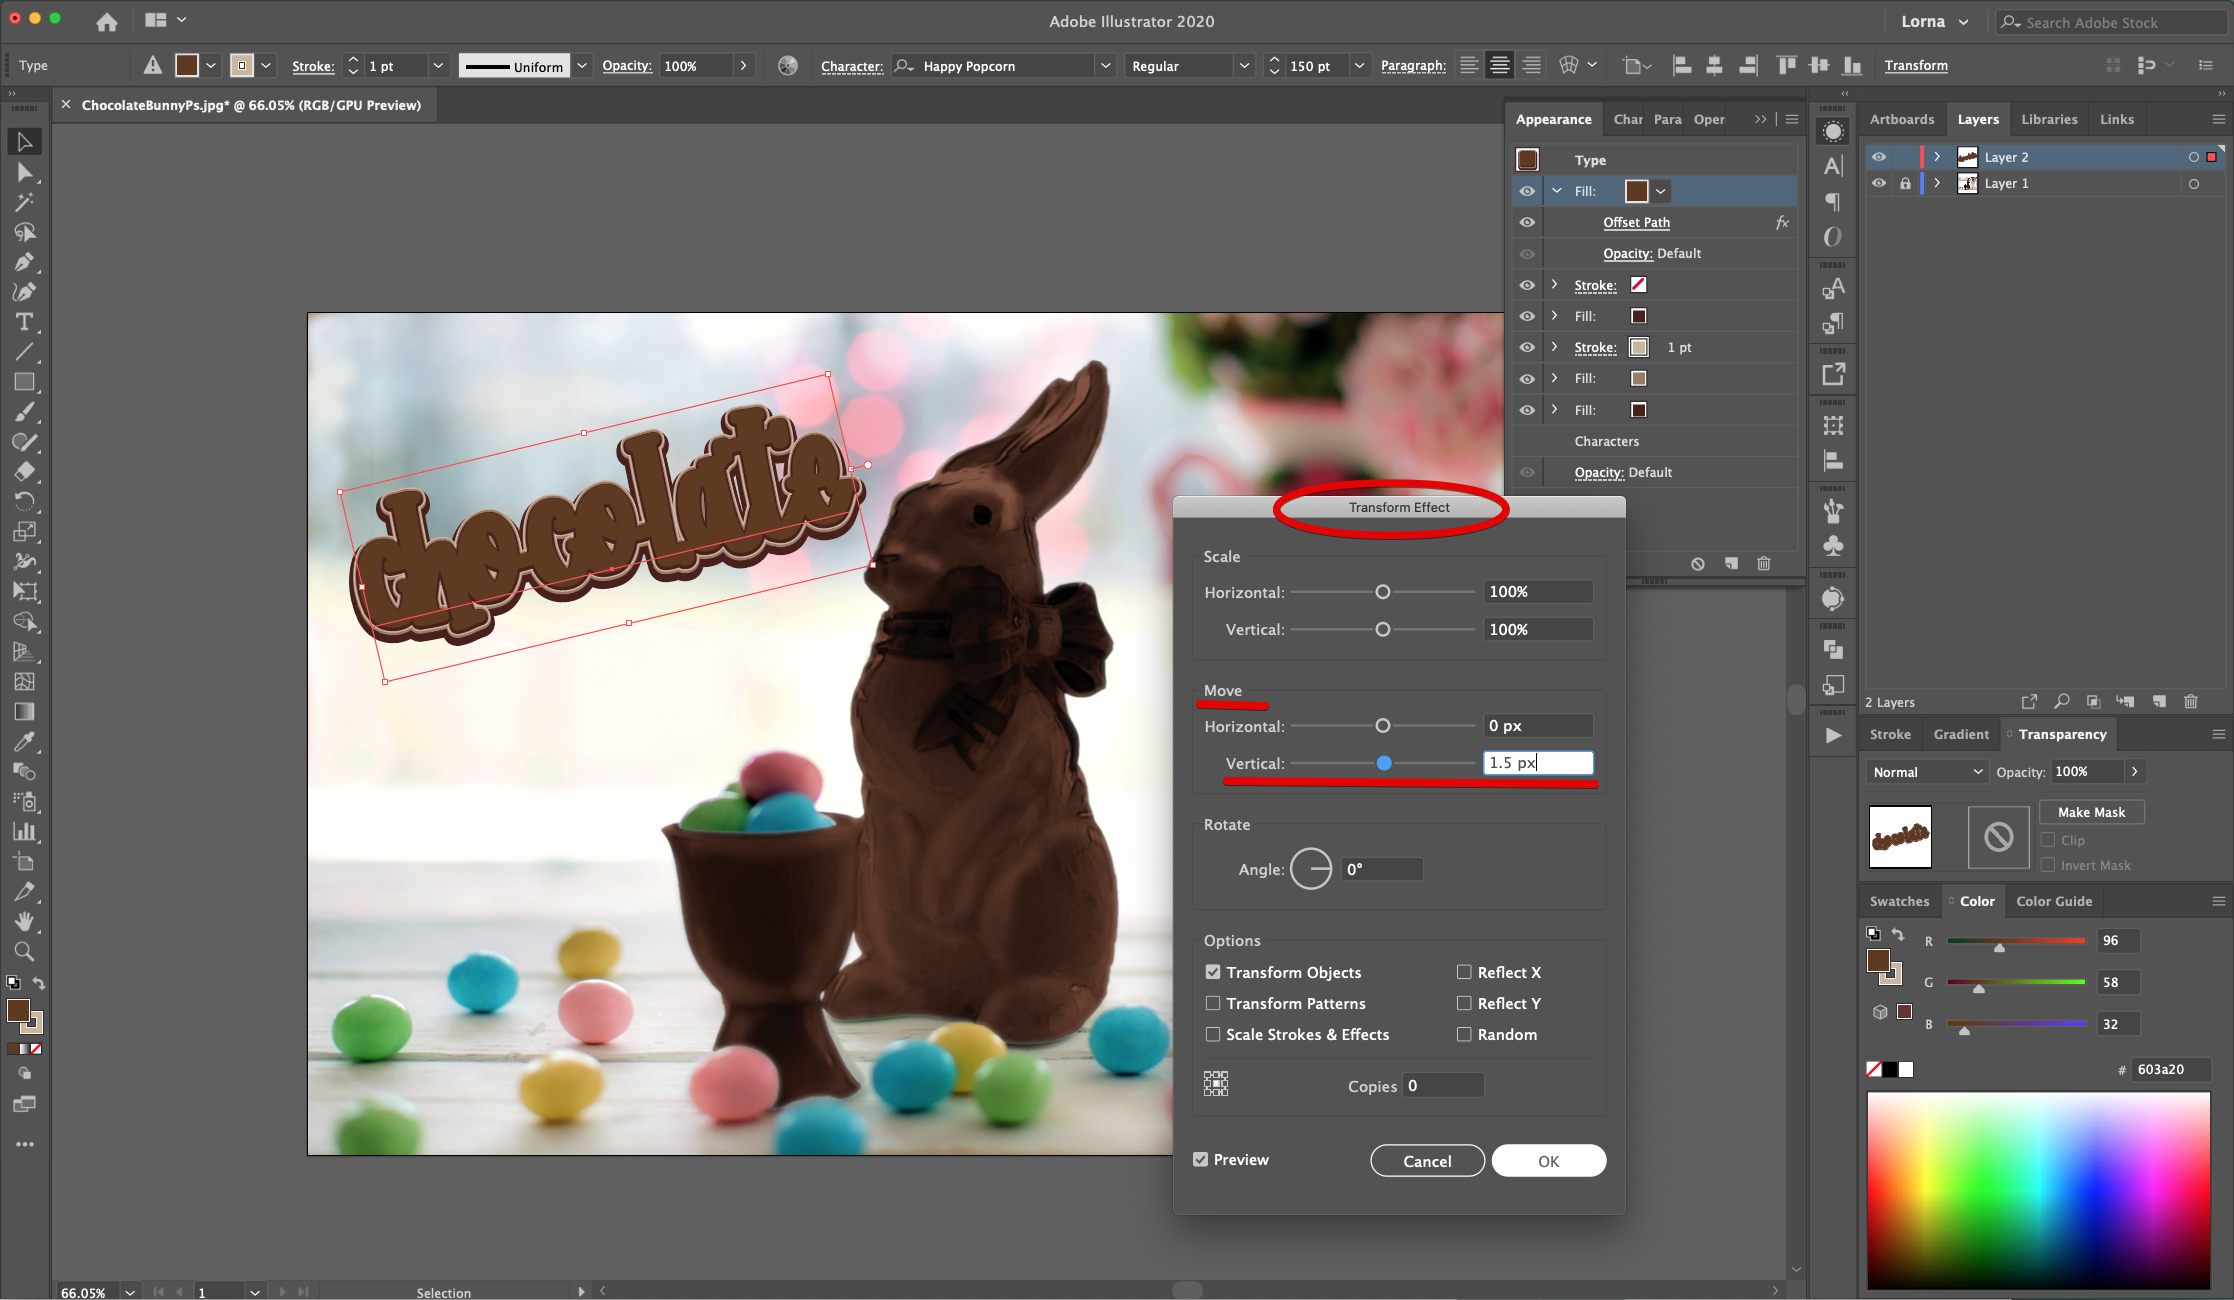
21 - Head to the “Appearance Panel” again, click on the “Add New Fill” button at the bottom of the panel and use a light Brown shade (#9b7b65). The “New Fill” should be on top of everything.
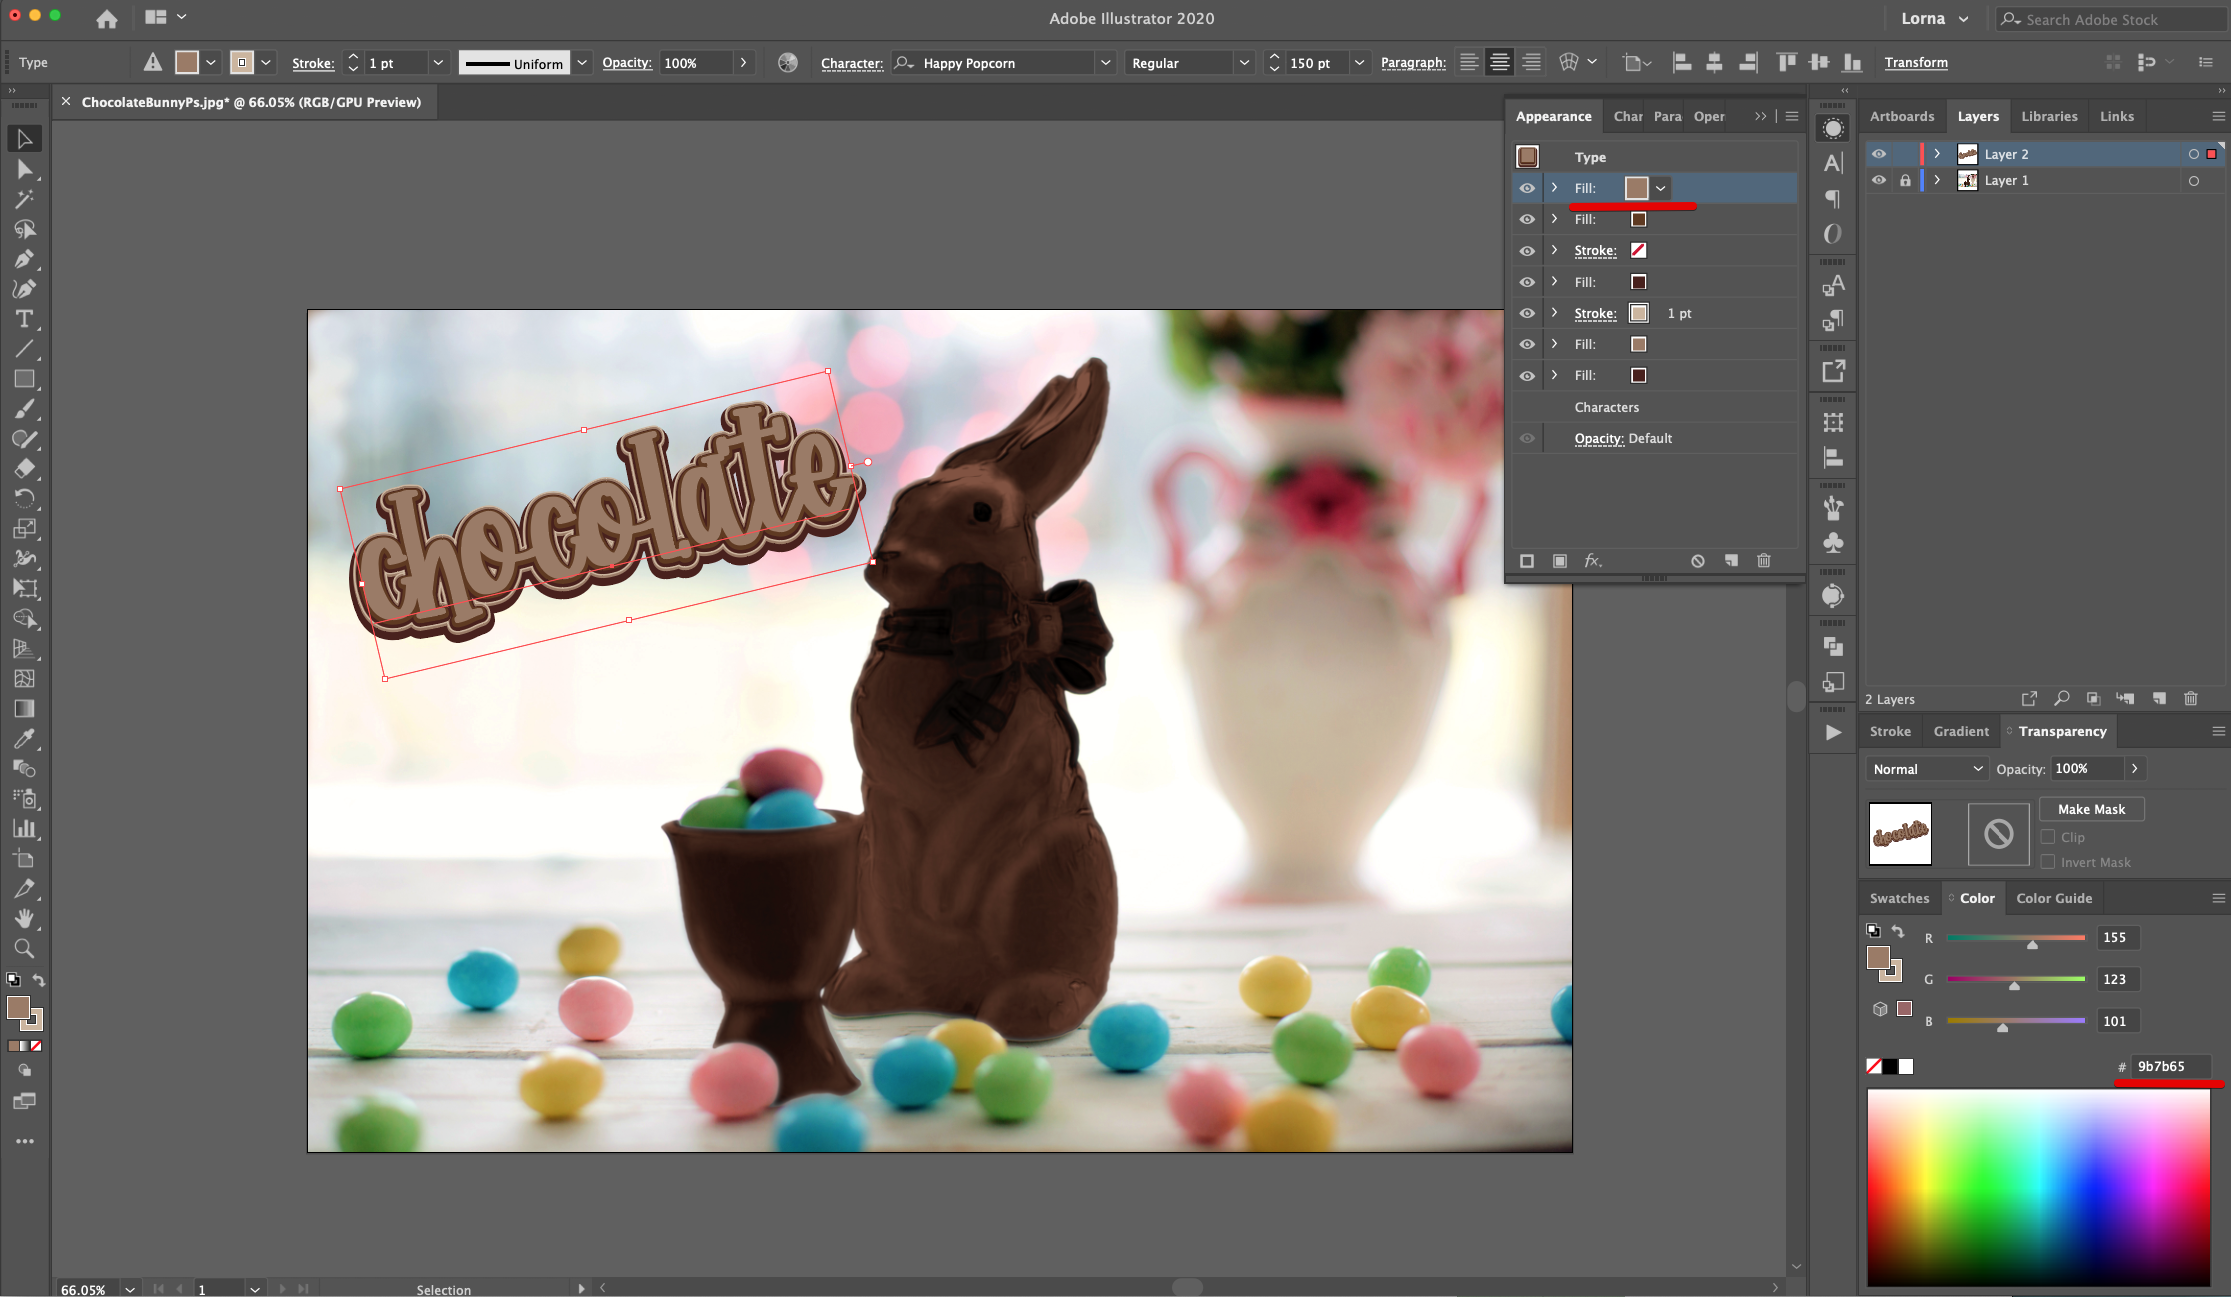
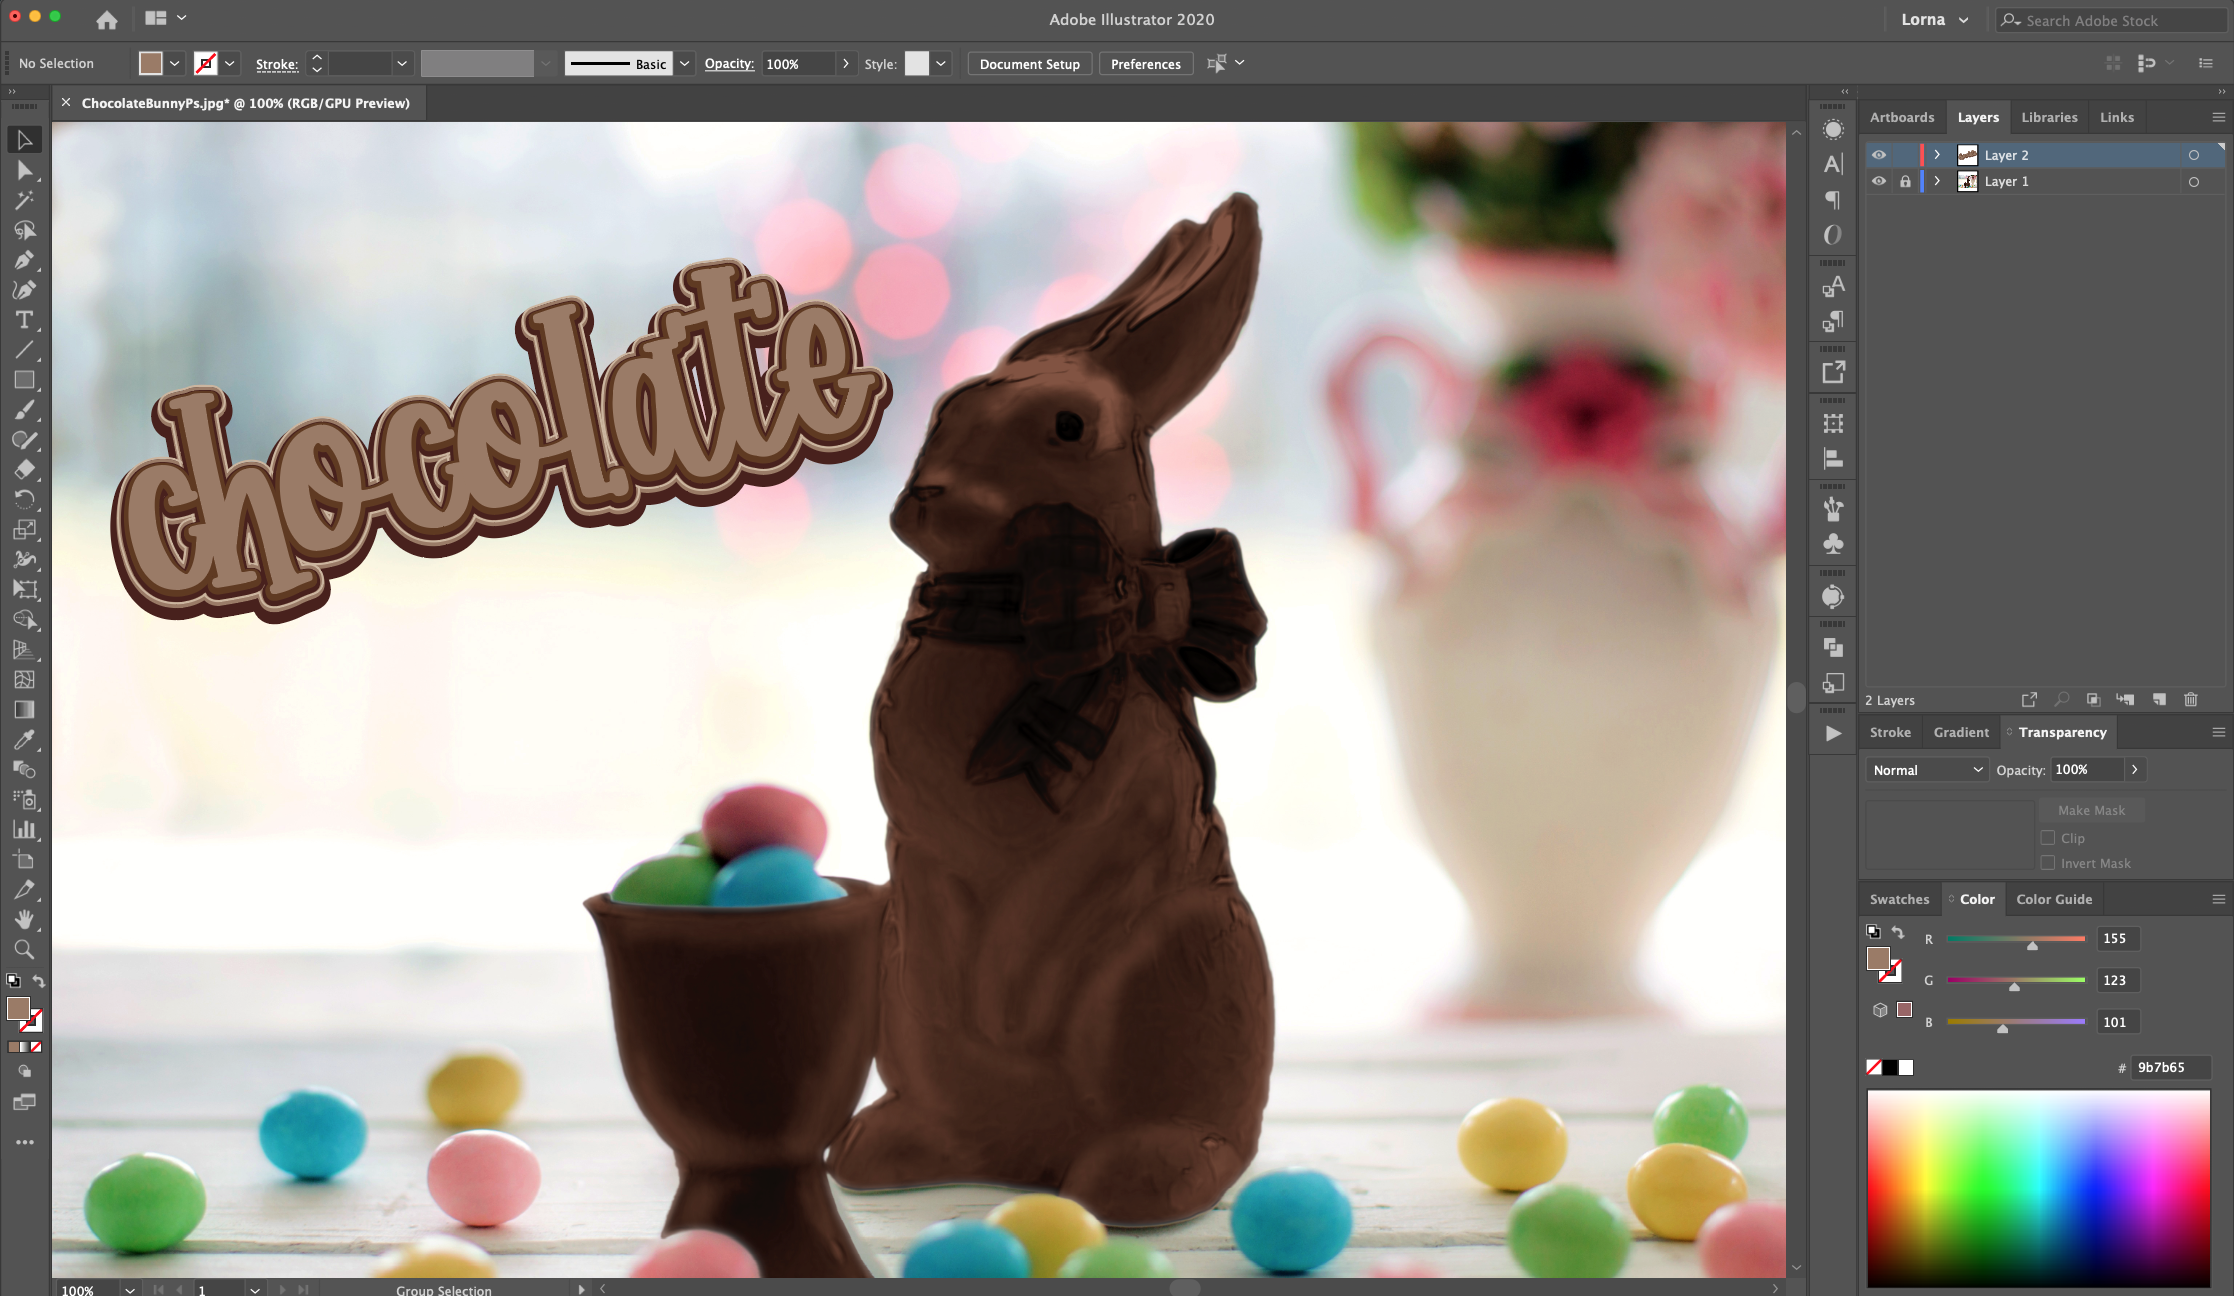
22 - Check it out!
1 - In Photoshop, open the file you created with the “Chocolate Bunny in Photoshop” tutorial, go to File > Save As and choose “JPEG” as format so your file won’t be so heavy. You can skip this step and choose any image you want as “Background”. Or you can just work in a blank “Illustrator” document.
2 - Open the image in Illustrator. If the size of the image is larger than the default “Artboard”, select it and write down the “Width” and “Height” values.
3 - Deselect the image and click on the “Document Setup” button on the Top Menu then, click the “Edit Artboards” button in the “Document Setup” Pop Up and change the “Width” and “Height” values to match the ones from the image.
4 - Lock the “Background” Layer by clicking on the small “Padlock” on the left side of its Thumbnail and “Create a New Layer” by clicking on the small button at the bottom of the “Layers Panel”.
5 - Select the “Type Tool” (T), choose your font and type your text. The size will depend on the word/s you chose. We used “Happy Popcorn”.
6 - Depending on your “Background” image you may need or want to “Rotate” the text. Use the “Selection Tool” to do it.
7 - With the text selected change the “Fill” color to “None”.
8 - With the text still selected, head to the “Appearance Panel”, click on the “Add New Fill” button at the bottom of the panel and use a deep Brown shade (#49211c).
9 - With the “Fill” still selected, in the “Appearance Panel”, click on the “Effects Menu” on the bottom left side, navigate to Path > Offset Path and use an “Offset” of 12 px and “Round Joins”. Click “OK”.
10 - With the “Fill” still selected, in the “Appearance Panel”, click on the “Effects Menu” but now choose Distort & Transform > Transform and use a “Vertical Move” of 8 px. Click “OK”.
11 - Head to the “Appearance Panel” again, click on the “Add New Fill” button at the bottom of the panel and use a medium Brown shade (#9b7b65). The “New Fill” should be on top of the darker one.
12 - With the “Fill” still selected, in the “Appearance Panel”, click on the “Effects Menu” on the bottom left side, navigate to Path > Offset Path and use an “Offset” of 8 px and “Round Joins”. Click “OK”.
13 - With the “Fill” still selected, in the “Appearance Panel”, click on the “Effects Menu” but now choose Distort & Transform > Transform and use a “Vertical Move” of 4 px. Click “OK”.
14 - Head to the “Appearance Panel” again and click on the “Add New Stroke” button at the bottom of the panel, use a light Brown shade (#ccb59e) and make it 1 pt.
15 - With the “Stroke still selected, in the “Appearance Panel”, click on the “Effects Menu” on the bottom left side, navigate to Path > Offset Path and use an “Offset” of 7 px and “Round Joins”. Click “OK”.
16 - With the “Stroke” still selected, in the “Appearance Panel”, click on the “Effects Menu” but now choose Distort & Transform > Transform and use a “Vertical Move” of 2 px. Click “OK”.
17 - Head to the “Appearance Panel” again, click on the “Add New Fill” button at the bottom of the panel and use a deep Brown shade (#49211c). The “New Fill” should be on top of everything.
18 - With the “Fill” still selected, in the “Appearance Panel”, click on the “Effects Menu” on the bottom left side, navigate to Path > Offset Path and use an “Offset” of 5 px and “Round Joins”. Click “OK”.
19 - With the “Fill” still selected, in the “Appearance Panel”, click on the “Effects Menu” but now choose Distort & Transform > Transform and use a “Vertical Move” of 3 px. Click “OK”.
20 - Head to the “Appearance Panel” again, click on the “Add New Fill” button at the bottom of the panel and use a medium Brown shade (#603a20). The “New Fill” should be on top of everything. With the “Fill” still selected, in the “Appearance Panel”, click on the “Effects Menu” on the bottom left side, navigate to Path > Offset Path and use an “Offset” of 3 px and “Round Joins”. Click “OK”. With the “Fill” still selected, in the “Appearance Panel”, click on the “Effects Menu” but now choose Distort & Transform > Transform and use a “Vertical Move” of 1.5 px. Click “OK”.
21 - Head to the “Appearance Panel” again, click on the “Add New Fill” button at the bottom of the panel and use a light Brown shade (#9b7b65). The “New Fill” should be on top of everything.
22 - Check it out!
by @lornacane
Related Tutorials
Illustrator Tutorials
Chocolate Text with Waffle Background in Illustrator
Illustrator Tutorials
Wavy Text in Illustrator
Learn how to create Wavy Text in Illustrator using two Methods in this tutorial.
Illustrator Tutorials
Place Images Inside Text in Adobe Illustrator
In this Adobe Illustrator tutorial, learn how to quickly place images inside text.
Illustrator Tutorials
How to Use Text Effects in Illustrator
Learn how to use Illustrator Text Effects in 1 click!
Illustrator Tutorials
Editing Text in Adobe Illustrator
With this step by step tutorial we'll show you everything you need to know about editing text.
Illustrator Tutorials
Overlapping Text in Illustrator
Learn how to easily overlap text in this Adobe Illustrator tutorial.