By Design Bundles
How to Use Artboards in Illustrator
Artboards in Illustrator are the print areas of your workspace. These are similar to the pages in Adobe InDesign or Microsoft Word. Your artboards can be completely customized for your needs. You can change their size, orientation and position within the document. When you export your document, it will exported as an artboard.
We will guide you on how to use and organize your artboards. We are going to use this floral moon SVG as an example throughout this tutorial.
Step 1 - Create Your Artboards
When you first open up Illustrator, you will be presented with a number of ways to create a new document.
Create and rename your file
In the center are some recommended formats, ranging from A4 print to Web-large for digital purposes. Select Create New on the left for more options.

At the top of this panel are more settings that may suit your needs. To create your own formats, use the preset details on the right side of this panel.

You can rename your file to make it easier to organize and identify.

Adjust Size and Orientation of the Artboards
You can also change your measurements to cm, inches, pixels or other measurements by selecting the drop down menu.

The orientation can changed to either Portrait or Landscape. Choose the one that best fits your needs.

Add Multiple Artboards
You are not restricted to creating just one artboard. Here you can create multiple artboards at once.

Add Bleed for Print Purposes
Adding a print bleed extends the borders of your document. This is useful for projects where you don't want a white border.

Open the Advanced Settings
Here you can change color modes and your raster effects.

When you have completed your settings, select Create. All of these settings can also be adjusted when you have already opened your document. So there is no need to worry if you want to change these settings later on.
Step 2 - Change Artboards Settings
The artboard settings can be changed in two ways, through the Artboards Menu or the Artboard Tools.
Artboards Menu
Open your artboard settings by selecting Window > Artboards.

The two icons at the bottom of the menu allow you to Add a new artboard with the same dimensions. You can also delete selected artboards. You can change the order of your artboards using the up and down arrows. This will be useful if you need your artboards in a specific order to export and/or print.

From the burger menu in the top right you are presented with many other editing options, one including Artboard Options.

Here you can rename your individual artboards, which will help for organizing and exporting your artboards.

The size of your artboards can be individually changed from this menu. We have a very helpful tutorial on how to change artboard sizes if needed.

Artboard Tool
Select your Artboard Tool from the left toolbar.
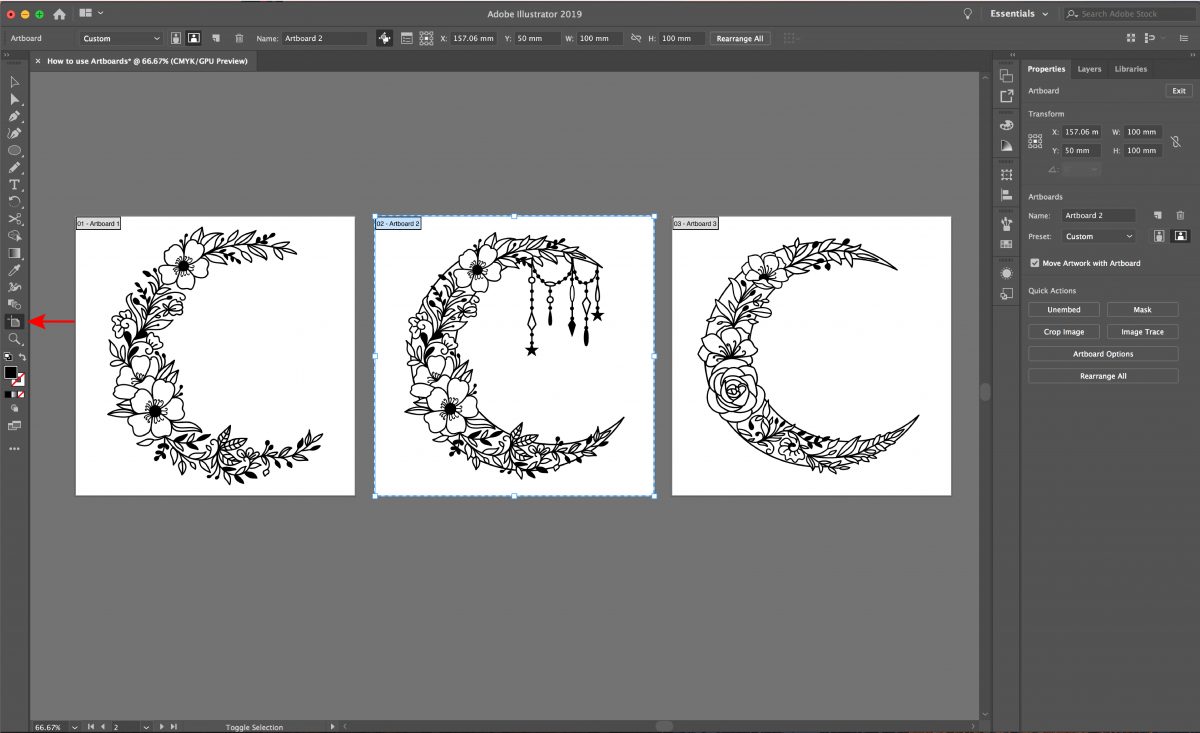
A new toolbar will appear at the top of your window. Here you can also access multiple settings to change the orientation, size, name and many other options.

Step 3 - Rearrange and Duplicate the artboards
Your artboards can be rearranged according to how you want. They can also be duplicated in case you a copy of your artwork.
Rearrange Artboards
The artboards can be rearranged and reorganized, including the number of columns and the space between each artboard. You do this by selecting Rearrange All.

Click on the move/copy icon so you can select individual artboards. You can then click and drag to reorganize them within Illustrator.

Duplicate Artboards
The artboards with your artwork can also be duplicated. Select ‘move artwork with artboard’ in the right toolbar, then click and drag whilst holding Shift + Alt + Opt. Disable this feature by clicking the Move/Copy artwork with artboard button in the Control panel. This will prevent you accidentally moving any content on the artboards.

Artboards are a great way to keep your artwork organized and easy to access. We hope that you enjoyed following this tutorial. Next up, learn how to make a wavy line in Illustrator.