By Design Bundles
Photoshop Tutorials12 min
How to Create an Embossed Text Effect in Photoshop
In this tutorial, discover how to create an Embossed Text Effect in Photoshop!
Today we will learn how to give a realistic embossed look in Photoshop to any logos, text, monograms, or even icons. Adding realistic depth and dimension will make them look as if they were pressed into the paper. This is a great way to preview how your designs would look in real-world environments.
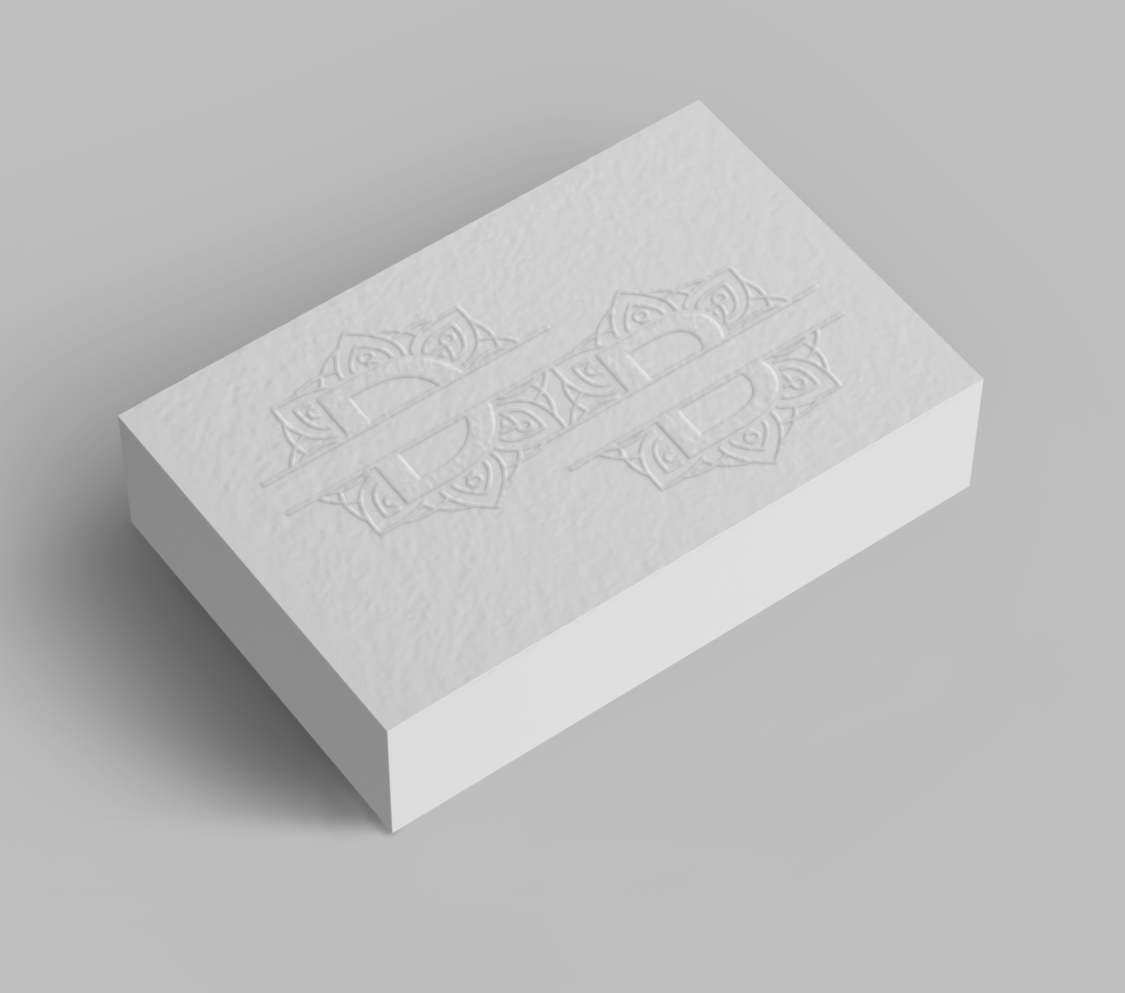
In this tutorial, we will use a Monogram SVG and a business card mock-up from the Plus Hub.
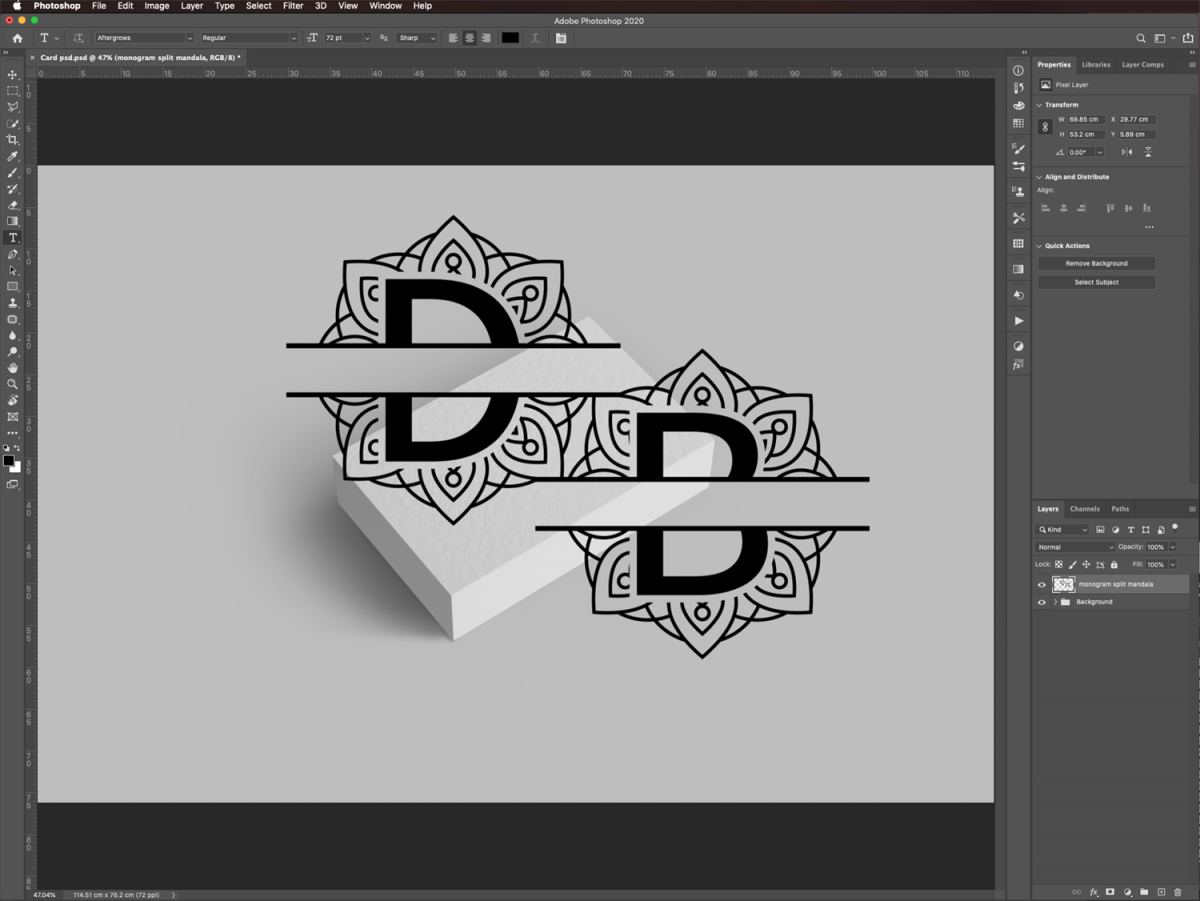
In Photoshop, open the image you chose as the background. Then, type the text you want to emboss or open the file with the logo and bring it into the background file.
We will convert the logo into a Smart Object, so the modifications applied to it are non-destructive.
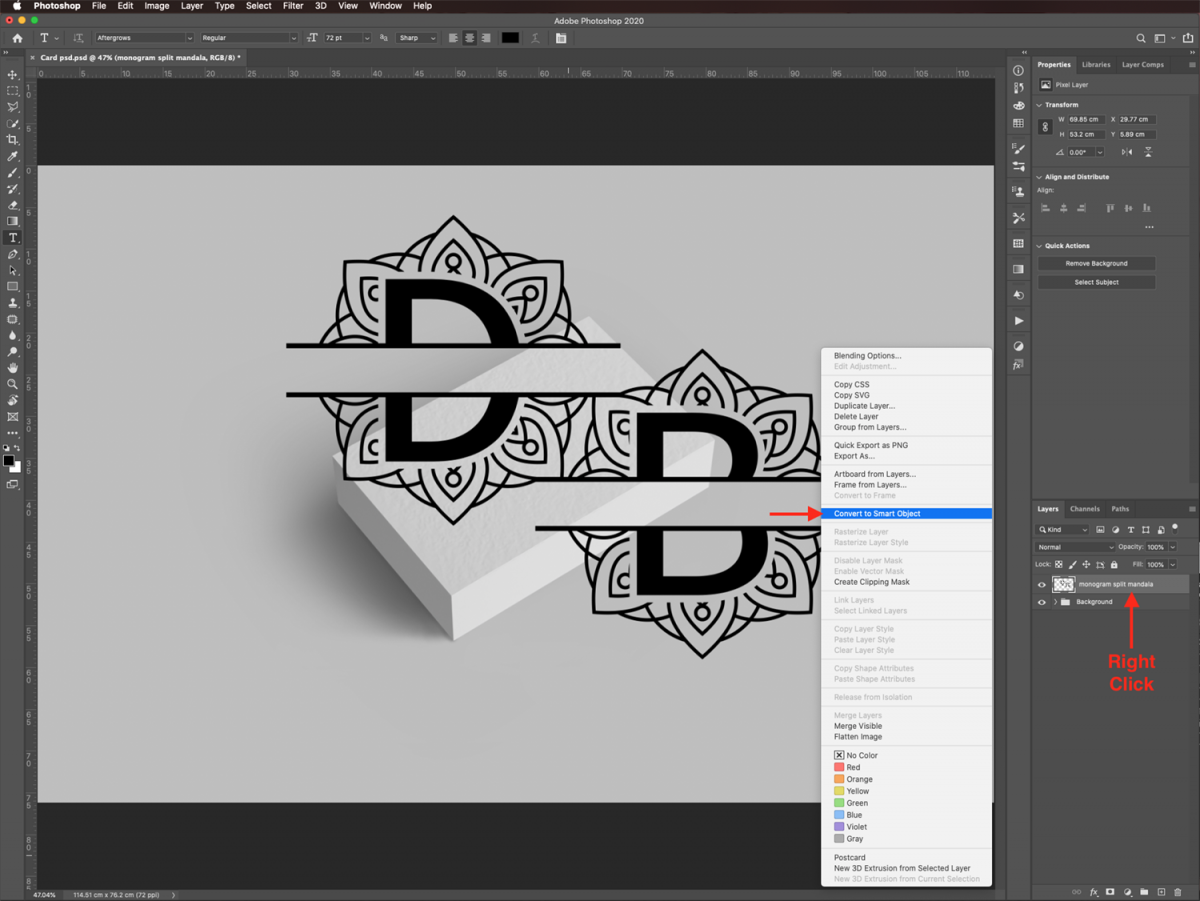
Right-click on top of the logo’s thumbnail and choose Convert to Smart Object.
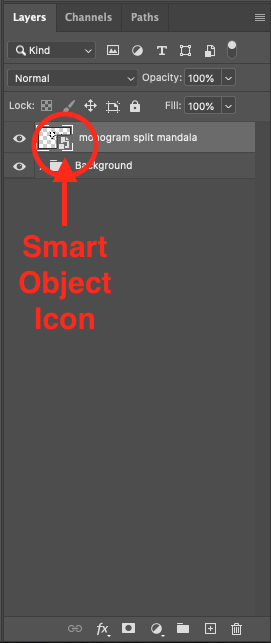
You should now see the Smart Object icon on the logo thumbnail.
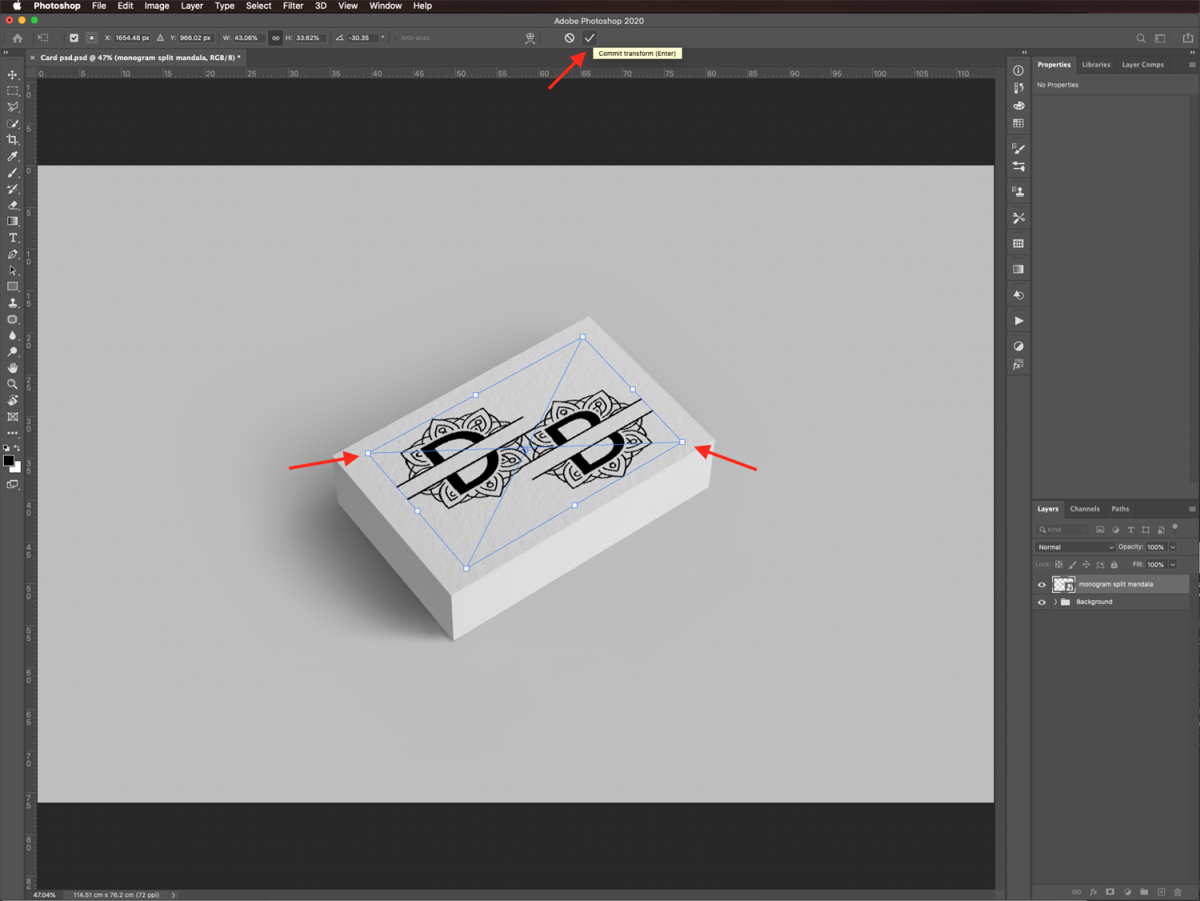
You need to adjust the logo to the object you want to add it to. Use Free Transform (Command/Control + T) to resize and/or rotate it to fit the object better.
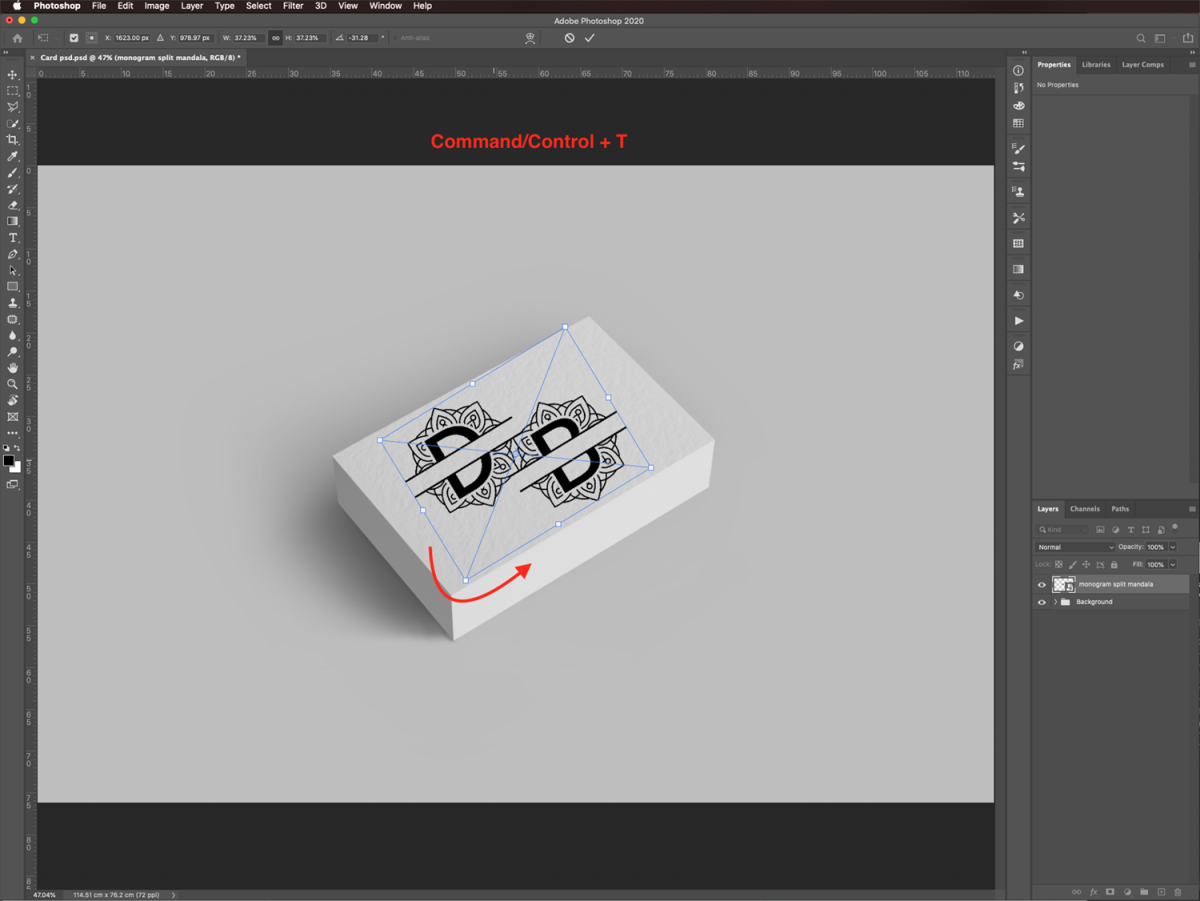
Then, without exiting Free Transform, go to Edit > Transform > Distort, and align the logo to your mockup object (in our case, some business cards). You need to make it fit as realistically as possible inside the mockup object.
When you are done, click on the small checkmark on the top menu or hit Enter to commit the changes.
To create the emboss effect, double-click on top of your Smart Object's thumbnail to apply some Layer Styles.
We need to try to match the light from the original source in the background layer and give the embossed portion a texture similar to the one on the paper.
In the Blending Options tab, move the Fill Opacity lever to 0% to get rid of the fill color.
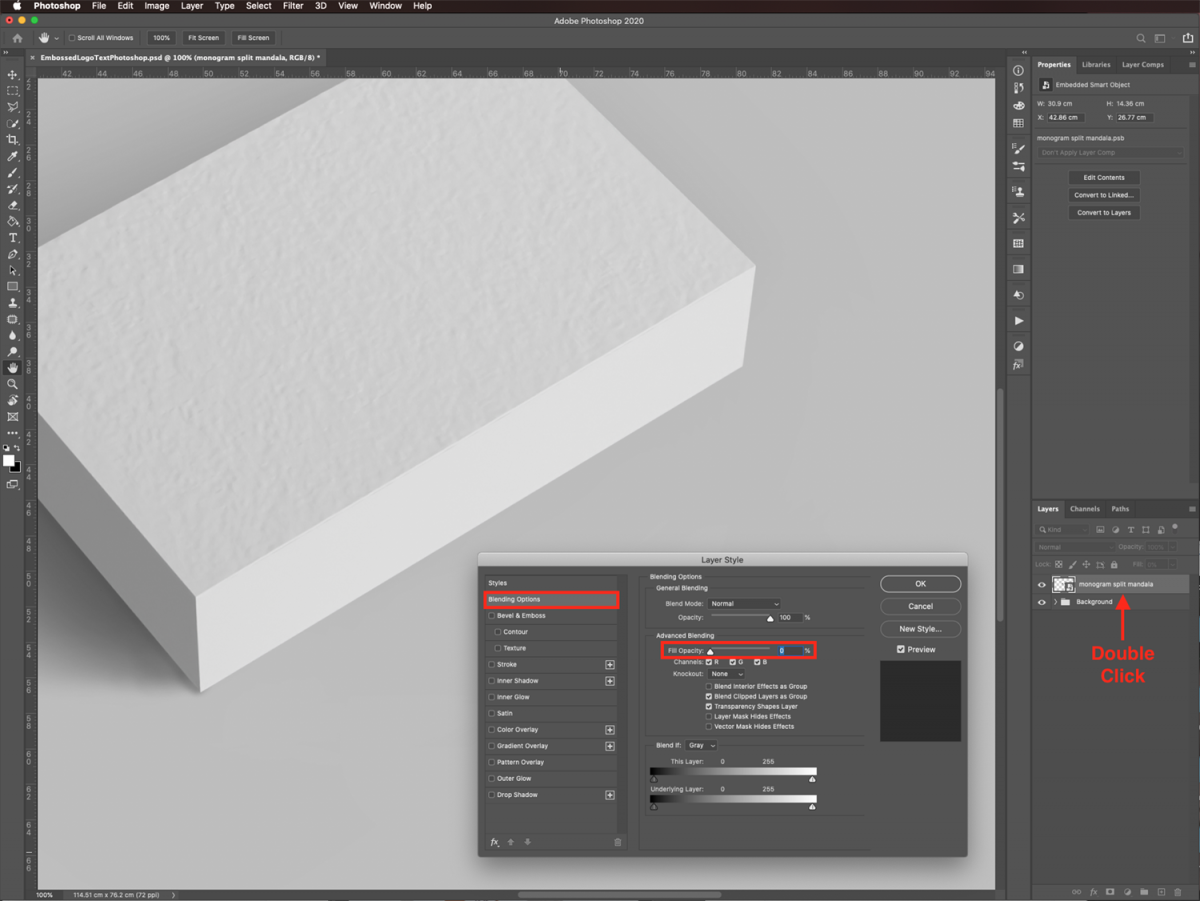
You need to check the shadows in the background image and mimic their position by adjusting the angles on the following tabs.
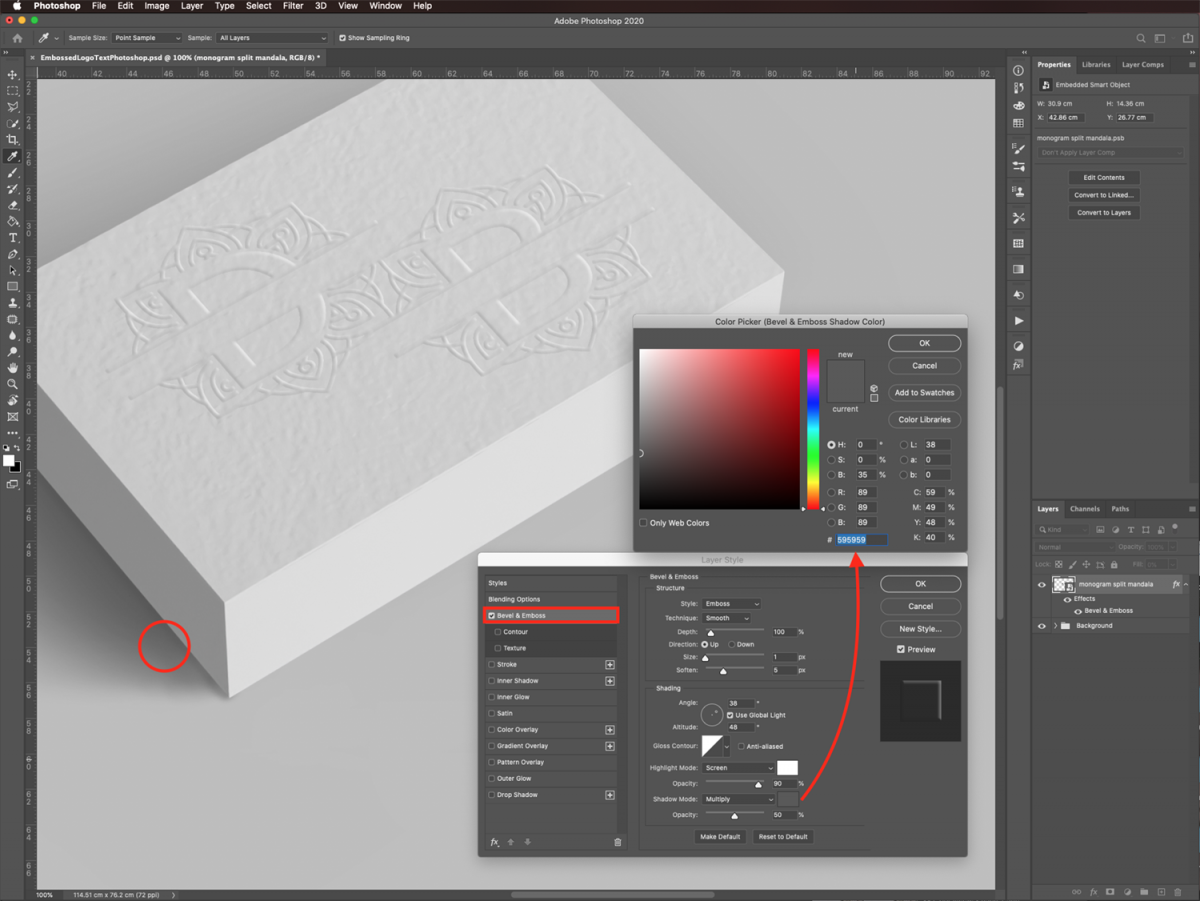
In the Bevel & Emboss tab, use the following values: Style - Emboss, Direction - Up.
For the rest of the values, you need to adjust them based on your background image.
Use white for the color and Screen as the mode for the Highlight. Change the Shadow color to one sampled from the background image and use Multiply as the mode. Our color was #595959.
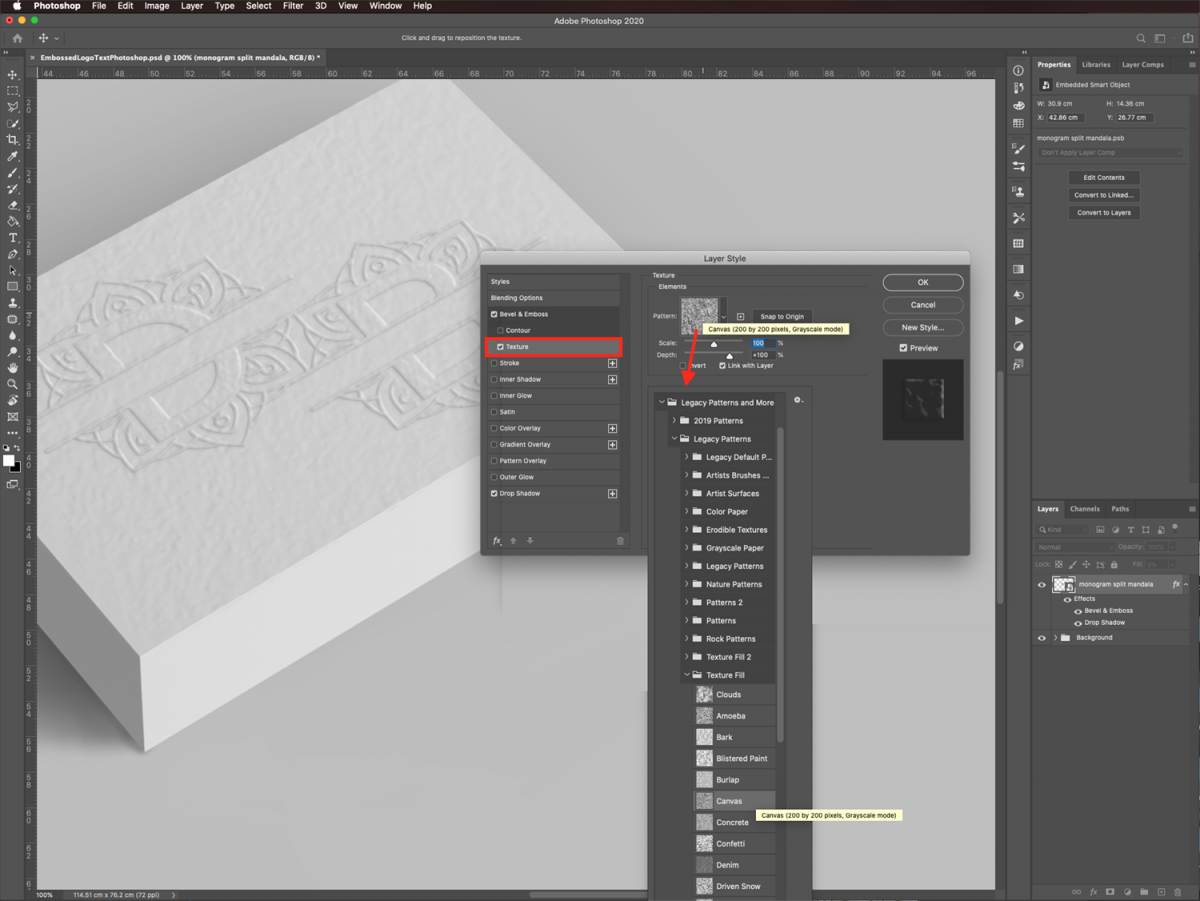
You want to mimic the texture of the paper. On the Texture tab, select a texture that gives your logo a similar look to the paper used in the background image. We chose the Canvas pattern from the Texture Fill folder of the Legacy Patterns provided by Photoshop.
Adjust the scale and depth values to your liking. We left ours at 100%.
Finally, on the Drop Shadow tab, use the same shadow color as the one used on the Bevel & Emboss tab (#595959). As before, adjust the values depending on where the light source is located in the background image.
Remember that this shadow needs to be very subtle.
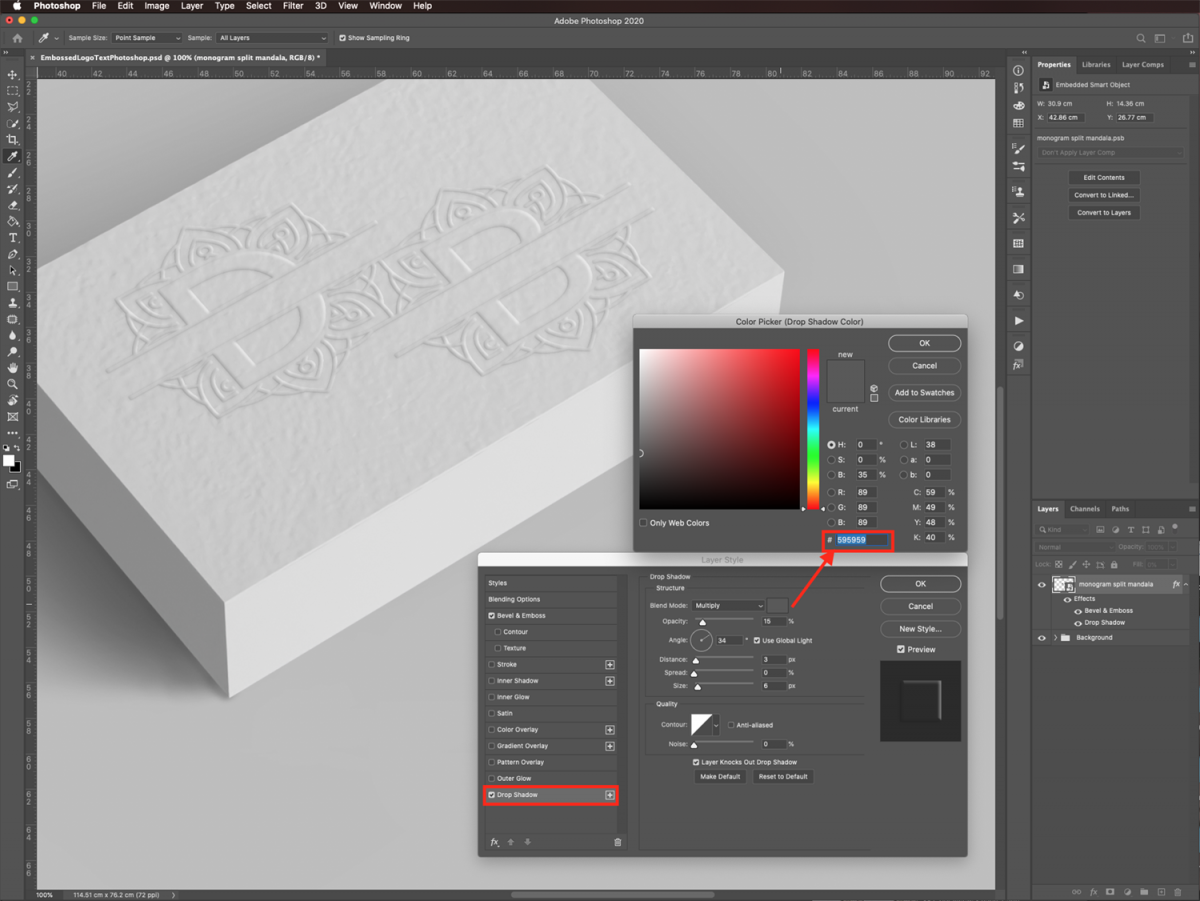
You can change the Layer Styles settings anytime you want.
To smooth out the edges of the embossed logo and give it a more realistic look, we are going to blur it a bit.
Go to Filter > Blur > Gaussian Blur and use a really small Radius value. We used 0.3%.
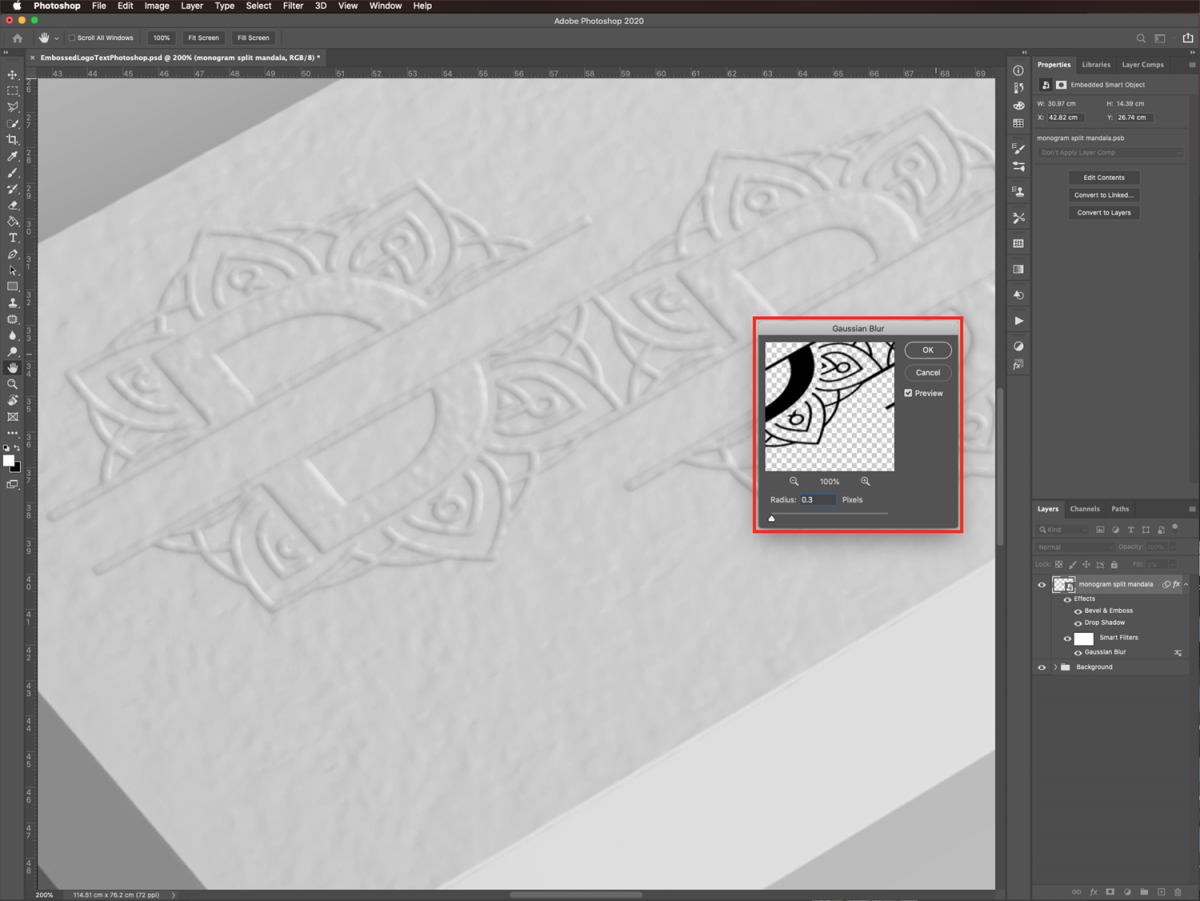
To add some color to the logo or text, double-click on your Smart Object’s thumbnail again to re-open the Layer Styles panel.
Click on the Color Overlay tab. Pick the color you want and use Multiply as the Blend Mode. We picked a medium blue (#4da5f9) for our example.
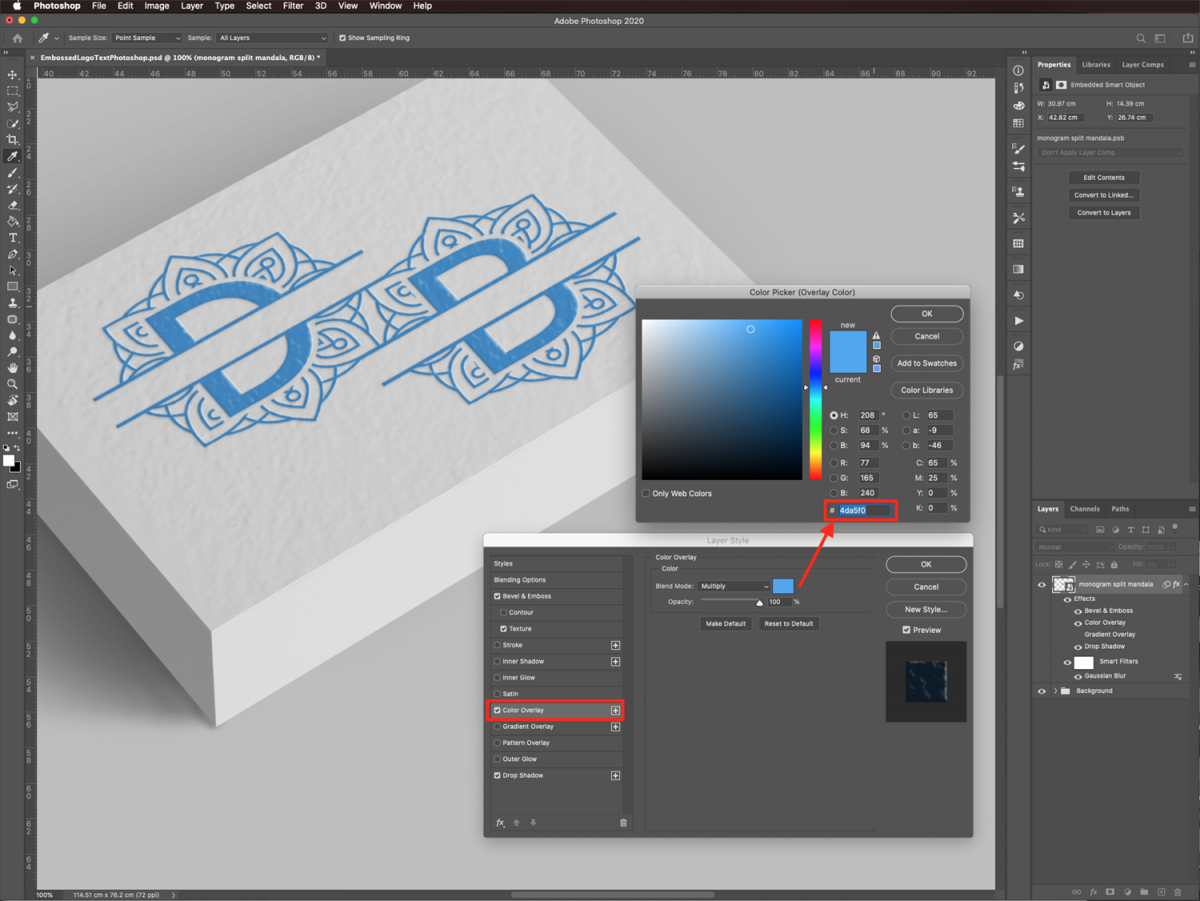
You can change the color and/or the Blend Mode to achieve different results.
Here’s our final product with the monogram applied!
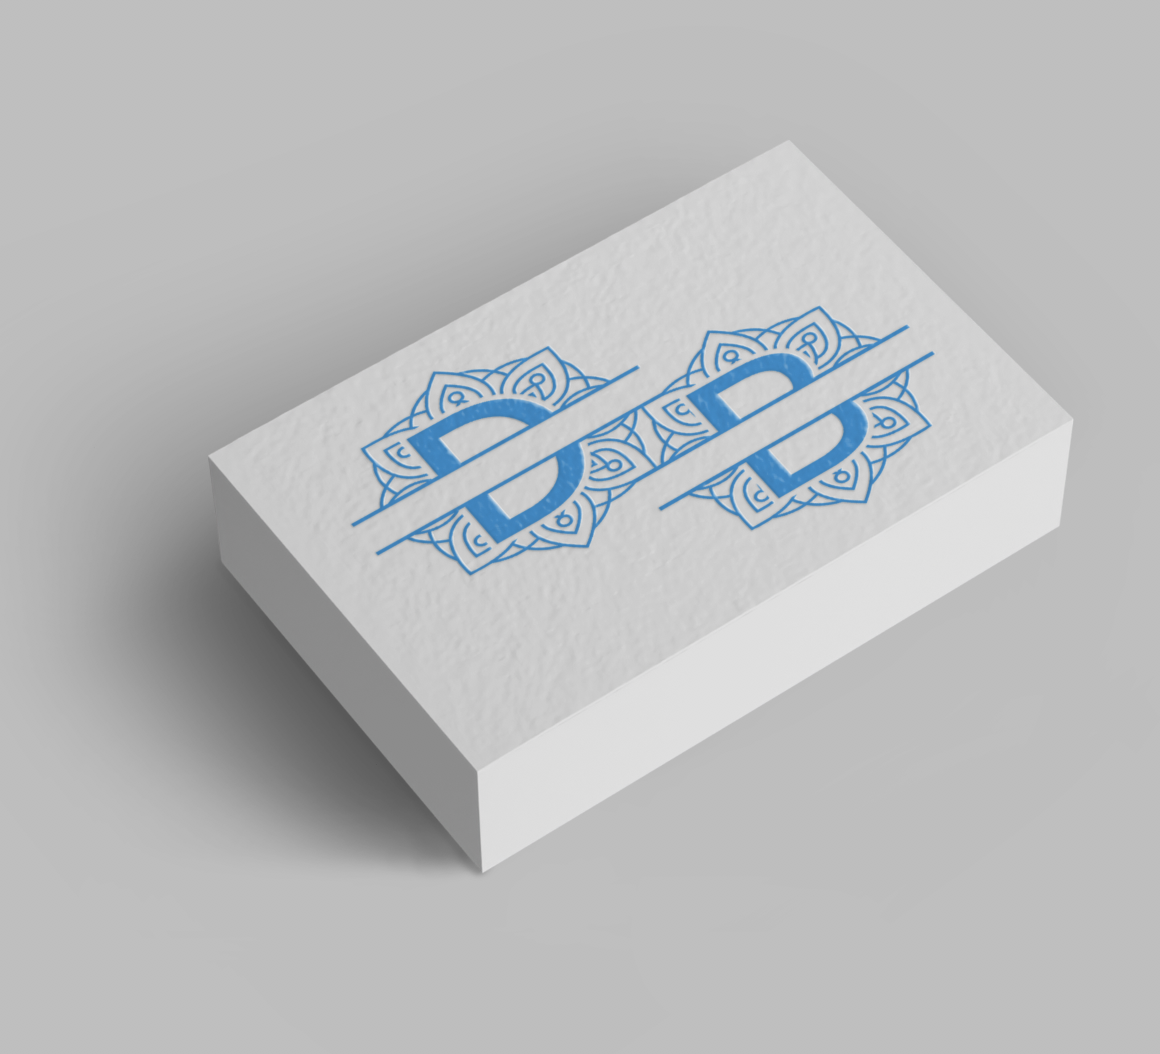
And here’s how variations on the effect look side by side.
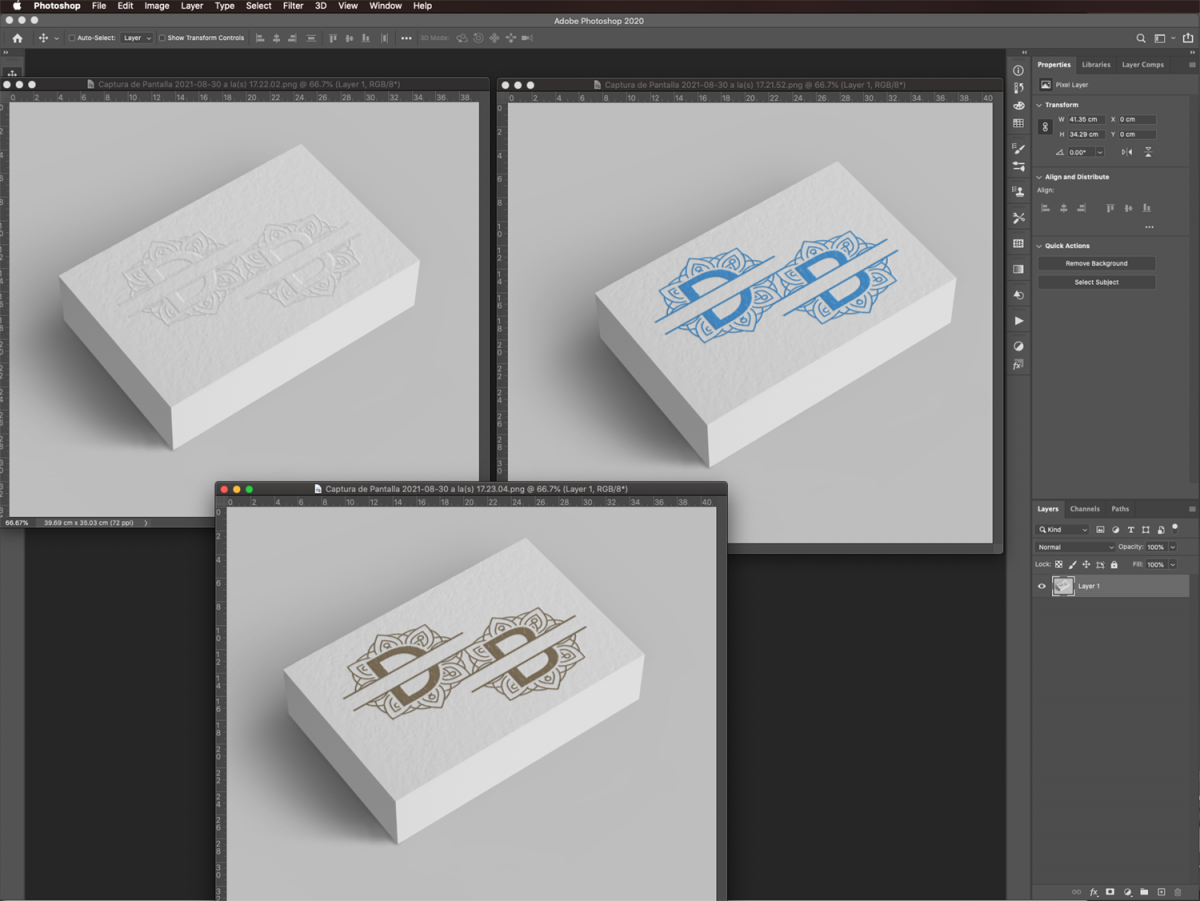
We successfully added an embossed 3D logo to our business card mockup.
Next, you can learn how to enhance sunset photos, enlarge a low resolution image, and remove objects using the Content Aware fill in Adobe Photoshop.
In this tutorial, we will use a Monogram SVG and a business card mock-up from the Plus Hub.
Step 1 - Open Your Images
In Photoshop, open the image you chose as the background. Then, type the text you want to emboss or open the file with the logo and bring it into the background file.
Step 2 - Make the Logo or Text a Smart Object
We will convert the logo into a Smart Object, so the modifications applied to it are non-destructive.
Right-click on top of the logo’s thumbnail and choose Convert to Smart Object.
You should now see the Smart Object icon on the logo thumbnail.
Step 3 - Distort the Logo or Text to Fit Your Background Image
You need to adjust the logo to the object you want to add it to. Use Free Transform (Command/Control + T) to resize and/or rotate it to fit the object better.
Then, without exiting Free Transform, go to Edit > Transform > Distort, and align the logo to your mockup object (in our case, some business cards). You need to make it fit as realistically as possible inside the mockup object.
When you are done, click on the small checkmark on the top menu or hit Enter to commit the changes.
Step 4 - Use Layer Styles to Emboss the Logo or Text
To create the emboss effect, double-click on top of your Smart Object's thumbnail to apply some Layer Styles.
We need to try to match the light from the original source in the background layer and give the embossed portion a texture similar to the one on the paper.
In the Blending Options tab, move the Fill Opacity lever to 0% to get rid of the fill color.
You need to check the shadows in the background image and mimic their position by adjusting the angles on the following tabs.
In the Bevel & Emboss tab, use the following values: Style - Emboss, Direction - Up.
For the rest of the values, you need to adjust them based on your background image.
Use white for the color and Screen as the mode for the Highlight. Change the Shadow color to one sampled from the background image and use Multiply as the mode. Our color was #595959.
You want to mimic the texture of the paper. On the Texture tab, select a texture that gives your logo a similar look to the paper used in the background image. We chose the Canvas pattern from the Texture Fill folder of the Legacy Patterns provided by Photoshop.
Adjust the scale and depth values to your liking. We left ours at 100%.
Finally, on the Drop Shadow tab, use the same shadow color as the one used on the Bevel & Emboss tab (#595959). As before, adjust the values depending on where the light source is located in the background image.
Remember that this shadow needs to be very subtle.
You can change the Layer Styles settings anytime you want.
Step 5 - Add a Gaussian Blur Filter
To smooth out the edges of the embossed logo and give it a more realistic look, we are going to blur it a bit.
Go to Filter > Blur > Gaussian Blur and use a really small Radius value. We used 0.3%.
Step 6 - Give the Logo or Text Color With a Color Overlay Layer Style
To add some color to the logo or text, double-click on your Smart Object’s thumbnail again to re-open the Layer Styles panel.
Click on the Color Overlay tab. Pick the color you want and use Multiply as the Blend Mode. We picked a medium blue (#4da5f9) for our example.
You can change the color and/or the Blend Mode to achieve different results.
Here’s our final product with the monogram applied!
And here’s how variations on the effect look side by side.
We successfully added an embossed 3D logo to our business card mockup.
Next, you can learn how to enhance sunset photos, enlarge a low resolution image, and remove objects using the Content Aware fill in Adobe Photoshop.
Related Tutorials
Photoshop Tutorials
How to Create a Holographic Text Effect in Photoshop
Discover how to create a holographic text effect in Photoshop with this step by step tutorial.
Inkscape Tutorials
How to Create a Neon Text Effect in Inkscape
Create a Neon Text Effect in Inkscape with this step-by-step tutorial!
Photoshop Tutorials
How to Make a Graffiti Text Effect in Photoshop
Learn how to create a realistic grafitti text effect in Photoshop.
Inkscape Tutorials
How to Create a Gold Text Effect in Inkscape
Create a Gold Text Effect in 4 steps with this beginner Inkscape tutorial.
Procreate Tutorials
How to Create a Neon Text Effect in Procreate
In this step-by-step tutorial, you will learn how to create a Neon Effect in Procreate.
Photoshop Tutorials
How to Create a Faded Blur Effect in Photoshop
Create a faded blur effect in Photoshop using these technique and add mystery to your images.