By Design Bundles
Photoshop Tutorials11 min
How to Use Color Correction in Photoshop
When using images there will be times where colors and details don’t look quite the way they should. You would need to tweak them a bit to fix that. There are many ways to correct the color of your images in Photoshop. In this tutorial, we will learn a handy technique using threshold and curves Adjustment layers.
We will use a cherry blossom and stonehenge photo from the nature stock photo collection.
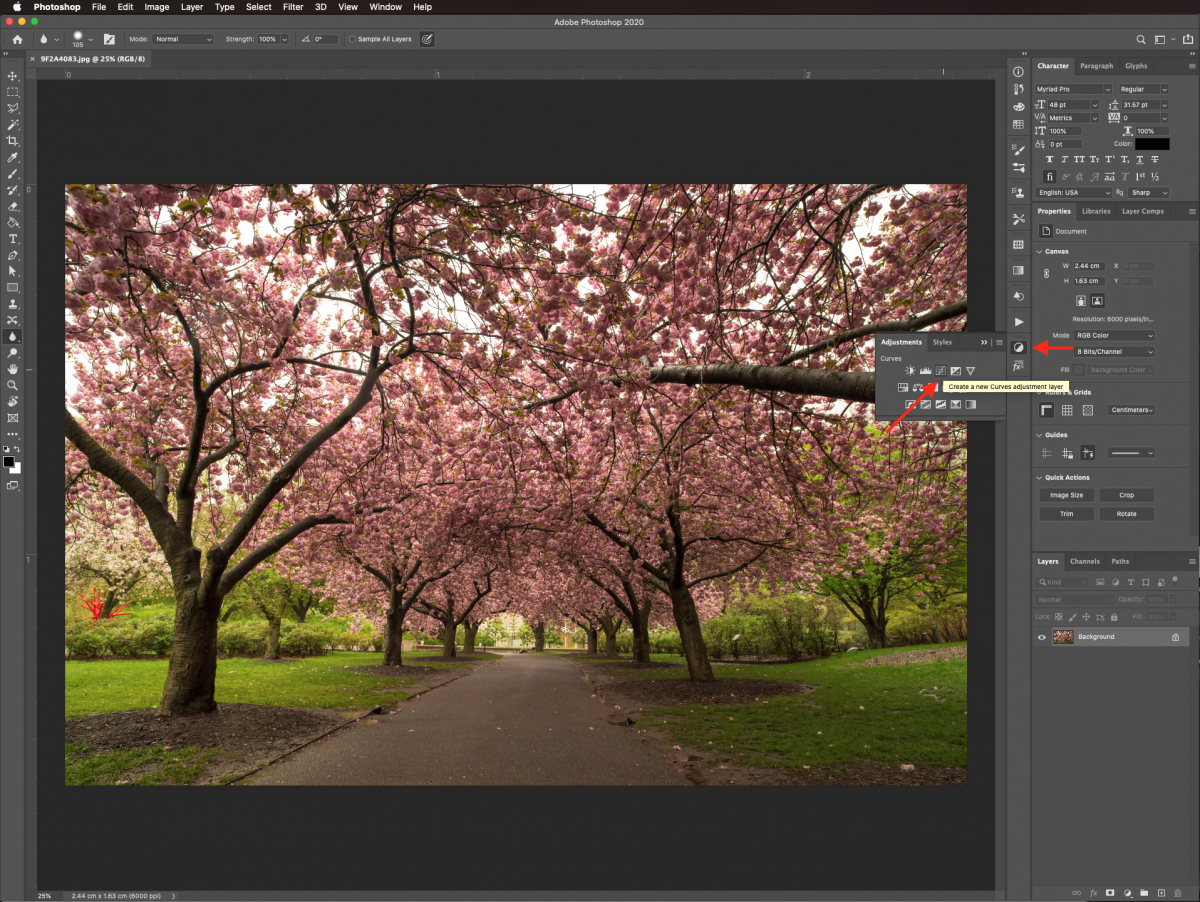
We will be working with adjustment layers. In Photoshop, open the image you need to color correct and create a new Curves adjustment layer in the Adjustments panel.
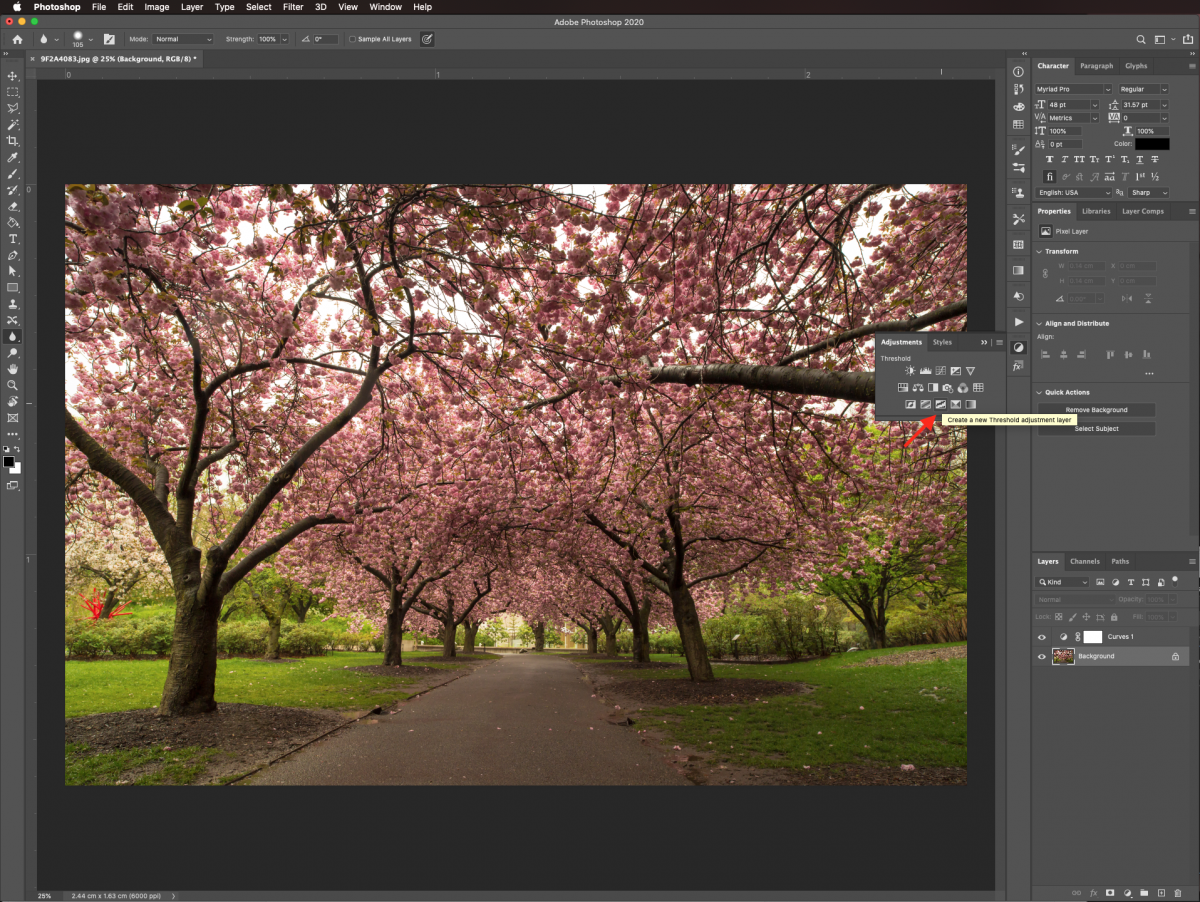
Next, we also need to create a Threshold adjustment layer.
In this step we want to create a bookmark for the lighter areas of the photo. In the Threshold adjustment layer properties, move the lever all the way to the right until everything is black.
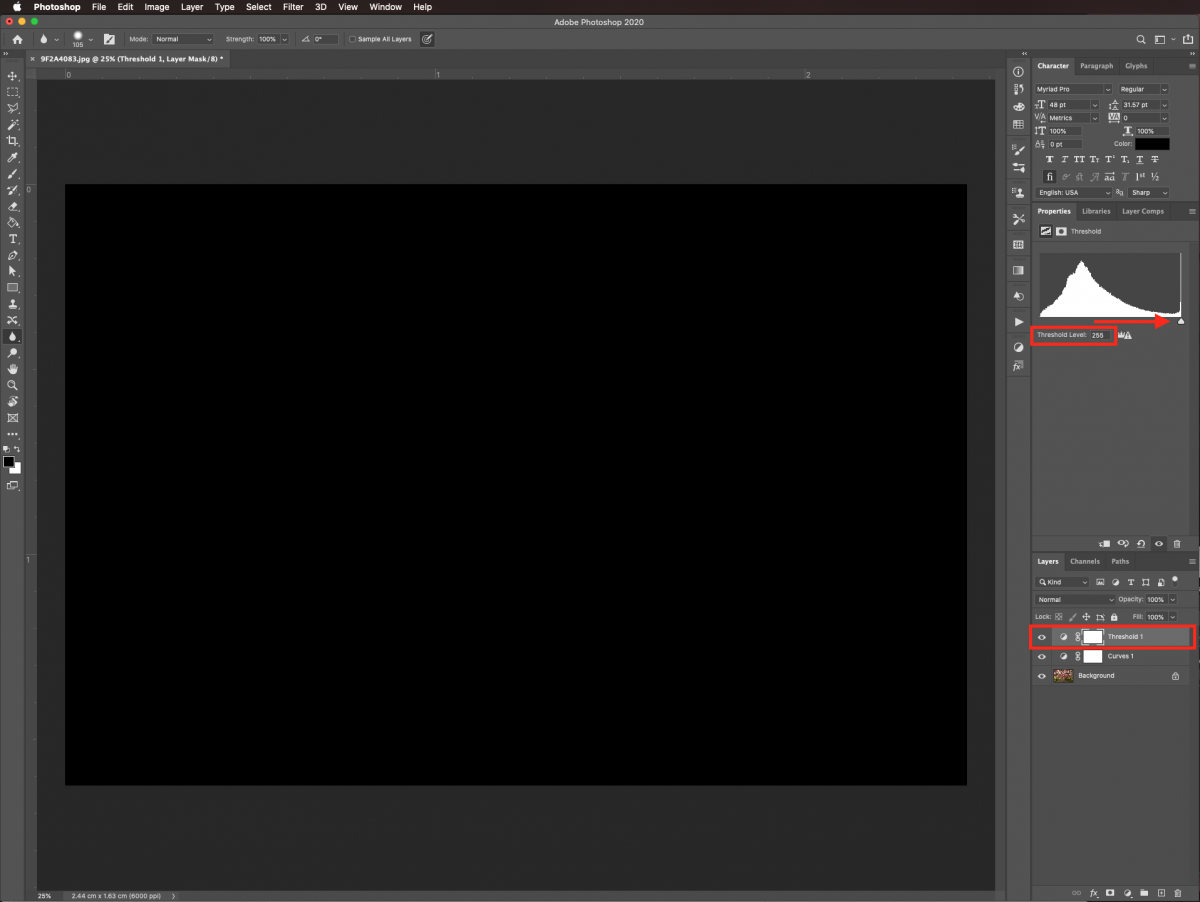
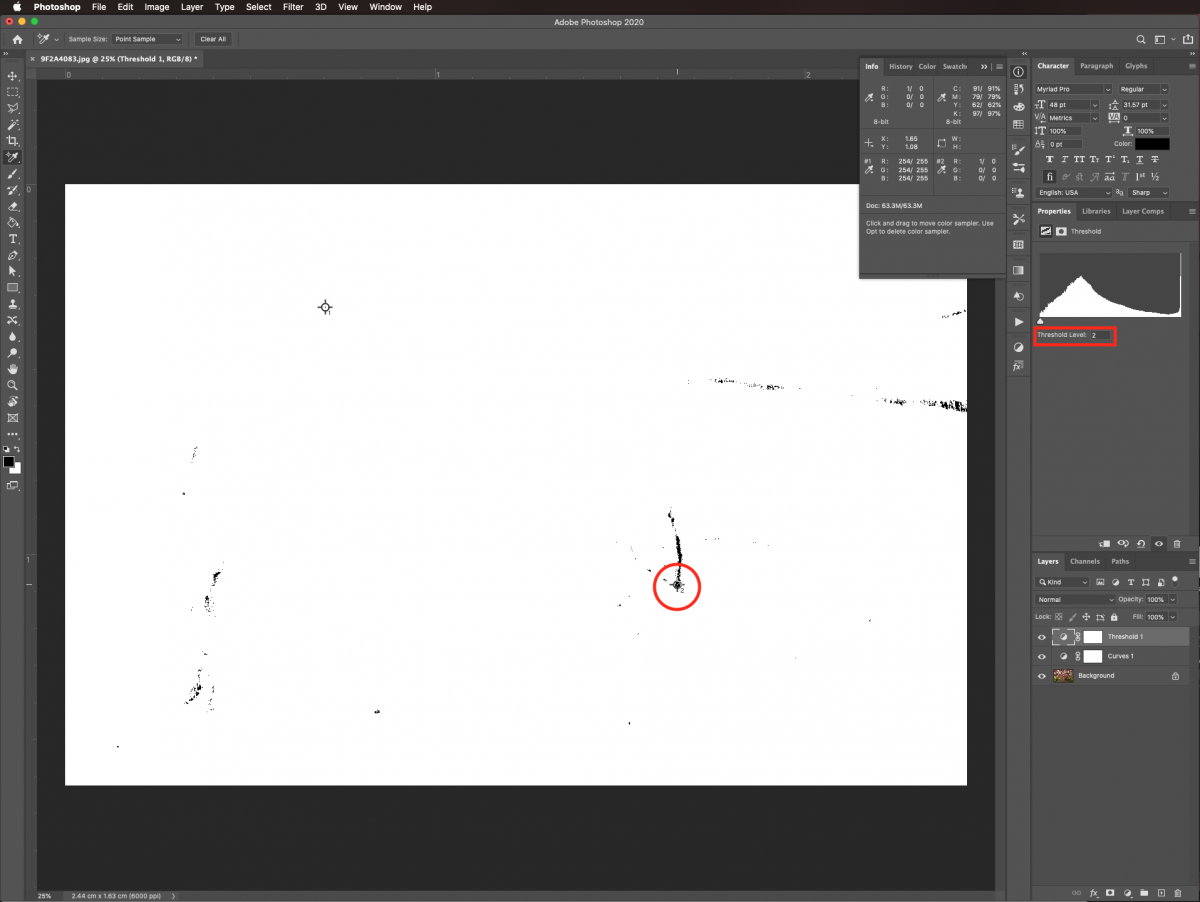
Then move it slightly to the left until you see a bit of white. Select the Color sampler tool (I) and click on the white area.
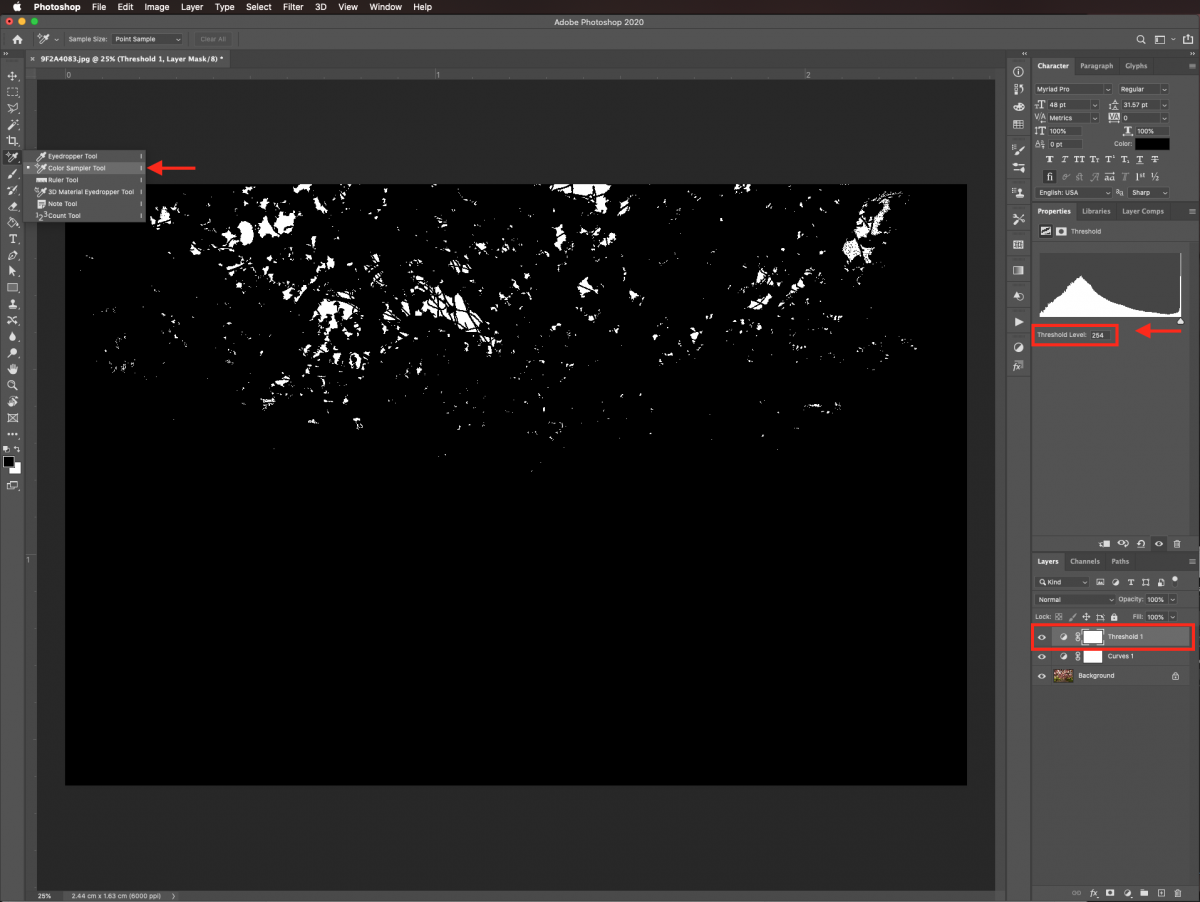
A bookmark will be created where the lighter part of the image is. You will see a mark with the number 1.
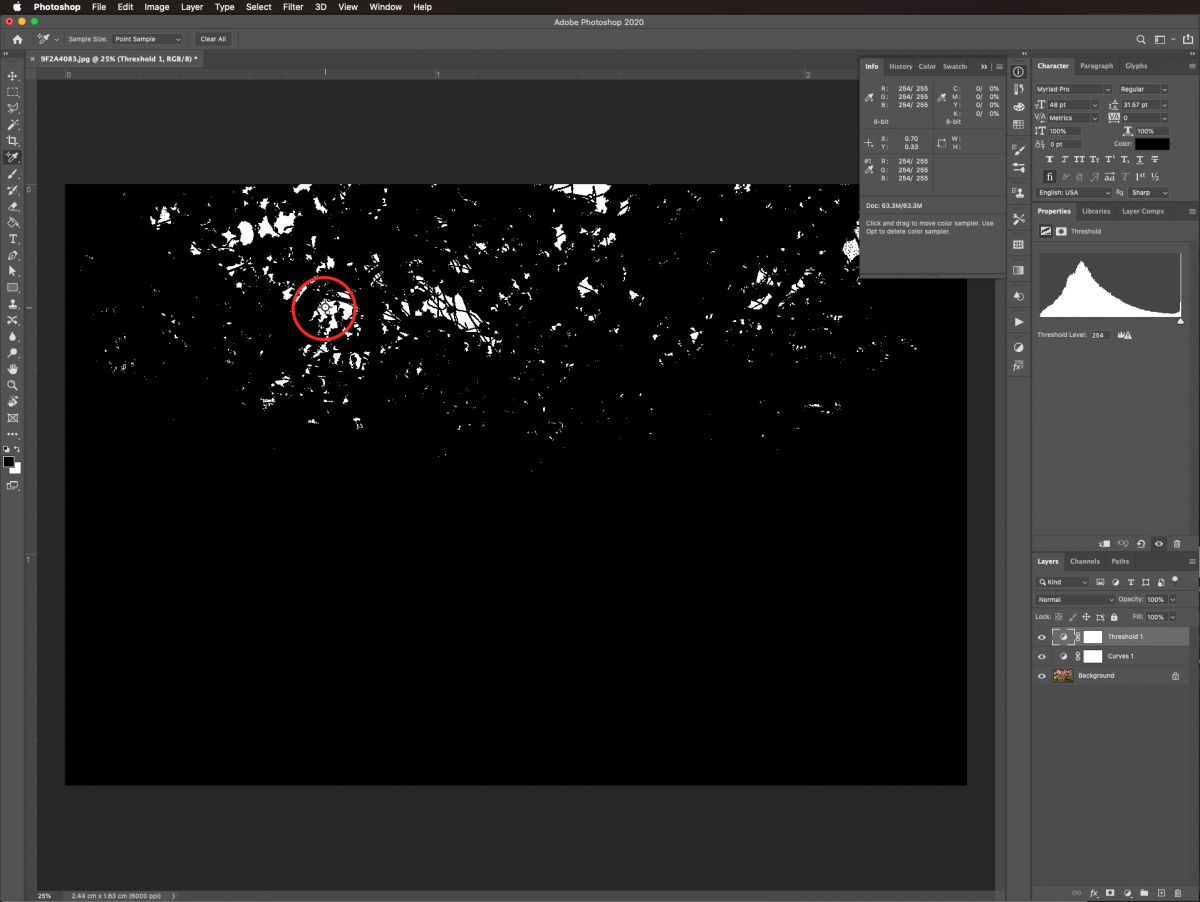
Next, we will create a bookmark for the darker areas of the image. Move the Threshold lever all the way to the left until everything is white. Then, move it slightly to the right until some black begins to appear.
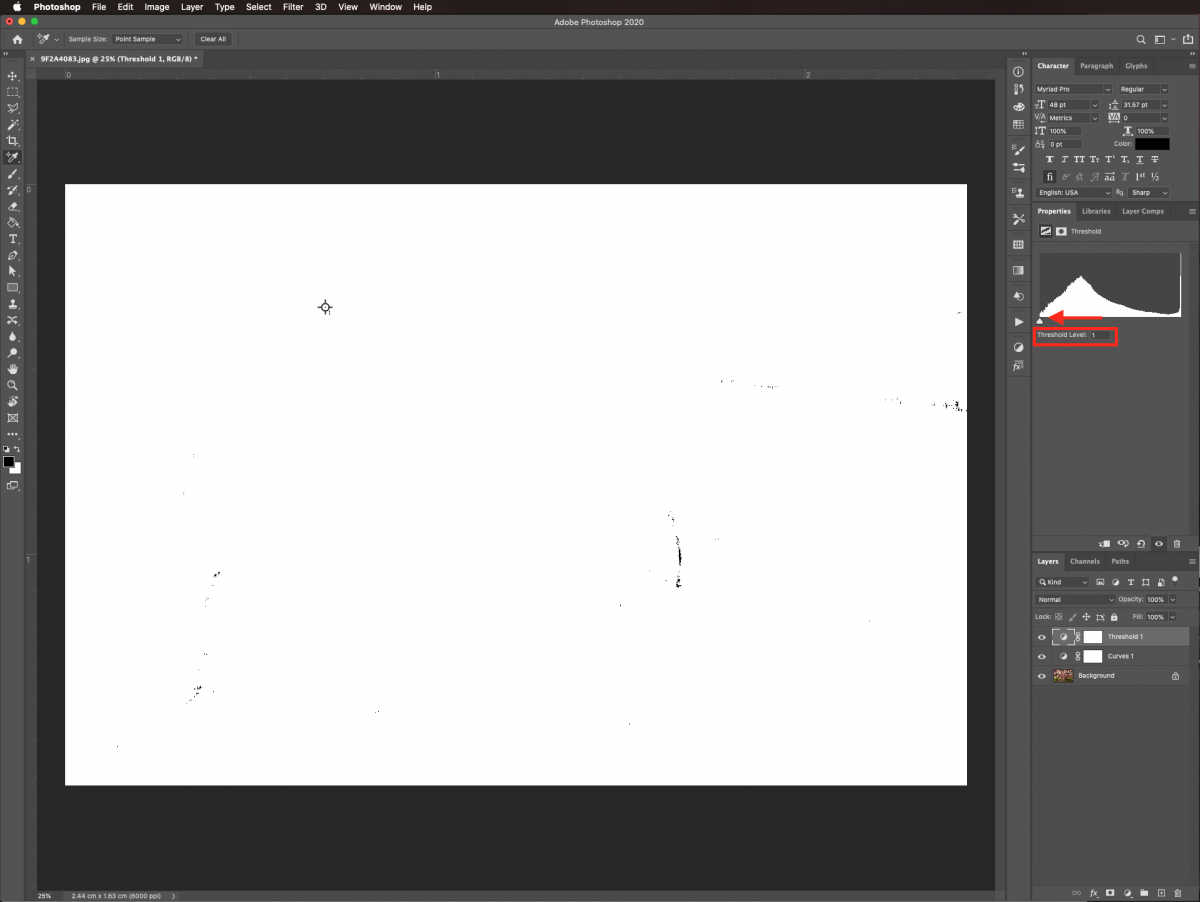
Make another mark with the Color sampler tool (I) to bookmark the darker areas. The mark should have the number 2.
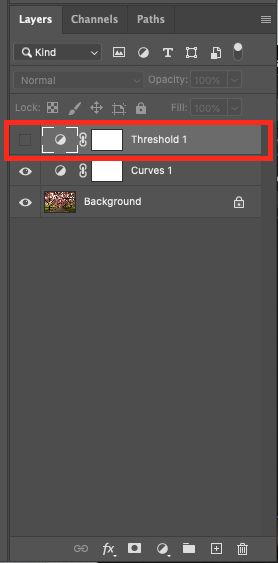
To add the Midpoint, turn off the Threshold layer visibility by clicking on the small eye icon on the left side of its thumbnail.
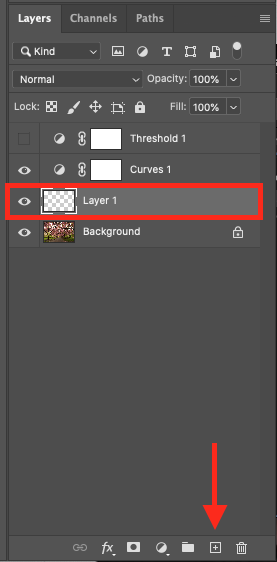
Create a New layer between your image and the adjustment layers. Do this by clicking on the small Plus icon button at the bottom of the Layers panel.
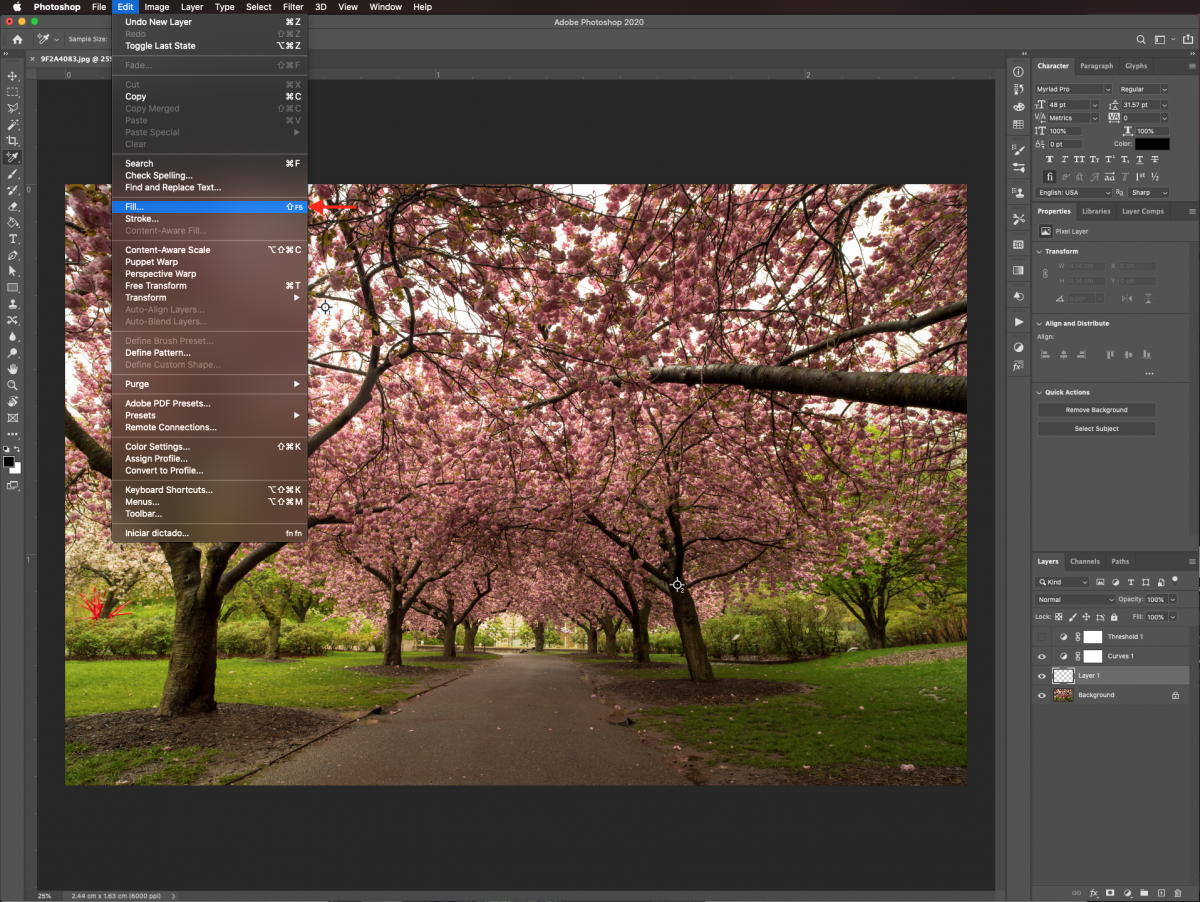
Go to the Edit menu and click Fill (shift + F5).
Under the Fill option choose 50% grey and then click OK.
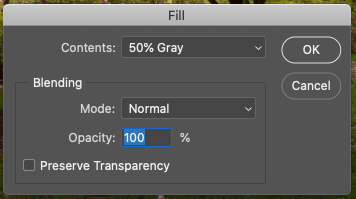
Change the Blending mode to Difference.
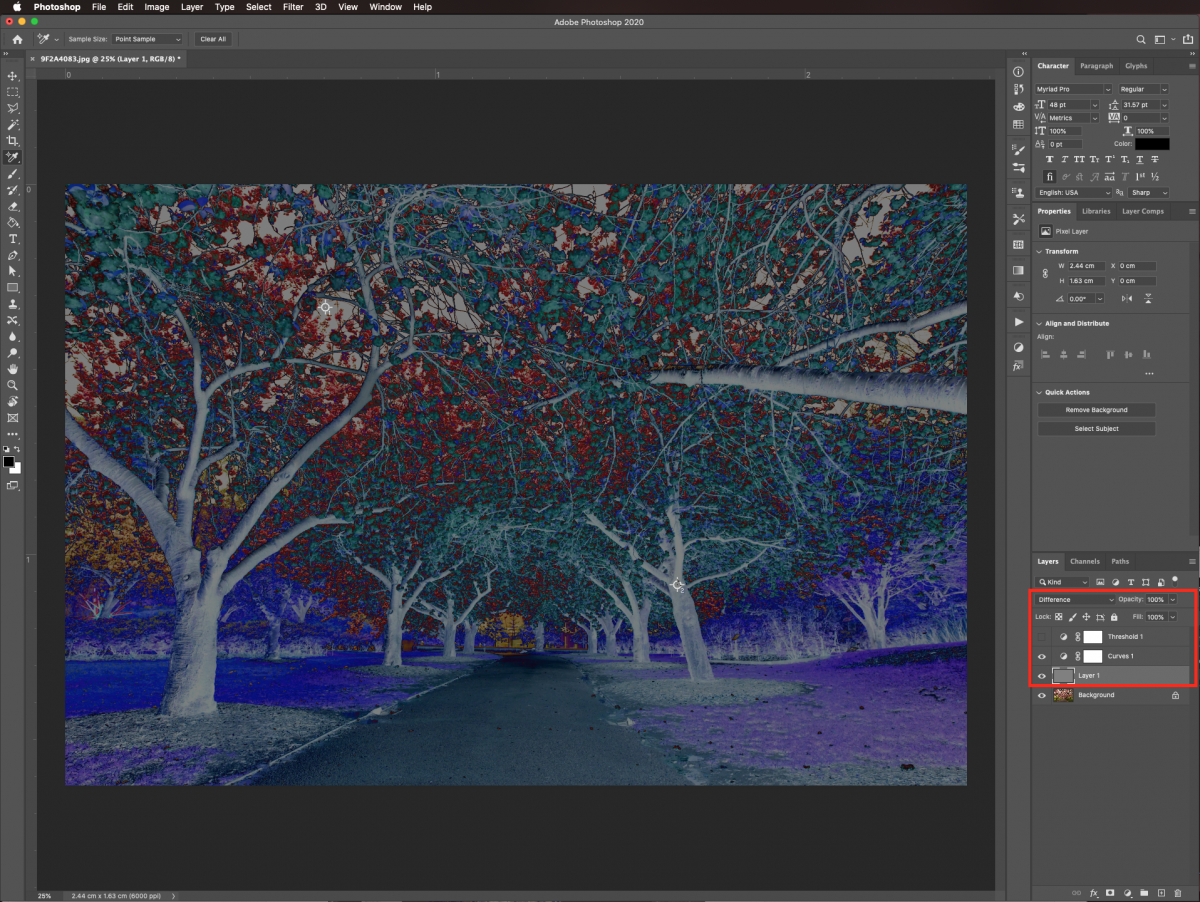
Turn the Threshold Layer visibility back on. Move the lever all the way to the left. Then move it a bit to the right to bring back some of the black.
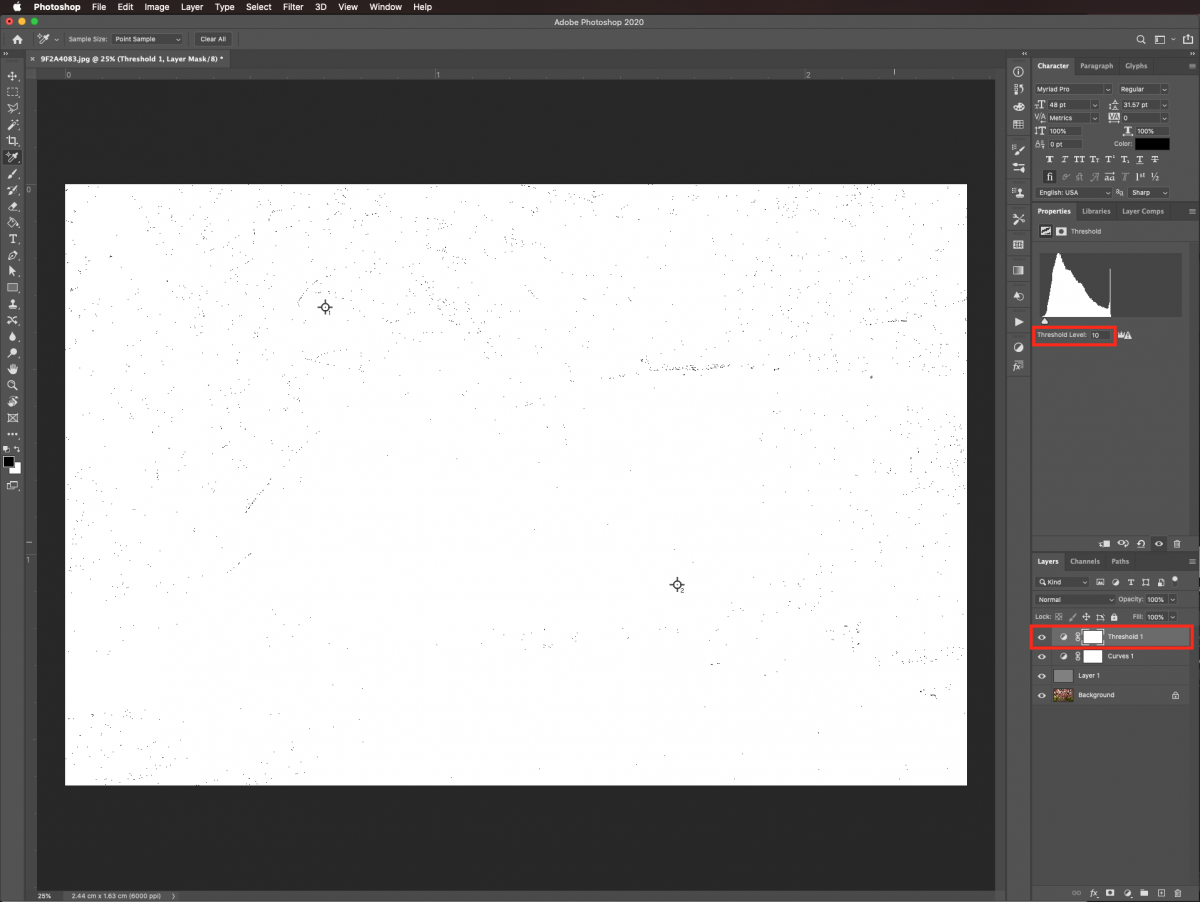
Add a third mark with the Color sampler tool (I) to bookmark the midtones. This mark should have the number 3.
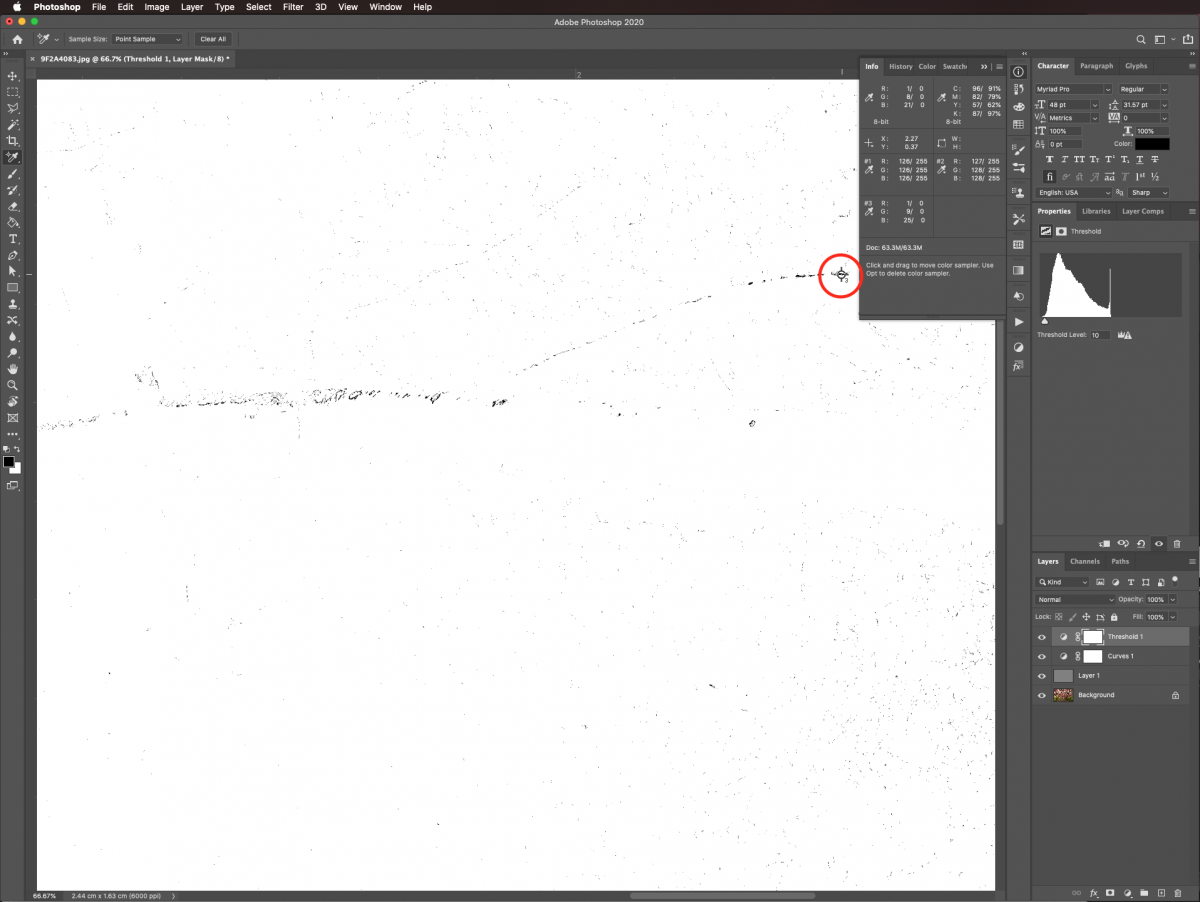
Turn the Threshold and Gray layers off by clicking the small eye icon. You can also Delete them if you want.
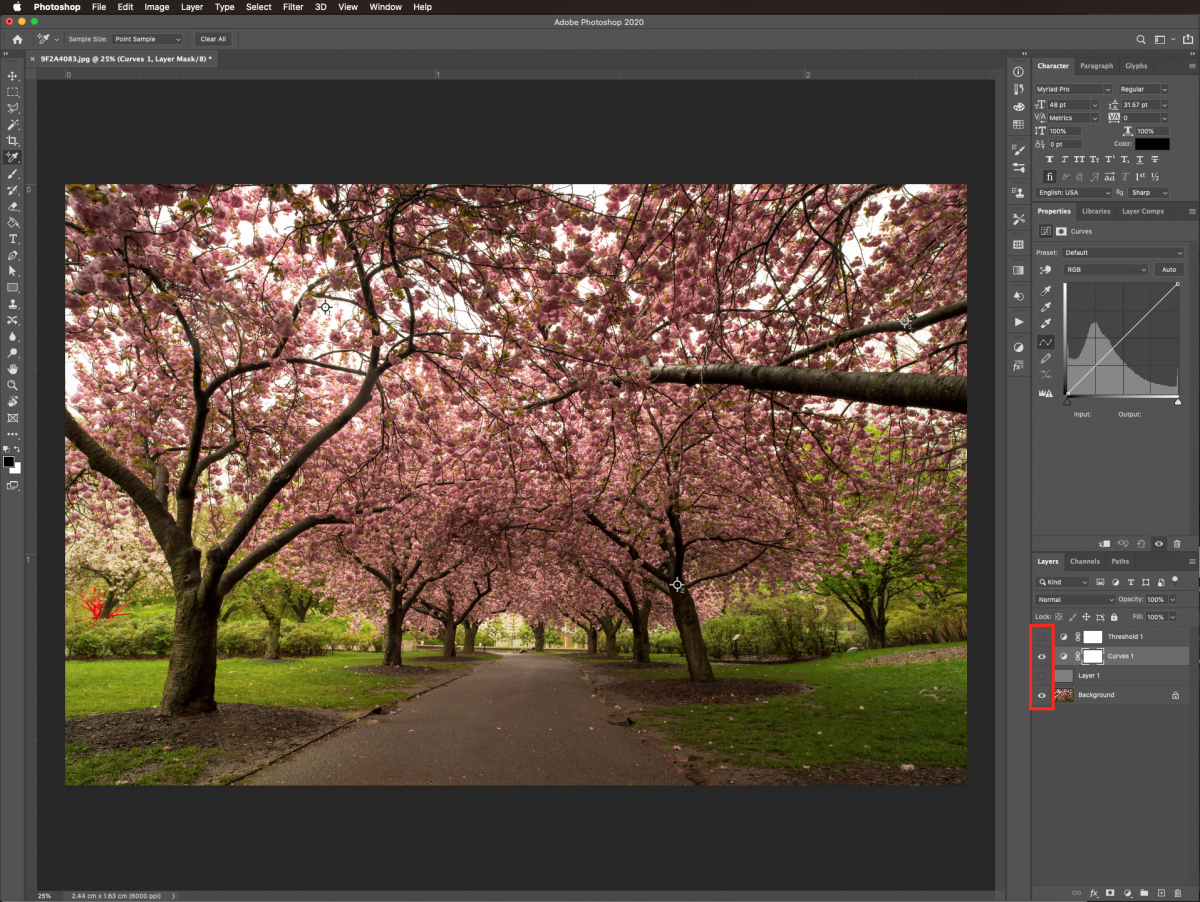
Select the Curves layer. In the Properties panel click on the small white eyedropper icon on the left side to set the white point. Click on top of your 1 bookmark.
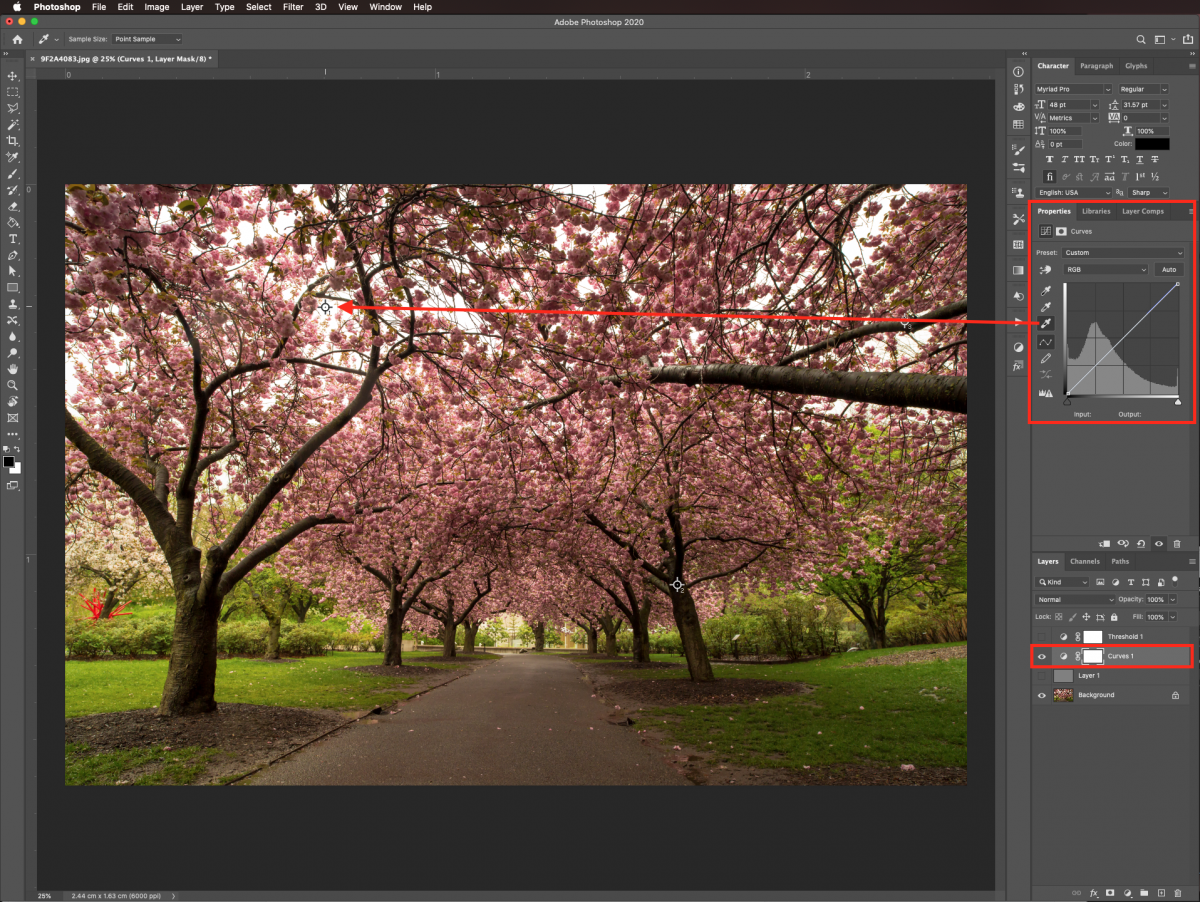
Choose the black eyedropper icon on the left side to set the black point. Next, click on top of bookmark number 2.
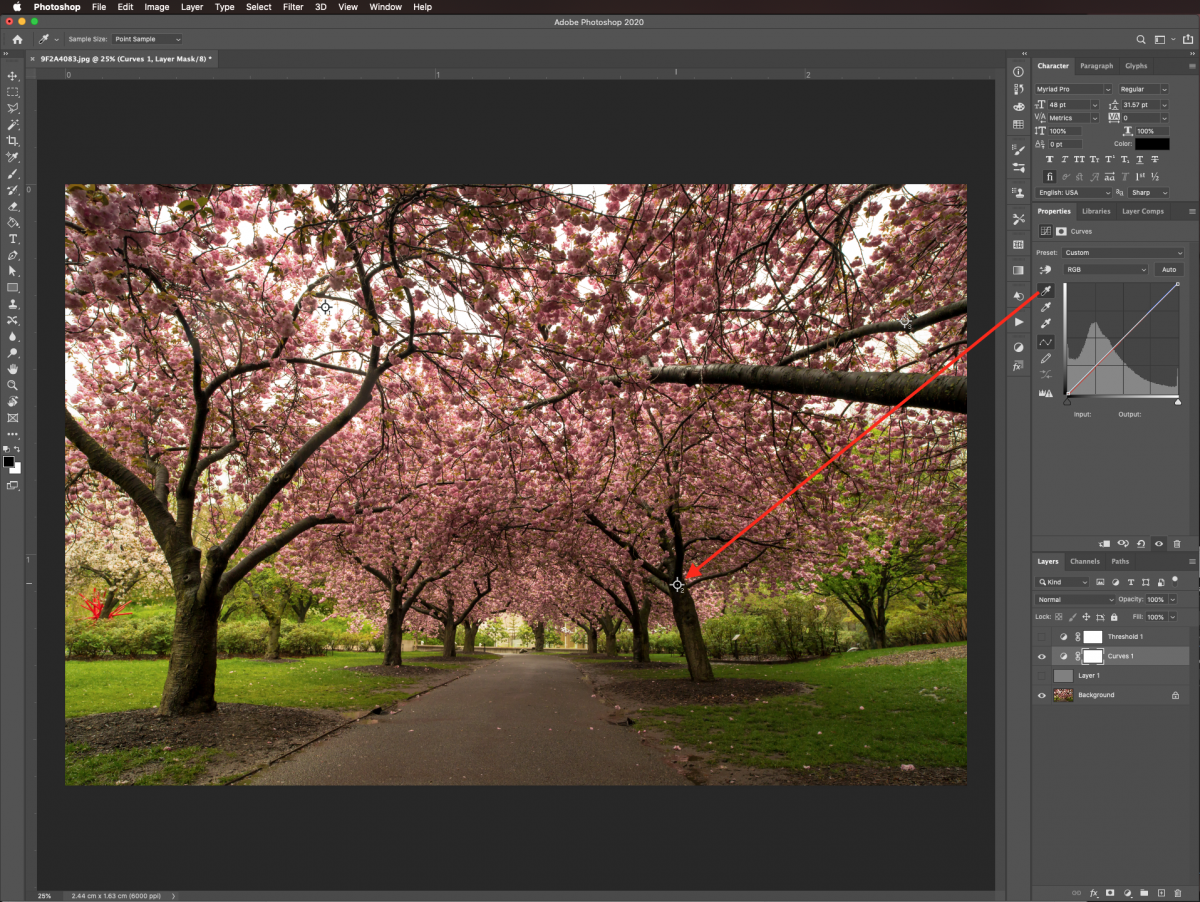
Finally, do the same with the gray point.
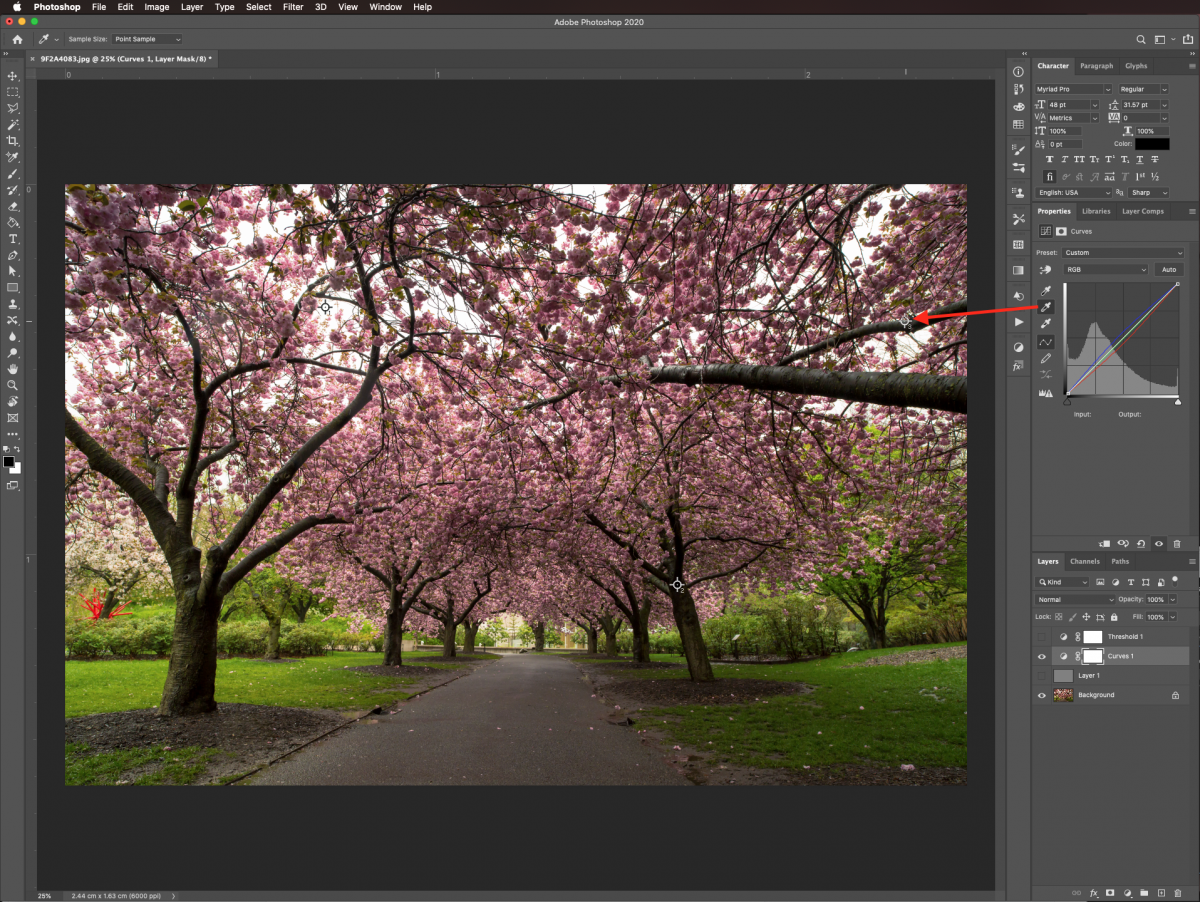
You should notice the changes on the image as you set the points.
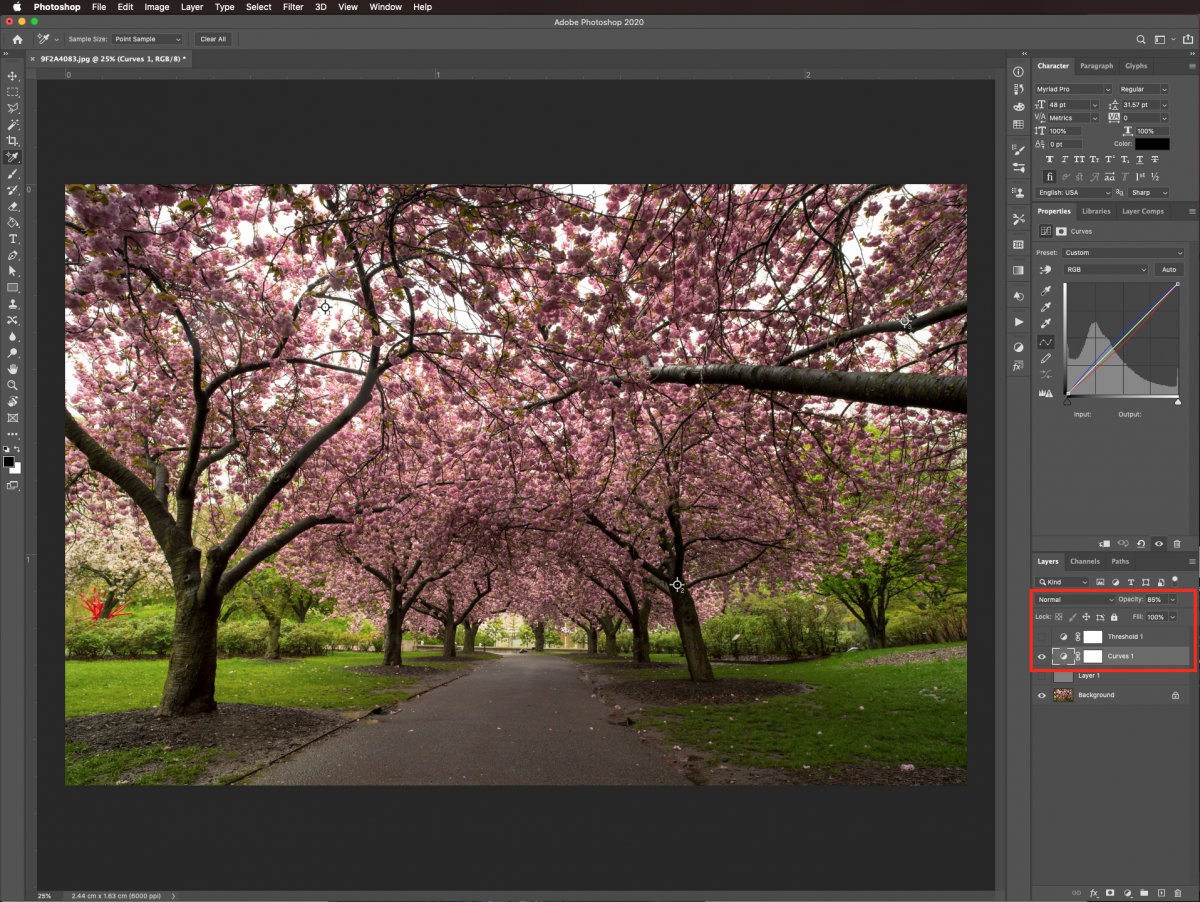
You may want to lower the Opacity of the Curves adjustment layer a bit. We set the opacity to 85%.
Right-click on top of the bookmarks you set with the Color sampler tool (I) and choose Delete to reset them.
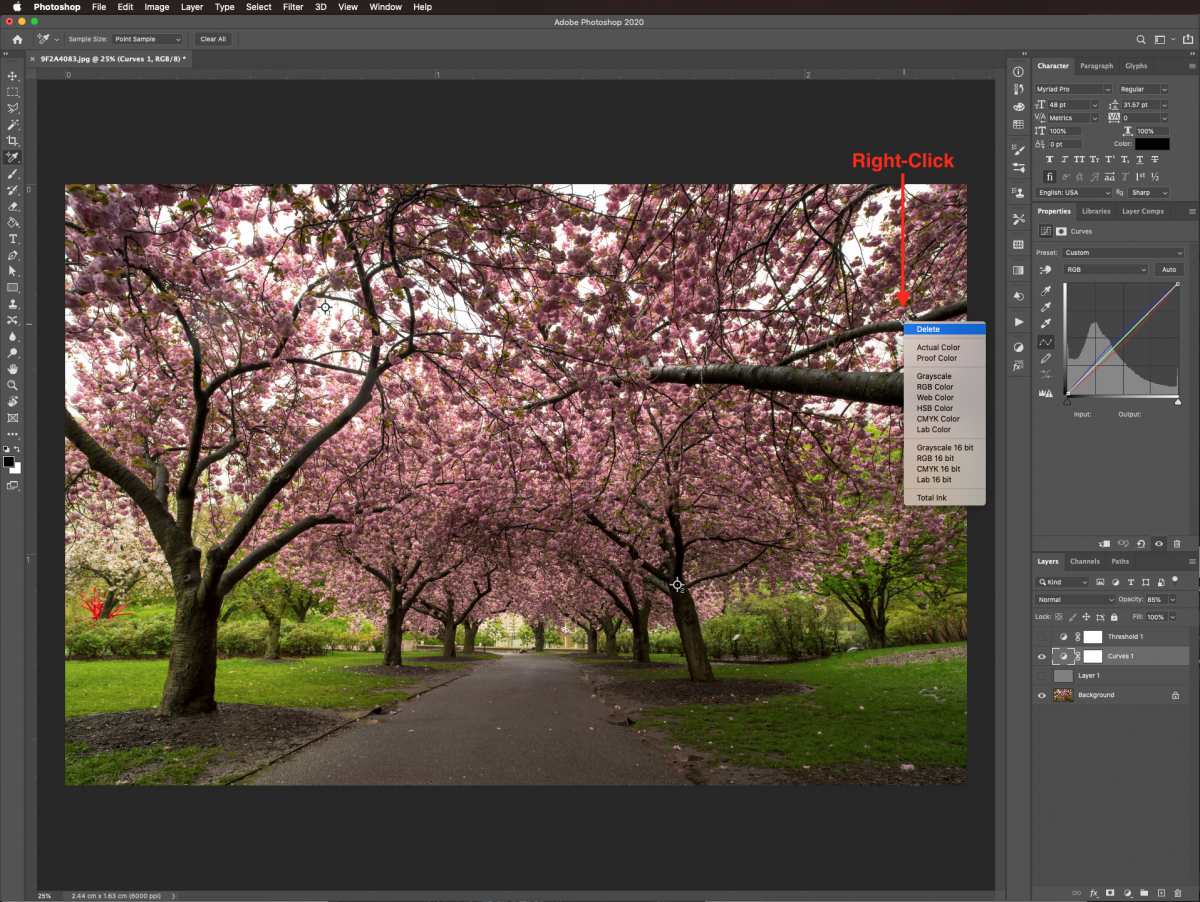
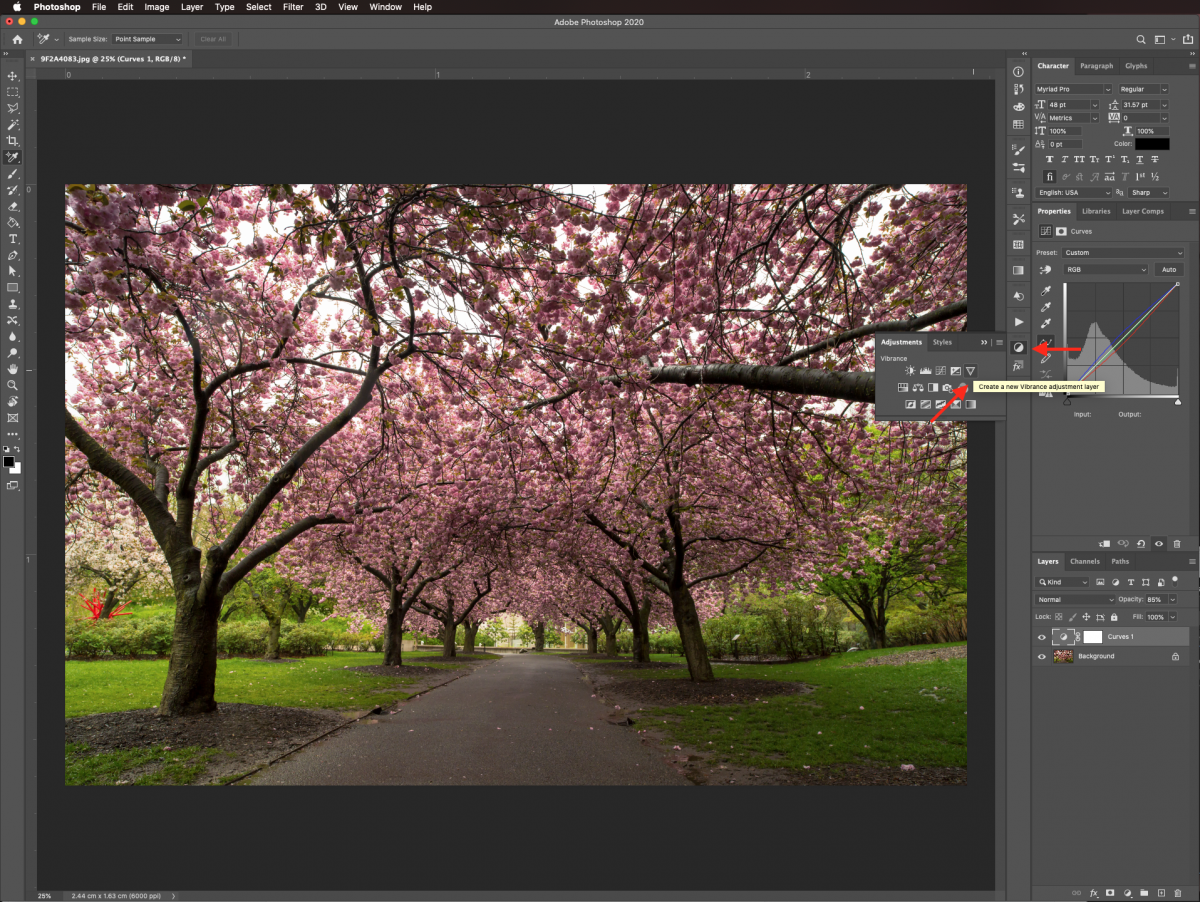
Create a new Vibrance adjustment layer on top of everything.
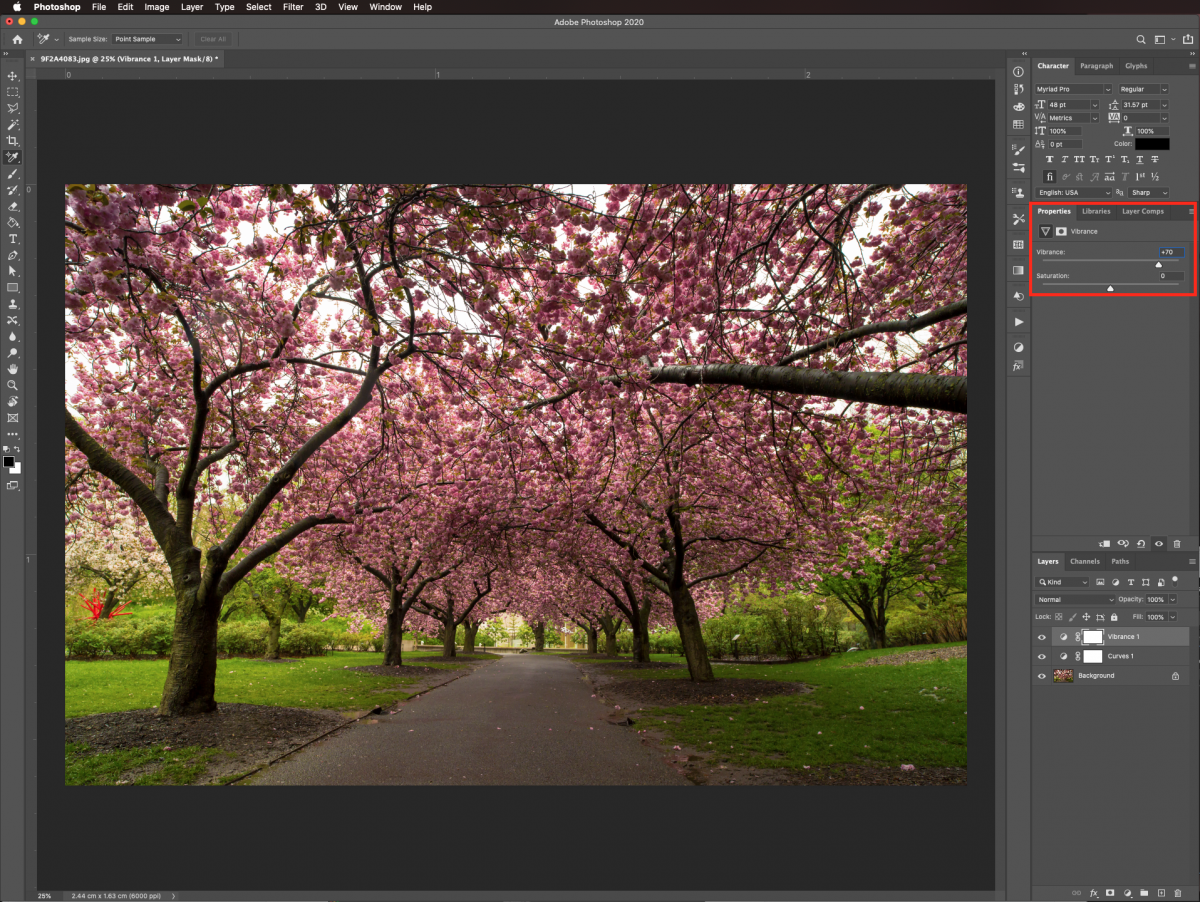
Set the vibrance value to +70 to make the colors pop a bit more.
Below are the before and after images for comparison.
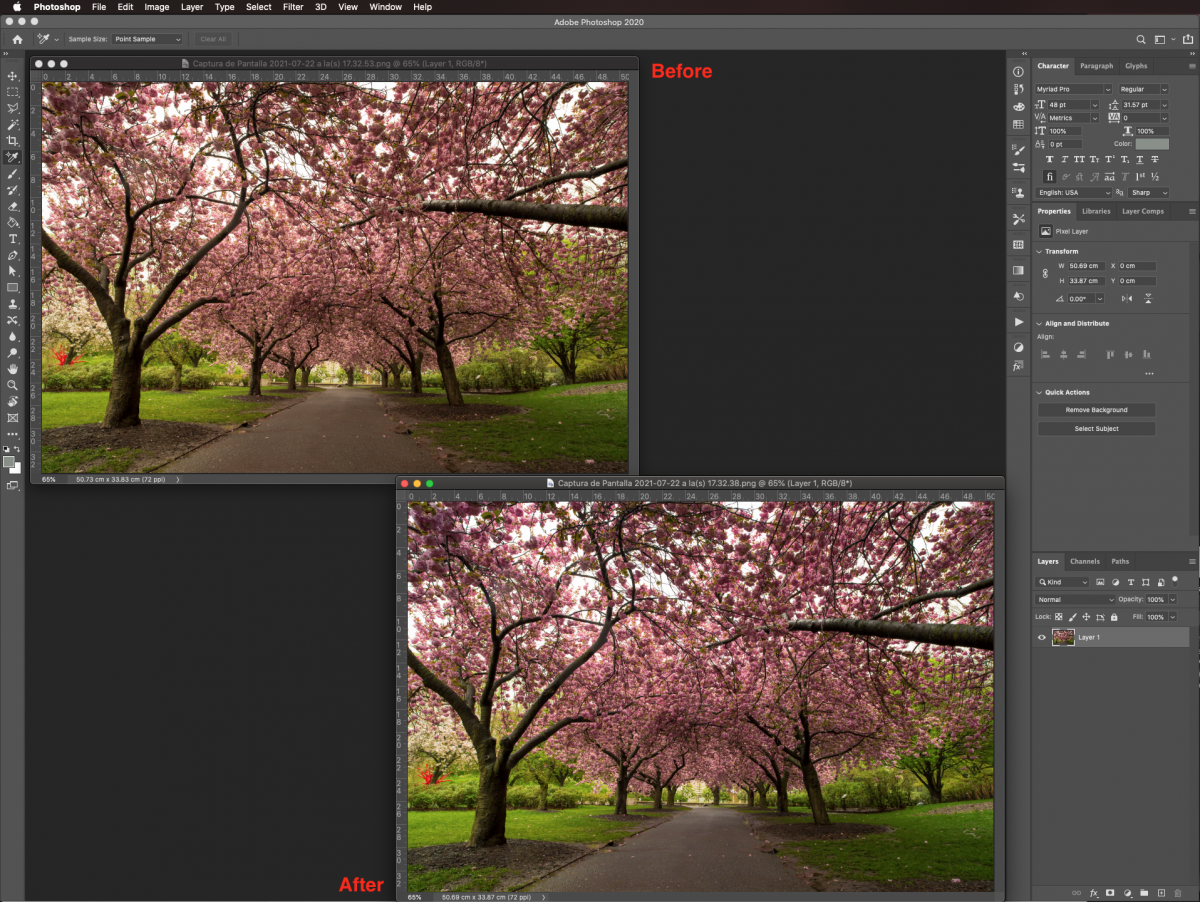
You can use this technique with almost any image you want to adjust.
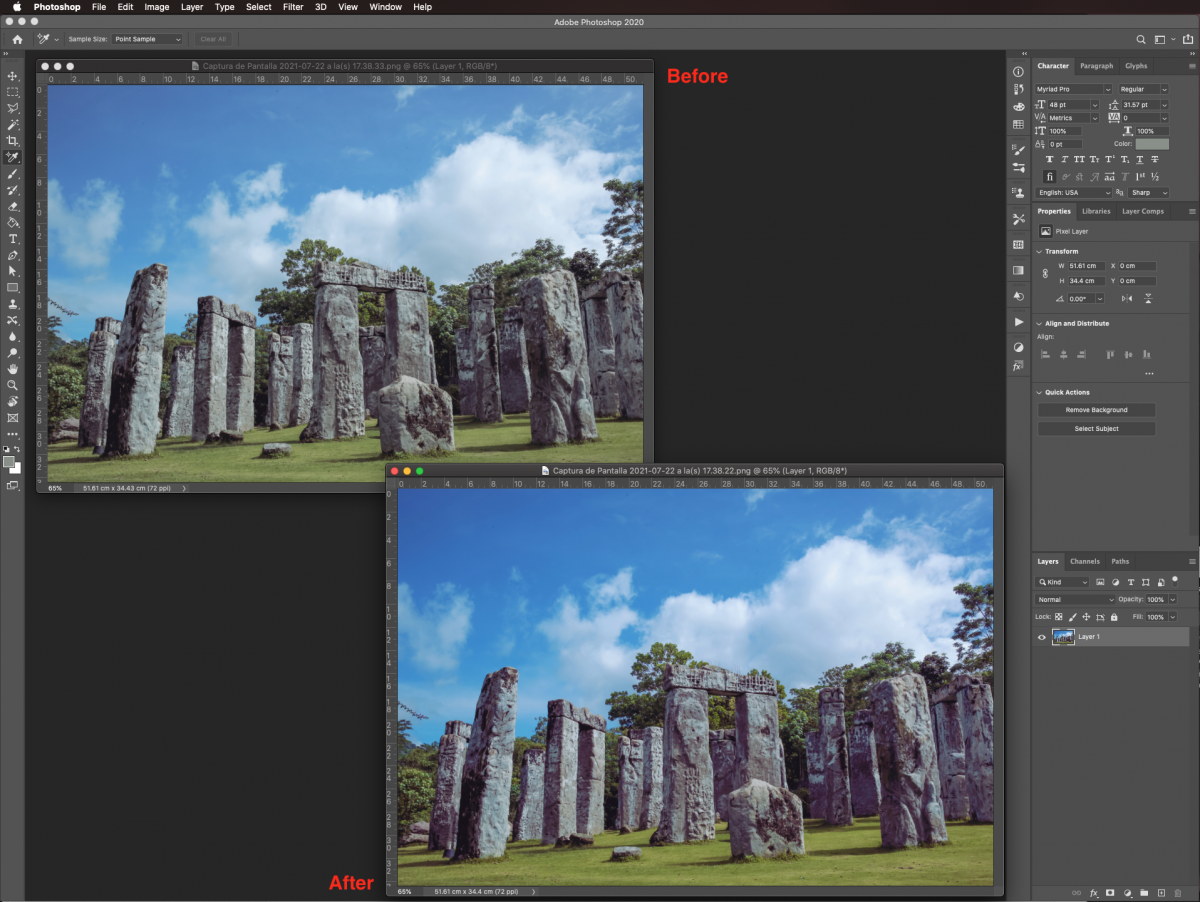
If you liked this tutorial make sure to check out our other guides on adding a shadow to a mockup, making a camouflage pattern, and retouching skin in Photoshop.
We will use a cherry blossom and stonehenge photo from the nature stock photo collection.
Step 1 - Create Curves and Threshold Adjustment Layers
We will be working with adjustment layers. In Photoshop, open the image you need to color correct and create a new Curves adjustment layer in the Adjustments panel.
Next, we also need to create a Threshold adjustment layer.
Step 2 - Bookmark the White Point of Your Image
In this step we want to create a bookmark for the lighter areas of the photo. In the Threshold adjustment layer properties, move the lever all the way to the right until everything is black.
Then move it slightly to the left until you see a bit of white. Select the Color sampler tool (I) and click on the white area.
A bookmark will be created where the lighter part of the image is. You will see a mark with the number 1.
Step 3 - Bookmark the Black Point of your Image
Next, we will create a bookmark for the darker areas of the image. Move the Threshold lever all the way to the left until everything is white. Then, move it slightly to the right until some black begins to appear.
Make another mark with the Color sampler tool (I) to bookmark the darker areas. The mark should have the number 2.
Step 4 - Bookmark the Midpoint of your Image
To add the Midpoint, turn off the Threshold layer visibility by clicking on the small eye icon on the left side of its thumbnail.
Create a New layer between your image and the adjustment layers. Do this by clicking on the small Plus icon button at the bottom of the Layers panel.
Go to the Edit menu and click Fill (shift + F5).
Under the Fill option choose 50% grey and then click OK.
Change the Blending mode to Difference.
Turn the Threshold Layer visibility back on. Move the lever all the way to the left. Then move it a bit to the right to bring back some of the black.
Add a third mark with the Color sampler tool (I) to bookmark the midtones. This mark should have the number 3.
Turn the Threshold and Gray layers off by clicking the small eye icon. You can also Delete them if you want.
Step 5 - Adjust the Color with the Curves Adjustment Layer
Select the Curves layer. In the Properties panel click on the small white eyedropper icon on the left side to set the white point. Click on top of your 1 bookmark.
Choose the black eyedropper icon on the left side to set the black point. Next, click on top of bookmark number 2.
Finally, do the same with the gray point.
You should notice the changes on the image as you set the points.
You may want to lower the Opacity of the Curves adjustment layer a bit. We set the opacity to 85%.
Step 6 - Delete Bookmarks and Add a Vibrance Adjustment Layer
Right-click on top of the bookmarks you set with the Color sampler tool (I) and choose Delete to reset them.
Create a new Vibrance adjustment layer on top of everything.
Set the vibrance value to +70 to make the colors pop a bit more.
Below are the before and after images for comparison.
You can use this technique with almost any image you want to adjust.
If you liked this tutorial make sure to check out our other guides on adding a shadow to a mockup, making a camouflage pattern, and retouching skin in Photoshop.
Related Tutorials
Photoshop Tutorials
How to Use Text Effects in Photoshop
With Photoshop Text Effects, you can create text with impact in just a few steps.
Photoshop Tutorials
How to Use EPS Files in Photoshop
In this tutorial, learn how to use EPS files in Photoshop as Smart Objects to maintain image quality
Procreate Tutorials
How to Use Photoshop Brushes in Procreate
In this step by step tutorial we will show you how to use your Photoshop brushes in Procreate.
Silhouette Tutorials
How to Use Advanced Color Settings in Silhouette Studio
Discover the Advanced Color Settings in Silhouette Studio!
Affinity Tutorials
How to Use Color Palettes in Affinity Designer
Learn how to use color palettes in this Affinity Designer tutorial.
Font Tutorials
How to Use SVG Color Fonts in Illustrator
Learn how to use SVG color fonts in Illustrator in this beginner friendly tutorial.