By Design Bundles
Photoshop Tutorials24 min
How to Create a Cracked Skin Effect in Photoshop
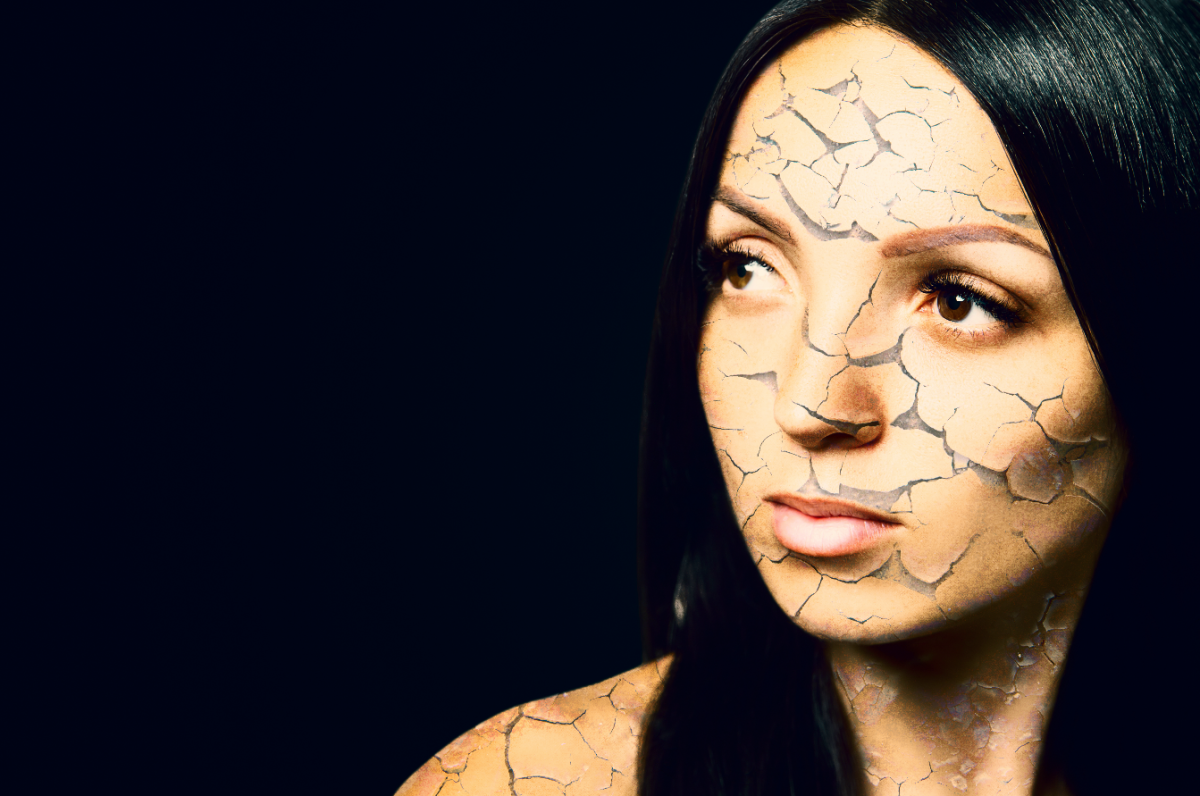
Today, we will create a cracked skin effect in Photoshop. It looks really cool, and it’s fairly easy to achieve by just overlapping some textures on the skin and blending them onto your subject using Photoshop tools. You can apply this effect to your friend’s photos and turn them into cool spooky gifts!
For this tutorial, we will use a stock photo of a female model to apply this effect to. We will also use a dry ground texture and a grunge texture JPG to achieve the effect.
Contents
Since our image has a white background, we are going to isolate the subject using a Layer Mask and add a darker background to it with a Gradient Fill layer.
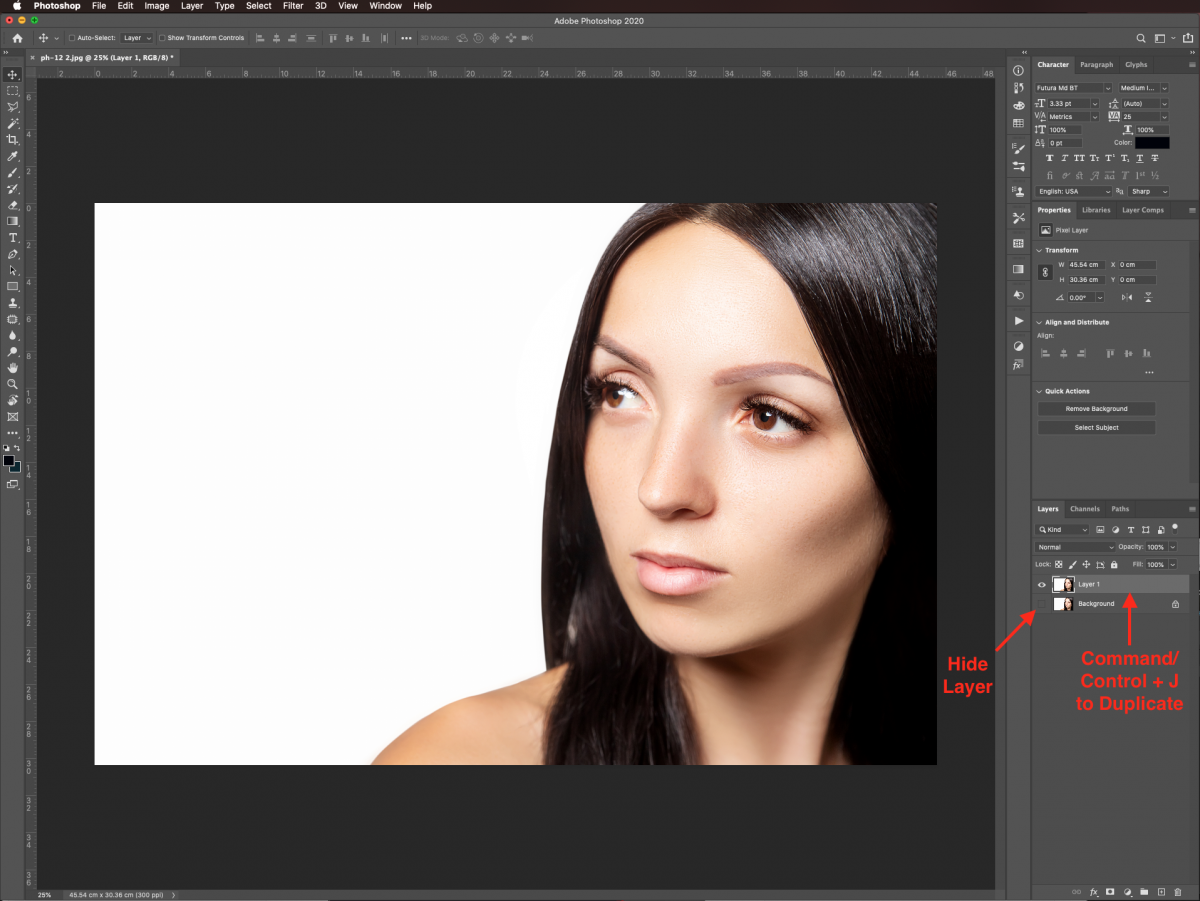
In Photoshop, open the image you chose to work with and create a duplicate (Command/Control + J). It is always good practice to keep a copy of the original file in case things go wrong.
You can hide the original background layer by clicking on the small eye icon on the left side of the layer’s thumbnail in the Layers panel.
If you want more detailed instructions on how to mask your subject, check our tutorial on how to smooth mask edges in Photoshop.
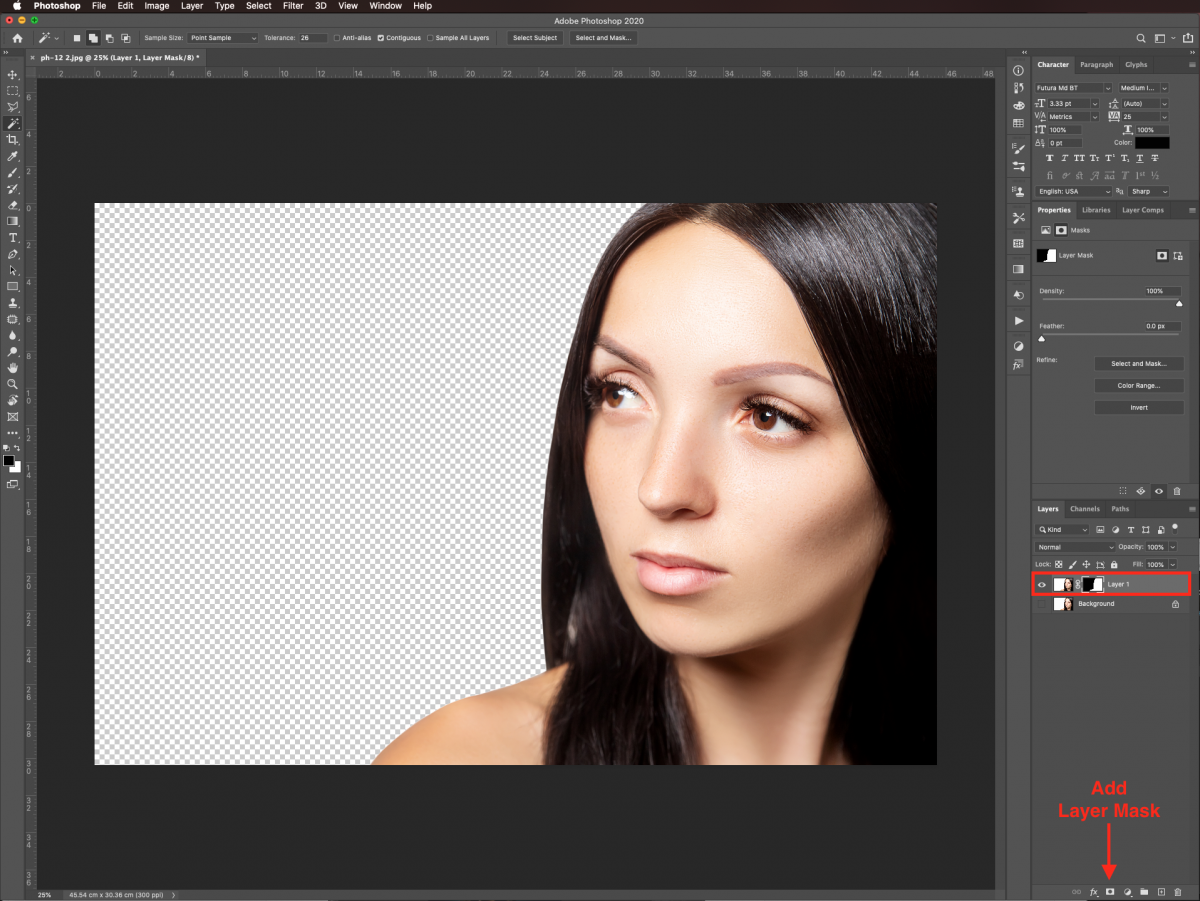
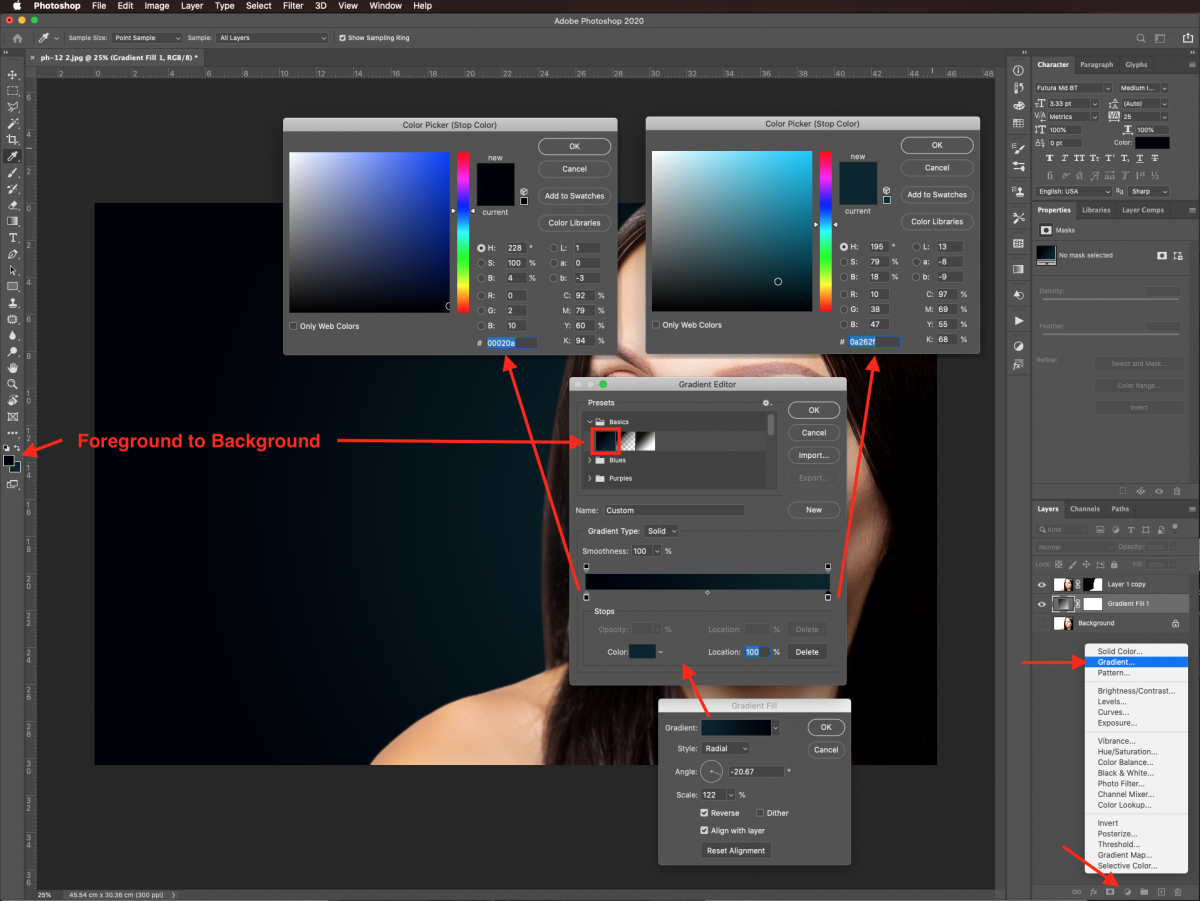
Then, create a new Gradient Fill Adjustment layer under your masked layer by clicking on the small black and white circle icon at the bottom of the Layers panel.
Use the following values on the Gradient panel:
Preset: Foreground to Background (#00020a to #0a262f)
Style: Radial
Angle: -20.67º
Scale: 122%
Reverse: checked
Dither: unchecked
Align with layer: checked
You may need to use different values depending on your images.
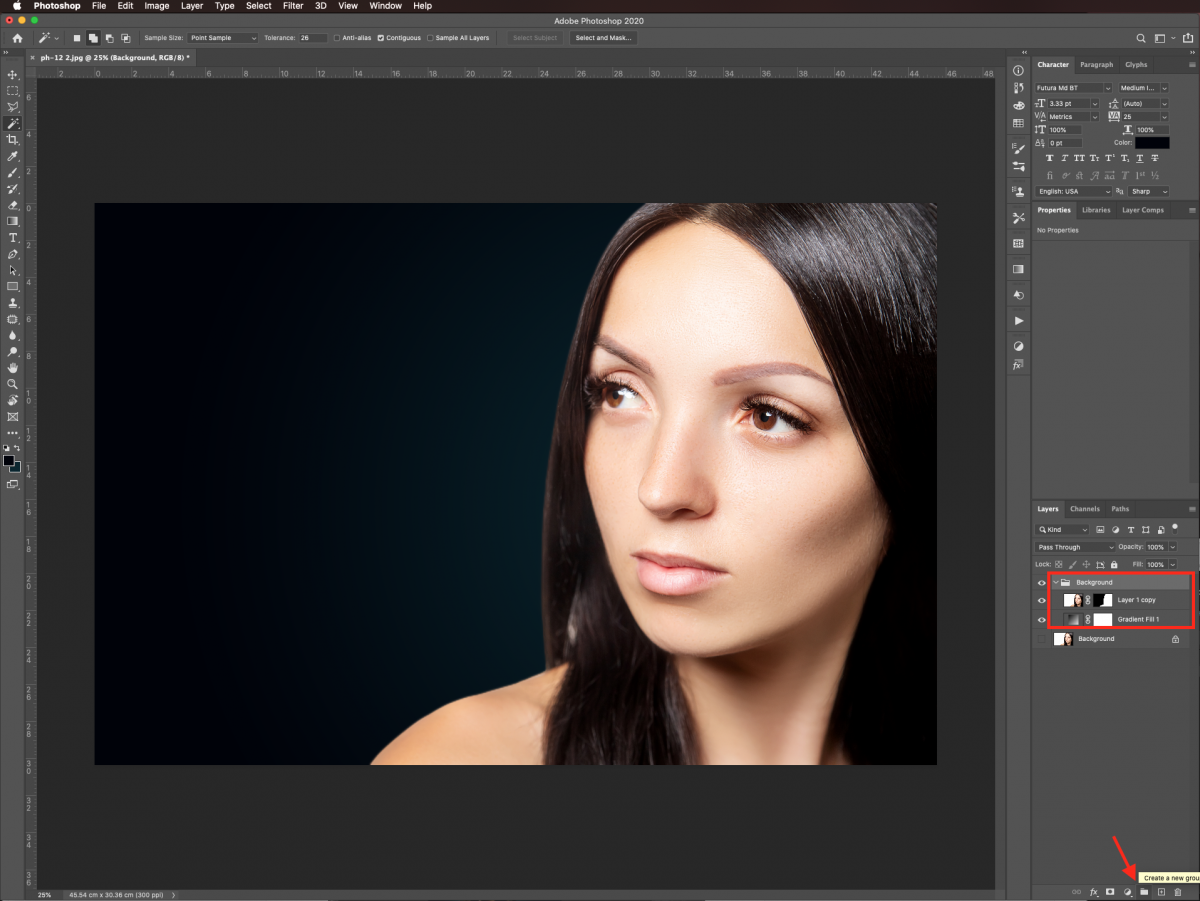
Select both the gradient fill and masked subject layers (use the Shift key) and group them together (Command/Control + G) by clicking on the small folder icon at the bottom of the Layers panel.
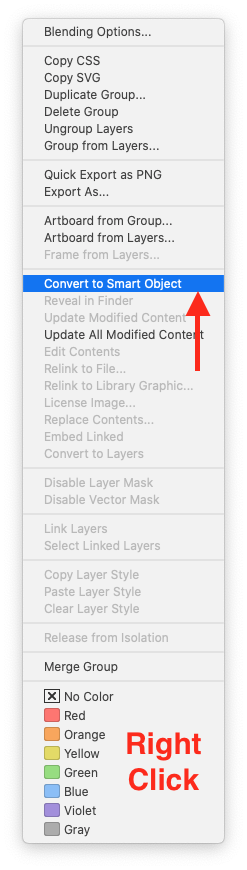
To be able to modify and apply filters in a non-destructive fashion, we are going to convert the group containing the main subject and gradient background into a Smart Object.
Right-click on top of the folder and choose Convert to Smart Object.
Name the newly created Smart Object Background.
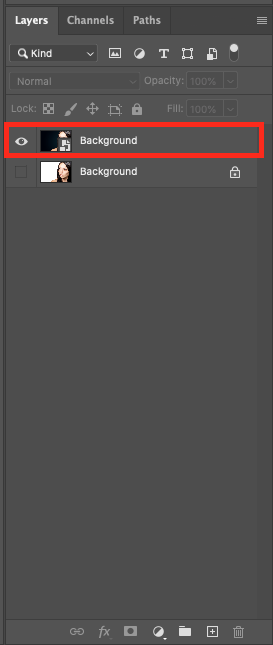
Now, we are going to start adding the cracks to our subject with the help of some dry dirt texture, blending modes, and layer styles.
Open the dry ground texture file and drag it onto your original document.
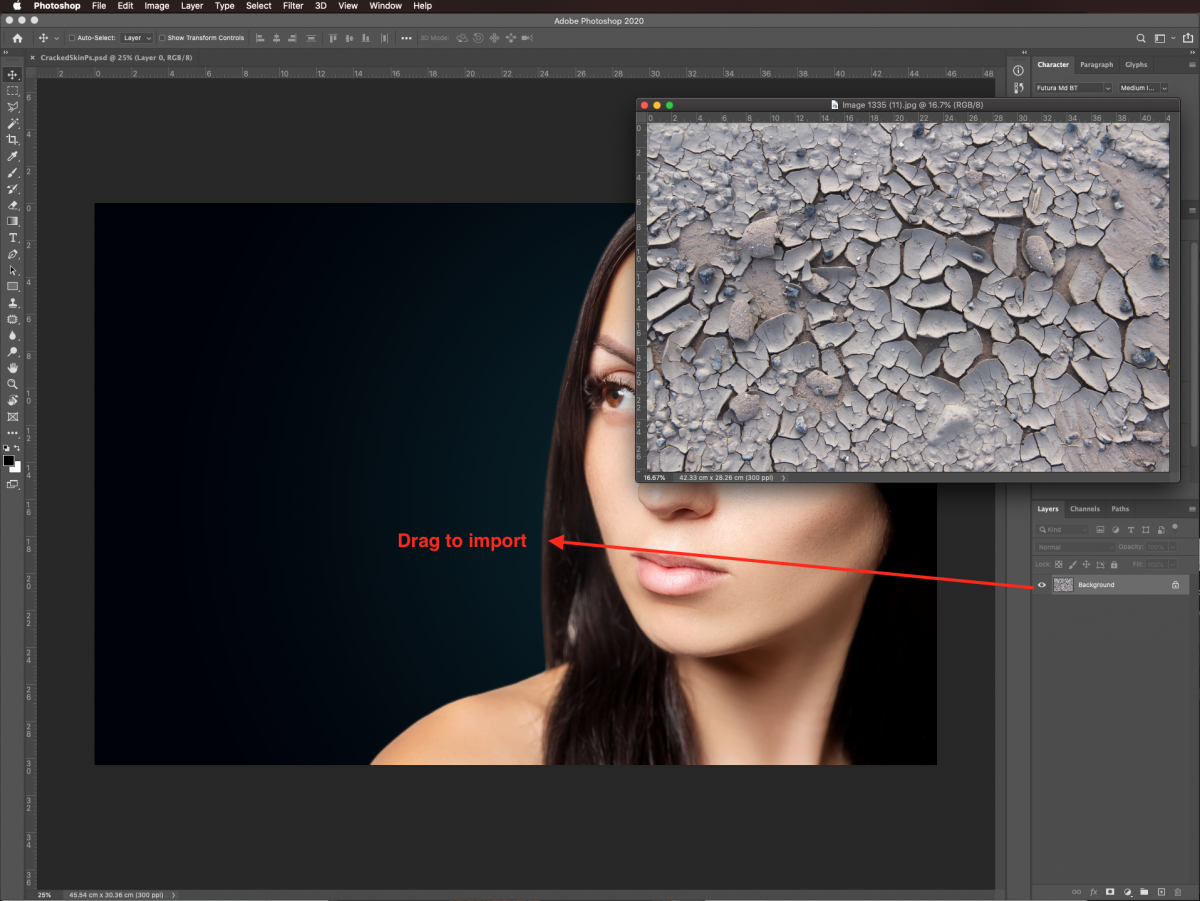
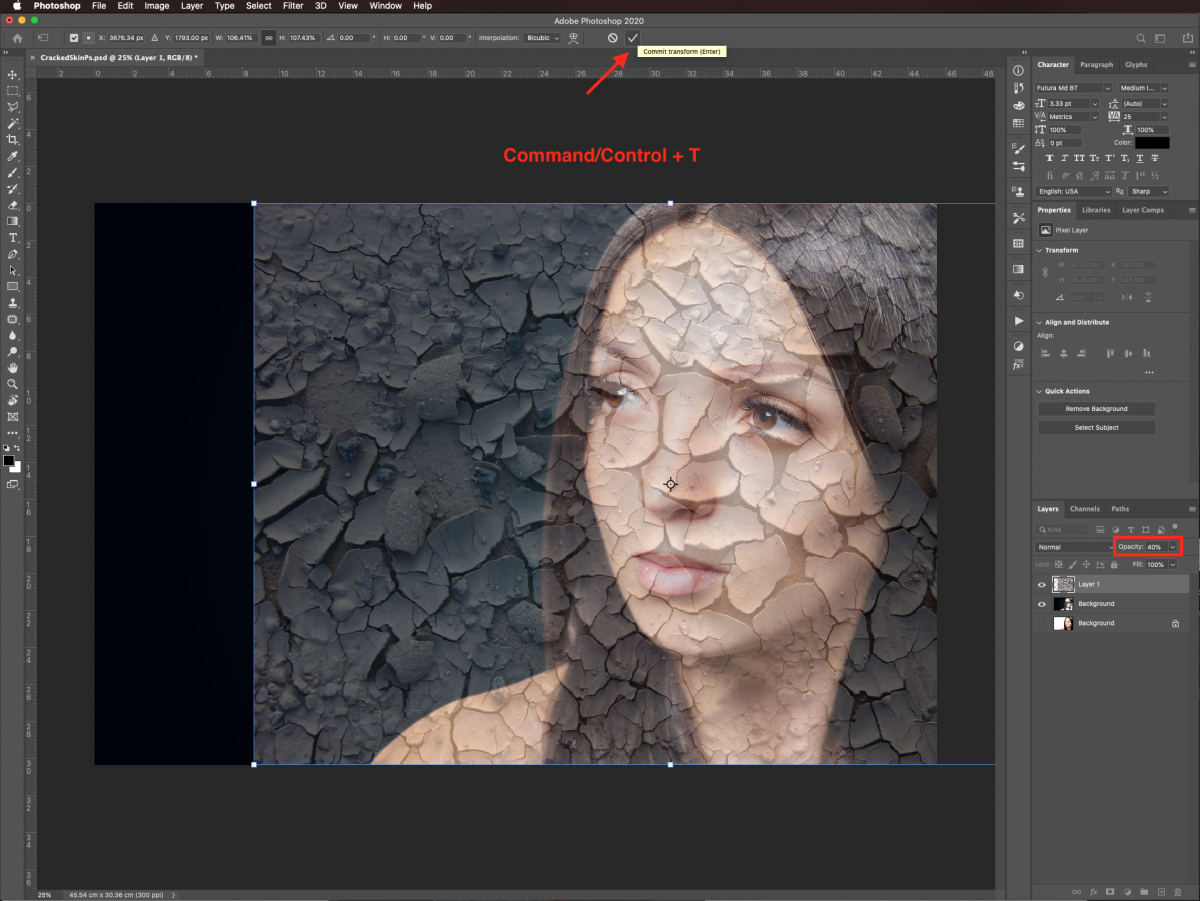
Use Free Transform (Command/Control + T) to resize, rotate, or modify the texture and position certain details where you want them. Hit Enter or click on the small checkmark on the top toolbar to commit the changes.
You may need to reduce its Opacity temporarily to have a better idea of where to place the imported image.
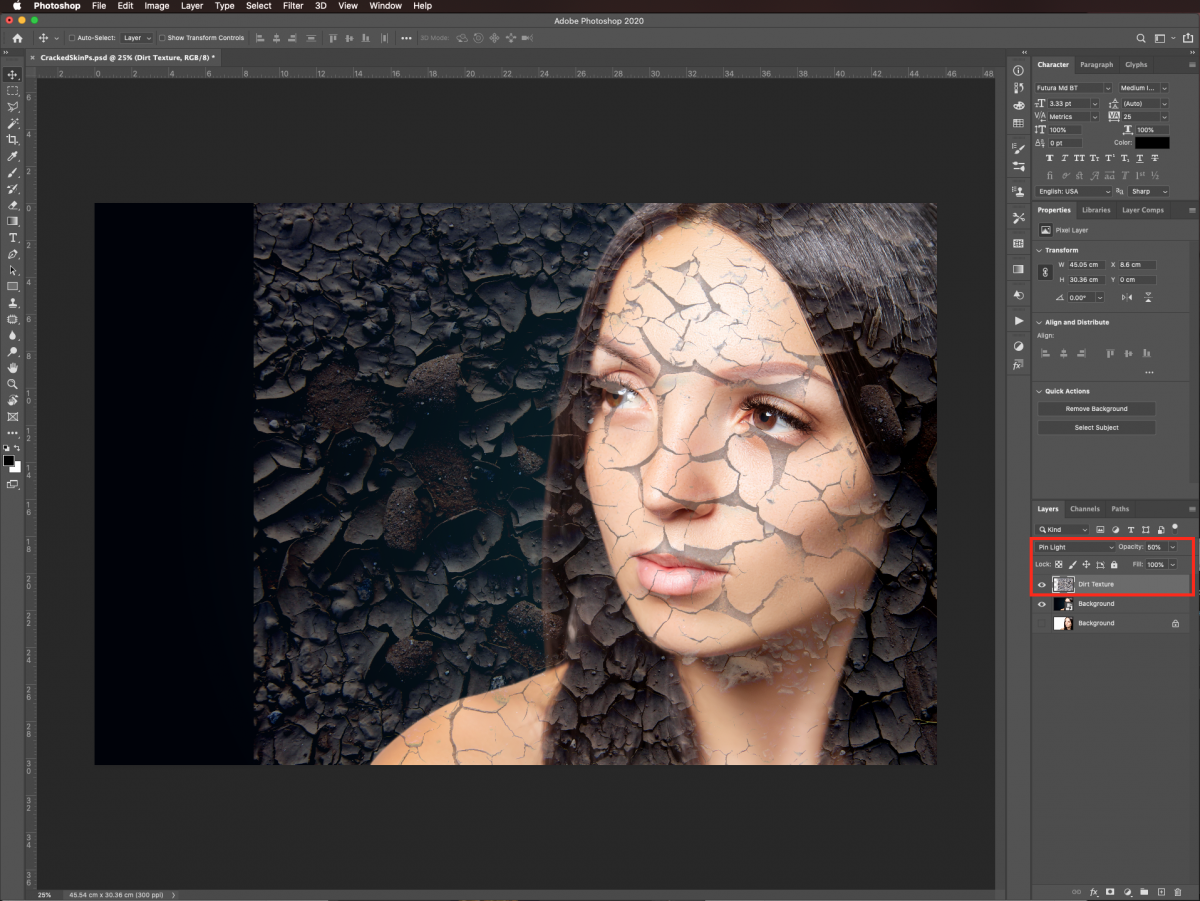
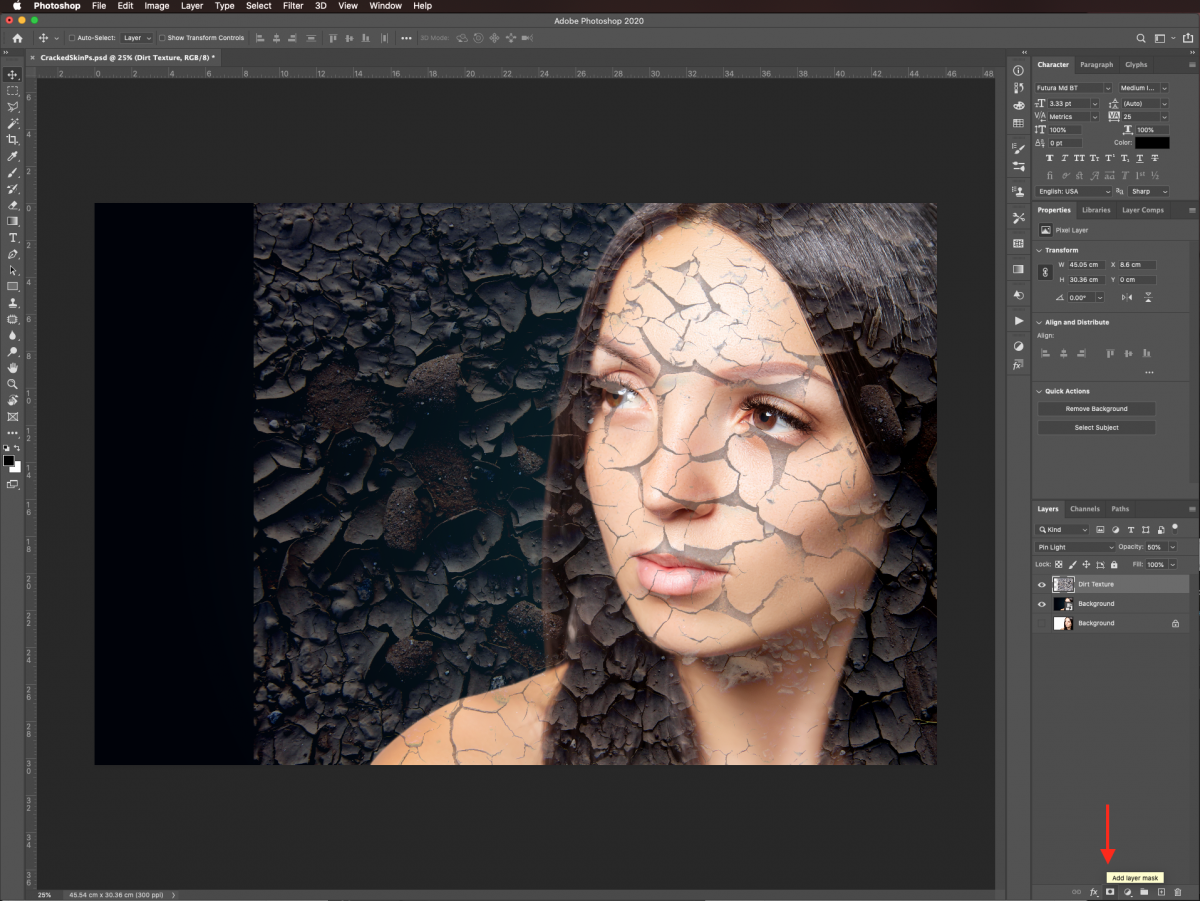
Change the Blending Mode of the dirt texture to Pin Light and lower the Opacity to 50% in the Layers panel. You may need to use different blending modes and/or opacity values depending on your images. Feel free to experiment with them. Name this layer Dirt Texture.
We just want the cracked texture applied to our subject’s skin, so we need to get rid of what’s on top of other areas. We will do that using a layer mask.
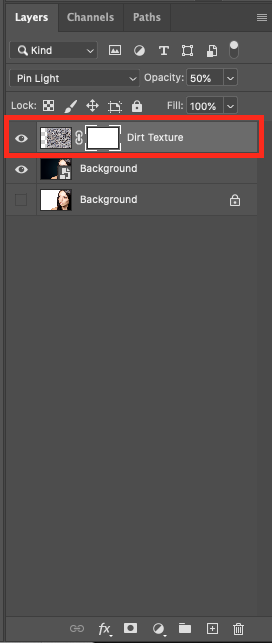
Select your dirt texture layer and add a Layer Mask by clicking on the button at the bottom of the Layers panel.
Select the Brush tool (B). Make it a large and soft brush (100 px, 0% Hardness, 49% Flow). Make sure you are working on the mask thumbnail. Then use black as the Foreground color to erase the areas of the texture that you don’t want to keep, like the ones on top of the eyes, mouth, etc.
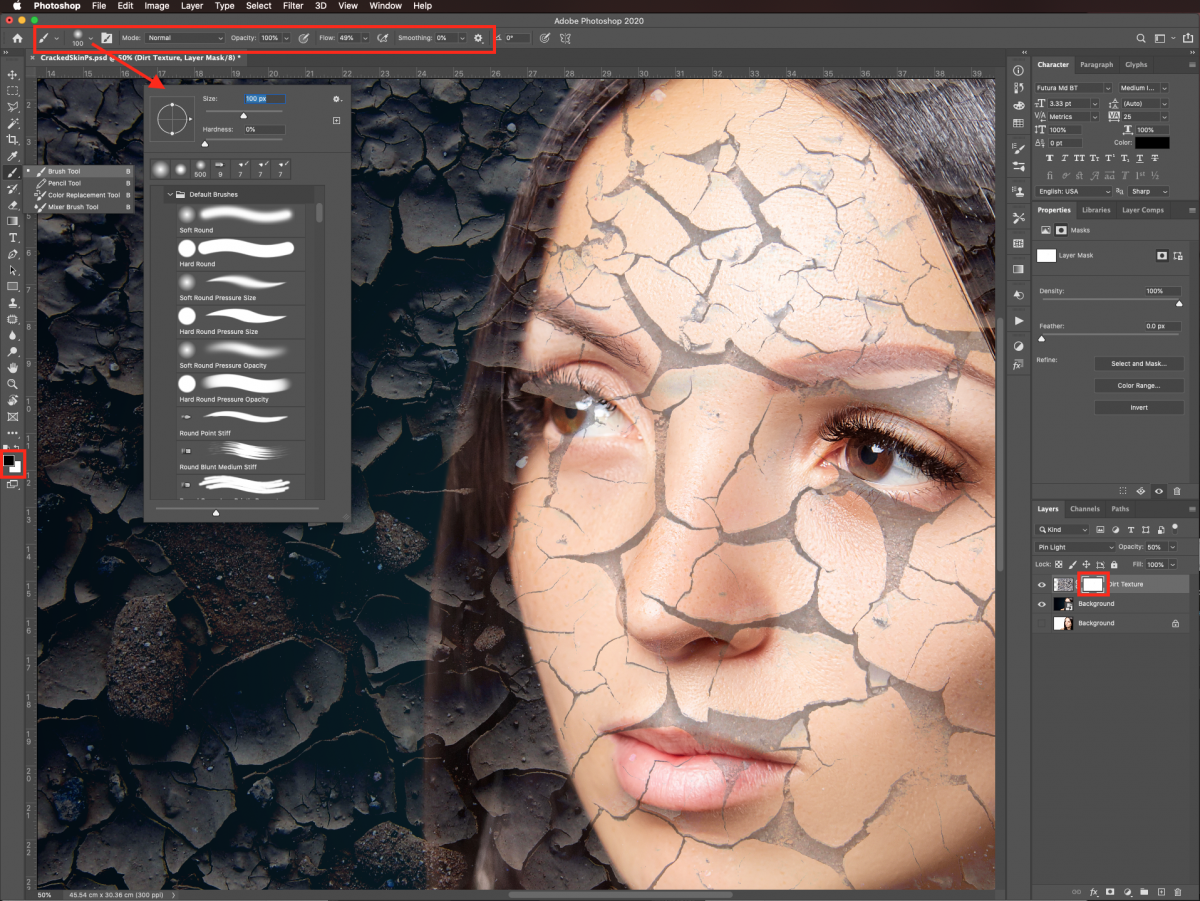
Remember to erase the texture on top of the subject’s clothes and the background if needed.
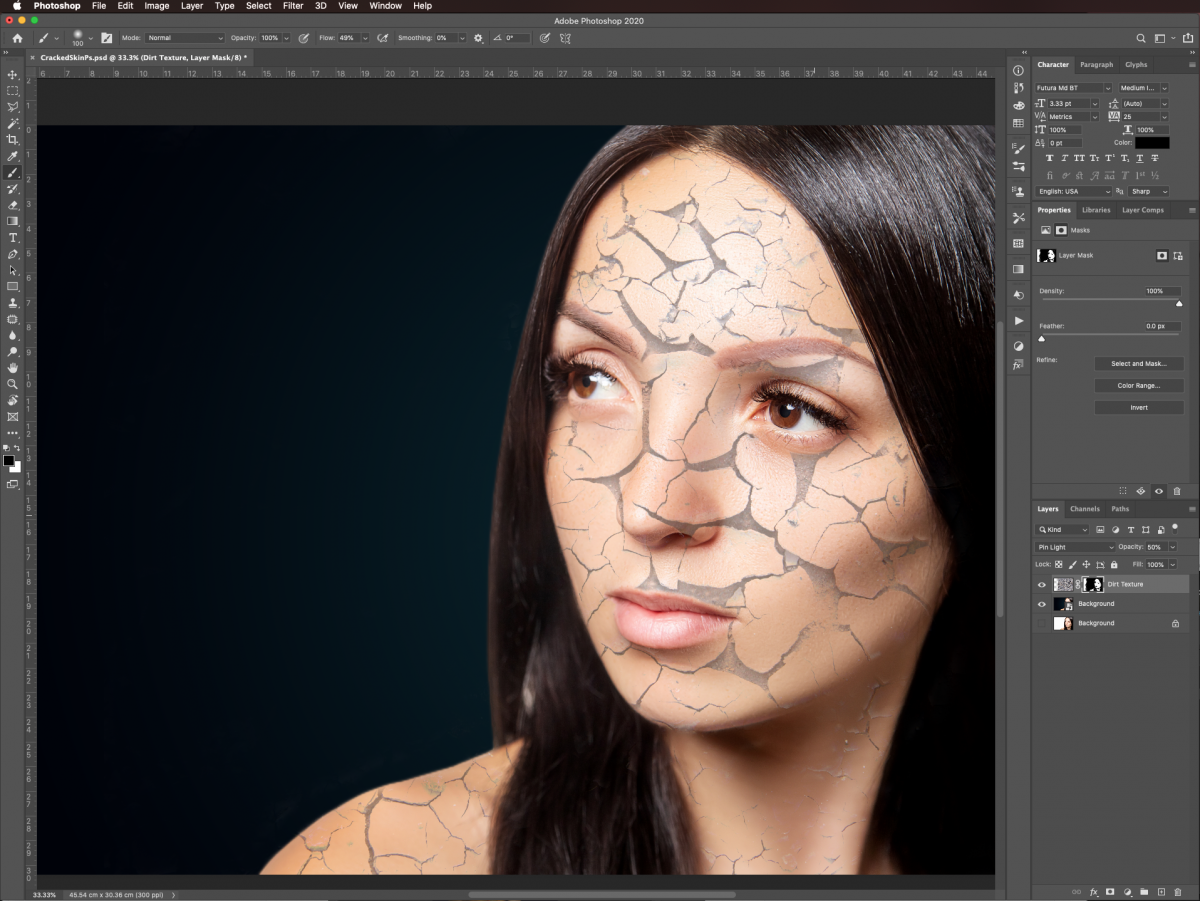
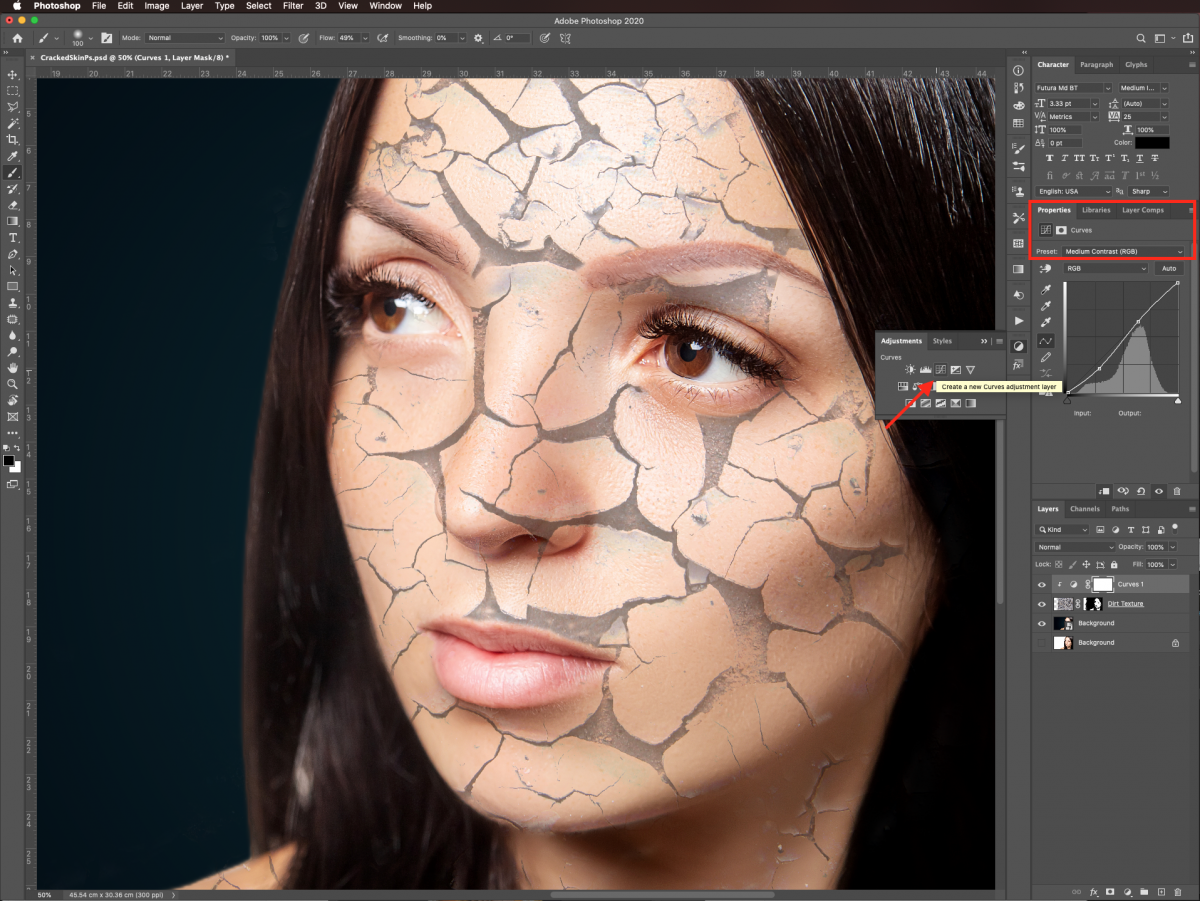
We want to add more contrast to the cracked skin effect. So, head to the Adjustments panel and create a new Curves Adjustment layer on top of everything.
Clip it down so it will only affect the layer under it by clicking on the button with a white square and small bent arrow at the bottom of the Properties panel. Choose the Medium Contrast (RGB) preset from the dropdown menu.
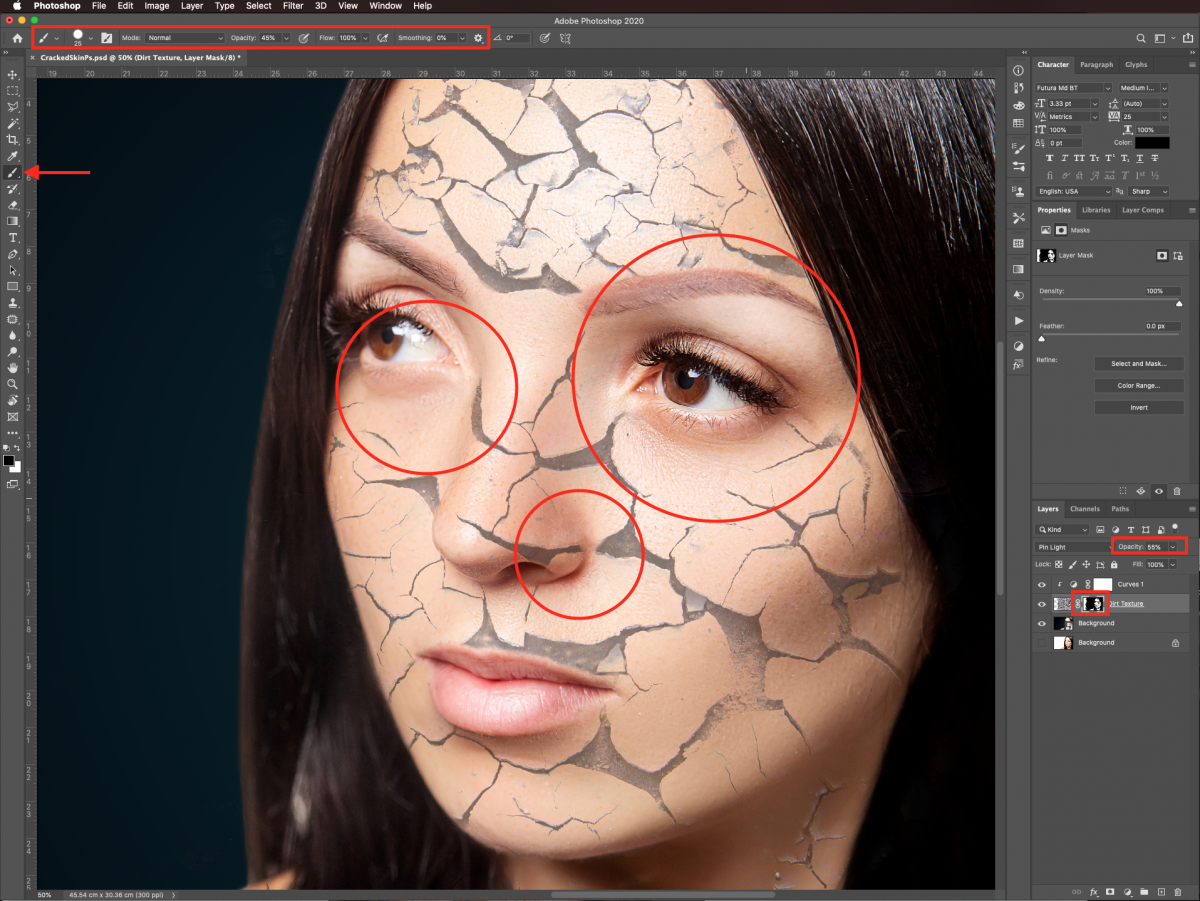
After looking at our work so far, we decided to increase the Opacity of the dirt texture to 55% to make the cracks more defined.
Then, we selected the Brush tool (B) again, this time with a smaller brush (25 px), and zoomed in to clean up the details and erase them. Lower the brush Opacity to about 45% to work on the edges of the nose, fingers, and similar areas.
If you need to bring back out some parts of the texture, swap the foreground and background colors (X), so white is the Foreground color.
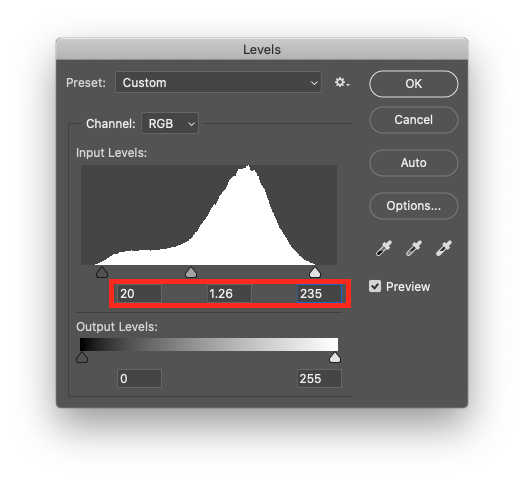
Select the Dirt Texture layer thumbnail in the Layers panel, and go to Image > Adjustments > Levels (Command/Control + L).
Move the levers a bit towards the center. Your values should be similar to the ones we used: Blacks 20, Greys 1.26, and Whites 235.
This should add more contrast, but you may notice that it brought out some unwanted areas.
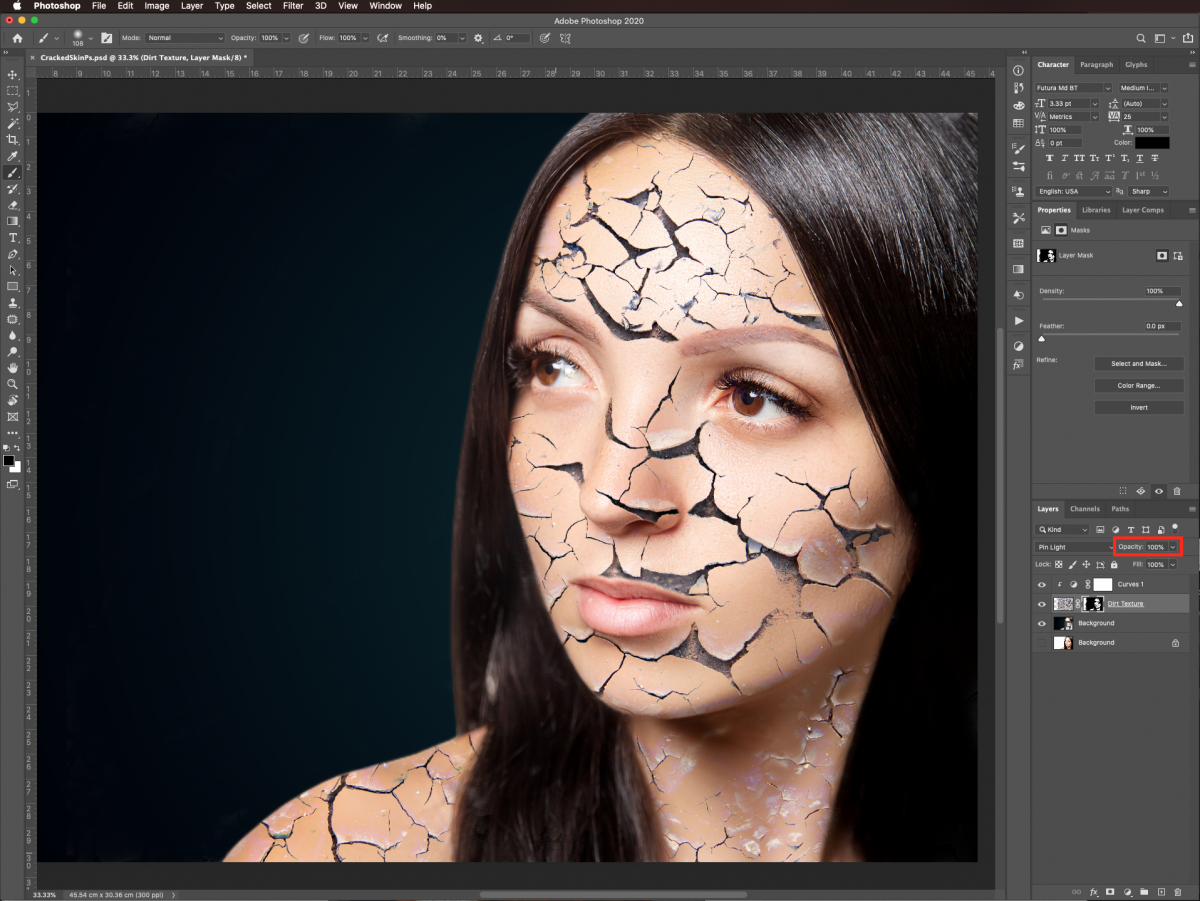
To fix it, select the mask thumbnail again, bring up the layer’s Opacity to 100%, and use the Brush tool (B) as before. Remember to set the Opacity back to the desired percentage (55%) again after you are done.
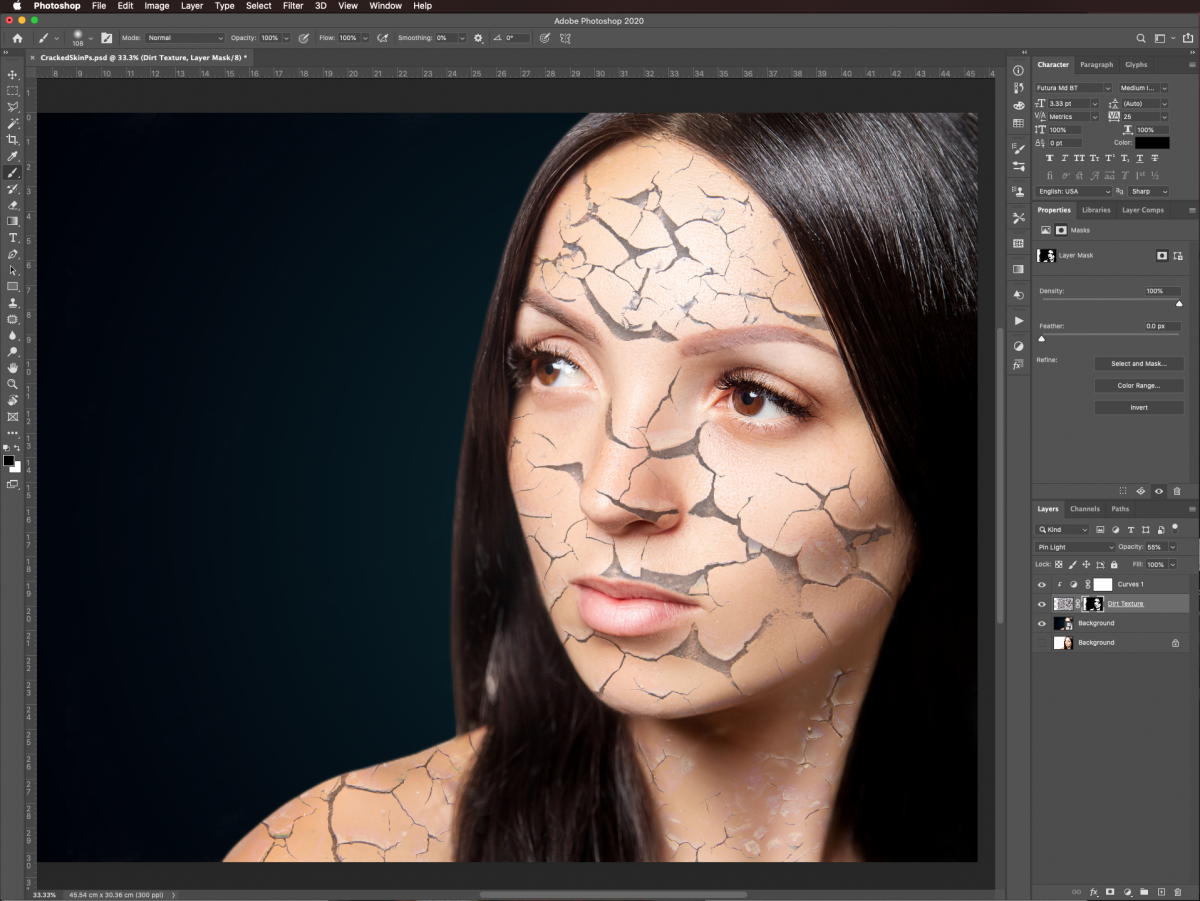
Let’s add a unique sheen to the piece using an adjustment layer.
Go back to the Adjustments panel, and this time create a new Color Lookup adjustment layer on top of everything.
Choose TealOrangePlusContrast.3dl as 3DLUT File. Like with the blending options, you may need to use a different option for this, depending on your images.
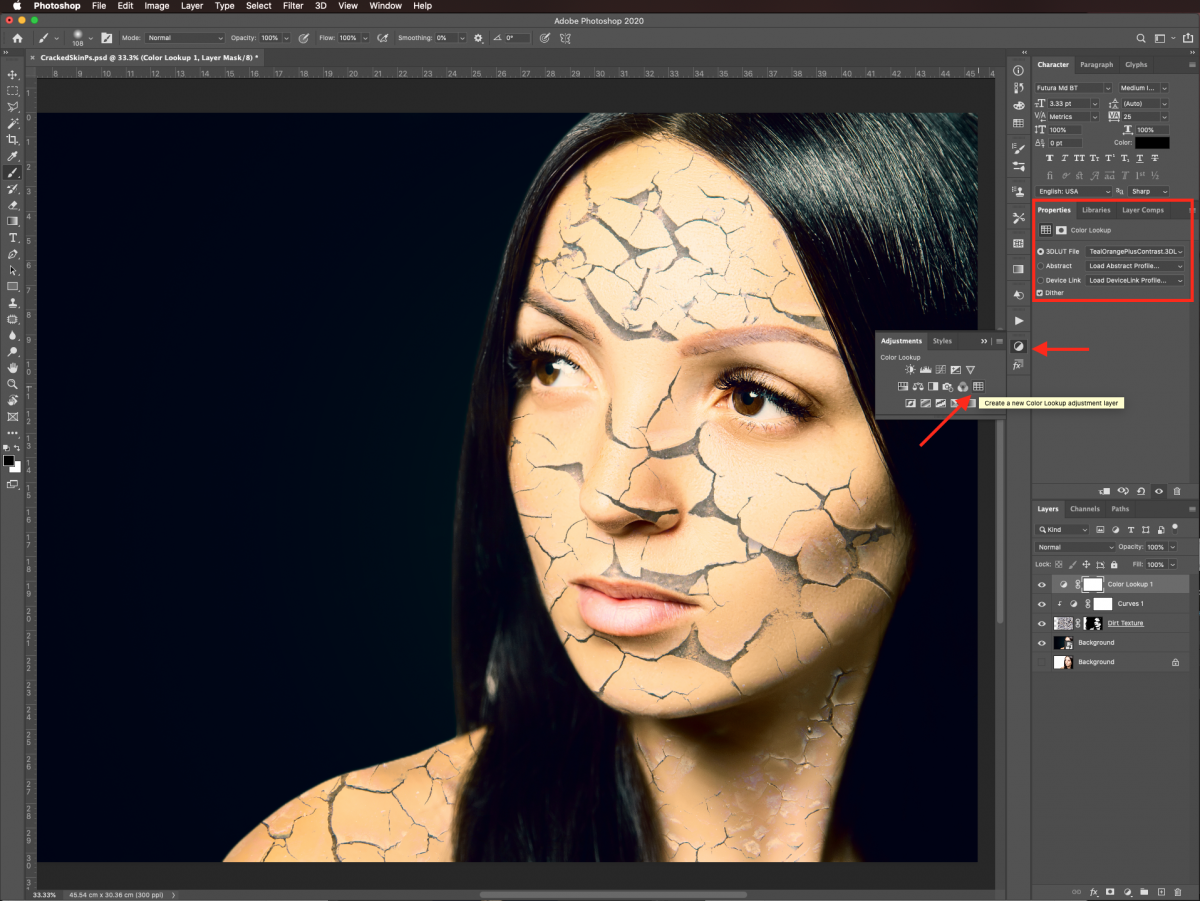
To complement the overall look, we are going to add a distressed finish to our subject’s skin using a grunge texture this time.
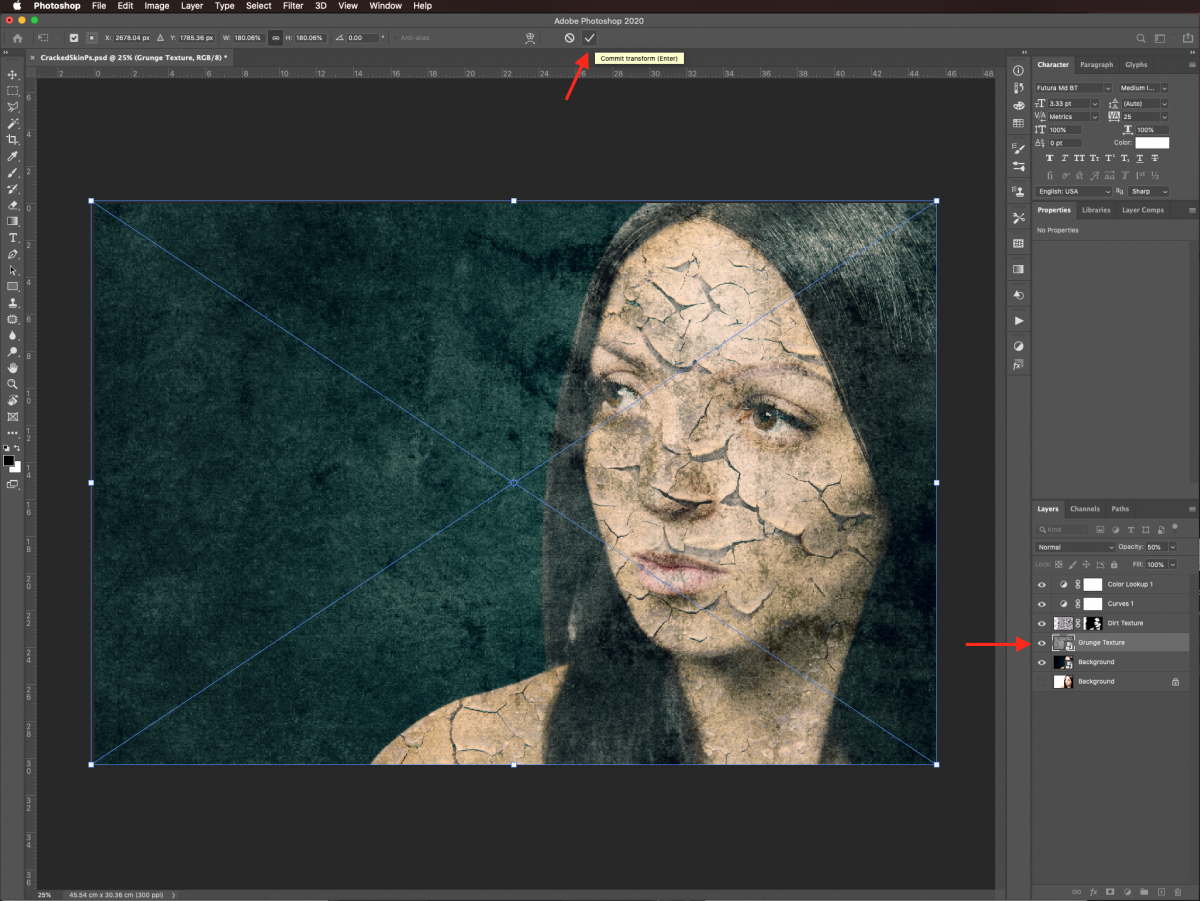
Open the grunge texture file and drag it onto your original document. Place it between the dirt texture and the background layers and name it Grunge Texture.
Use Free Transform (Command/Control + T) to resize and/or rotate it if needed and hit Enter or the small checkmark on the top toolbar to commit the changes.
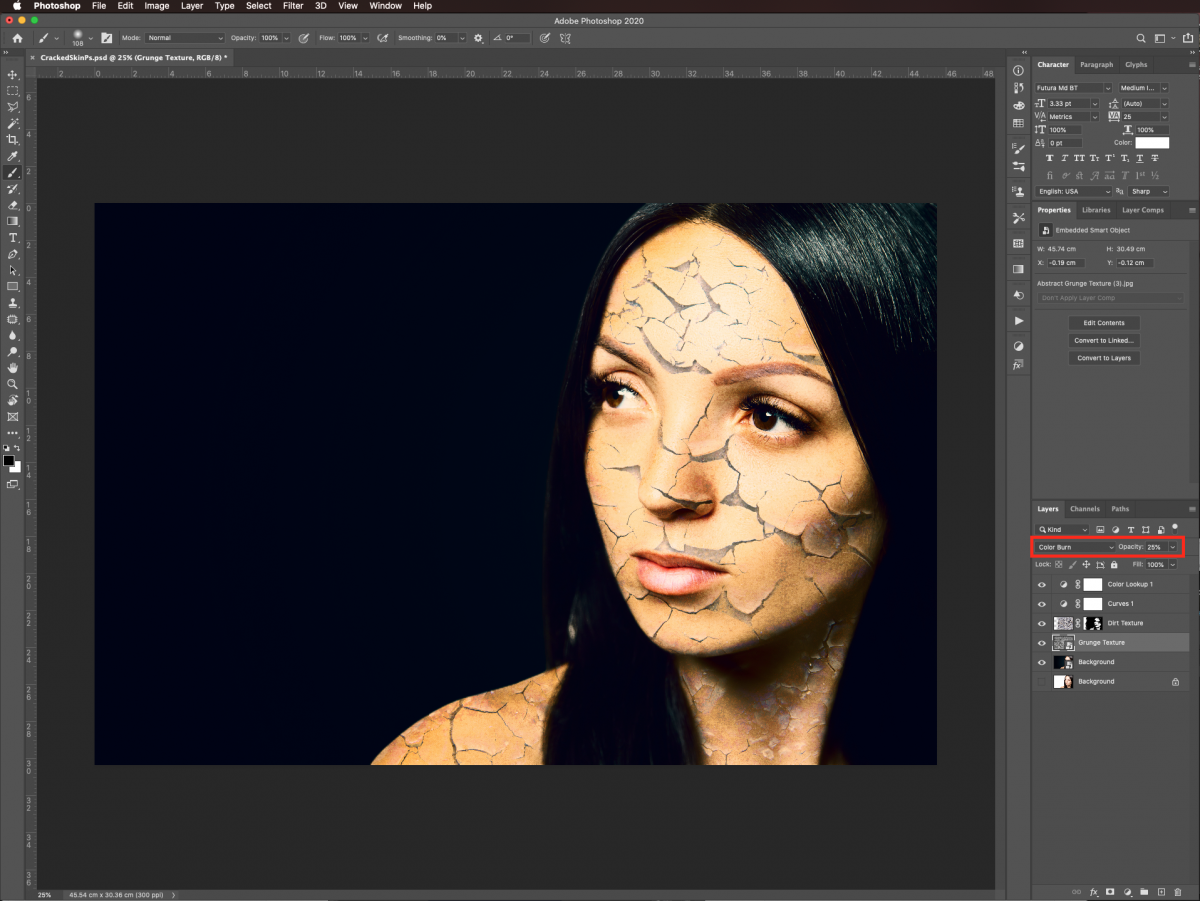
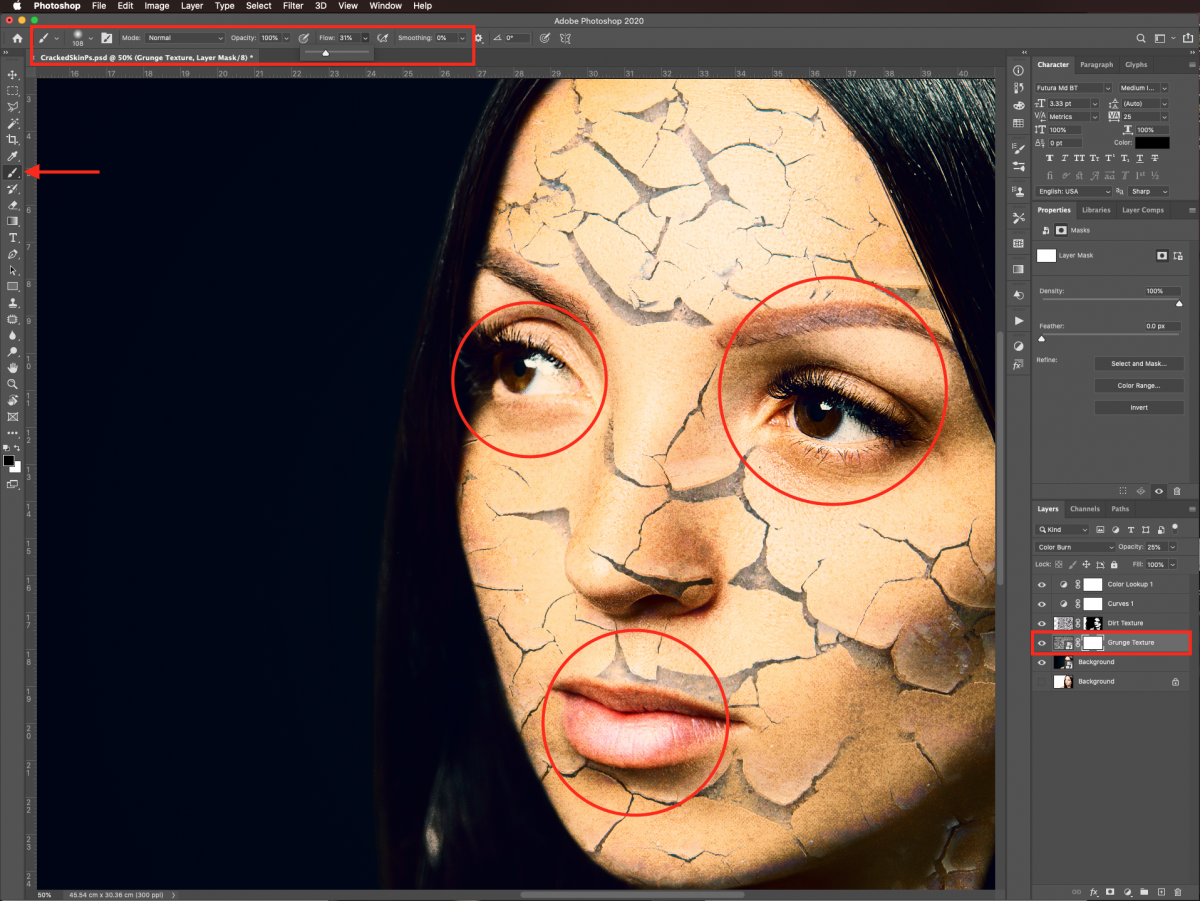
Change its Blending Mode to Color Burn and lower the Opacity to 25%.
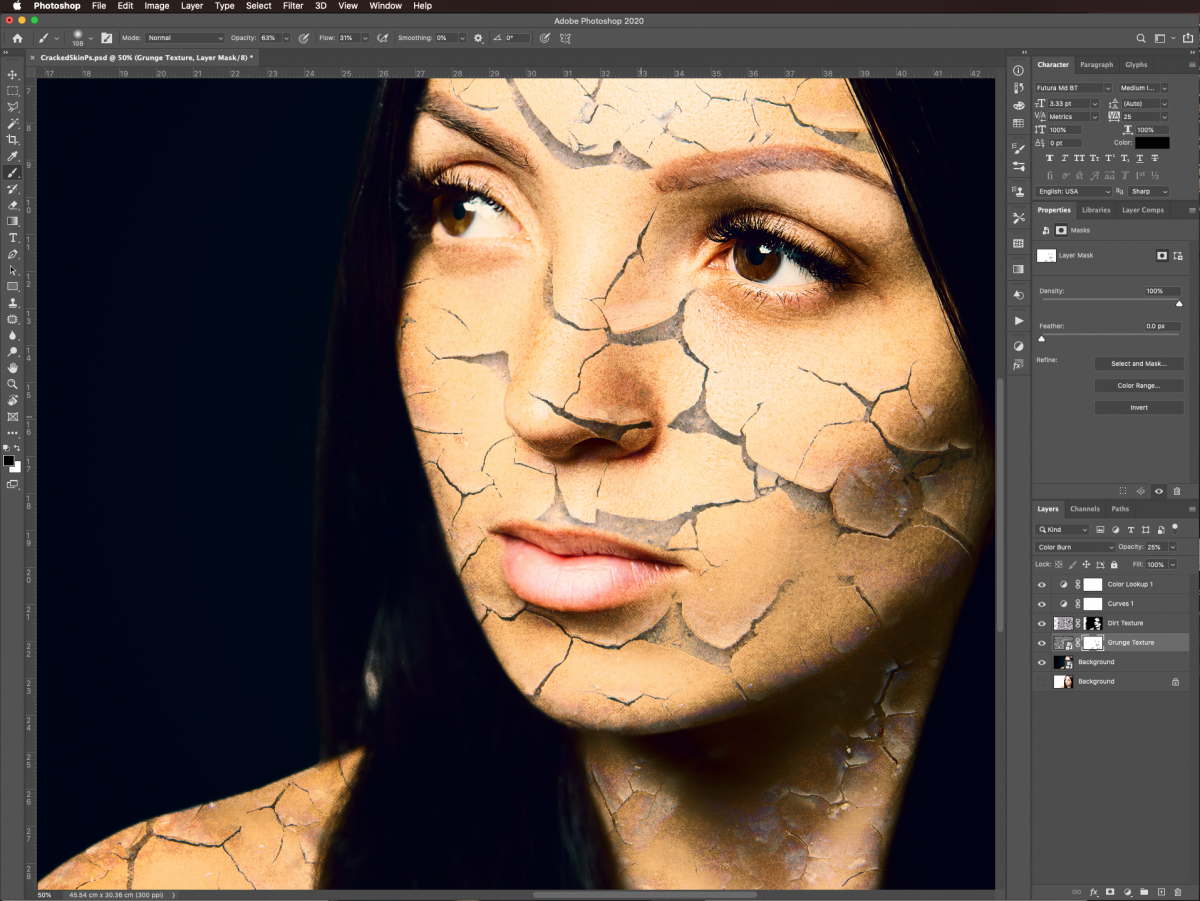
Just like with the previous texture, we need to get rid of the unwanted portions of the grunge texture using a layer mask.
Add a Layer Mask to the Grunge Texture layer and use a soft brush to soften or erase some portions if you think it’s necessary.
And finally, we will use a filter to slightly smooth out the image and add just a bit more contrast.
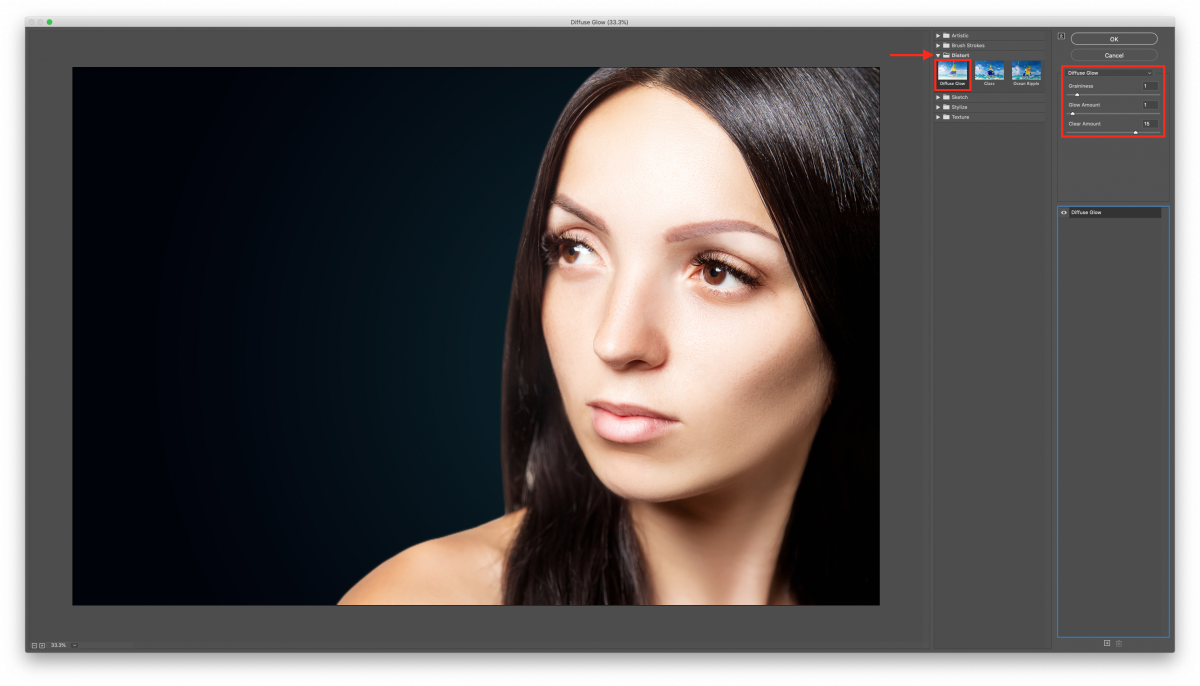
Select the Smart Object layer, and go to Filter > Filter Gallery > Distort > Diffuse Glow.
Use the following values:
Remember that since your layer is a Smart Object, you can adjust the filter settings by double-clicking on top of its thumbnail to open the filter panel.
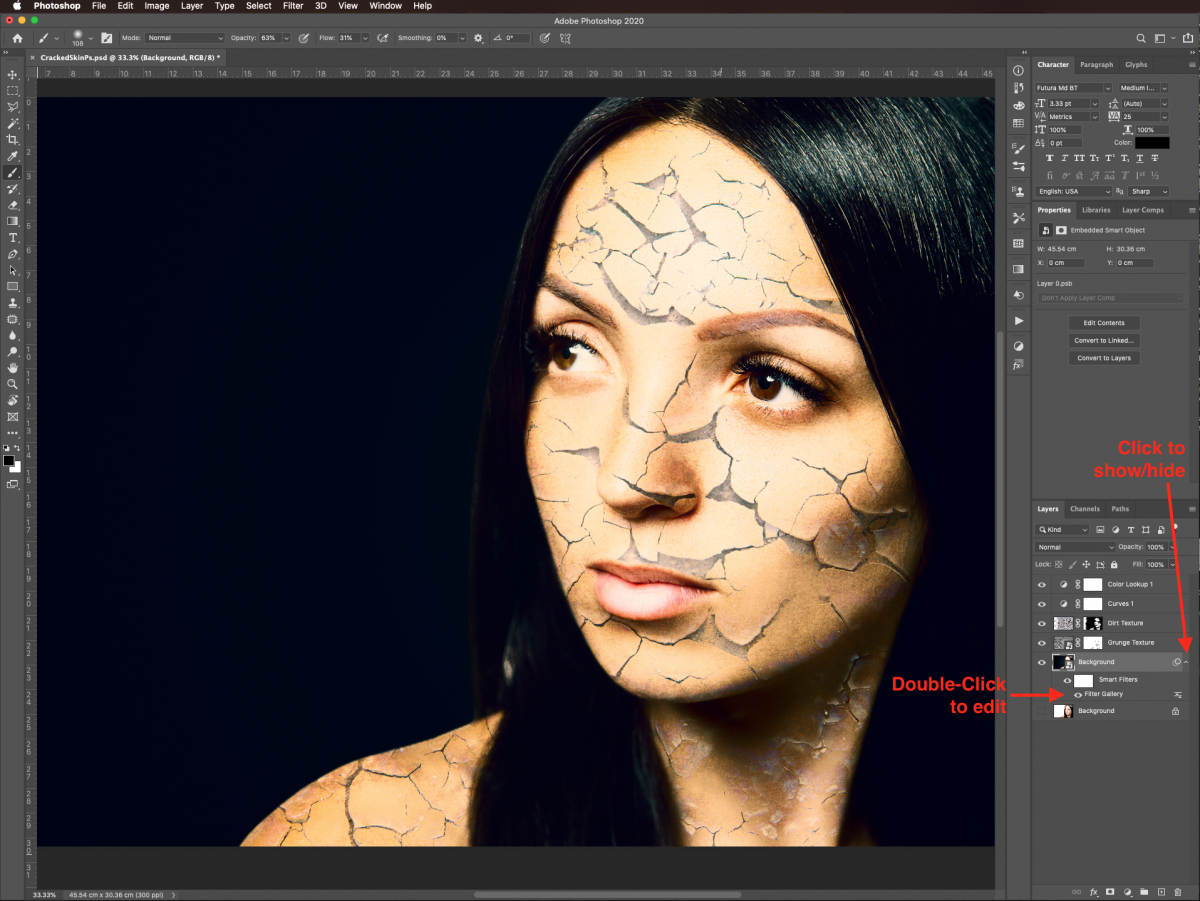
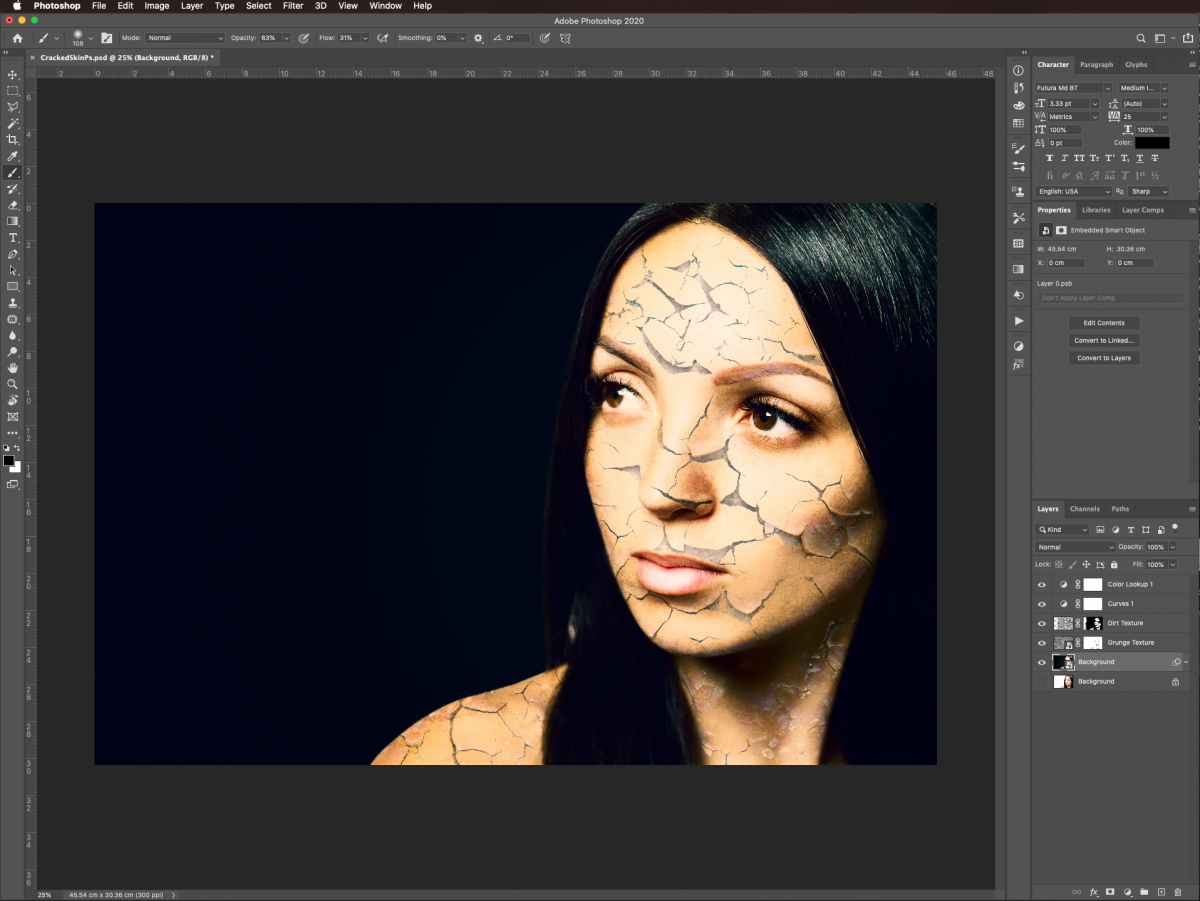
Here’s how our final image looks after going through the steps to apply the cracked skin effect. Remember that you can change the background color and add different blending modes, layer styles, and filter values to make your design unique.
We have many more great tutorials for you to check out, like using the patch tool, content-aware cropping, and perspective cropping in Photoshop.
For this tutorial, we will use a stock photo of a female model to apply this effect to. We will also use a dry ground texture and a grunge texture JPG to achieve the effect.
Contents
- Adjust the Background Image
- Turn Your Background Image into a Smart Object
- Add Cracks to the Skin Using a Dry Dirt Texture
- Create a Color Lookup Adjustment Layer
- Add a Distressed Look Using a Grunge Texture
- Apply a Diffuse Glow Filter to Your Smart Object Layer
Step 1 - Adjust the Background Image
Since our image has a white background, we are going to isolate the subject using a Layer Mask and add a darker background to it with a Gradient Fill layer.
Duplicate the Background Layer
In Photoshop, open the image you chose to work with and create a duplicate (Command/Control + J). It is always good practice to keep a copy of the original file in case things go wrong.
You can hide the original background layer by clicking on the small eye icon on the left side of the layer’s thumbnail in the Layers panel.
Select and Mask the Subject
If you want more detailed instructions on how to mask your subject, check our tutorial on how to smooth mask edges in Photoshop.
Add a Gradient Fill Layer to Replace the Background
Then, create a new Gradient Fill Adjustment layer under your masked layer by clicking on the small black and white circle icon at the bottom of the Layers panel.
Use the following values on the Gradient panel:
Preset: Foreground to Background (#00020a to #0a262f)
Style: Radial
Angle: -20.67º
Scale: 122%
Reverse: checked
Dither: unchecked
Align with layer: checked
You may need to use different values depending on your images.
Group Your Background and Subject Layers Together
Select both the gradient fill and masked subject layers (use the Shift key) and group them together (Command/Control + G) by clicking on the small folder icon at the bottom of the Layers panel.
Step 2- Turn Your Background Image into a Smart Object
To be able to modify and apply filters in a non-destructive fashion, we are going to convert the group containing the main subject and gradient background into a Smart Object.
Right-click on top of the folder and choose Convert to Smart Object.
Name the newly created Smart Object Background.
Step 3 - Add Cracks to the Skin Using a Dry Dirt Texture
Now, we are going to start adding the cracks to our subject with the help of some dry dirt texture, blending modes, and layer styles.
Import the Dry Dirt Texture
Open the dry ground texture file and drag it onto your original document.
Use Free Transform (Command/Control + T) to resize, rotate, or modify the texture and position certain details where you want them. Hit Enter or click on the small checkmark on the top toolbar to commit the changes.
You may need to reduce its Opacity temporarily to have a better idea of where to place the imported image.
Change the Dirt Texture Blending Mode and Opacity
Change the Blending Mode of the dirt texture to Pin Light and lower the Opacity to 50% in the Layers panel. You may need to use different blending modes and/or opacity values depending on your images. Feel free to experiment with them. Name this layer Dirt Texture.
Erase Unwanted Portions of the Dry Dirt Texture Using a Mask
We just want the cracked texture applied to our subject’s skin, so we need to get rid of what’s on top of other areas. We will do that using a layer mask.
Select your dirt texture layer and add a Layer Mask by clicking on the button at the bottom of the Layers panel.
Select the Brush tool (B). Make it a large and soft brush (100 px, 0% Hardness, 49% Flow). Make sure you are working on the mask thumbnail. Then use black as the Foreground color to erase the areas of the texture that you don’t want to keep, like the ones on top of the eyes, mouth, etc.
Remember to erase the texture on top of the subject’s clothes and the background if needed.
Create a Curves Adjustment Layer
We want to add more contrast to the cracked skin effect. So, head to the Adjustments panel and create a new Curves Adjustment layer on top of everything.
Clip it down so it will only affect the layer under it by clicking on the button with a white square and small bent arrow at the bottom of the Properties panel. Choose the Medium Contrast (RGB) preset from the dropdown menu.
Fine Tune Details on the Dirt Texture Layer
After looking at our work so far, we decided to increase the Opacity of the dirt texture to 55% to make the cracks more defined.
Then, we selected the Brush tool (B) again, this time with a smaller brush (25 px), and zoomed in to clean up the details and erase them. Lower the brush Opacity to about 45% to work on the edges of the nose, fingers, and similar areas.
If you need to bring back out some parts of the texture, swap the foreground and background colors (X), so white is the Foreground color.
Adjust the Levels of the Dirt Texture Layer
Select the Dirt Texture layer thumbnail in the Layers panel, and go to Image > Adjustments > Levels (Command/Control + L).
Move the levers a bit towards the center. Your values should be similar to the ones we used: Blacks 20, Greys 1.26, and Whites 235.
This should add more contrast, but you may notice that it brought out some unwanted areas.
To fix it, select the mask thumbnail again, bring up the layer’s Opacity to 100%, and use the Brush tool (B) as before. Remember to set the Opacity back to the desired percentage (55%) again after you are done.
Step 4 - Create a Color Lookup Adjustment Layer
Let’s add a unique sheen to the piece using an adjustment layer.
Go back to the Adjustments panel, and this time create a new Color Lookup adjustment layer on top of everything.
Choose TealOrangePlusContrast.3dl as 3DLUT File. Like with the blending options, you may need to use a different option for this, depending on your images.
Step 5 - Add a Distressed Look Using a Grunge Texture
To complement the overall look, we are going to add a distressed finish to our subject’s skin using a grunge texture this time.
Import the Grunge Texture
Open the grunge texture file and drag it onto your original document. Place it between the dirt texture and the background layers and name it Grunge Texture.
Use Free Transform (Command/Control + T) to resize and/or rotate it if needed and hit Enter or the small checkmark on the top toolbar to commit the changes.
Change the Grunge Texture Blending Mode and Opacity
Change its Blending Mode to Color Burn and lower the Opacity to 25%.
Erase Unwanted Portions of the Grunge Texture Using a Mask
Just like with the previous texture, we need to get rid of the unwanted portions of the grunge texture using a layer mask.
Add a Layer Mask to the Grunge Texture layer and use a soft brush to soften or erase some portions if you think it’s necessary.
Step 6 - Apply a Diffuse Glow Filter to Your Smart Object Layer
And finally, we will use a filter to slightly smooth out the image and add just a bit more contrast.
Select the Smart Object layer, and go to Filter > Filter Gallery > Distort > Diffuse Glow.
Use the following values:
- Graininess: 1
- Glow Amount: 1
- Clear Amount: 15
Remember that since your layer is a Smart Object, you can adjust the filter settings by double-clicking on top of its thumbnail to open the filter panel.
Here’s how our final image looks after going through the steps to apply the cracked skin effect. Remember that you can change the background color and add different blending modes, layer styles, and filter values to make your design unique.
We have many more great tutorials for you to check out, like using the patch tool, content-aware cropping, and perspective cropping in Photoshop.
Related Tutorials
Photoshop Tutorials
How to Create a Holographic Text Effect in Photoshop
Discover how to create a holographic text effect in Photoshop with this step by step tutorial.
Photoshop Tutorials
How to Create a Faded Blur Effect in Photoshop
Create a faded blur effect in Photoshop using these technique and add mystery to your images.
Photoshop Tutorials
How to Create a Smoke Effect in Photoshop
Learn how to add smoke to your photos in Photoshop with this step by step tutorial.
Photoshop Tutorials
How to Create a Line Distortion Effect in Photoshop
In this tutorial learn how to create a line distortion effect in Photoshop.
Photoshop Tutorials
How to Create an Embossed Text Effect in Photoshop
In this tutorial, discover how to create an Embossed Text Effect in Photoshop!
Photoshop Tutorials
How to Create a Glitch Effect in Photoshop
In this Photoshop tutorial, discover how to create a glitch effect using multiple different filters.