By Design Bundles
Photoshop Tutorials9 min
How to Retouch Skin in Photoshop
Portraits can be improved by editing your subject's skin to make it nice and smooth. It’s important to keep a balance so that details like eyes, hair, and skin texture are not lost. In this tutorial, you will learn how to retouch skin in Photoshop.
You will need a portrait that needs some retouching. We used a stock photo of womanfrom Design Bundles.
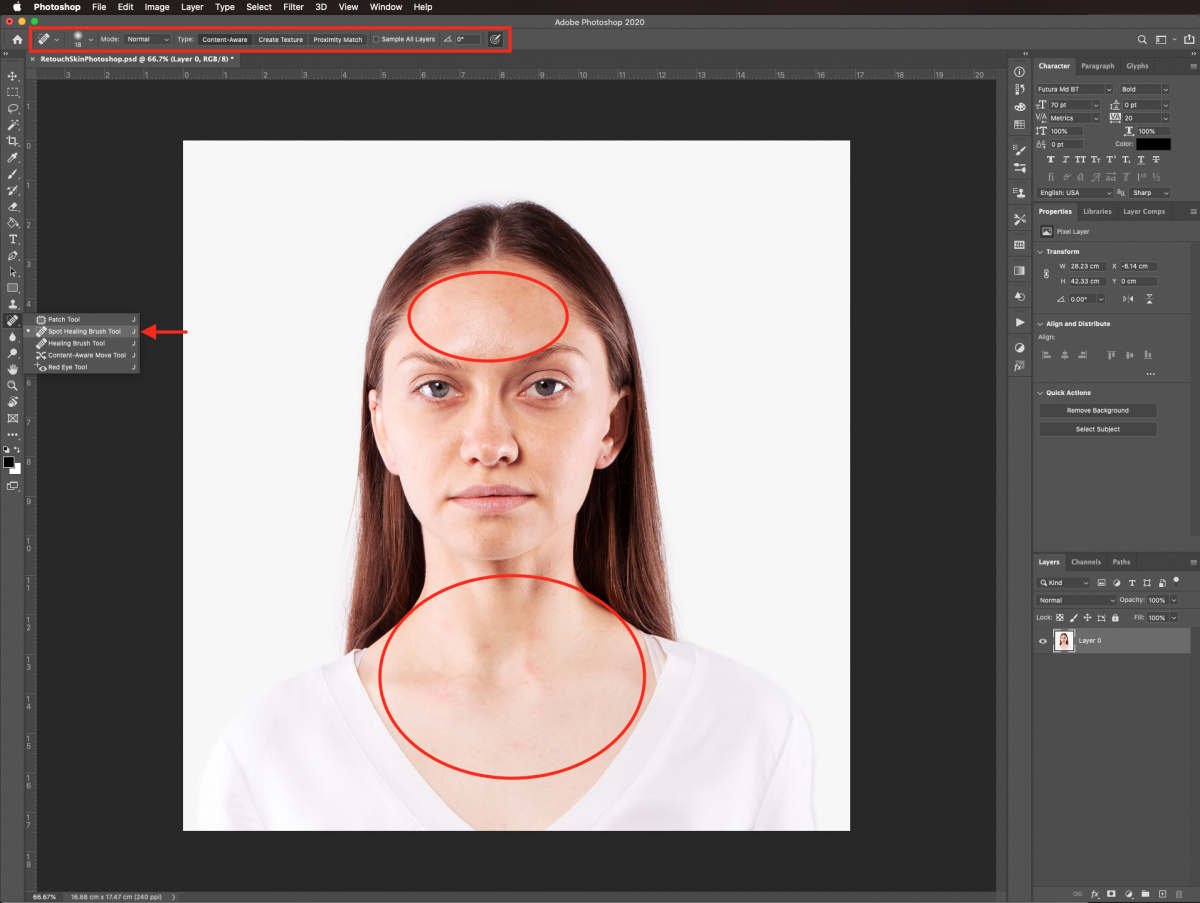
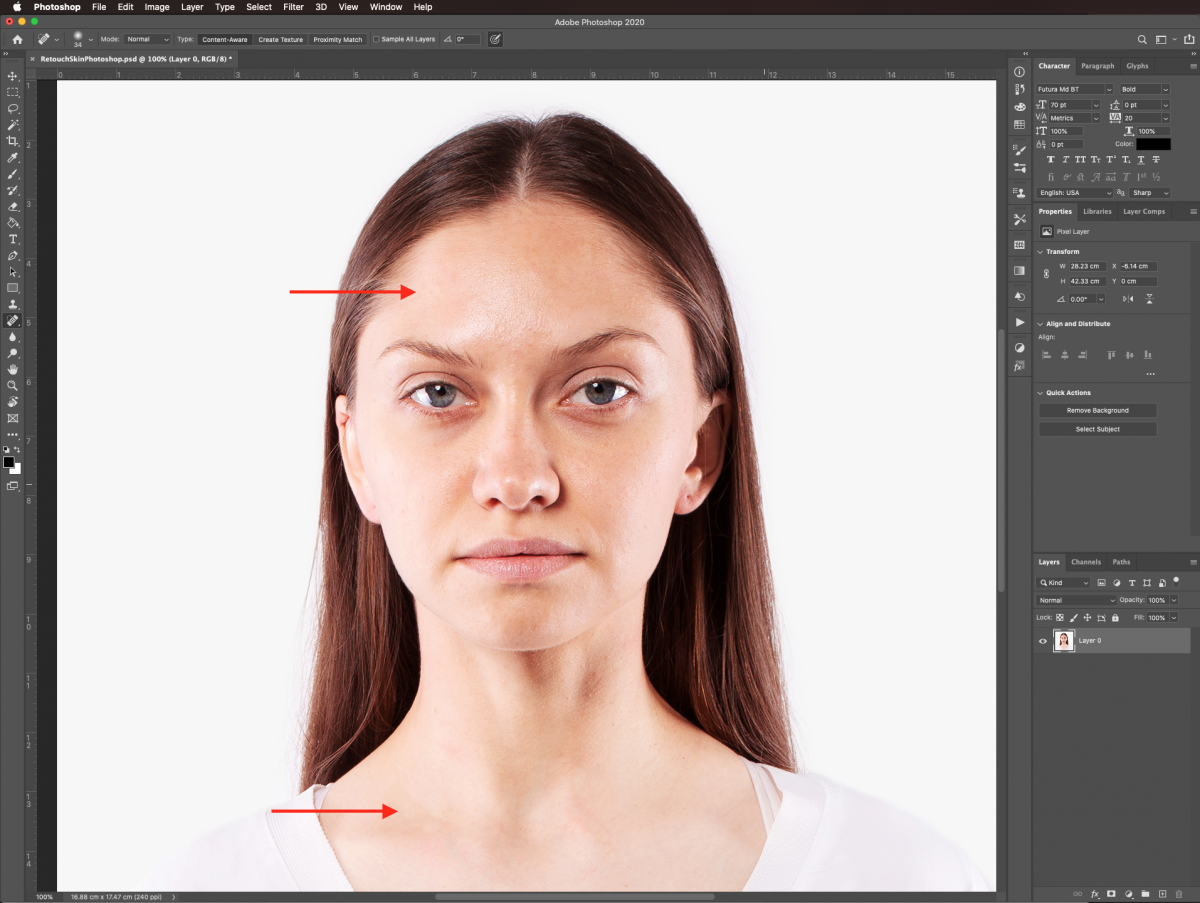
Open the image you want to retouch. If your subject has pimples and other minor skin blemishes you can remove them using the Spot Healing Brush.
We will need to create a couple of duplicates of the subject in order to apply some of the effects and then blend them with the original. Duplicate your background layer twice (Command/Control + J).
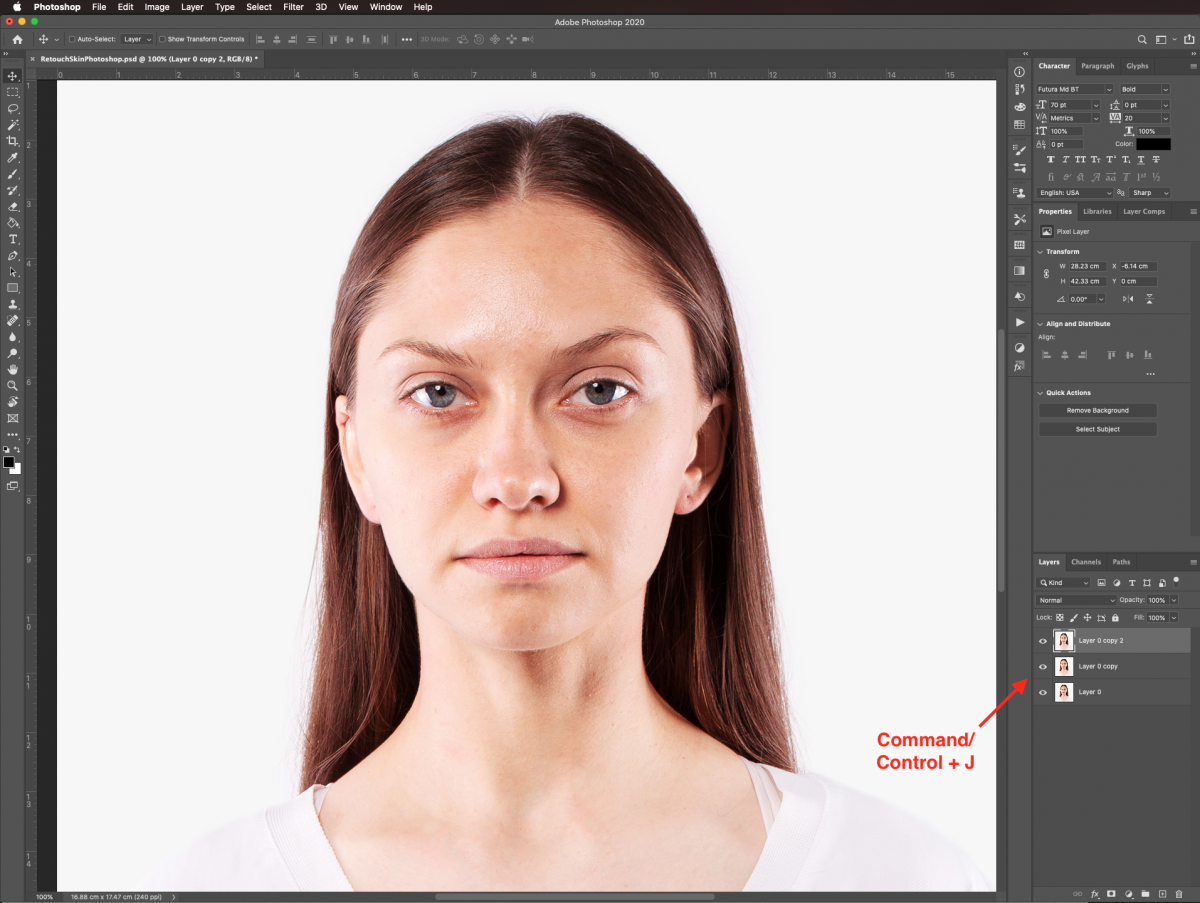
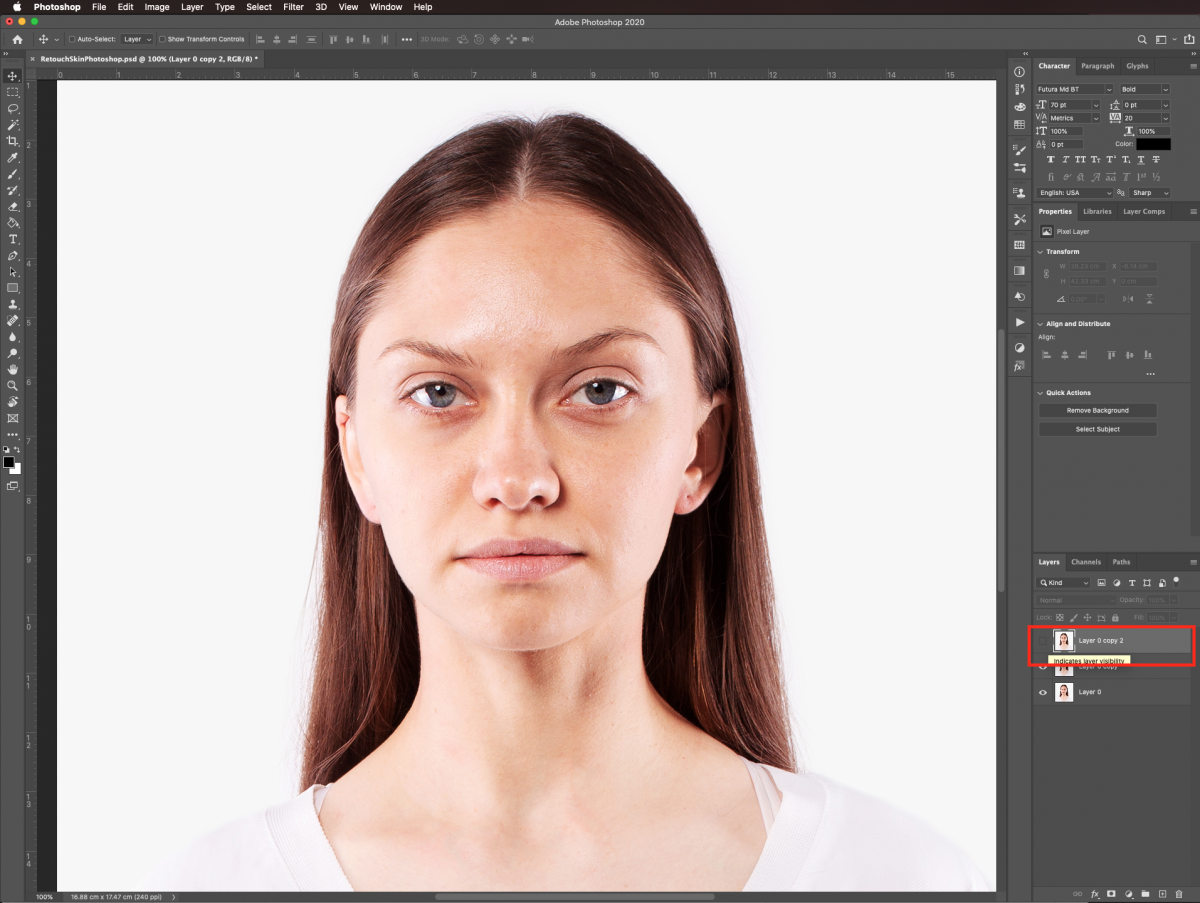
For now, hide the top-most duplicate by clicking on the small eye icon to its left in the Layers panel.
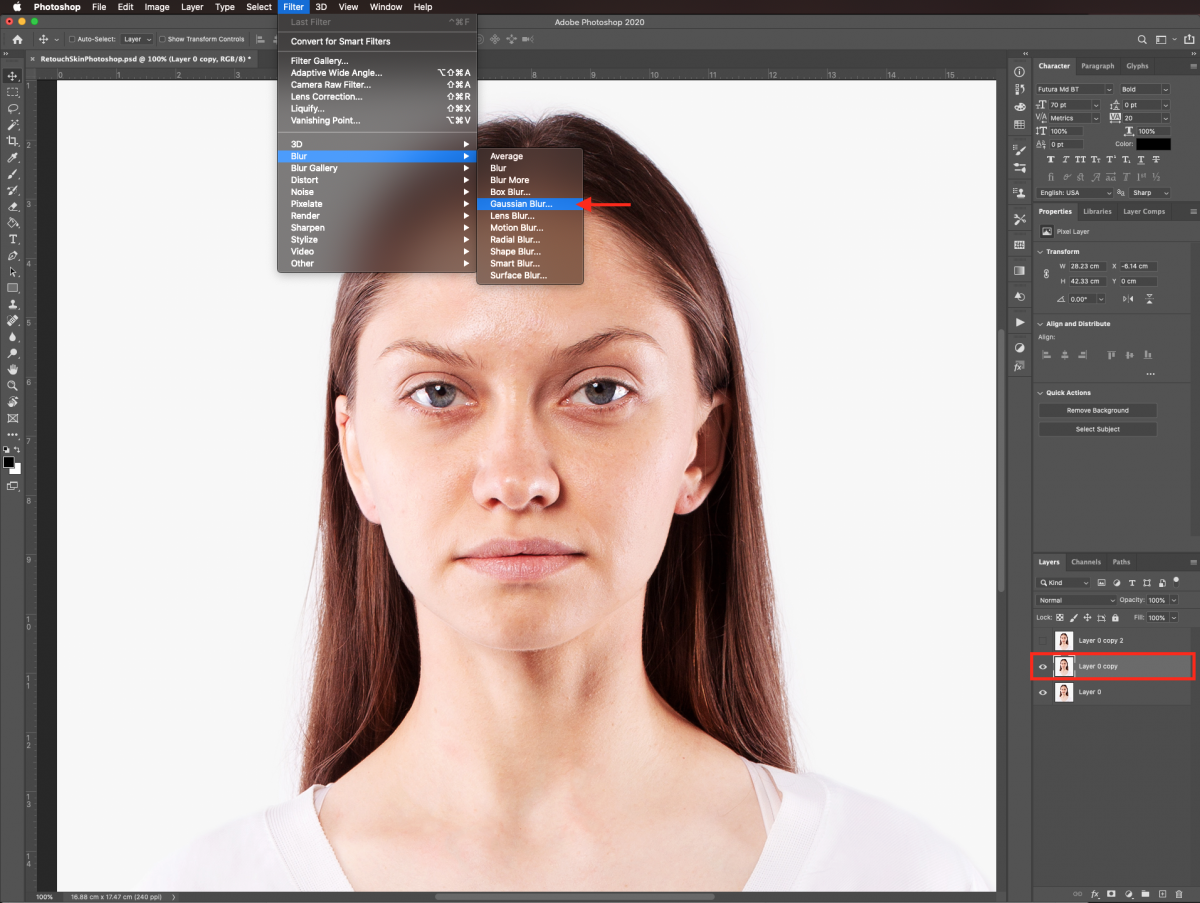
Next, we will use the Gaussian Blur Filter to start smoothing the skin. Select the first duplicate (the one in the middle), go to Filter > Blur > Gaussian Blur.
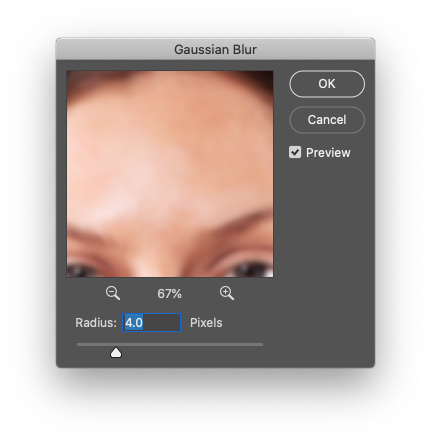
Move your Radius lever until the skin seems even. We set it to 4.0 Pixels.
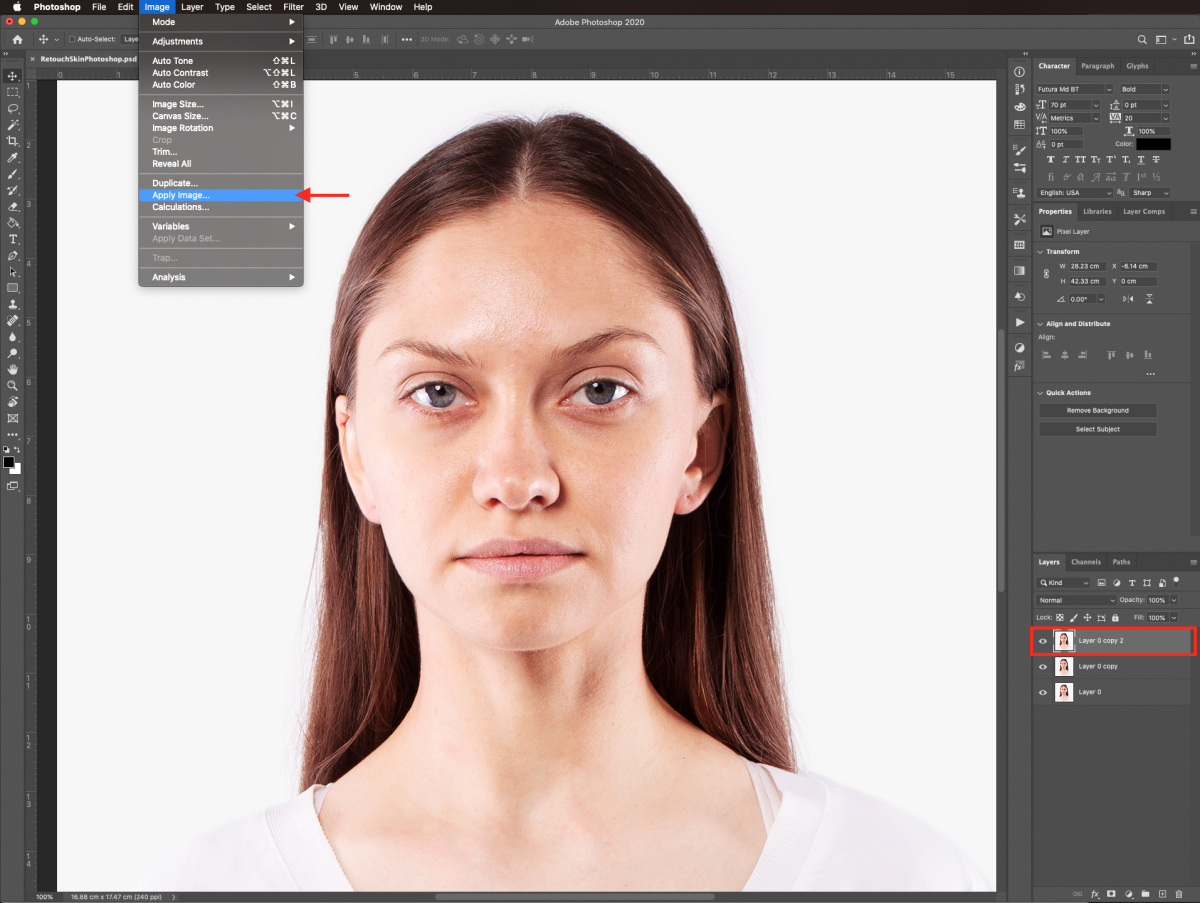
Turn on your topmost duplicate layer and go to Image > Apply Image. Use your document as the Source and the first duplicate (the one you applied the gaussian blur filter to) as Layer.
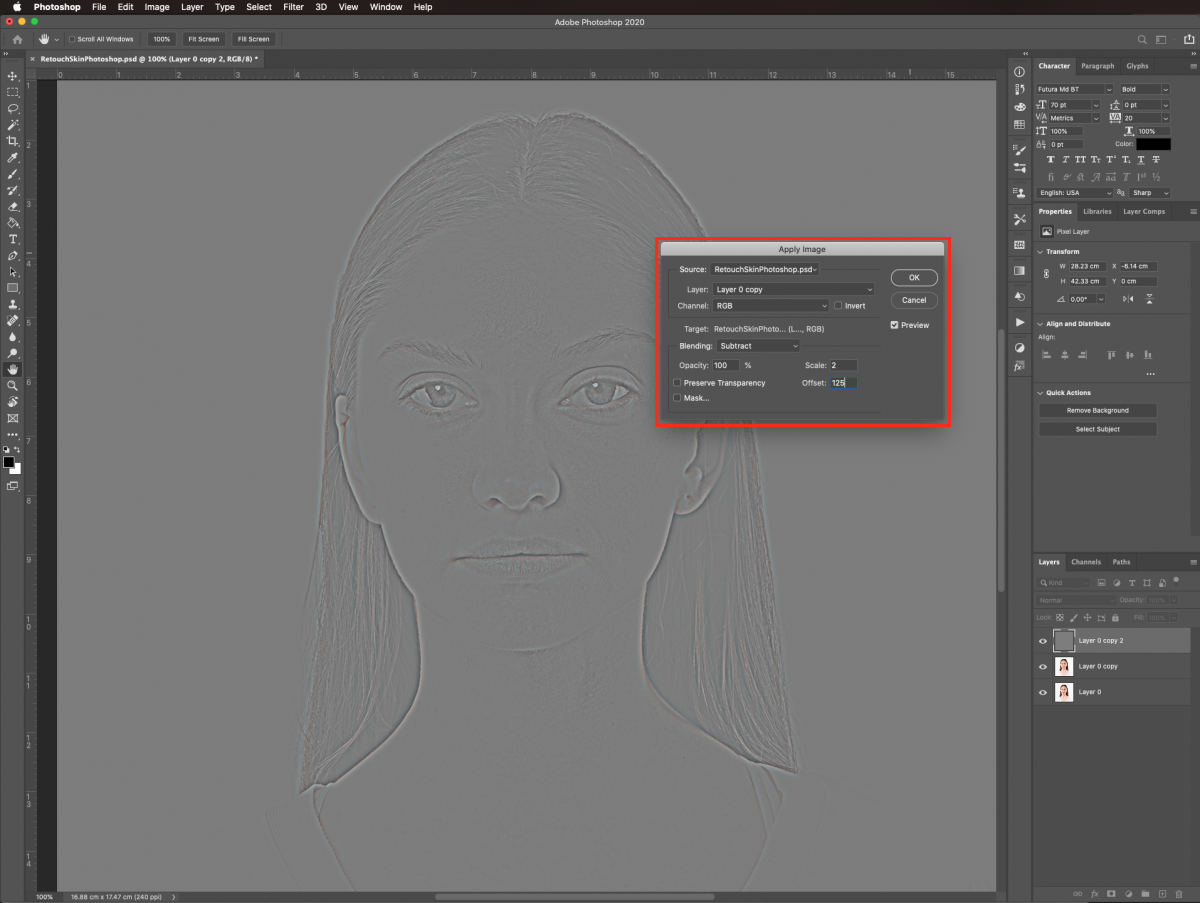
Use Subtract as Blending Mode, with a Scale of 2 and an Offset of 125.
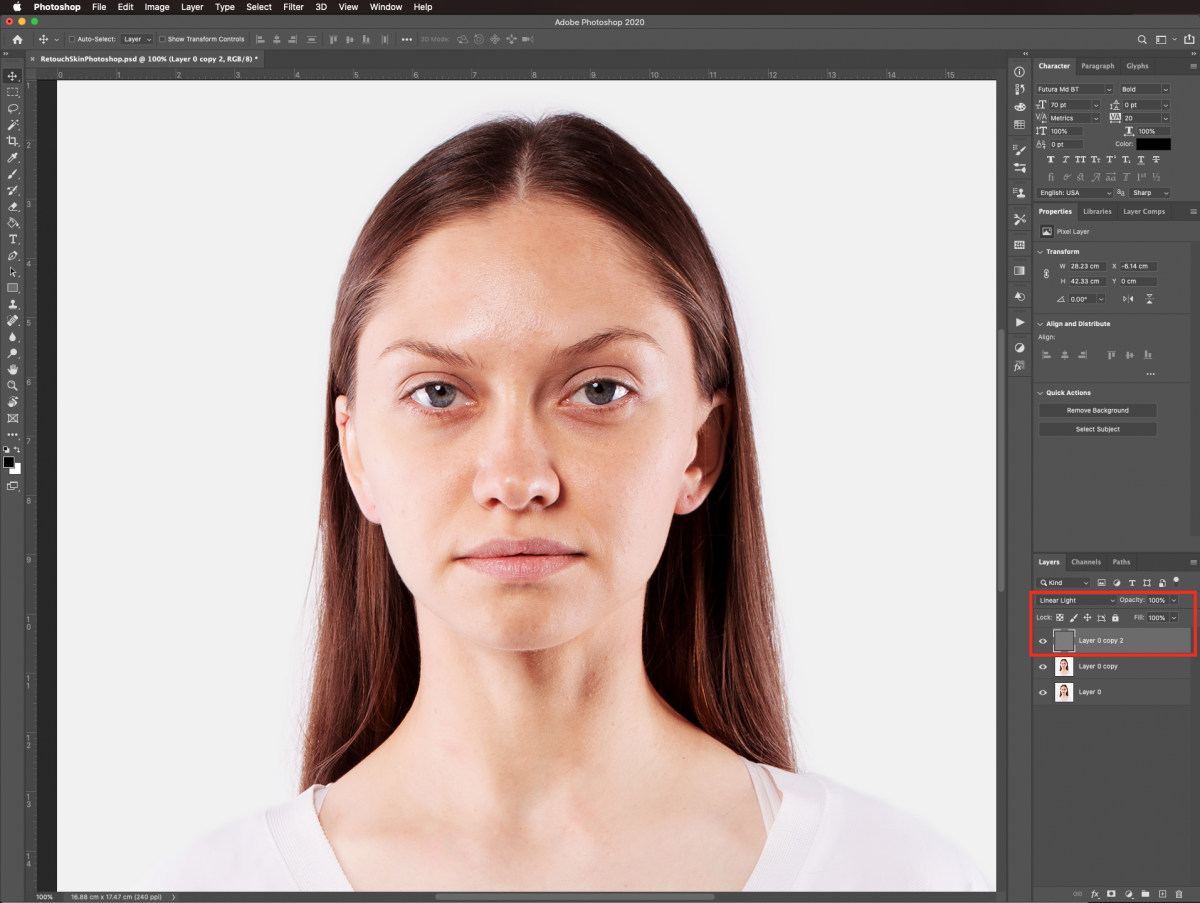
Then, change the Blending Mode of the layer to Linear Light.
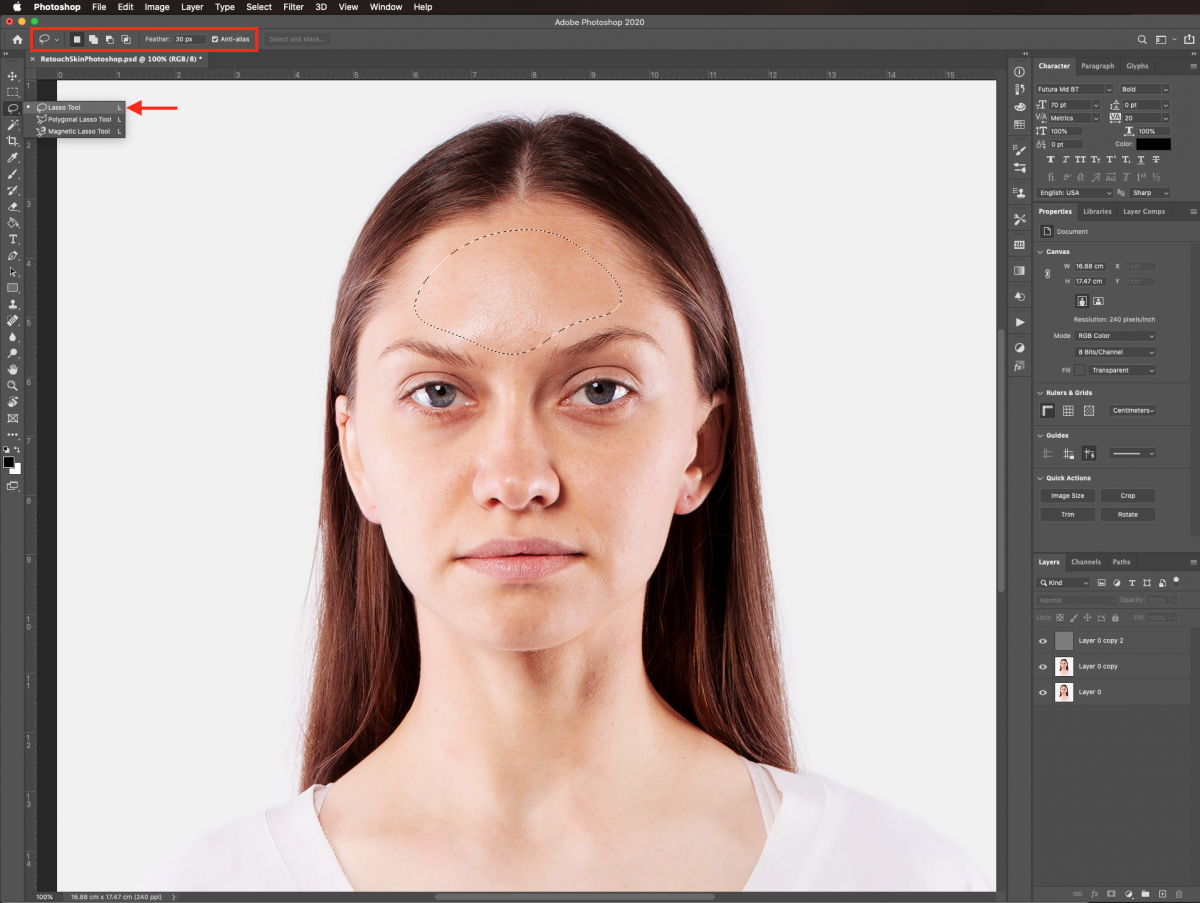
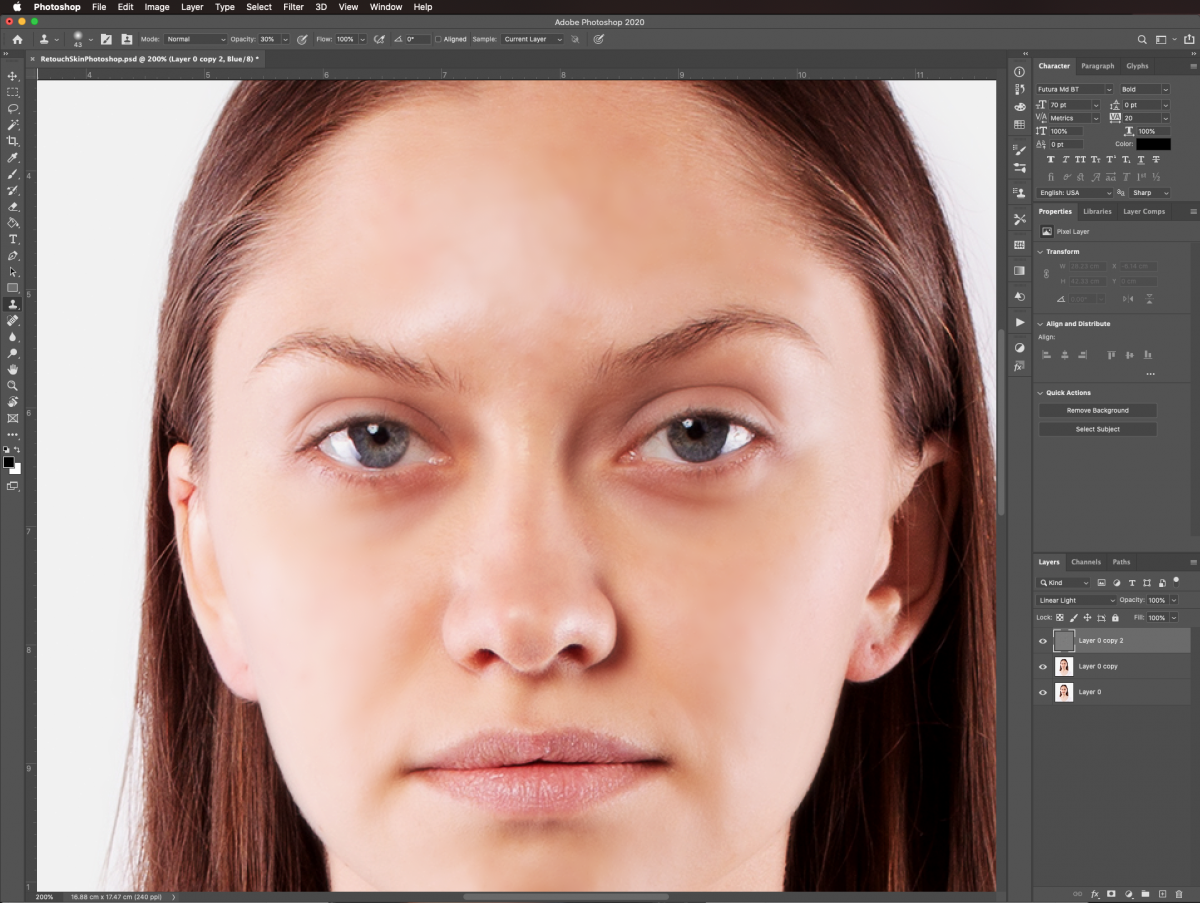
We are going to smooth the portions of the face that need it. Click on the topmost duplicate layer, then use the Lasso tool (L) and change Feather to 30 px. Make a selection of the forehead area, trying not to be too close to the eyebrows and hairline.
Go to Filter > Blur > Gaussian Blur and this time use a very high Radius value. We used 10 Pixels. The idea is to get rid of as many imperfections as possible.
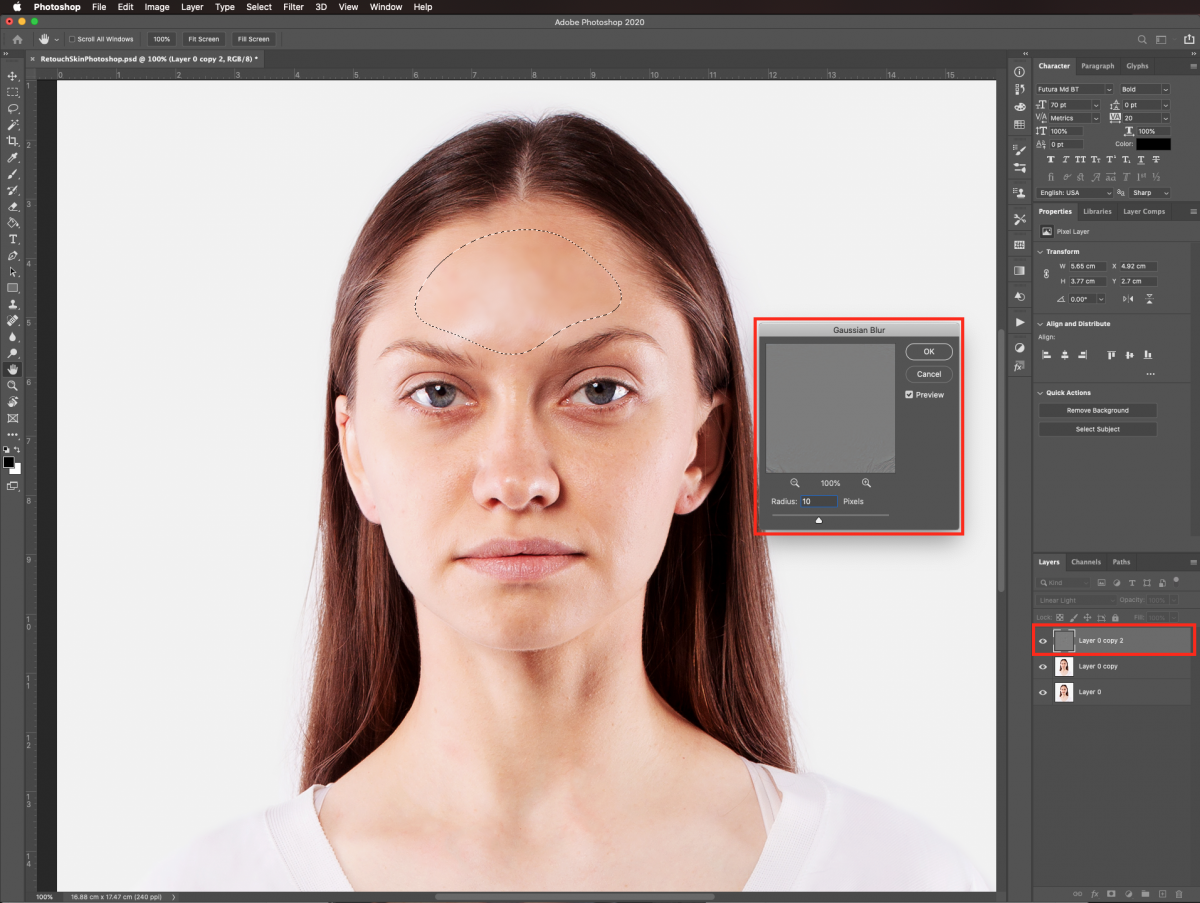
Do the same with the other areas of the face you want to retouch like the cheeks, chin, and eyelids. To apply the Gaussian Blur with the same values, go to the Filter menu, the last applied filter should be on top.
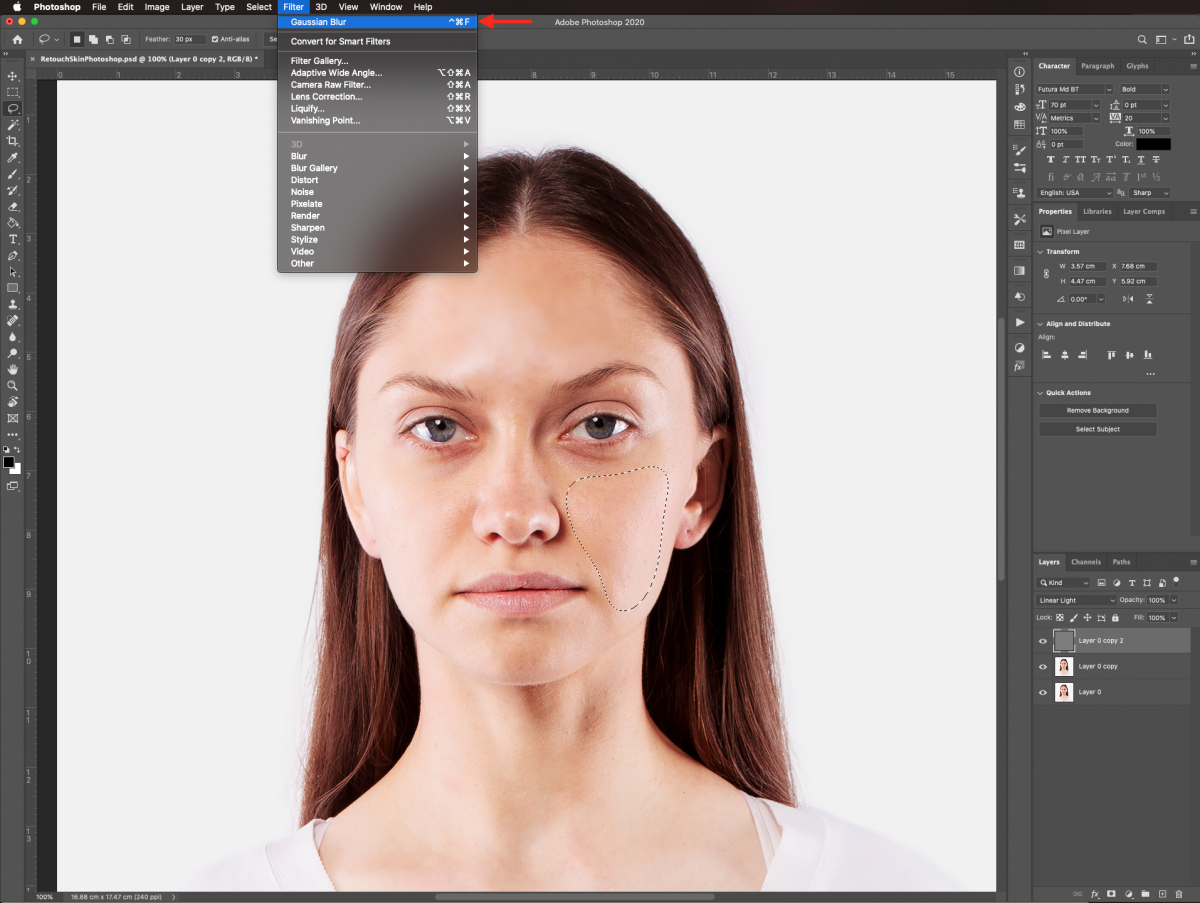
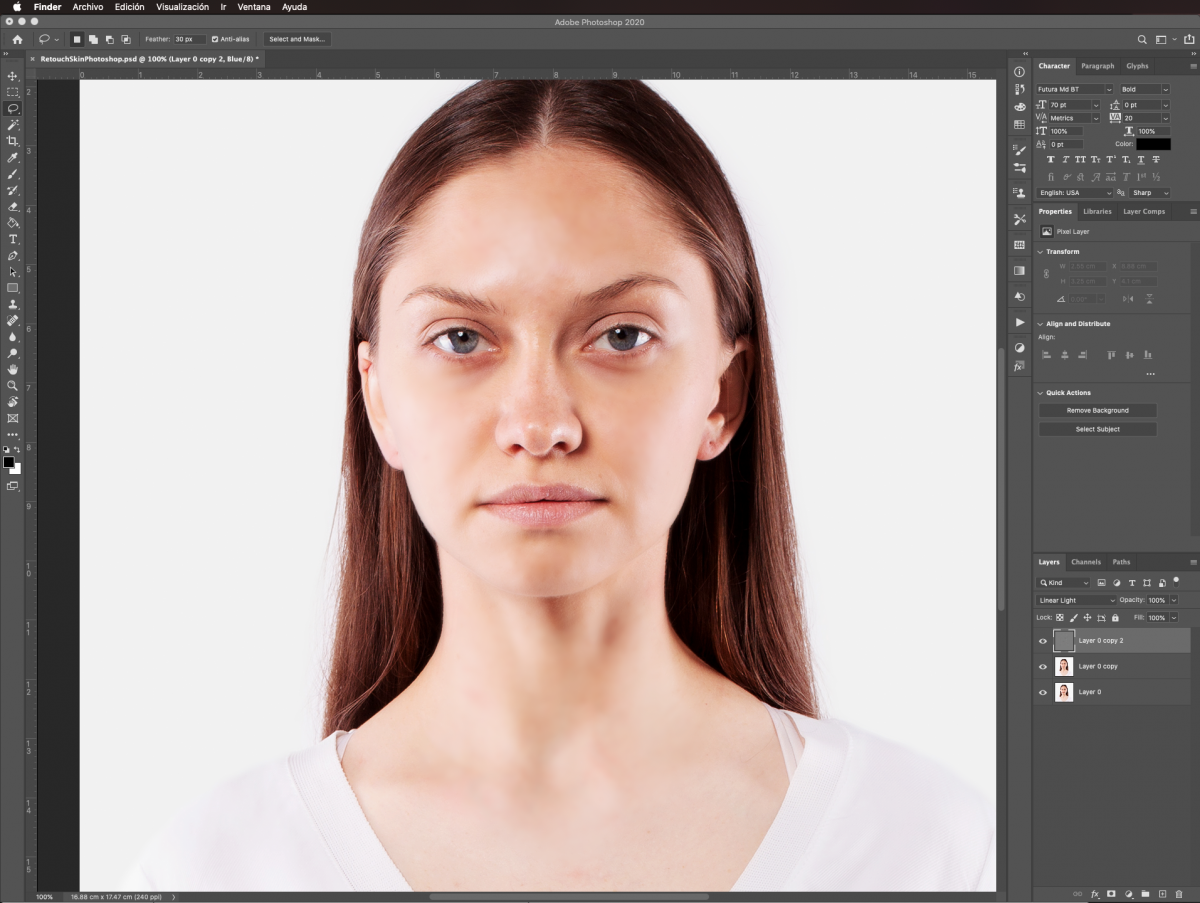
If you want to get a better view, you can hide and unhide the selection by clicking the H key. Remember to Deselect (Command/Control + D) after you are finished with an area.
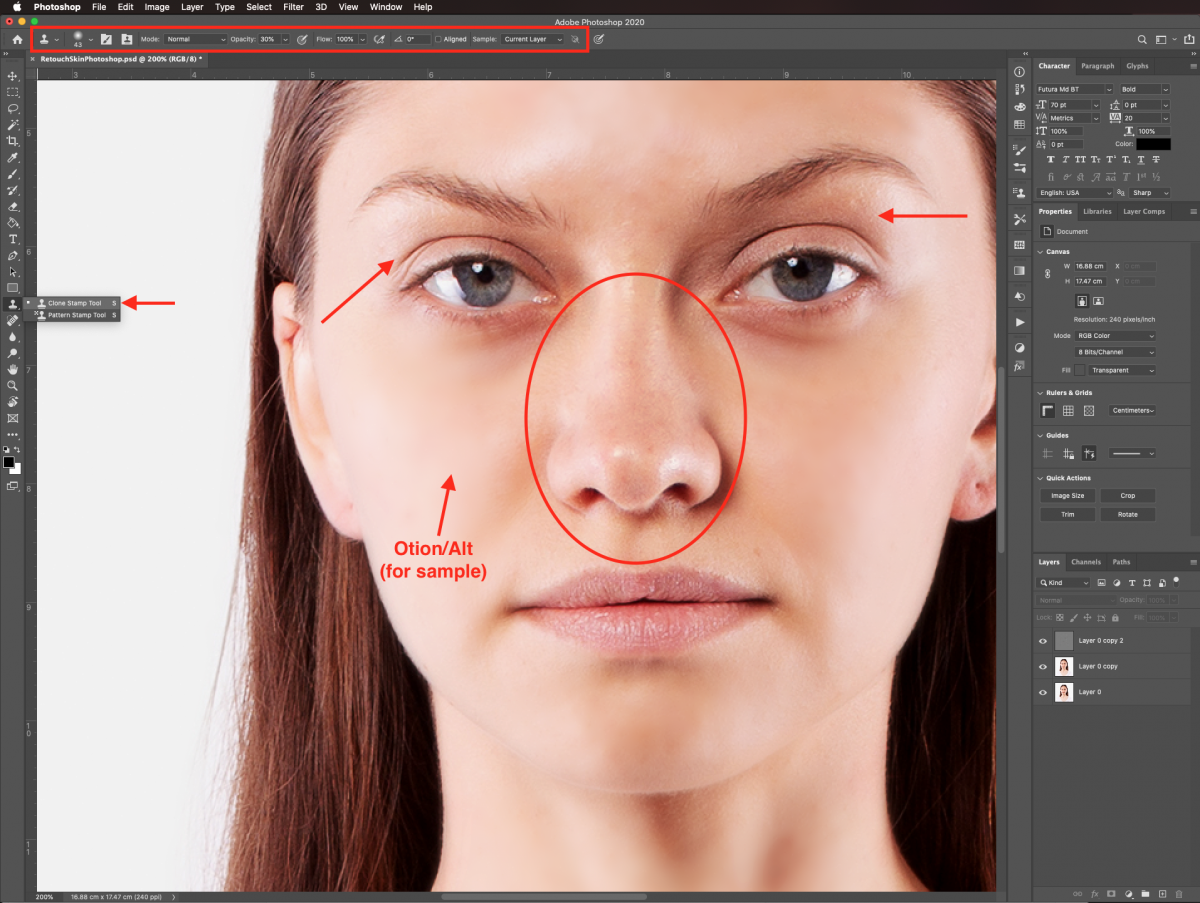
To fix other areas, like the nose, use the Clone Stamp tool (S). Hold the Alt/Option key and click on top of the area you want to use as Source. Then, use a medium brush with a lower Opacity (around 30%) and choose Current Layer as the Sample to cover the spots that need it.
If you want to see the difference, you can turn your layers off and on.
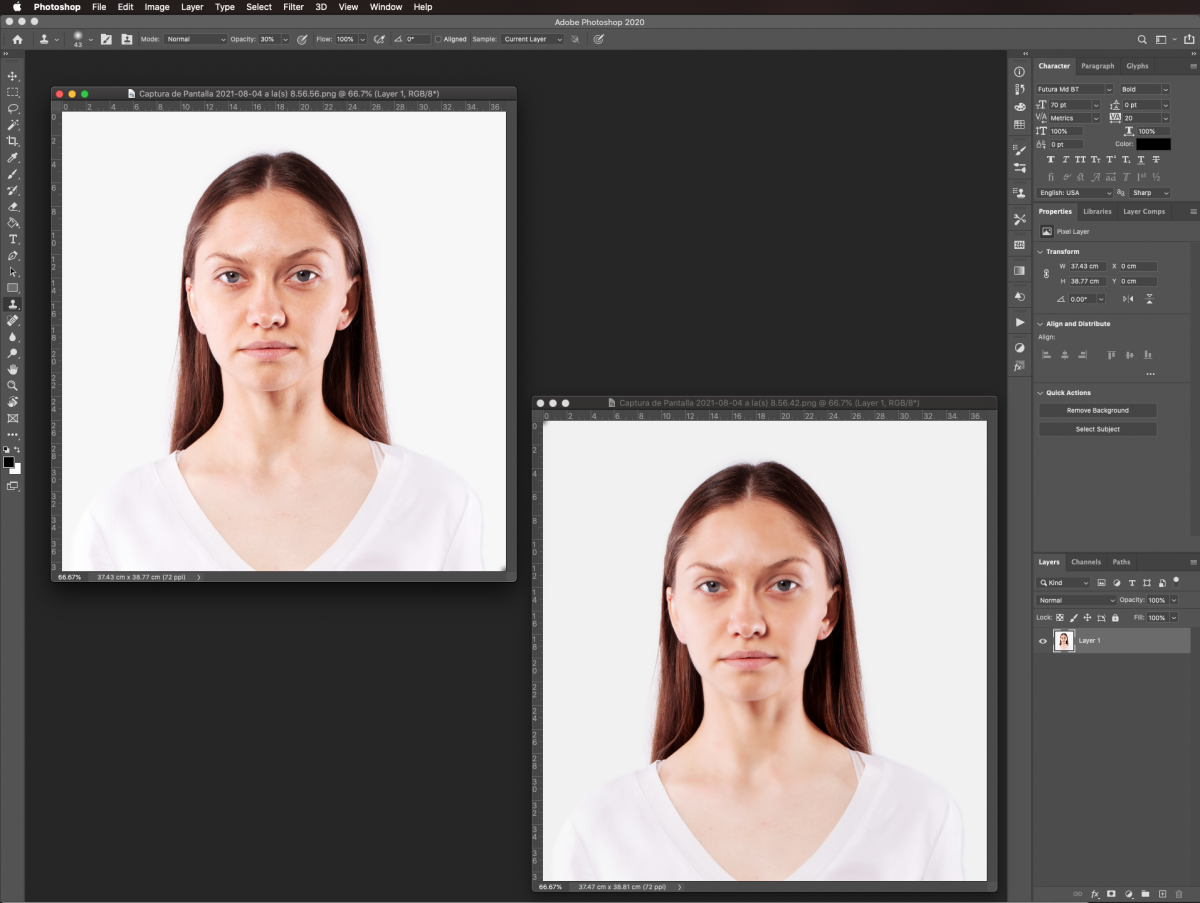
This is how our subject looks like before and after the retouching.
You may also be interested in our tutorials on how to change hair color in Photoshop, and how to mask a transparent object in Photoshop.
You will need a portrait that needs some retouching. We used a stock photo of womanfrom Design Bundles.
Step 1 - Remove larger imperfections
Open the image you want to retouch. If your subject has pimples and other minor skin blemishes you can remove them using the Spot Healing Brush.
Step 2 - Duplicate the original layer
We will need to create a couple of duplicates of the subject in order to apply some of the effects and then blend them with the original. Duplicate your background layer twice (Command/Control + J).
For now, hide the top-most duplicate by clicking on the small eye icon to its left in the Layers panel.
Step 3 - Apply a Gaussian Blur filter
Next, we will use the Gaussian Blur Filter to start smoothing the skin. Select the first duplicate (the one in the middle), go to Filter > Blur > Gaussian Blur.
Move your Radius lever until the skin seems even. We set it to 4.0 Pixels.
Step 4 - Blend layers together
Turn on your topmost duplicate layer and go to Image > Apply Image. Use your document as the Source and the first duplicate (the one you applied the gaussian blur filter to) as Layer.
Use Subtract as Blending Mode, with a Scale of 2 and an Offset of 125.
Then, change the Blending Mode of the layer to Linear Light.
Step 5 - Select the portions of skin to smooth out
We are going to smooth the portions of the face that need it. Click on the topmost duplicate layer, then use the Lasso tool (L) and change Feather to 30 px. Make a selection of the forehead area, trying not to be too close to the eyebrows and hairline.
Go to Filter > Blur > Gaussian Blur and this time use a very high Radius value. We used 10 Pixels. The idea is to get rid of as many imperfections as possible.
Do the same with the other areas of the face you want to retouch like the cheeks, chin, and eyelids. To apply the Gaussian Blur with the same values, go to the Filter menu, the last applied filter should be on top.
If you want to get a better view, you can hide and unhide the selection by clicking the H key. Remember to Deselect (Command/Control + D) after you are finished with an area.
Step 6 - Fix other areas with the Clone Stamp
To fix other areas, like the nose, use the Clone Stamp tool (S). Hold the Alt/Option key and click on top of the area you want to use as Source. Then, use a medium brush with a lower Opacity (around 30%) and choose Current Layer as the Sample to cover the spots that need it.
If you want to see the difference, you can turn your layers off and on.
This is how our subject looks like before and after the retouching.
You may also be interested in our tutorials on how to change hair color in Photoshop, and how to mask a transparent object in Photoshop.
Related Tutorials
Photoshop Tutorials
How to Create a Cracked Skin Effect in Photoshop
Photoshop Tutorials
Cracked Skin and White Eyes in Photoshop Part 2
Photoshop Tutorials
Golden Skin in Photoshop
Photoshop Tutorials
Masking Tape Text Effect in Photoshop
Photoshop Tutorials
How to Use Text Effects in Photoshop
With Photoshop Text Effects, you can create text with impact in just a few steps.
Photoshop Tutorials
How to Create Speech Bubbles in Photoshop
Learn how to create and edit fun speech bubbles in Photoshop using custom shapes.