By Design Bundles
Using the Sketch Tool with the Silhouette Curio
I will be using a script calligraphy font called September Smile but you are welcome to use any Cursive Font from Font Bundles.
Step 1 - Change the Cutting mat options
Let us begin by opening Silhouette Studio. Next, we want to change the cutting mat options. On the right hand side click on the Page Setup panel to open the page options. First, change the Machine option to Curio. This will allow you to choose the cutting mat size specific to that machine.
Click the down arrow next to Cutting Mat and change to Auto Curio. Change the Media size of the cut area to fit the curio mat if needed. Most of the time it will be set to Auto.

With the cutting mat and the size changed, you will see the curio mat appear.

Step 2 - Add text and a design
For this tutorial we will add some text and designs. Click on the Text tool on the left hand side then click on the mat and start typing. We changed the font using the Text Style Panel on the right hand side.
We have an in depth tutorial on editing text in Silhouette Studio for you to follow if you want.

For fonts like the one we used above, you will need to weld them. With the text selected, right click and select Weld. Then, while still selected, right click again and choose Group. This will make it a single object.
You can also sketch simple shapes, designs you have created or intricate designs like the family monogram svg we used below. You can add a basic shape with the Shape Tool on the left side panel.

You may not see them right now, but the cut lines are there. Even if the design is filled with color you can still sketch it.
Step 3 - Adjust settings under Send Panel
Click on the Send Panel to open up the machine options. At the bottom of the screen, next to the little graduation hat, click the machine icon. Select the Curio machine from the options.

Under the Carriage 1 options, next to Material, choose your material type. We chose the pre-loaded material settings for Card Stock.
You are welcome to use your own settings. If you want, you can follow our tutorial on how to create custom material settings in Silhouette Studio. Next to Action we clicked the drop down arrow and selected Sketch. The Tool choice will automatically be adjusted to the Pen.
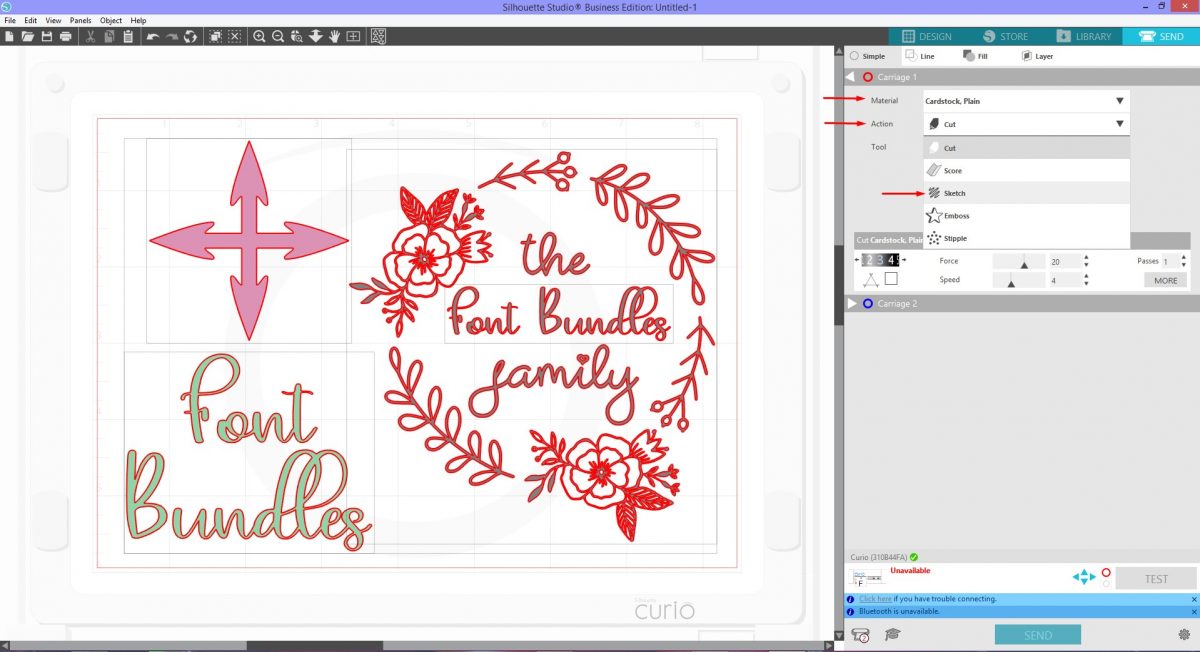
Be sure that after selecting all of your items, Sketch is selected as shown in the image below.
Now that everything has been set up, we can get going with sketching. Place your sketch pen into the carriage that corresponds with the one on your screen. With your media placed onto the cutting mat you can go ahead and click Send.

Silhouette Studio will give an idea of the time it will take it sketch. You now have the knowledge of how to use the Sketch option with the Curio machine.
We hope this tutorial has been insightful. If you enjoyed learning about the Curio, check out our other tutorials like how to fill text for sketching, how to use the stipple tool and making your first cut with Silhouette Curio.