By Design Bundles
Affinity Tutorials11 min
How to Make a Mandala in Affinity Designer
The Symmetry Tool in Affinity Designer is found under the Pixel Persona. It works with the Paint Brush Tool to create symmetrical or mirrored designs. These designs are placed on one or multiple planes to create amazing detail. In this tutorial we will make a mandala design in Affinity Designer.
We will be using a textured affinity brush created by Studio Fabian Fischer. To begin, open Affinity Designer and click New Document. Adjust your document settings if needed and click Create.
We will quickly draw out a circle in the Designer Persona then move over to Pixel Persona. In the Designer Persona, click on the Ellipse Tool on the left side panel. Hold Ctrl and click + drag out a circle.
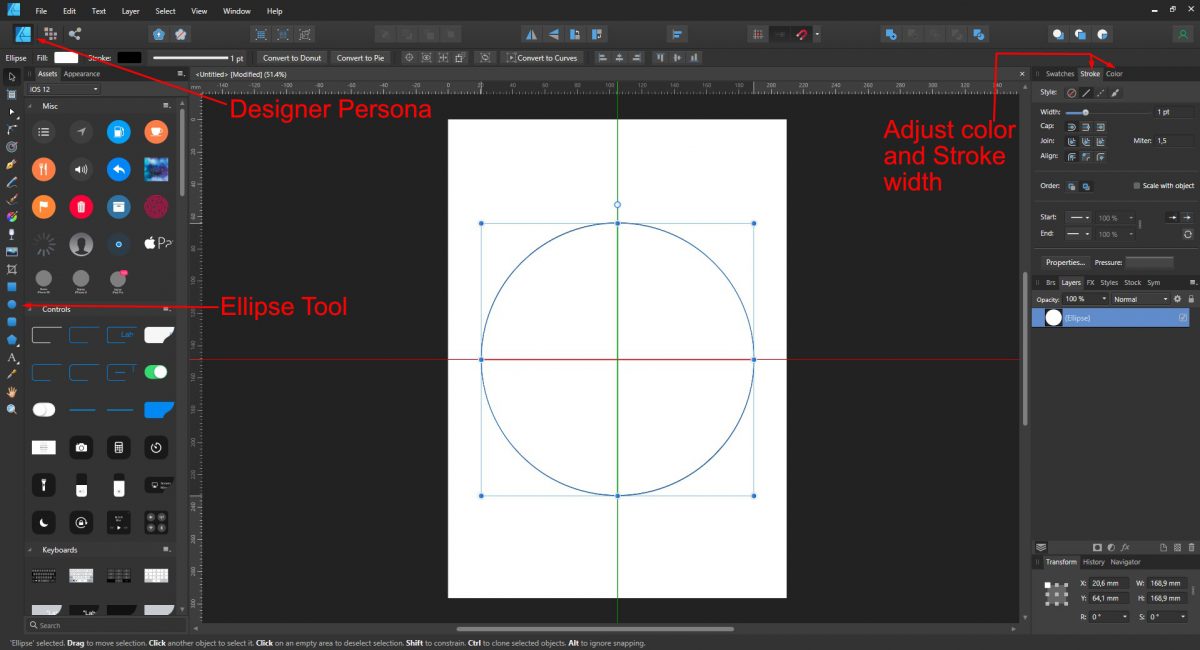
Next, draw out your guidelines. Click on the ruler at the top and drag a guideline down until it turns red. This indicates it is centered in the circle. Do the same with the ruler on the left side, which will turn green when centered.
If the rulers are not visible, click on the View menu and click on Show Rulers.
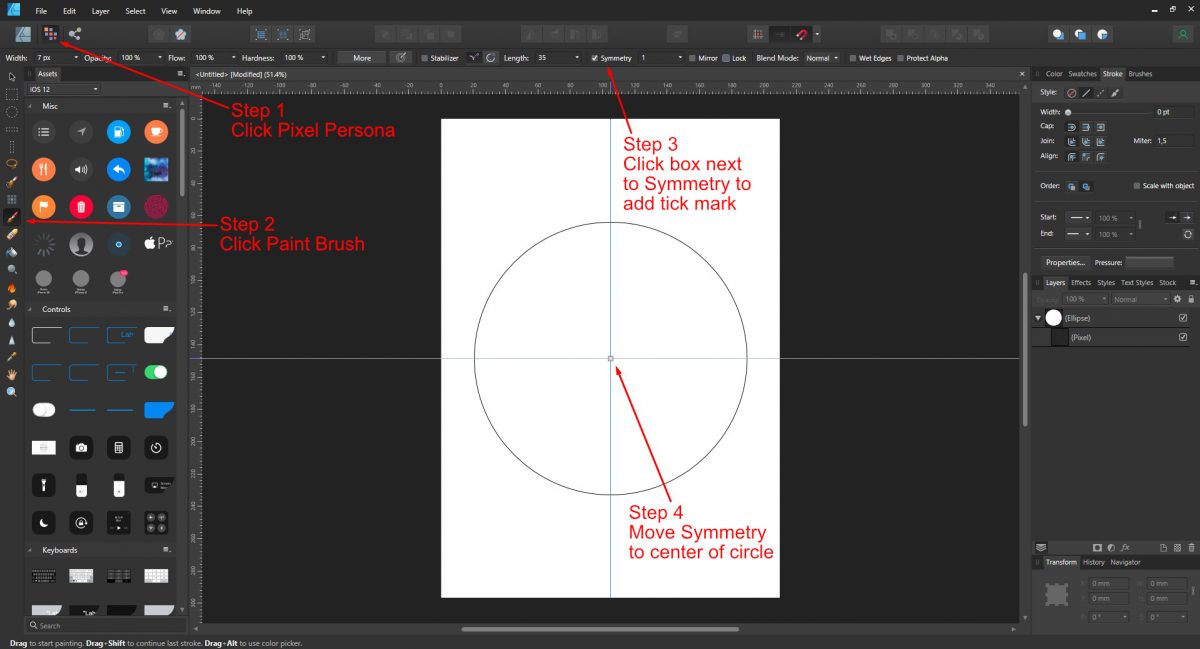
At the top left of the screen, click on Pixel Persona. Click on the Paint Brush tool on the left side panel to select. At the top of the screen tick the box next to Symmetry. The number of symmetry lines is usually set to 1.
When you click on Symmetry, a plane is added. Placing your mouse over the little square will change the cursor to directional arrows. You are able to move the plane around. If not already done, position the plane at the center where your guidelines meet.
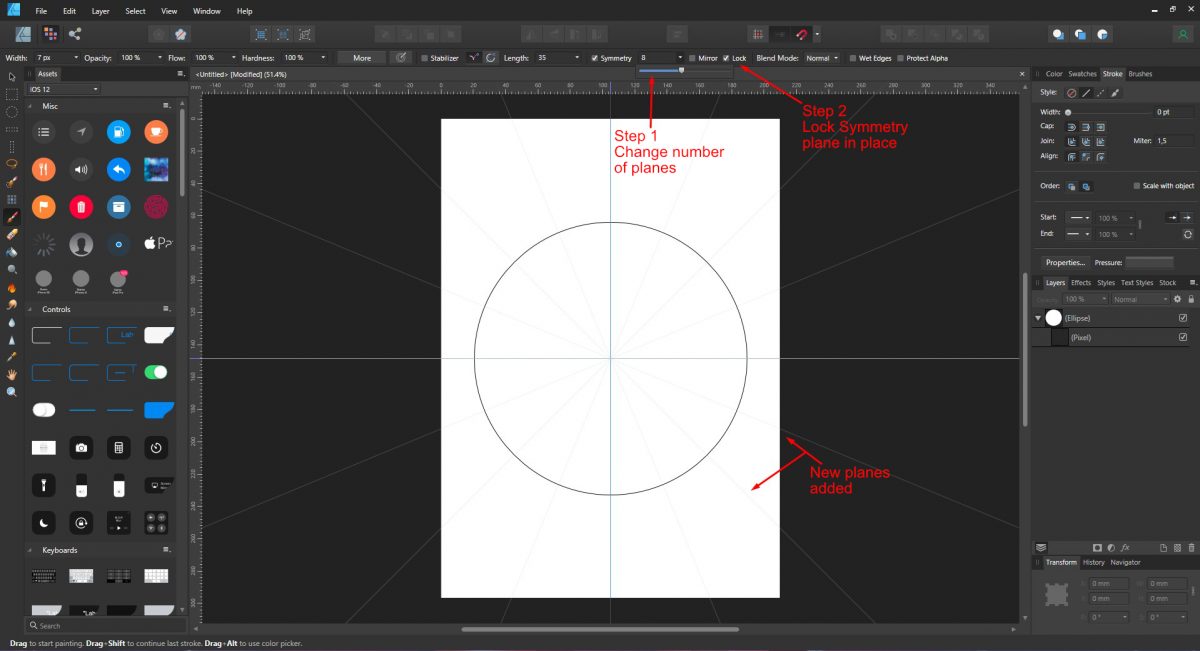
The Symmetry Tool allows for up to 16 planes. Next to Symmetry is the Plane number. The number was changed to eight planes for this example. To lock the planes in place, tick the box next to Lock at the top of the screen.
Affinity Designer comes preloaded with brushes. But for this tutorial we will be importing brushes. We have a great tutorial on how to install Affinity Designer Brushes to help you get going.
On the right side panel at the top click on Brushes. Click on the drop down menu and choose Crayon. We will use Crayon 3. Be sure to change the brush width to a smaller size before drawing to prevent any lagging issues.
Adjust the width of your brush at the top left corner or by pressing the [ or ] keys.
Click and drag your mouse anywhere on the circle. As you continue to click and drag over the circle the lines are copied across all eight planes.
Here we started at the center. While clicking + dragging, the mouse was moved around the center point multiple times. Changing the distance while moving prevented the design condensing in the middle.
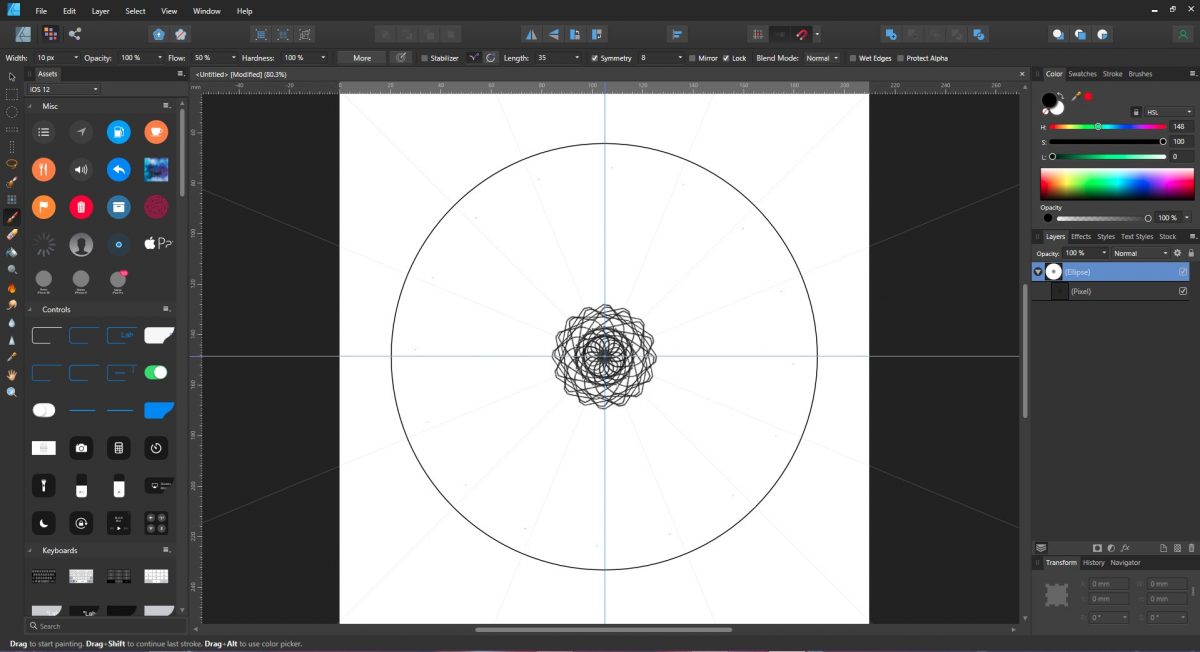
You can stop drawing at one point and start again at another. The Symmetry planes can be increased or decreased. When you change the planes the design already drawn won't be affected. Additional drawing will take place on the new planes.
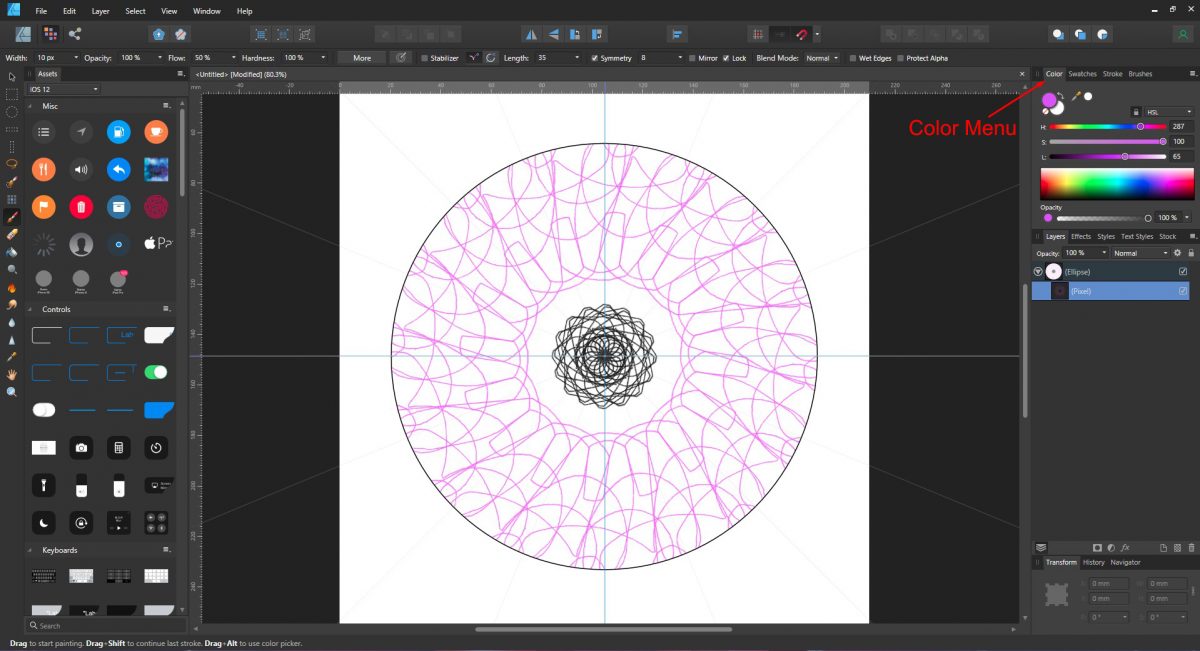
The width of the brush can be adjusted and the color changed. On the right side panel click on the Color menu, choose a color and carry on drawing.
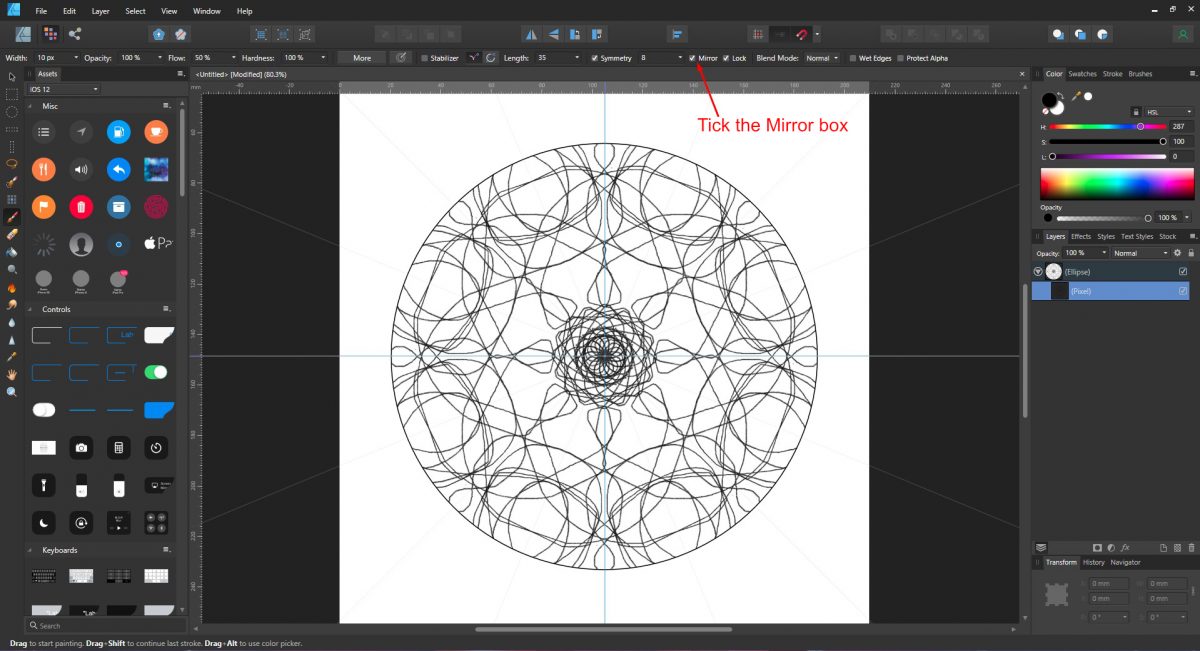
The Mirror feature is a great option for creating a more uniform Mandala. You have better control of the design as drawing is mirrored. At the top of the screen tick the box for Mirror and start drawing.
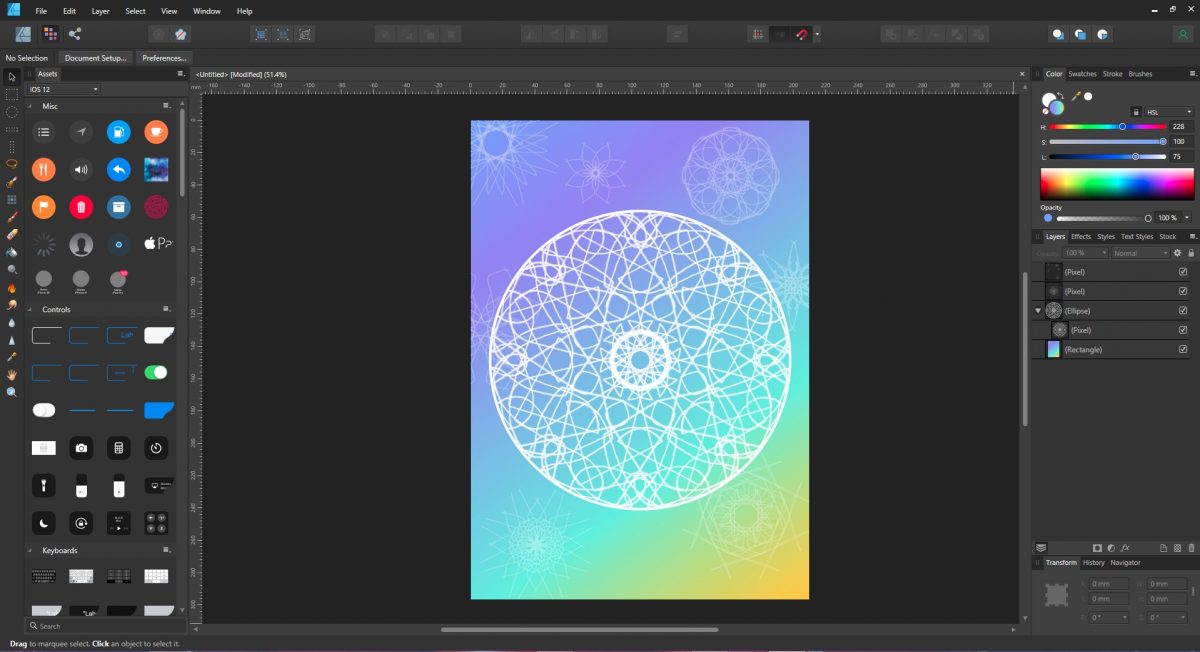
Background gradients and adjusting the Fill and Stroke gives a more striking effect. To add individual designs, unlock the Symmetry and click + drag to a new position. Begin drawing and repeat this for each new design.
Check out our other guides like how to use SVGs in Affinity, an introduction to using fonts in Affinity, and making gradients in Affinity Designer.
We will be using a textured affinity brush created by Studio Fabian Fischer. To begin, open Affinity Designer and click New Document. Adjust your document settings if needed and click Create.
Step 1 - Draw out a circle and add guidelines
We will quickly draw out a circle in the Designer Persona then move over to Pixel Persona. In the Designer Persona, click on the Ellipse Tool on the left side panel. Hold Ctrl and click + drag out a circle.
Next, draw out your guidelines. Click on the ruler at the top and drag a guideline down until it turns red. This indicates it is centered in the circle. Do the same with the ruler on the left side, which will turn green when centered.
If the rulers are not visible, click on the View menu and click on Show Rulers.
Step 2 - Add and lock Symmetry Planes
At the top left of the screen, click on Pixel Persona. Click on the Paint Brush tool on the left side panel to select. At the top of the screen tick the box next to Symmetry. The number of symmetry lines is usually set to 1.
When you click on Symmetry, a plane is added. Placing your mouse over the little square will change the cursor to directional arrows. You are able to move the plane around. If not already done, position the plane at the center where your guidelines meet.
The Symmetry Tool allows for up to 16 planes. Next to Symmetry is the Plane number. The number was changed to eight planes for this example. To lock the planes in place, tick the box next to Lock at the top of the screen.
Step 3 - Install and select brushes
Affinity Designer comes preloaded with brushes. But for this tutorial we will be importing brushes. We have a great tutorial on how to install Affinity Designer Brushes to help you get going.
On the right side panel at the top click on Brushes. Click on the drop down menu and choose Crayon. We will use Crayon 3. Be sure to change the brush width to a smaller size before drawing to prevent any lagging issues.
Adjust the width of your brush at the top left corner or by pressing the [ or ] keys.
Step 4 - Begin drawing the Mandala
Click and drag your mouse anywhere on the circle. As you continue to click and drag over the circle the lines are copied across all eight planes.
Here we started at the center. While clicking + dragging, the mouse was moved around the center point multiple times. Changing the distance while moving prevented the design condensing in the middle.
You can stop drawing at one point and start again at another. The Symmetry planes can be increased or decreased. When you change the planes the design already drawn won't be affected. Additional drawing will take place on the new planes.
The width of the brush can be adjusted and the color changed. On the right side panel click on the Color menu, choose a color and carry on drawing.
Step 5 - Use the Mirror option
The Mirror feature is a great option for creating a more uniform Mandala. You have better control of the design as drawing is mirrored. At the top of the screen tick the box for Mirror and start drawing.
Background gradients and adjusting the Fill and Stroke gives a more striking effect. To add individual designs, unlock the Symmetry and click + drag to a new position. Begin drawing and repeat this for each new design.
Check out our other guides like how to use SVGs in Affinity, an introduction to using fonts in Affinity, and making gradients in Affinity Designer.
Related Tutorials
Affinity Tutorials
How to Make an SVG in Affinity Designer
Learn how to create SVG files in Affinity Designer with this tutorial.
Affinity Tutorials
How to Make GIFs Using Affinity Designer
In just 3 easy steps you will learn how to create animated GIFs using Affinity Designer.
Affinity Tutorials
How to Make a Seamless Pattern in Affinity Designer
In this tutorial you will learn how create a Seamless Pattern in Affinity Designer.
Affinity Tutorials
How to Make a Gradient in Affinity Designer
In this tutorial, learn how to make a gradient background in Affinity Designer.
Affinity Tutorials
How to Make a Flat Character in Affinity Designer
Learn how to make a flat character in Affinity Designer with this step by step tutorial.
Affinity Tutorials