By Design Bundles
Affinity Tutorials20 min
How to Make Line Art Illustration in Affinity Designer
Line art is everywhere, in web design, logos, even in some patterns. It is a drawing technique made up of lines and curves that are very distinctive. Placed against a plain background, line art doesn't consist of gradients or colors. It is created to be represented on 2D or 3D planes. Follow our tutorial as we show you how to make a Line art illustration in Affinity Designer.
You can create current and on-trend logos or patterns to use on everything. Projects can range from throw pillows and mugs to t-shirts, stickers, and phone cases. Line art is a great way to make any composition more fun and give a nice depth to your designs.
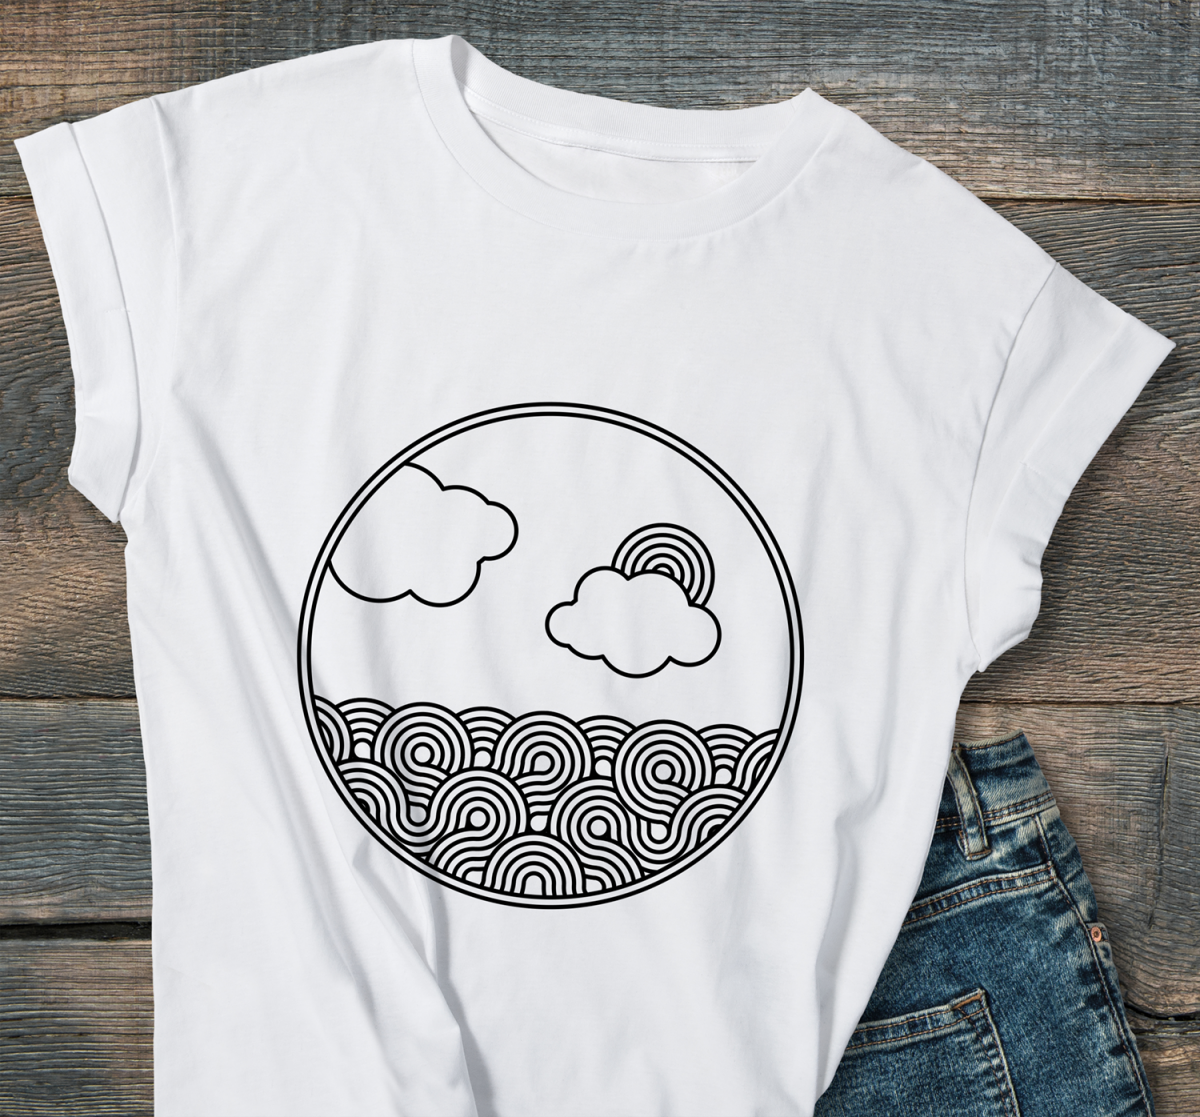
In this tutorial, we will be creating a geometrical line art illustration in Affinity Designer. We will be using a t-shirt mockup to showcase our design.
To begin, create a New document and adjust the document settings if needed. We are going to create the concentric circle for the base of our design. Next, use the Ellipse tool (M) to create a circle with a 500 x 500 px diameter.
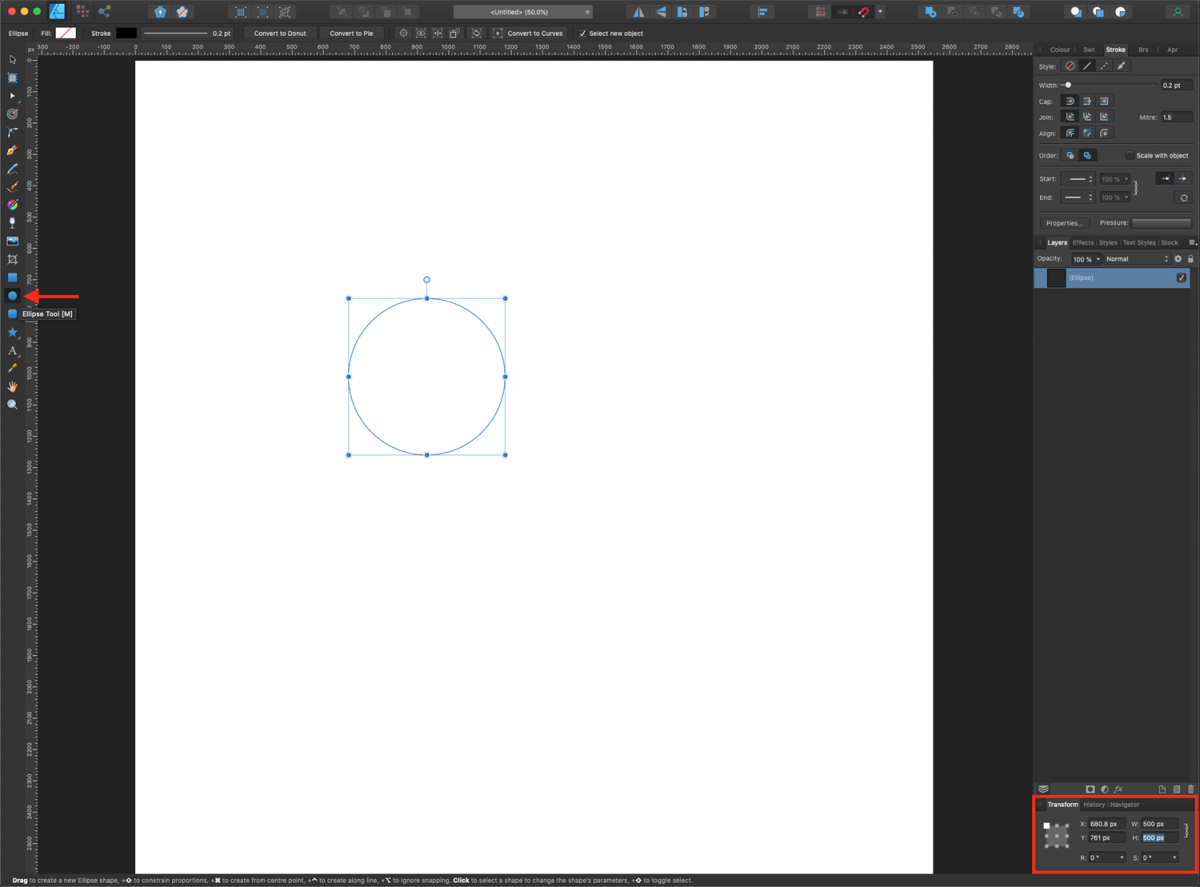
Change the Stroke weight to 5 pt and make sure that the stroke color is set to black.
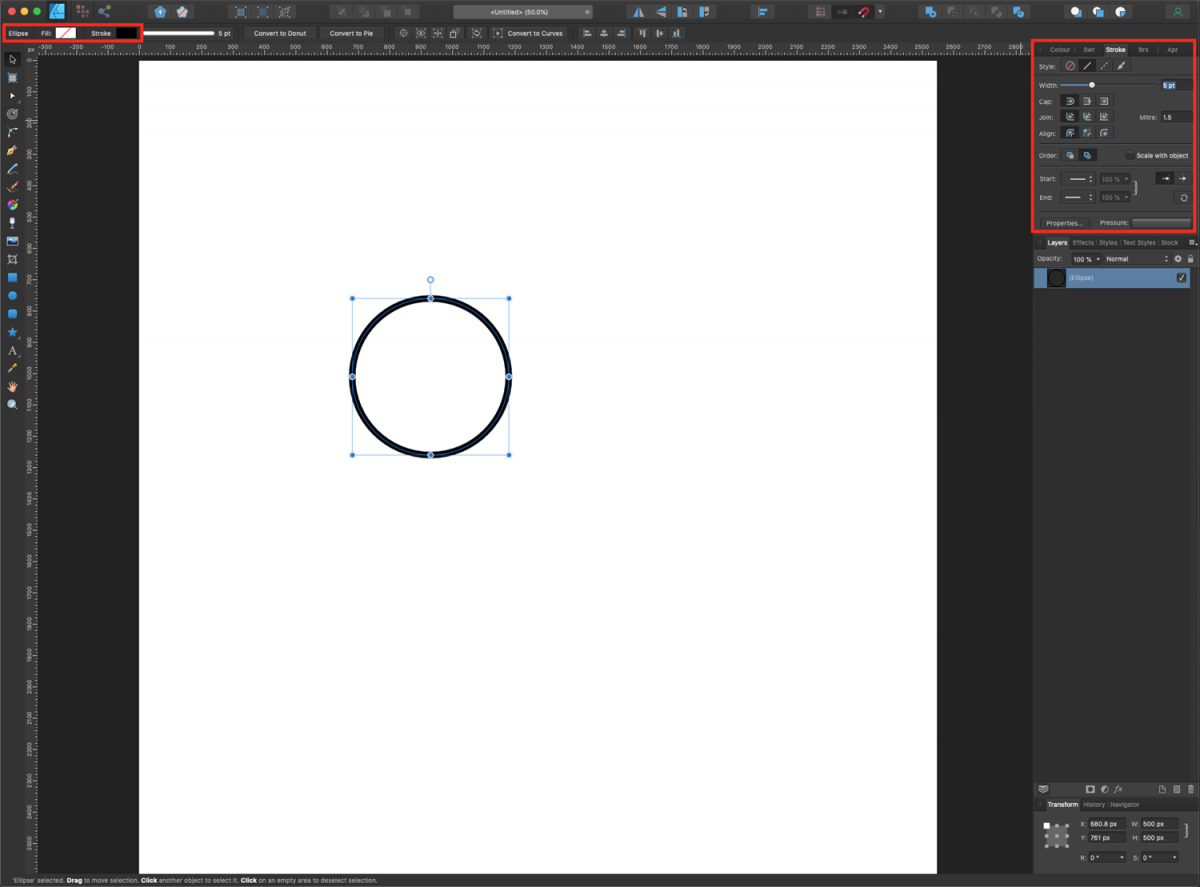
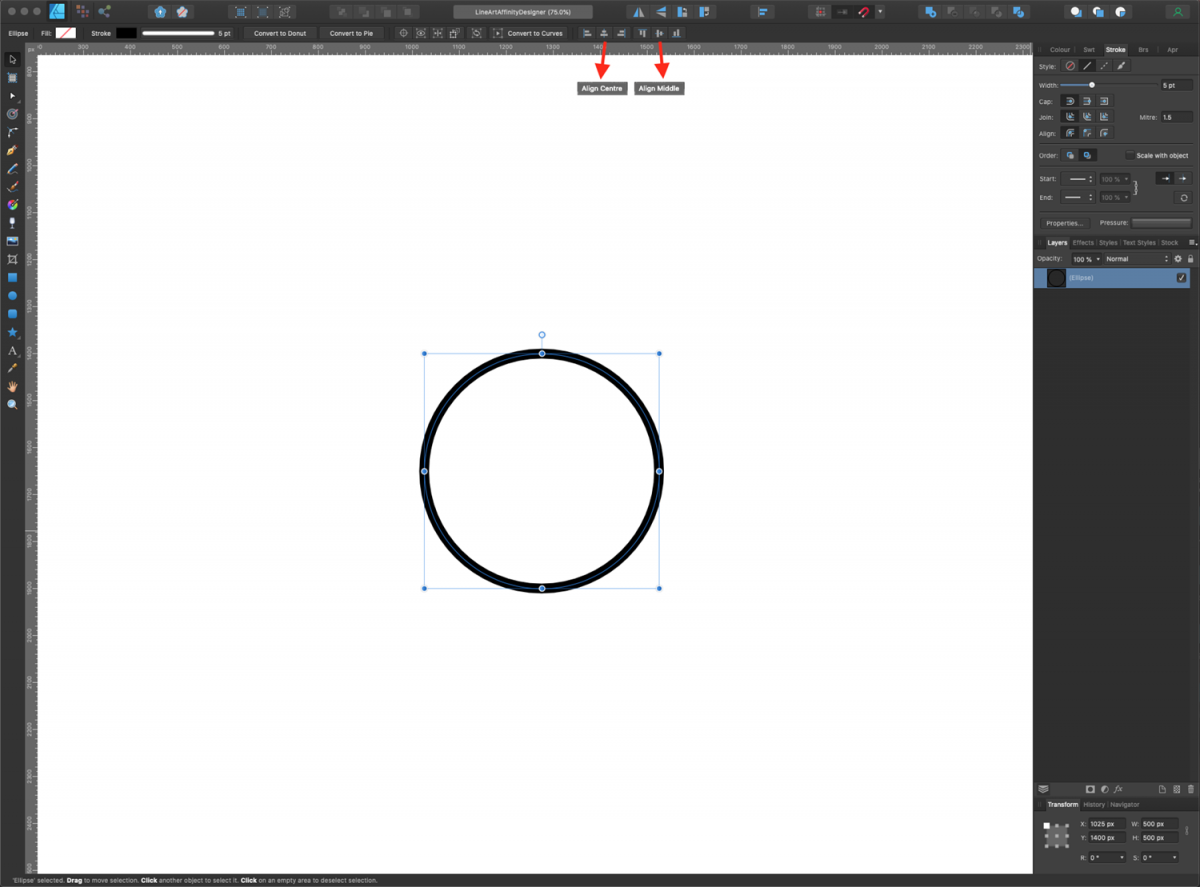
Center the circle to your document using the Align Center and Middle options of the Alignment toolbar. You may need to click on the Move tool on the left hand side to see the options.
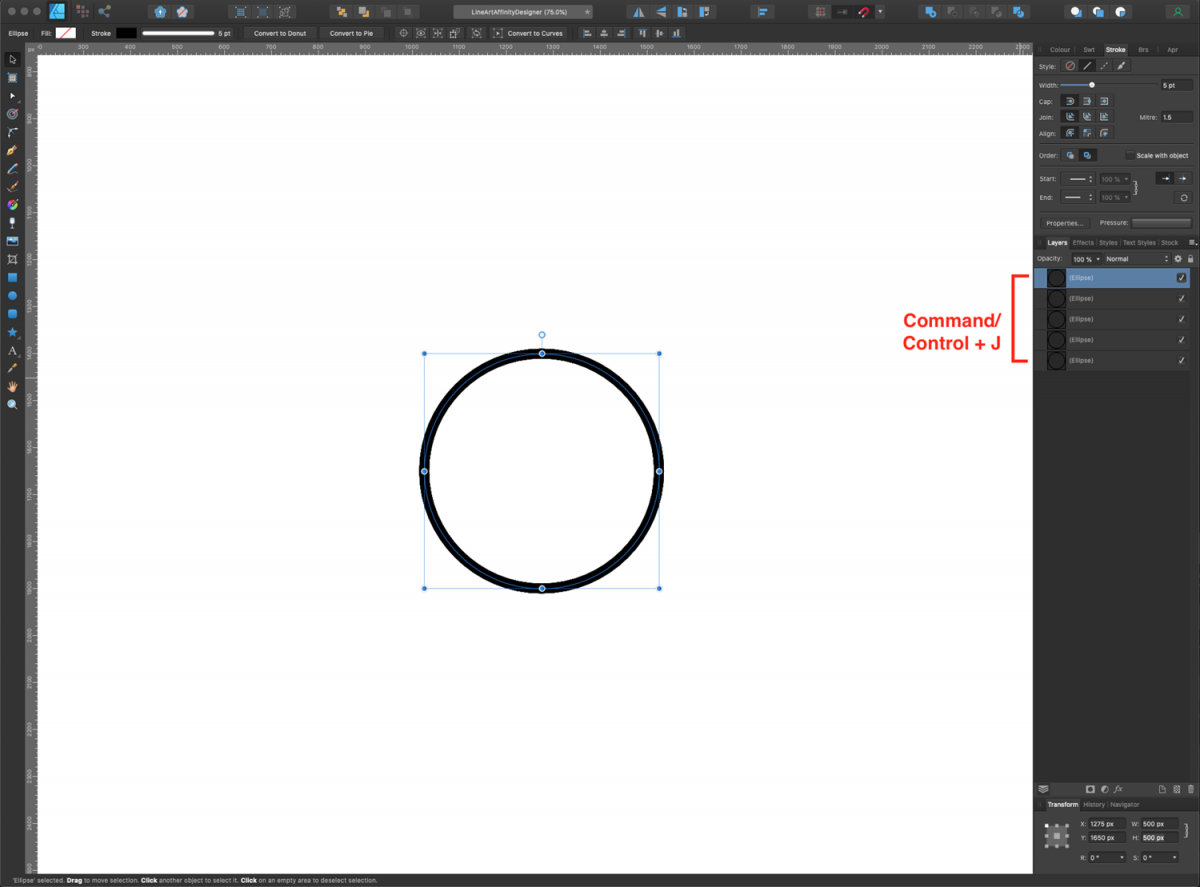
Now, we are going to create several duplicates of our base circle and adjust their sizes. Create four duplicates of the base circle using Command/Control + J. You need to end up with five instances of it.
Select the circle that is placed on top of the Layers panel. Now go to the Transform panel and click on the center in the Anchor point selector. This will make it certain that the transformations are carried out from the center. Change the Width and Height values to 100 px. The circle should now be smaller and should be centered in regards to the base circle.
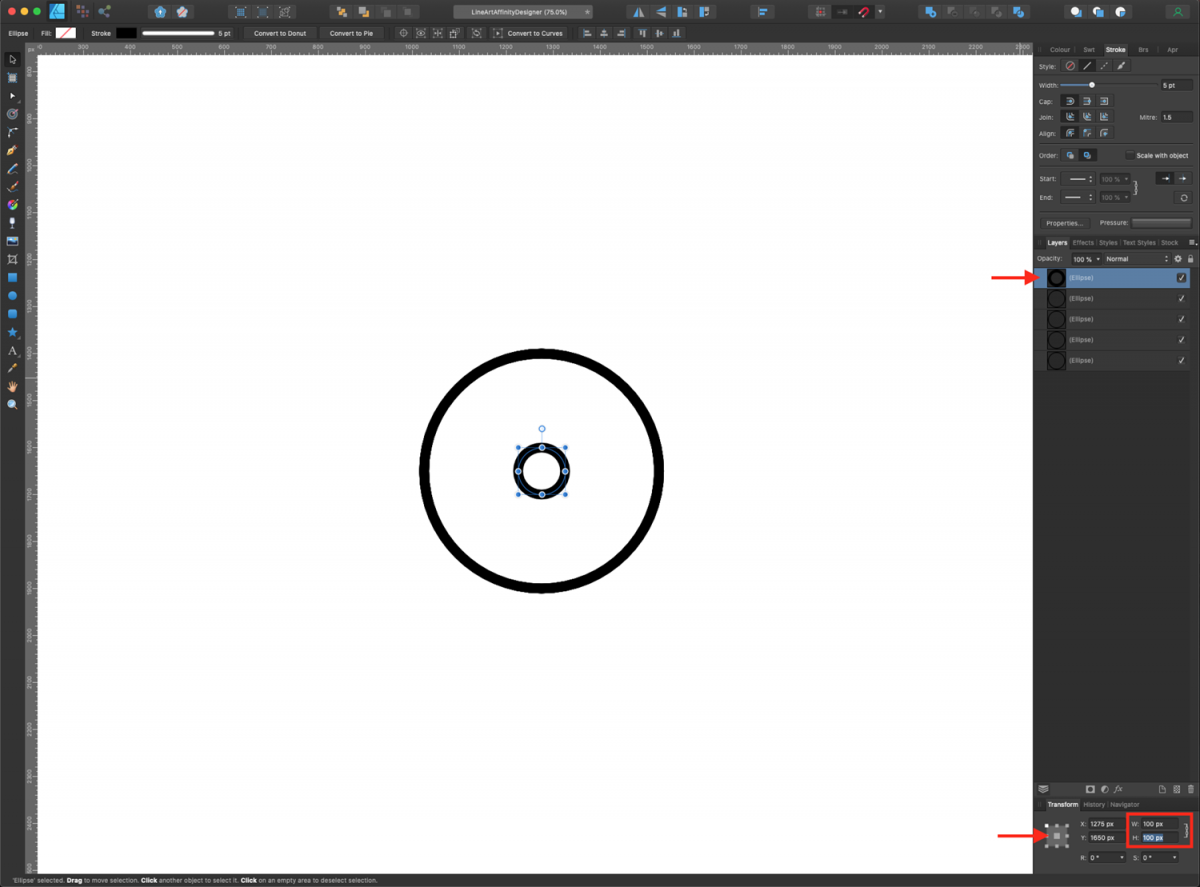
Repeat this with the rest of the circles. Go down from top to bottom and increase the Width and Height values by 100 px each time. The second circle from the top should be 200 x 200 px, the next lot of circles 300 x300 and 400 x 400 respectively. Then, leave the last one as it is.
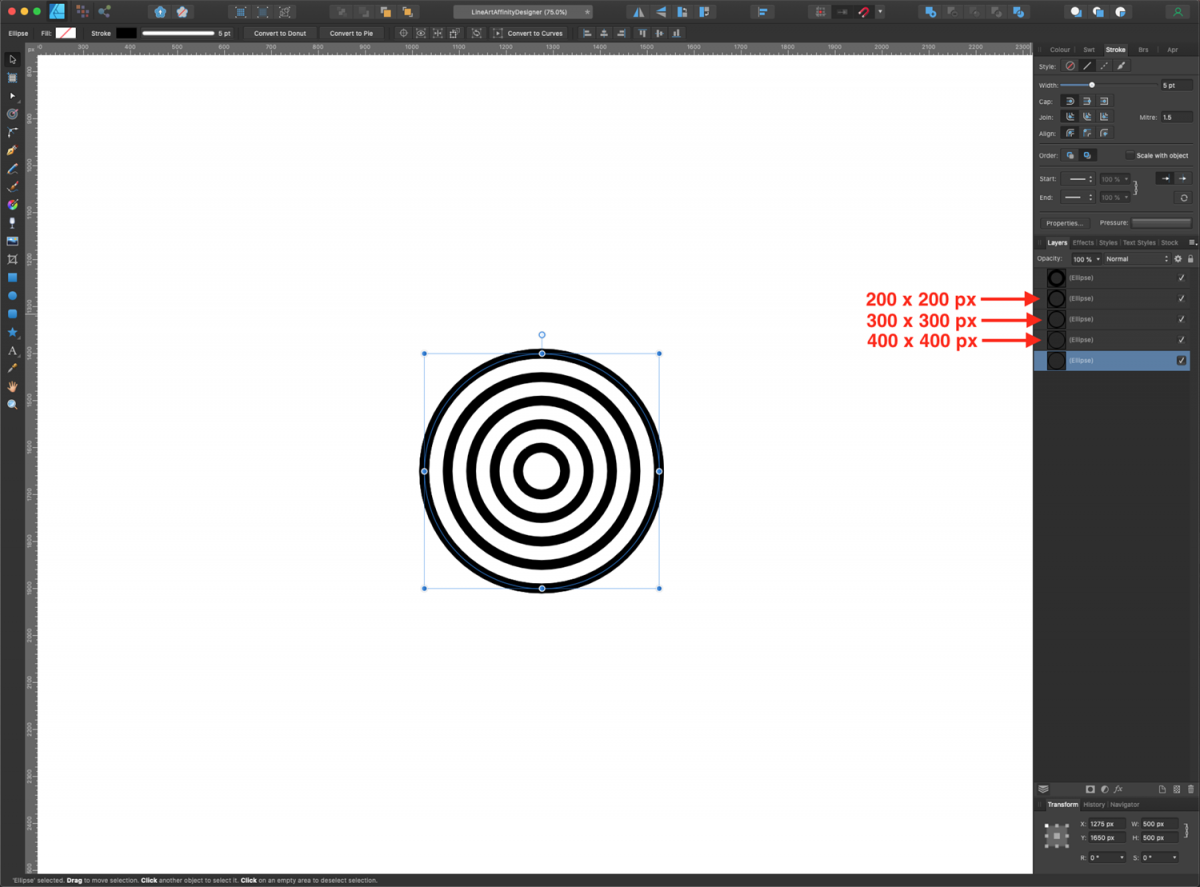
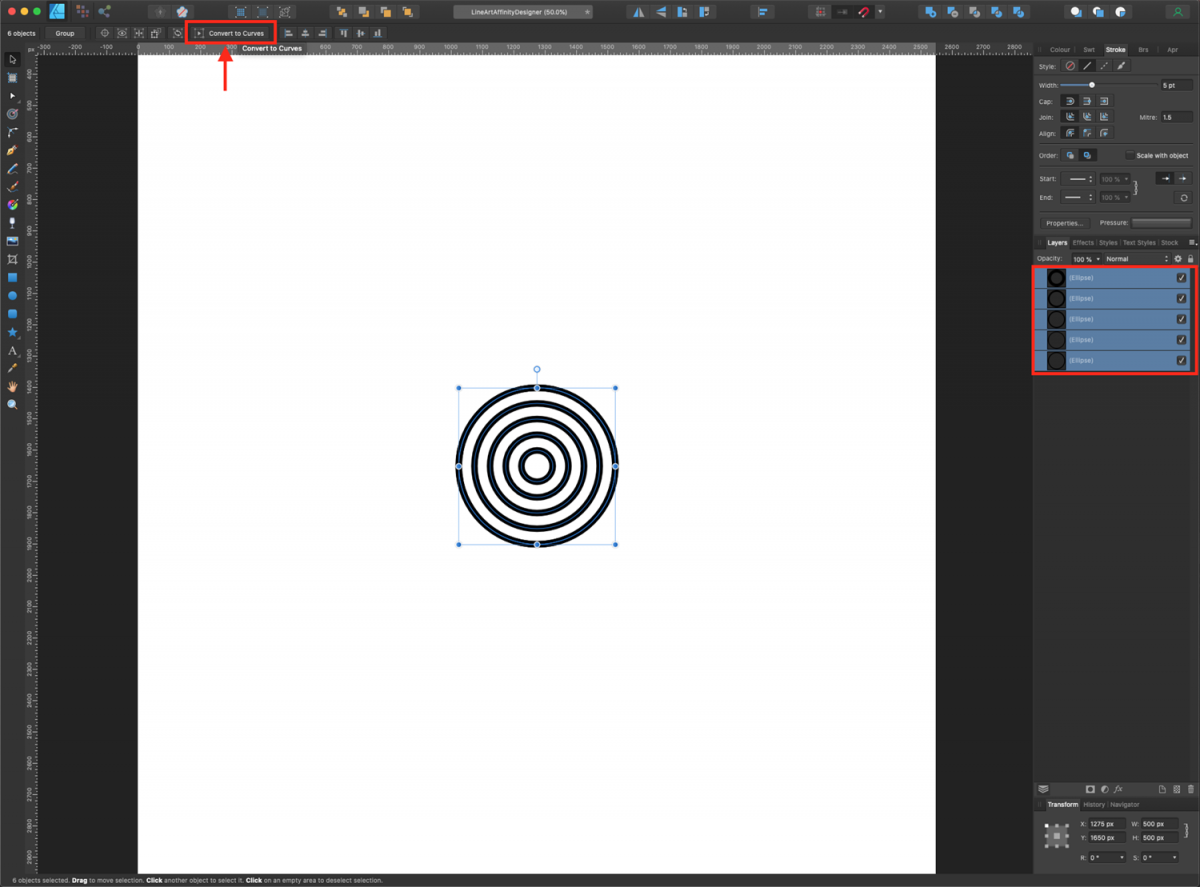
Once you are done, select all the circles and click the Convert to Curves button on the top menu.
We will only use half of the circle to create our geometric pattern. So we are going to split it in half and delete a portion of it.
Select the Node tool (A). Then click around the middle of the circles and drag horizontally from one side to the other. You need to select all the nodes that form a horizontal line in the middle of the circles. Once selected, click the Break Curve button from the Actions menu on the context toolbar. They will now be broken apart.
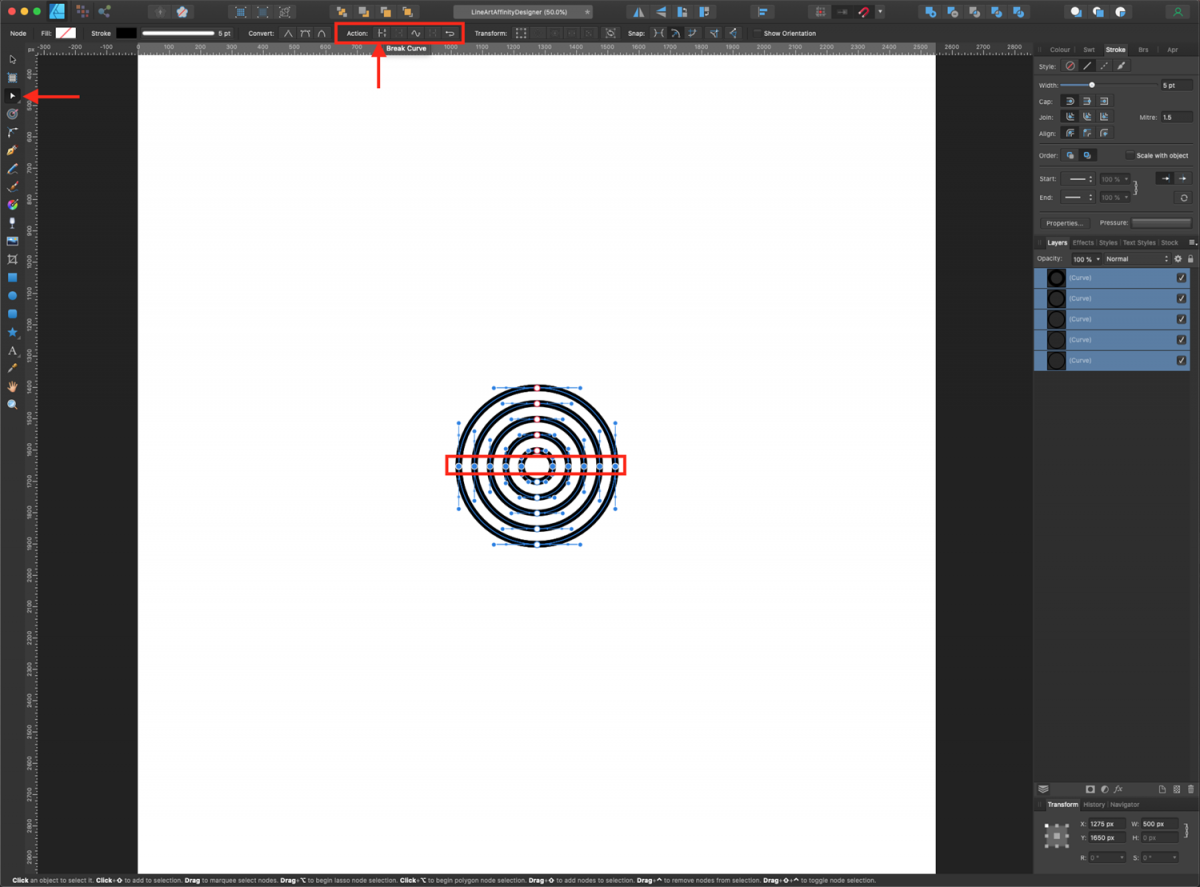
You will notice that the thumbnails in the Layers panel now show ten half circles (curves).
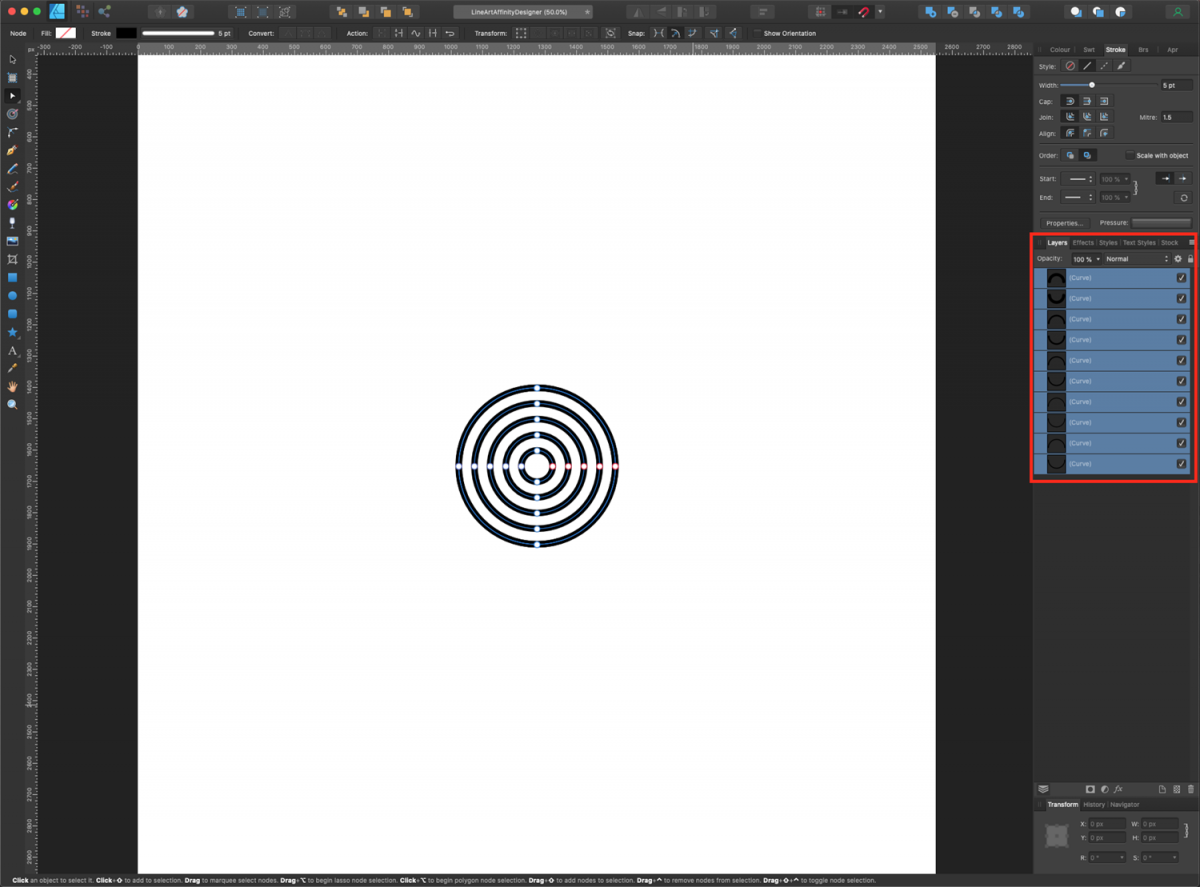
Finally, select the bottom part of the circle and hit Delete to erase it.
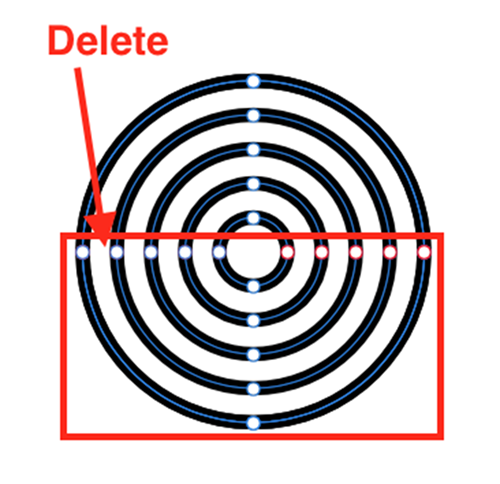
You will end with a rainbow-shaped semi-circle.
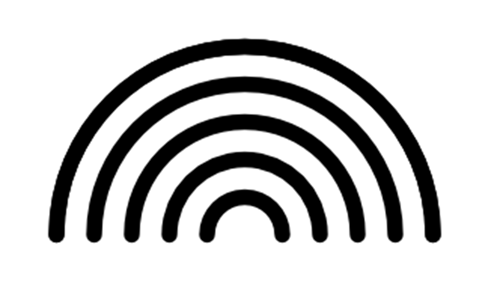
Select all the curves that form it, right-click on top, then Group them together.
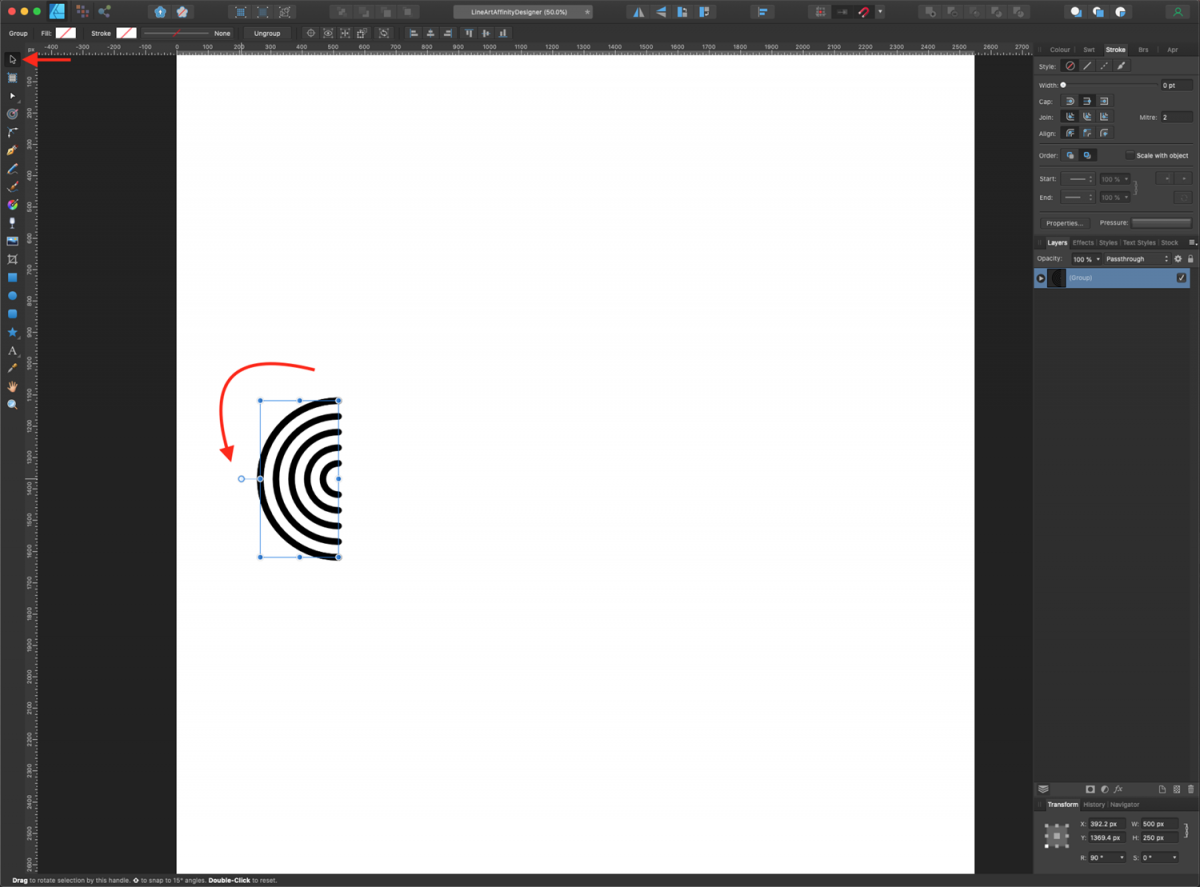
Next, we are going to create a line art geometric pattern that looks like waves to use in our design. First, rotate the semi-circle 90 degrees by clicking and dragging the top handle.
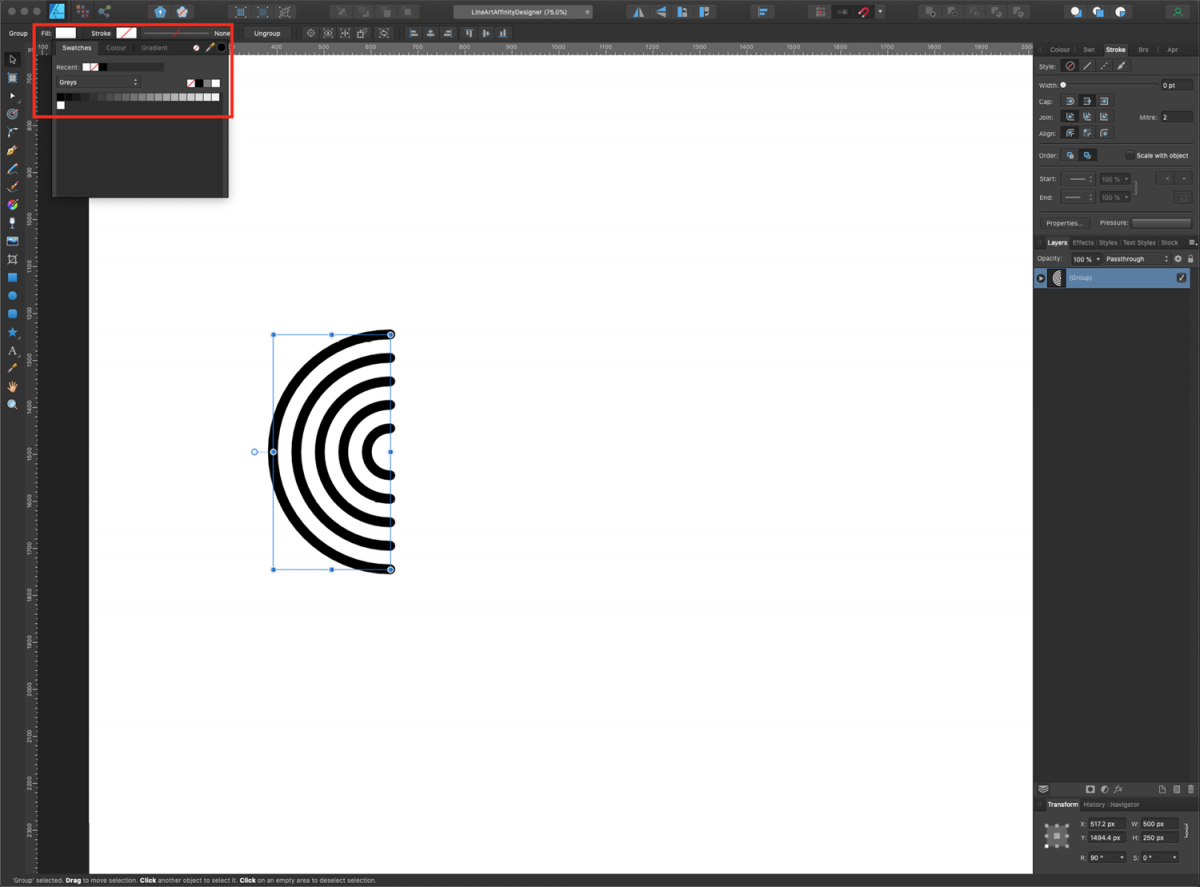
If you have no fill color selected for the shapes, change it to white. We need to have a fill color present in our shapes to better see when the semicircles overlap.
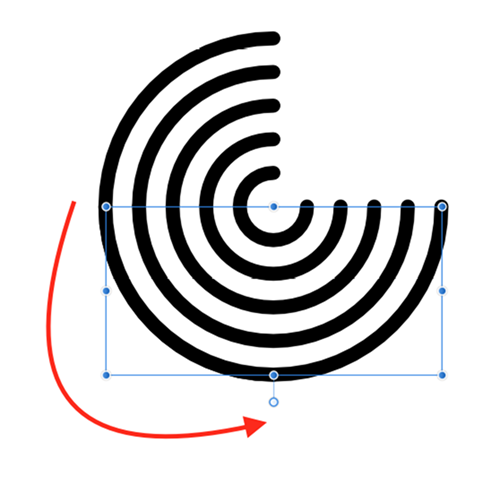
Now, duplicate the semicircle (Command/Control + J) and rotate it another 90 degrees so the top handle is pointing down. It should be placed exactly on top of the bottom section of the other one. It will look like a circle with the top-left wedge removed from it.
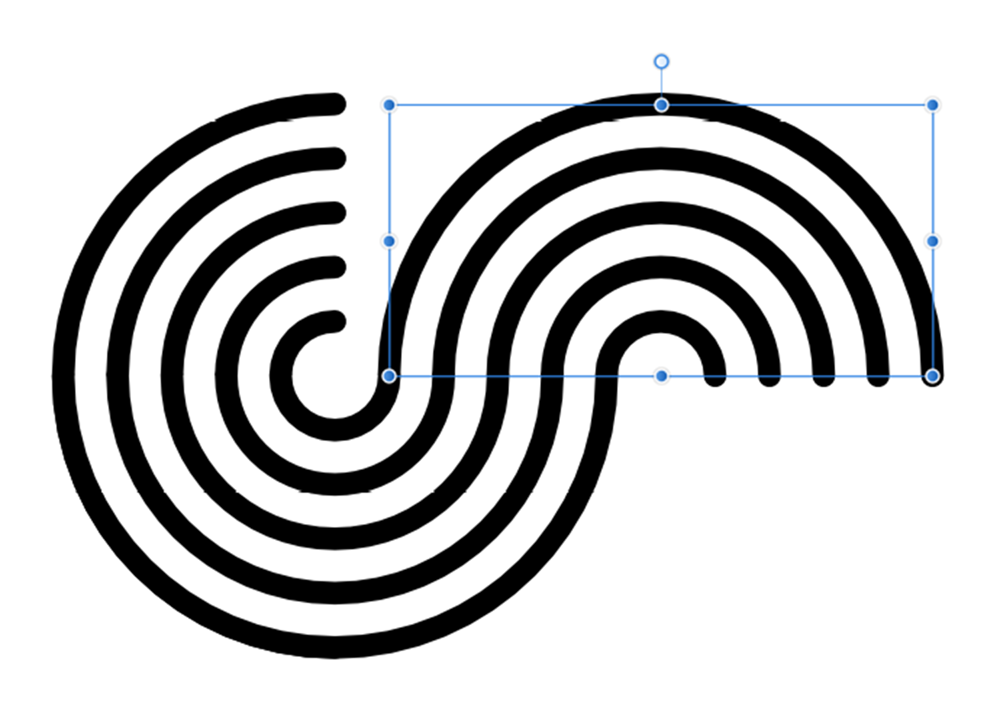
Create another duplicate, and rotate it 180 degrees so it looks like the original semicircle (the top half of the circle). Move this duplicate to the side. Adjust the position so the bottom left meets up with top right end of the upside-down semicircle. We want to create a seamless smooth transition. The resulting image should look like an S facing down.
Keep adding semicircles, rotating, and overlapping them to create a geometric line art pattern that looks similar to a wave.
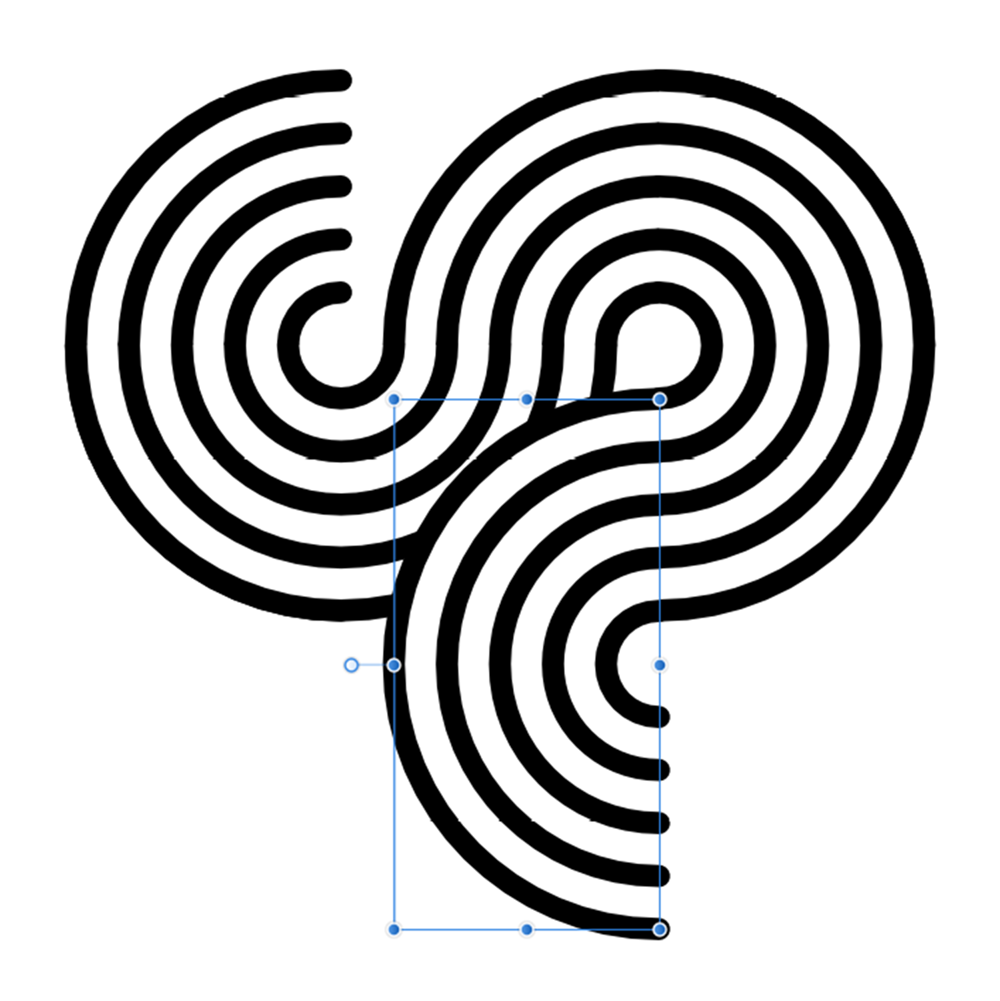
Keep going until you create an entire line with the pattern.
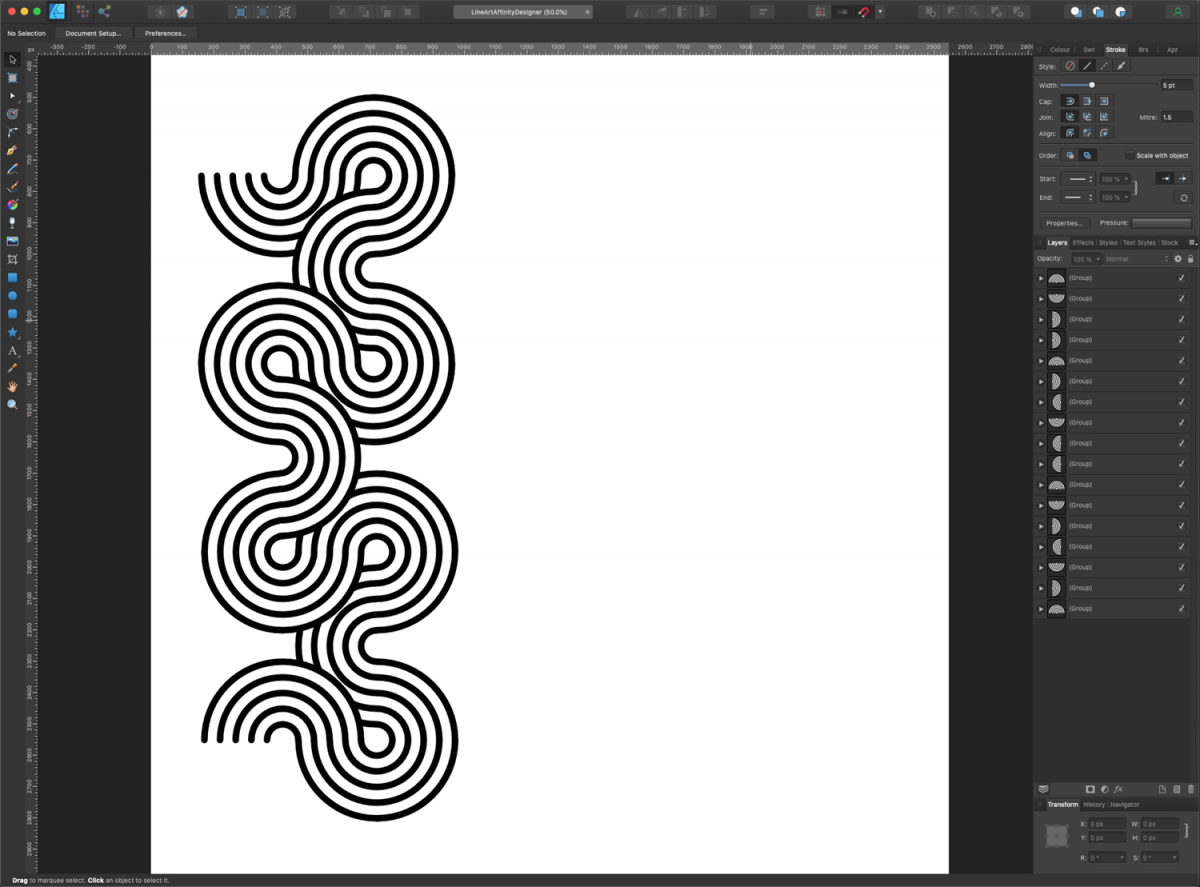
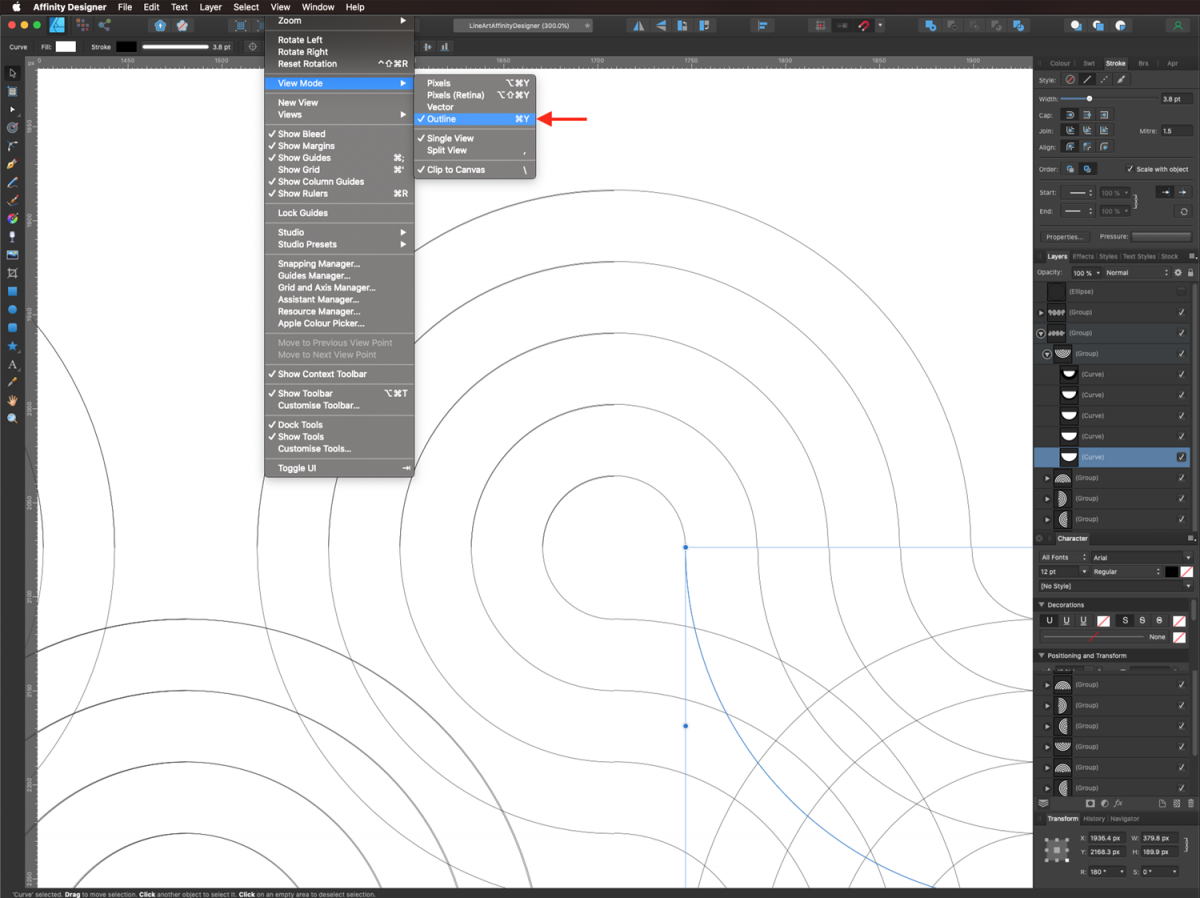
You may want to check that all the lines of the overlapping semicircles are placed correctly. You can do this by switching between Outline and Vector in View > View Mode (Command/Control + Y).
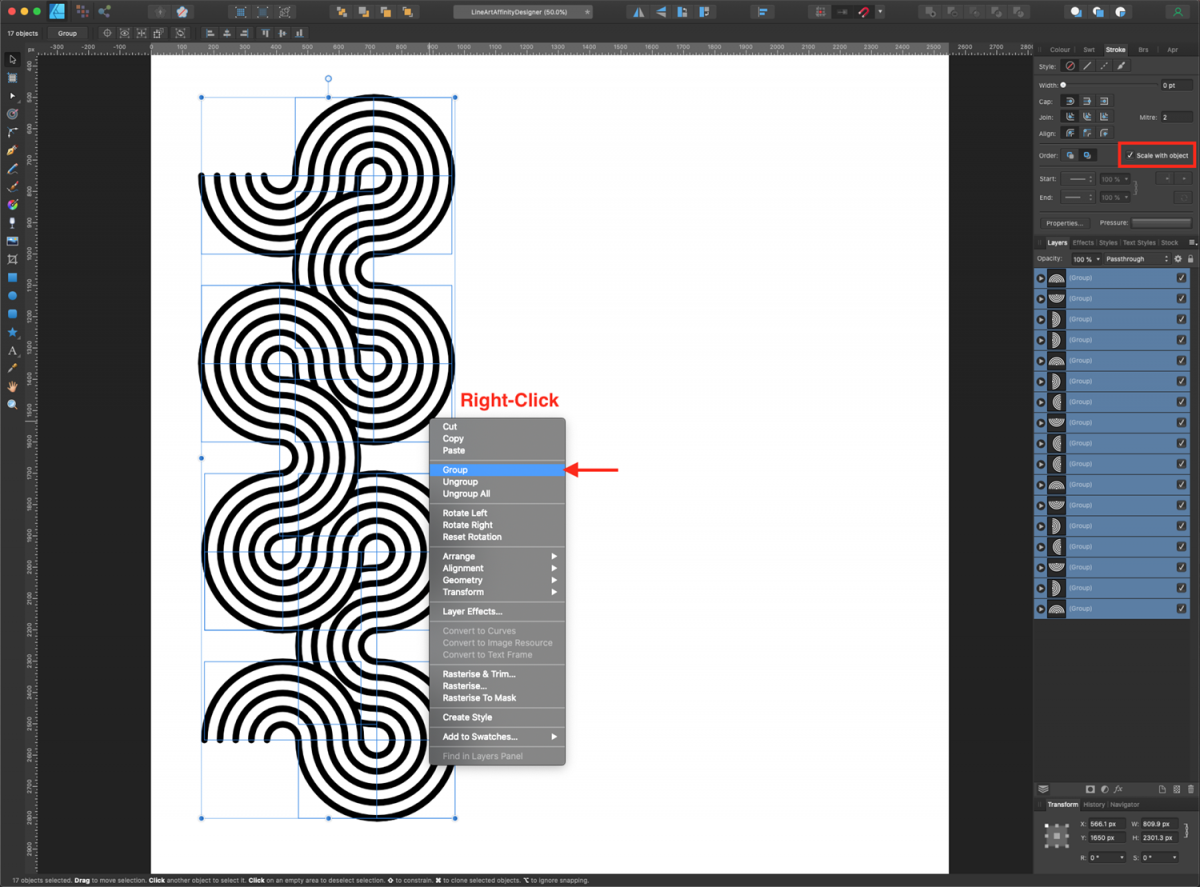
We want to use our wavy line art pattern to create the sea in our design. First, select all the semicircles. Then right-click and choose Group from the drop-down menu.
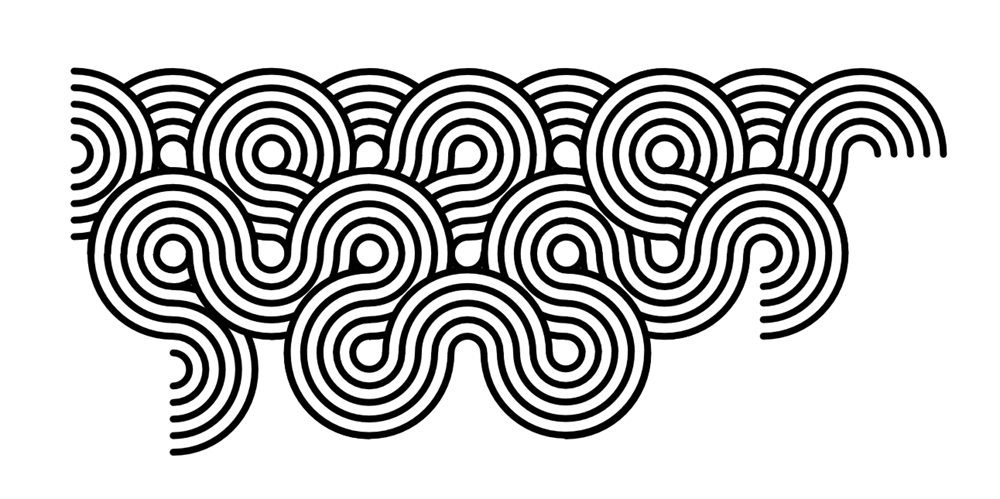
Rotate the group 90 degrees so the wavy line is horizontal. Then, duplicate it a couple of times and arrange the duplicates so they overlap and look like water.
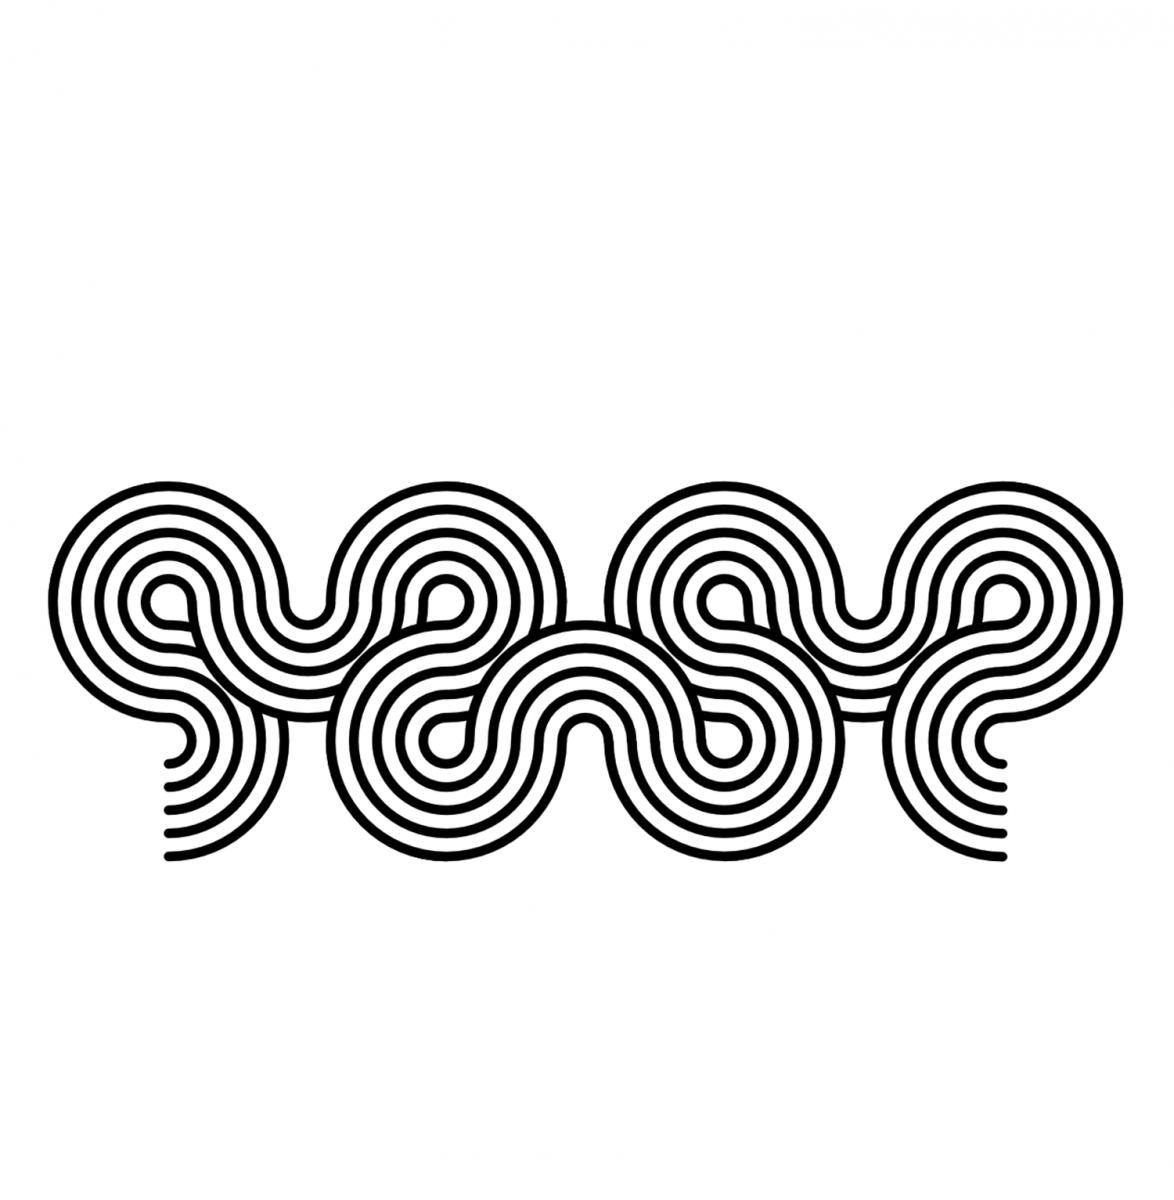
If you want, you can delete the semicircles that will be cut out from the final design.
Now, we are going to create a circular frame and paste the wavy line art design into it.
Create a circle big enough so the wavy pattern will fit into its bottom portion. Make sure that the Stroke weight is equal to the pattern's stroke weight. Select all the wavy shapes, right click and select Cut (Command/Control + X).
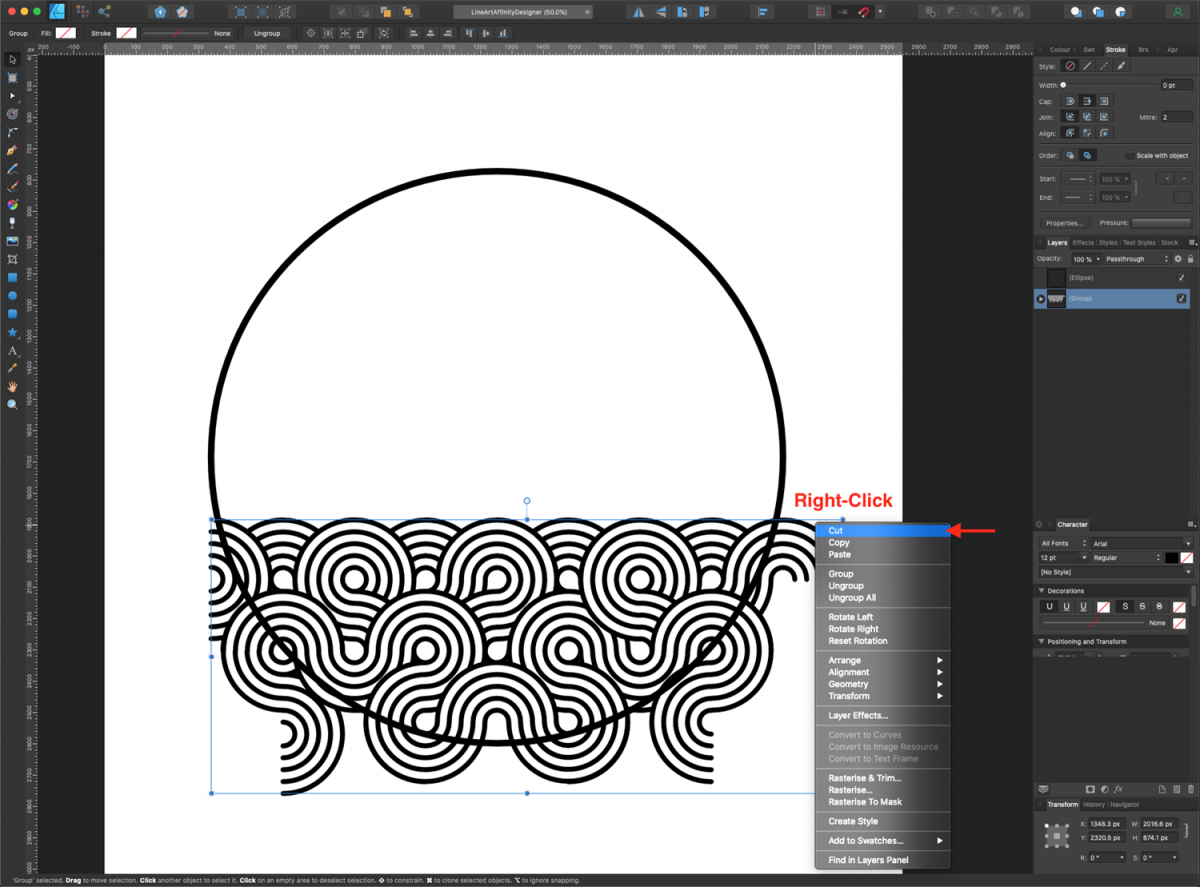
Then, with the circular frame selected, go to Edit > Paste Inside to place the pattern inside the frame.
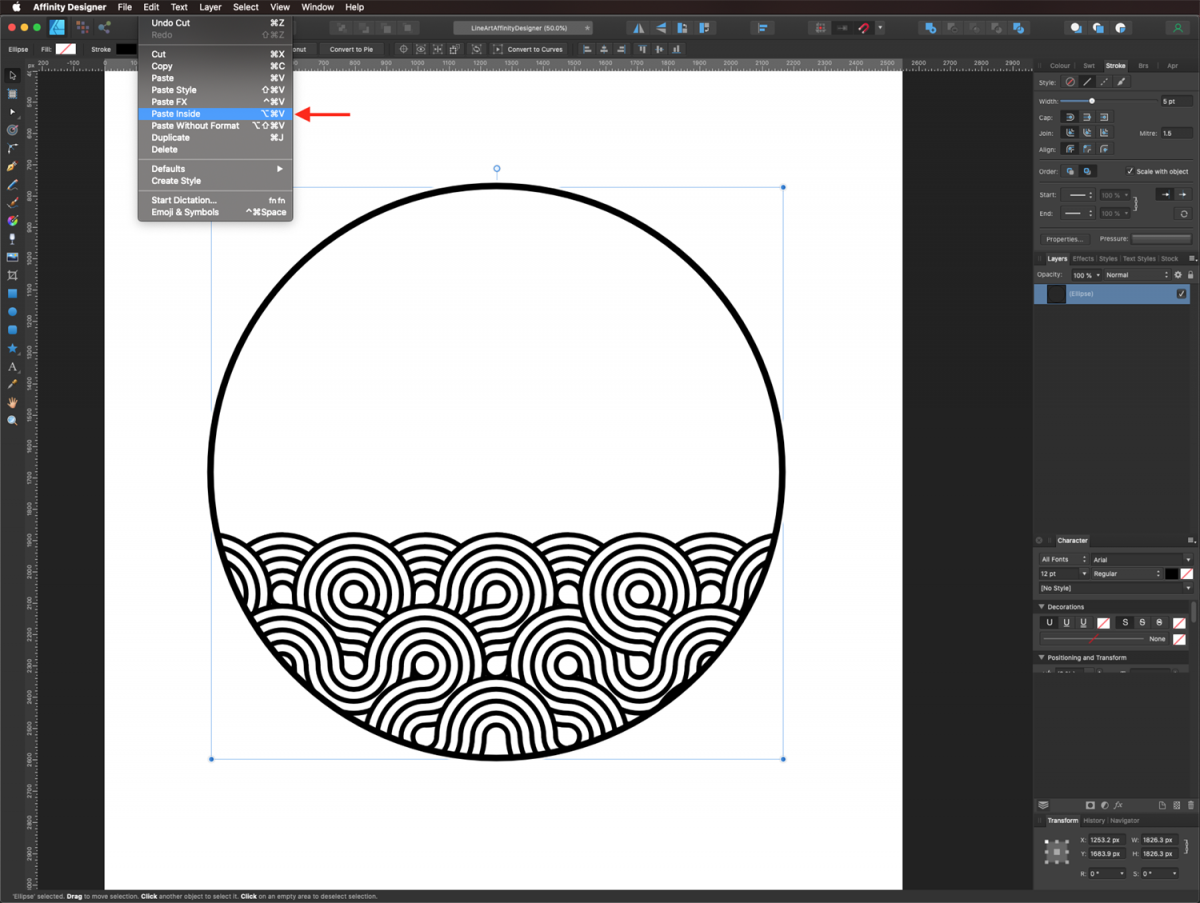
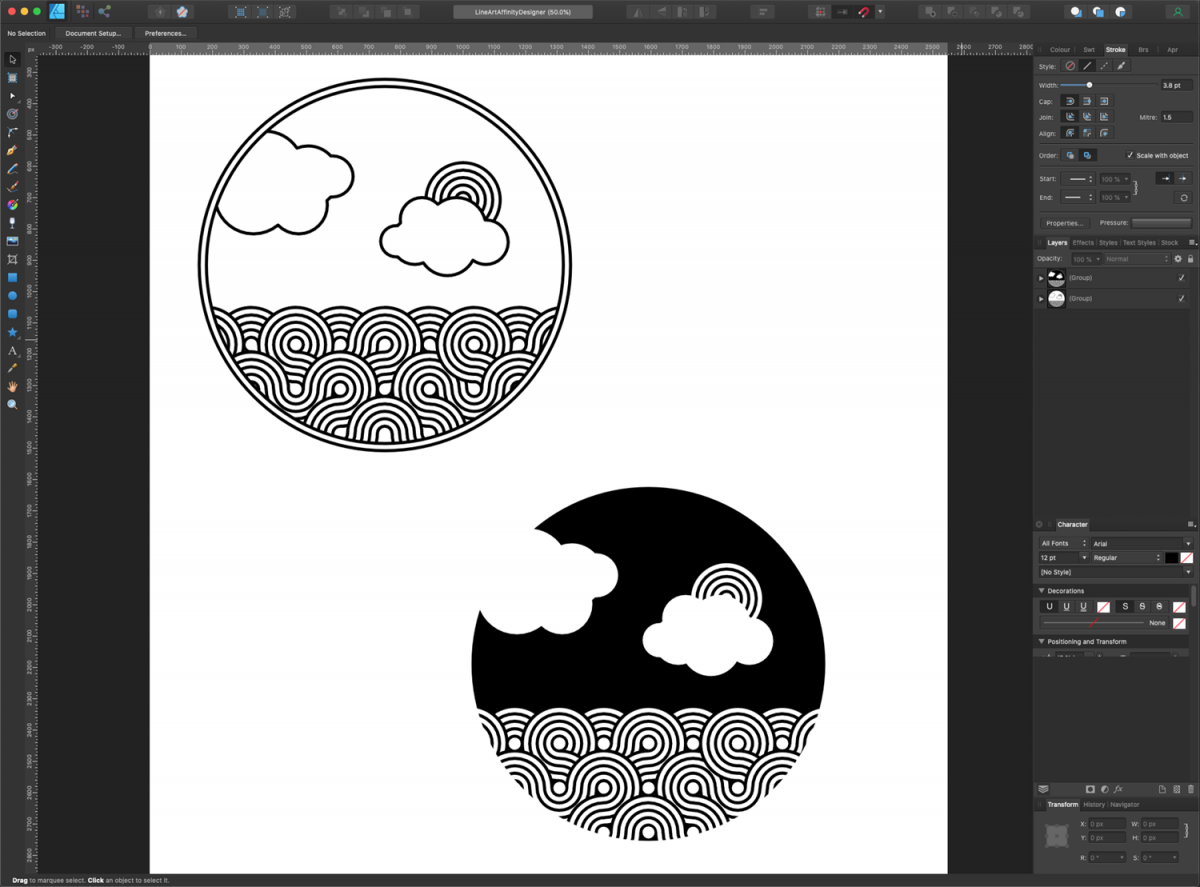
We created a second circular frame and made it slightly bigger than the original one. This will make it look more similar to the geometric line art used on the wavy pattern.
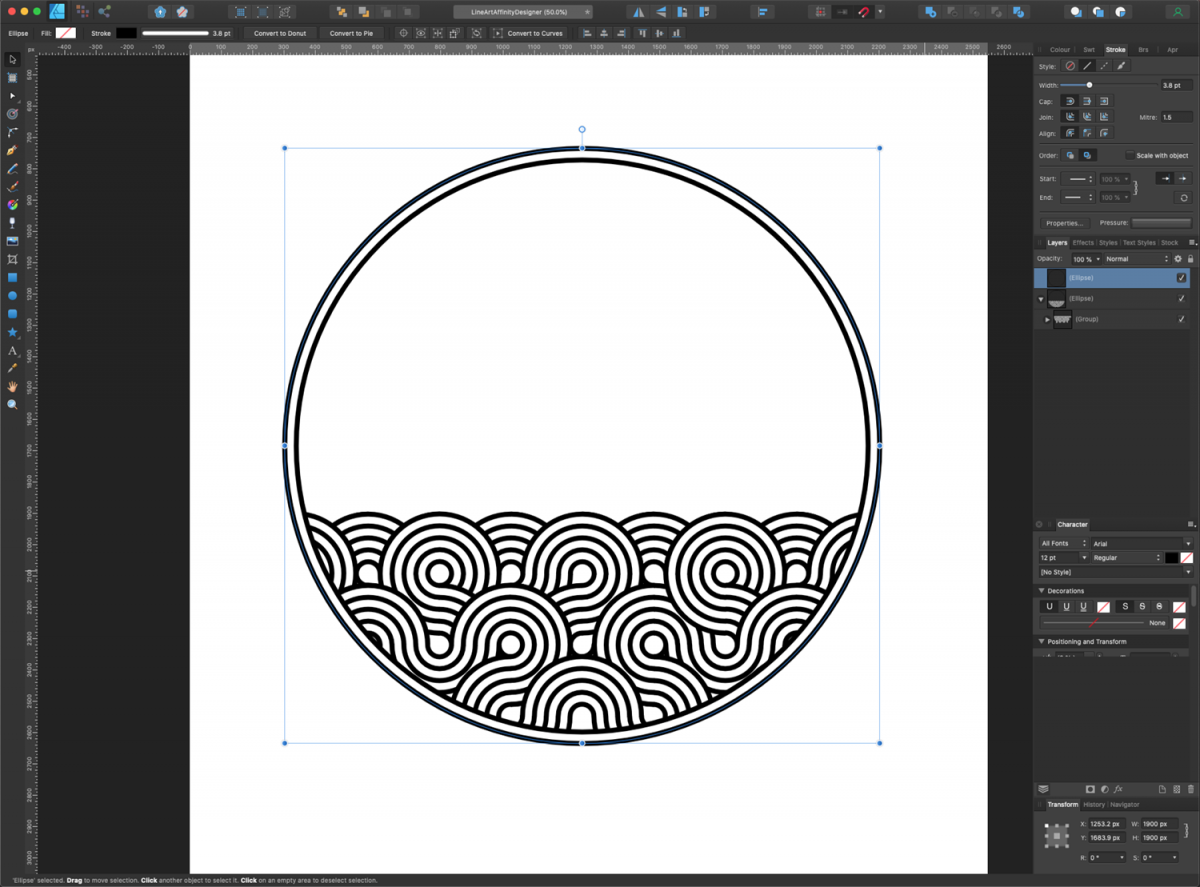
We are going to add some clouds to our design. To create them, use the Ellipse tool (M) to make many different-sized circles. Arrange them together so they are overlapping to create the overall shape of a cloud.
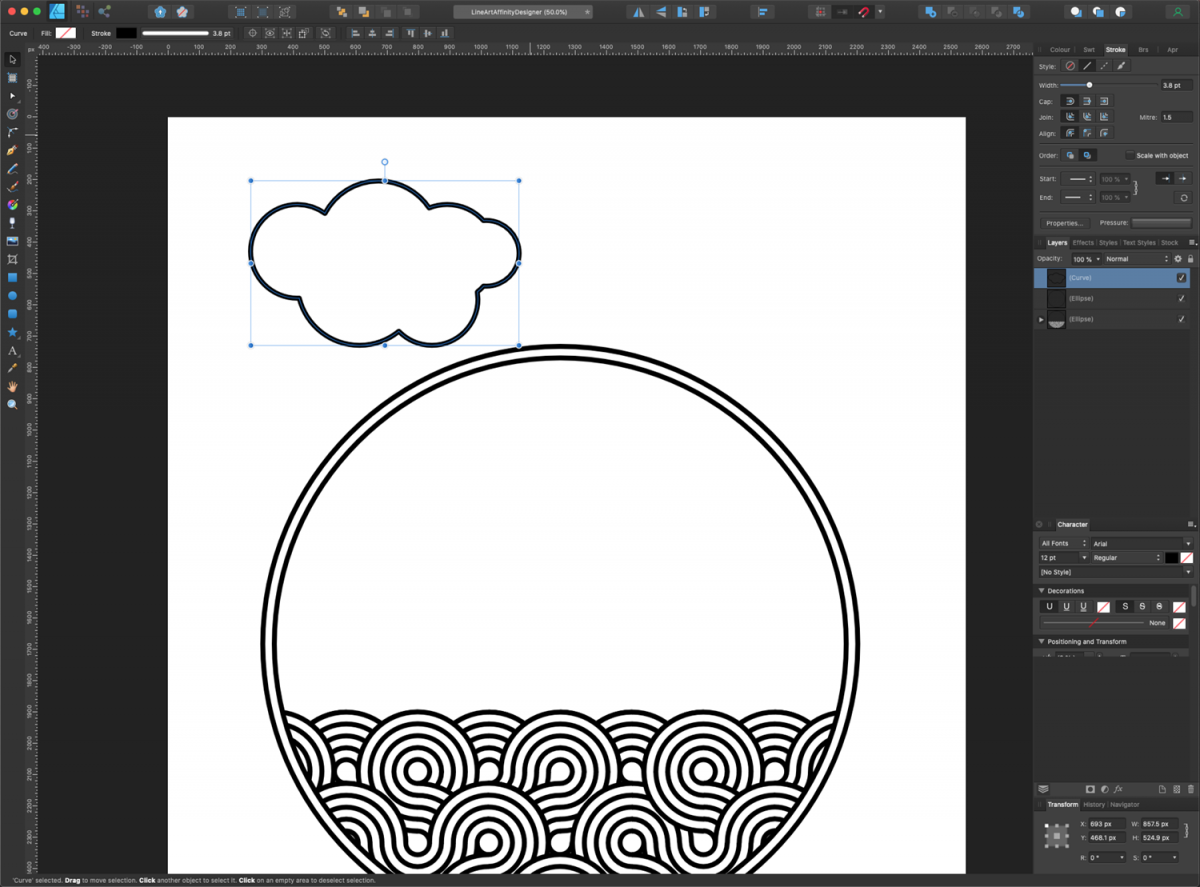
Once you are done, select them all and use the Add option from the Boolean Operations in the Geometry menu.
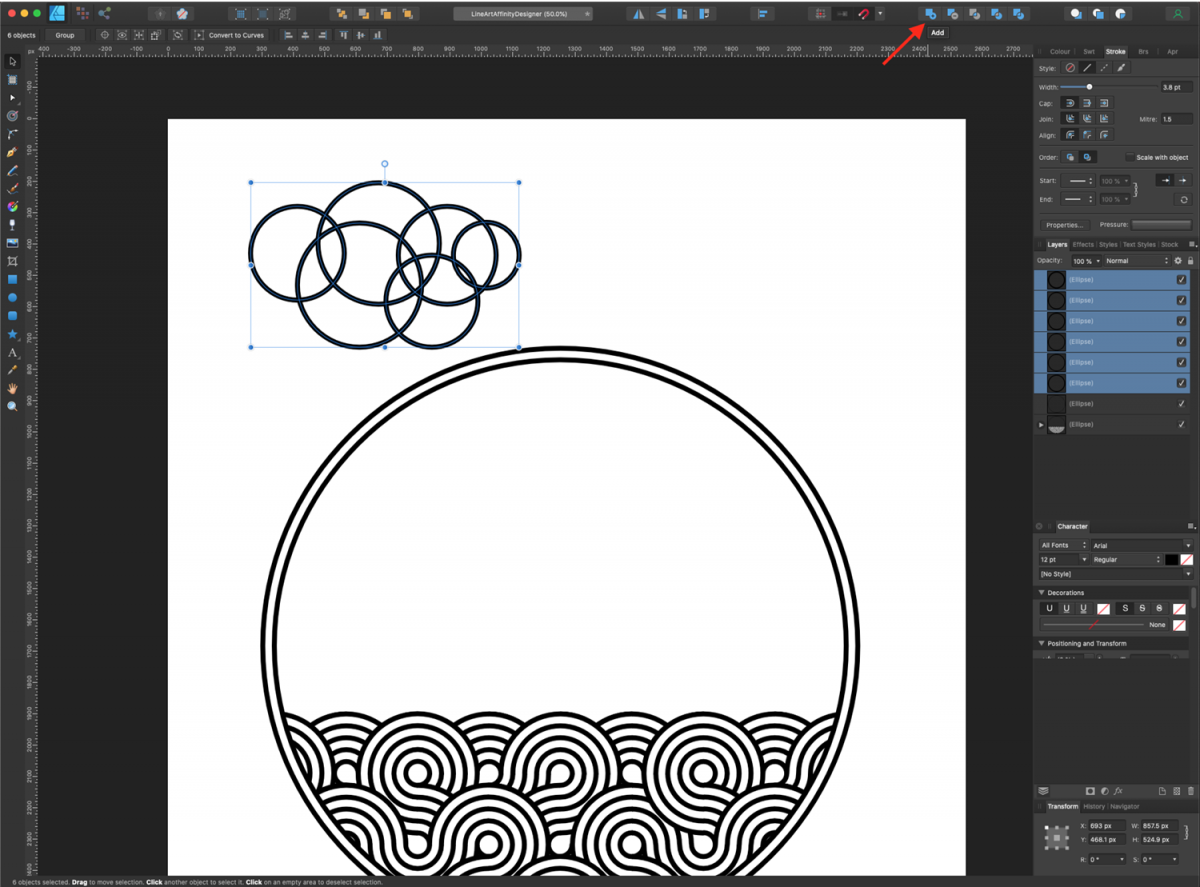
Once you are done, select them all and use the Add option from the Boolean Operations in the Geometry menu.
To finish up the design, add the clouds. You can change them a bit by resizing, flipping, and/or rotating them to your liking. We also added the sun using a complete concentric circular shape.
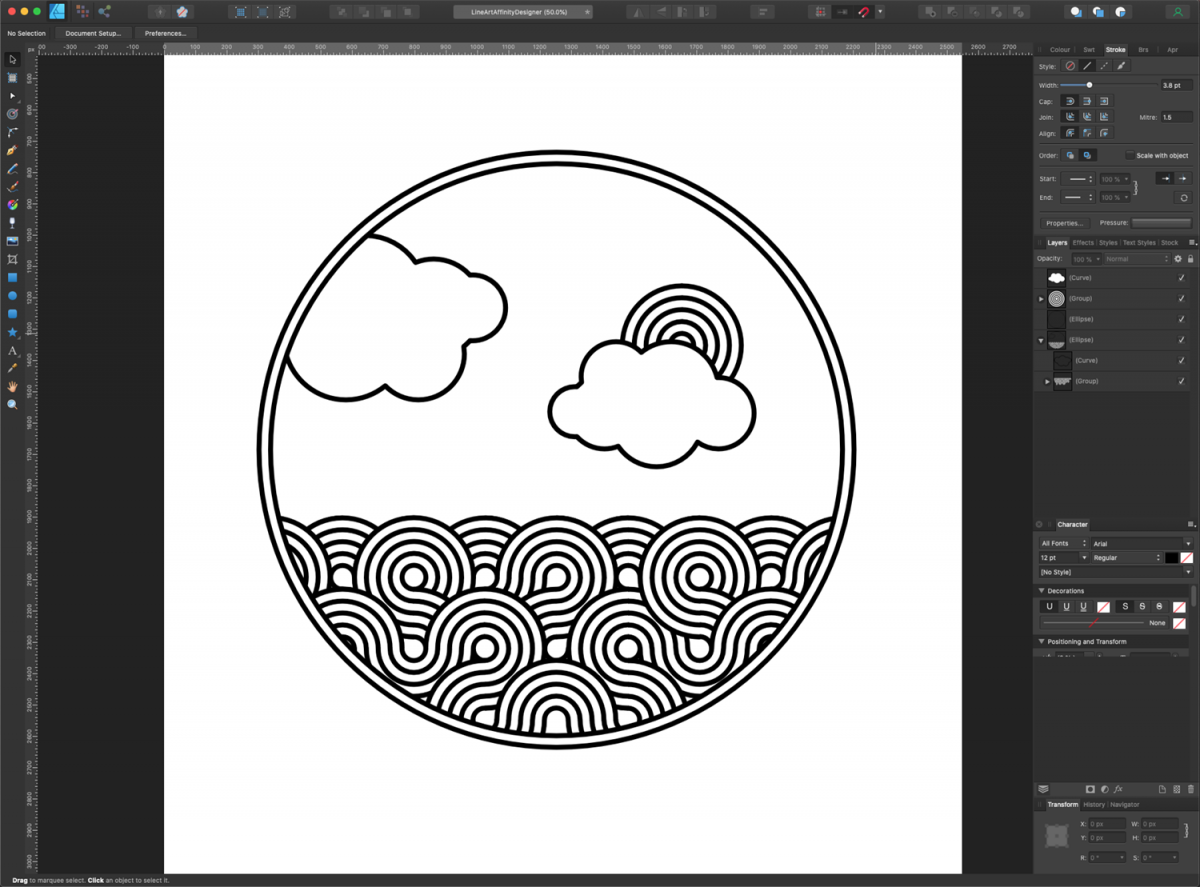
You can use this design as it is, or maybe invert the color to create a negative version.
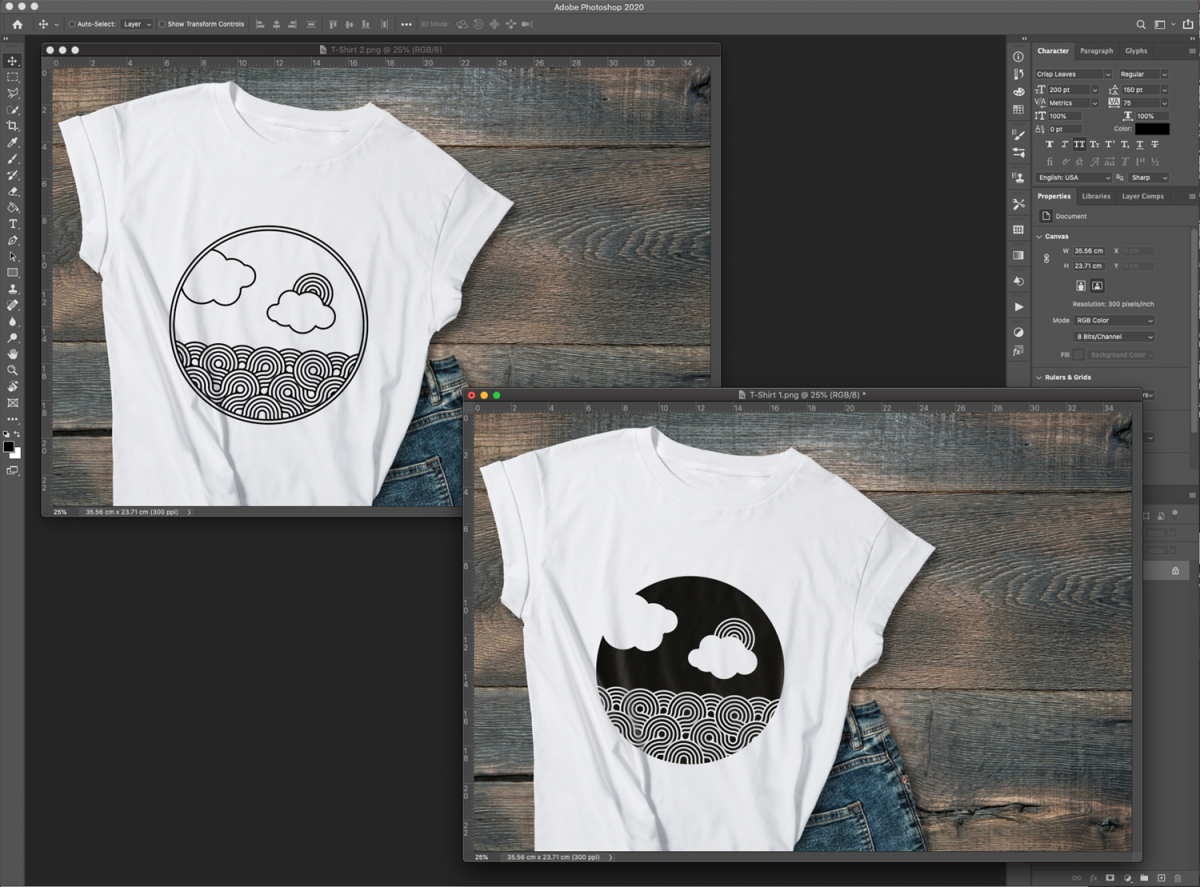
Here’s how our geometrical line art designs work on a t-shirt. Looks great, doesn’t it!
Make sure to check out our other tutorials like making a seamless pattern, using the pen tool in Affinity, and making an SVG in Affinity Designer.
You can create current and on-trend logos or patterns to use on everything. Projects can range from throw pillows and mugs to t-shirts, stickers, and phone cases. Line art is a great way to make any composition more fun and give a nice depth to your designs.
In this tutorial, we will be creating a geometrical line art illustration in Affinity Designer. We will be using a t-shirt mockup to showcase our design.
Step 1 - Create the concentric circles as the base for your design
To begin, create a New document and adjust the document settings if needed. We are going to create the concentric circle for the base of our design. Next, use the Ellipse tool (M) to create a circle with a 500 x 500 px diameter.
Change the Stroke weight to 5 pt and make sure that the stroke color is set to black.
Center the circle to your document using the Align Center and Middle options of the Alignment toolbar. You may need to click on the Move tool on the left hand side to see the options.
Now, we are going to create several duplicates of our base circle and adjust their sizes. Create four duplicates of the base circle using Command/Control + J. You need to end up with five instances of it.
Select the circle that is placed on top of the Layers panel. Now go to the Transform panel and click on the center in the Anchor point selector. This will make it certain that the transformations are carried out from the center. Change the Width and Height values to 100 px. The circle should now be smaller and should be centered in regards to the base circle.
Repeat this with the rest of the circles. Go down from top to bottom and increase the Width and Height values by 100 px each time. The second circle from the top should be 200 x 200 px, the next lot of circles 300 x300 and 400 x 400 respectively. Then, leave the last one as it is.
Once you are done, select all the circles and click the Convert to Curves button on the top menu.
Step 2 - Split the circles in half
We will only use half of the circle to create our geometric pattern. So we are going to split it in half and delete a portion of it.
Select the Node tool (A). Then click around the middle of the circles and drag horizontally from one side to the other. You need to select all the nodes that form a horizontal line in the middle of the circles. Once selected, click the Break Curve button from the Actions menu on the context toolbar. They will now be broken apart.
You will notice that the thumbnails in the Layers panel now show ten half circles (curves).
Finally, select the bottom part of the circle and hit Delete to erase it.
You will end with a rainbow-shaped semi-circle.
Select all the curves that form it, right-click on top, then Group them together.
Step 3 - Create a geometric pattern
Next, we are going to create a line art geometric pattern that looks like waves to use in our design. First, rotate the semi-circle 90 degrees by clicking and dragging the top handle.
If you have no fill color selected for the shapes, change it to white. We need to have a fill color present in our shapes to better see when the semicircles overlap.
Now, duplicate the semicircle (Command/Control + J) and rotate it another 90 degrees so the top handle is pointing down. It should be placed exactly on top of the bottom section of the other one. It will look like a circle with the top-left wedge removed from it.
Create another duplicate, and rotate it 180 degrees so it looks like the original semicircle (the top half of the circle). Move this duplicate to the side. Adjust the position so the bottom left meets up with top right end of the upside-down semicircle. We want to create a seamless smooth transition. The resulting image should look like an S facing down.
Keep adding semicircles, rotating, and overlapping them to create a geometric line art pattern that looks similar to a wave.
Keep going until you create an entire line with the pattern.
You may want to check that all the lines of the overlapping semicircles are placed correctly. You can do this by switching between Outline and Vector in View > View Mode (Command/Control + Y).
Step 4 - Combine the pattern to create the water design
We want to use our wavy line art pattern to create the sea in our design. First, select all the semicircles. Then right-click and choose Group from the drop-down menu.
Rotate the group 90 degrees so the wavy line is horizontal. Then, duplicate it a couple of times and arrange the duplicates so they overlap and look like water.
If you want, you can delete the semicircles that will be cut out from the final design.
Step 5 - Add a circular frame to the wavy pattern
Now, we are going to create a circular frame and paste the wavy line art design into it.
Create a circle big enough so the wavy pattern will fit into its bottom portion. Make sure that the Stroke weight is equal to the pattern's stroke weight. Select all the wavy shapes, right click and select Cut (Command/Control + X).
Then, with the circular frame selected, go to Edit > Paste Inside to place the pattern inside the frame.
We created a second circular frame and made it slightly bigger than the original one. This will make it look more similar to the geometric line art used on the wavy pattern.
Step 6 - Create Clouds using circles
We are going to add some clouds to our design. To create them, use the Ellipse tool (M) to make many different-sized circles. Arrange them together so they are overlapping to create the overall shape of a cloud.
Once you are done, select them all and use the Add option from the Boolean Operations in the Geometry menu.
Once you are done, select them all and use the Add option from the Boolean Operations in the Geometry menu.
Step 7 - Add details to your design
To finish up the design, add the clouds. You can change them a bit by resizing, flipping, and/or rotating them to your liking. We also added the sun using a complete concentric circular shape.
You can use this design as it is, or maybe invert the color to create a negative version.
Here’s how our geometrical line art designs work on a t-shirt. Looks great, doesn’t it!
Make sure to check out our other tutorials like making a seamless pattern, using the pen tool in Affinity, and making an SVG in Affinity Designer.
Related Tutorials
Illustrator Tutorials
How to Make Line Art Illustration in Illustrator
Affinity Tutorials
How to Make an SVG in Affinity Designer
Learn how to create SVG files in Affinity Designer with this tutorial.
Affinity Tutorials
How to Make GIFs Using Affinity Designer
In just 3 easy steps you will learn how to create animated GIFs using Affinity Designer.
Affinity Tutorials
How to Draw a Straight Line in Affinity Designer
Learn how to use the pen tool to draw a straight line in Affinity Designer.
Affinity Tutorials
How to Make a Seamless Pattern in Affinity Designer
In this tutorial you will learn how create a Seamless Pattern in Affinity Designer.
Affinity Tutorials
How to Make a Gradient in Affinity Designer
In this tutorial, learn how to make a gradient background in Affinity Designer.