By Design Bundles
Inkscape Tutorials12 min
How to Duplicate Around a Circle in Inkscape
Placing duplicates around a circle in Inkscape is a great way to create a consistent design. These designs are very popular with monograms, mandalas and personalized projects. Accurately duplicating and rotating works with a combination of keys. But this method is super easy and fun to do.
You will learn how to duplicate around a circle using the stars and polygons tool. Begin by opening Inkscape and, depending on your version, selecting New document.
For visual reference we will use a circle as the center shape. There is no need to have a center shape but you may want it as part of a design. On the left hand side click on Create circles, ellipses and arcs. Next, Ctrl + click and drag out a uniform circle.
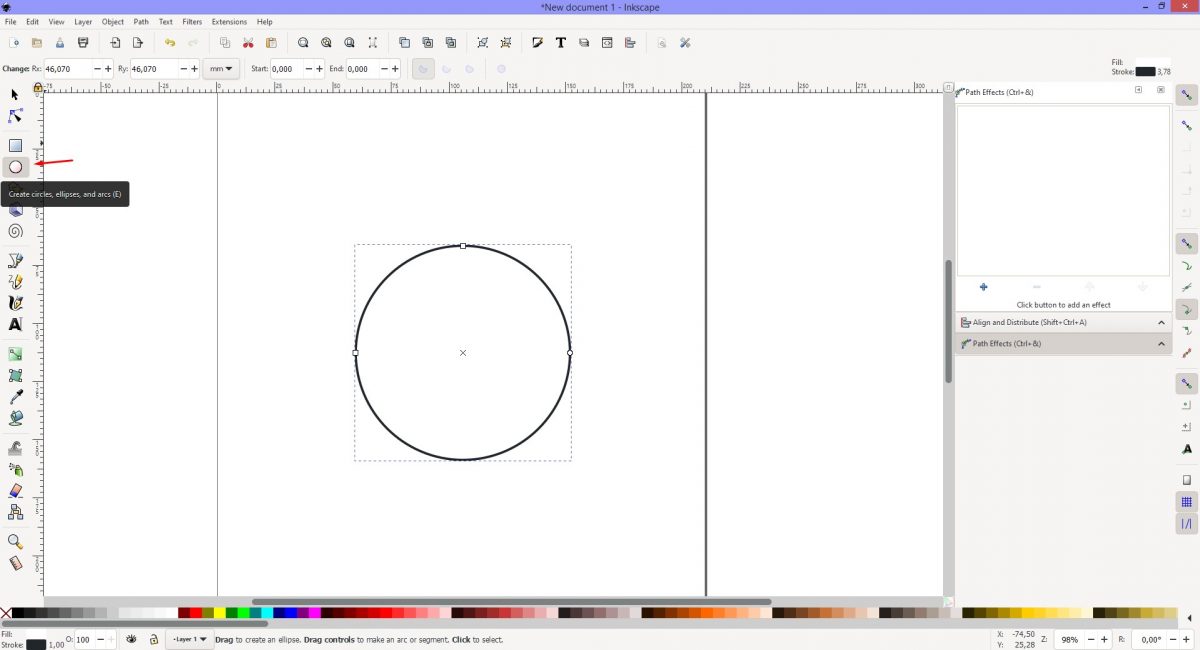
Adjust the size and color if needed. We kept a white solid fill and black stroke for now. Change the circle to a path. Do this by clicking on Path at the top of the screen then selecting Object to Path.
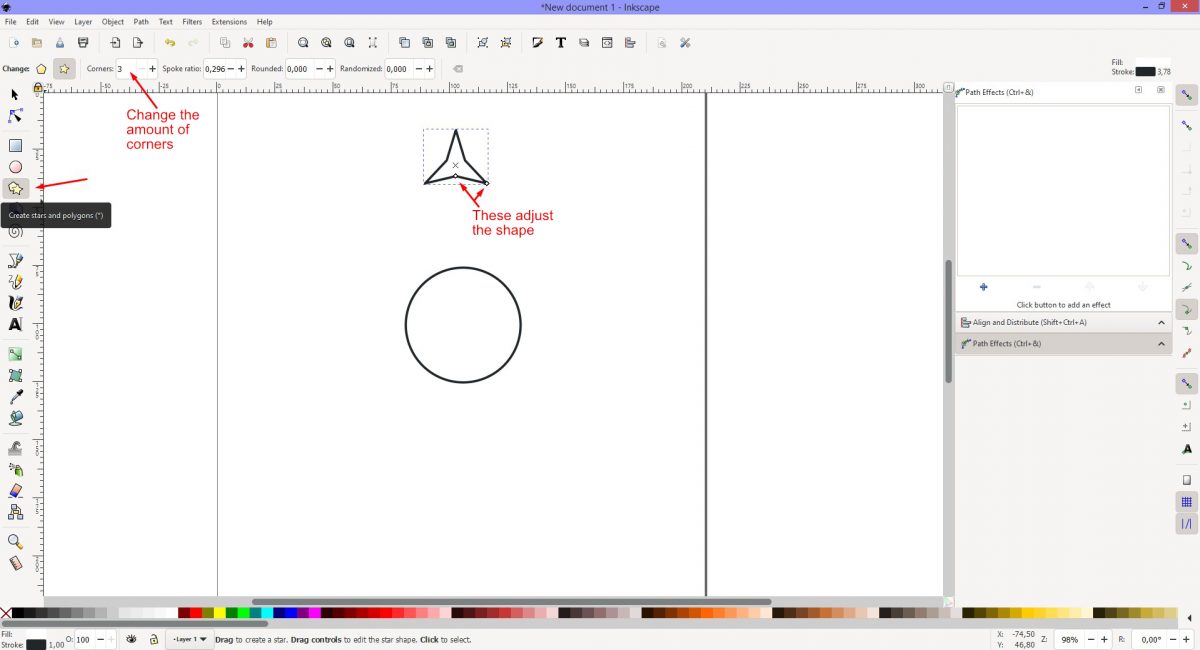
We want to add a star shape that will go around the circle. Click on Create stars and polygons on the left hand side. Adjust the amount for the Corners at the top of the screen to what you want. On the shape are two small diamonds. These change the shape of the object so you can adjust these if needed. Convert the star object to a path as well.
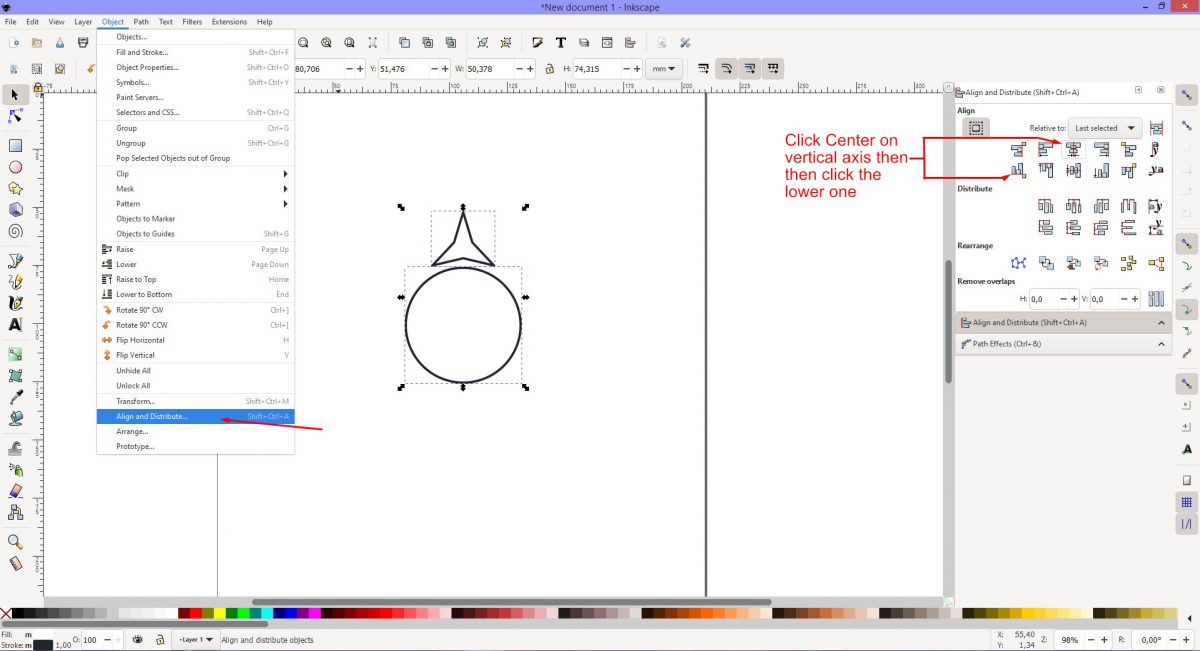
To get off to a good starting point, we need to align the objects correctly. If not already open, click the Object menu then Align and Distribute. The panel will open on the side. Make sure that Relative to on the top right shows as Last Selected. In this specific order, select the star shape then Shift + click to the select the circle. As the circle is the last selected the star will align to it.
Under the Align and Distribute panel click on Center on Vertical Axis. Next, click on the lower icon Align bottom edges of objects to the top edge of the anchor.
We will be moving the center point of the star. This will allow us to rotate the shape. To accurately move the center point, click on Enable Snapping on the top right hand side.
Then further down the right panel click on Snap an item's rotation center. When moving the star's rotation point, it will snap to the center of the circle.
Double click the star so the rotation handles show. In the middle you will see crosshairs. Click + drag the crosshairs down to the middle of the circle and you will notice it snap to the center.
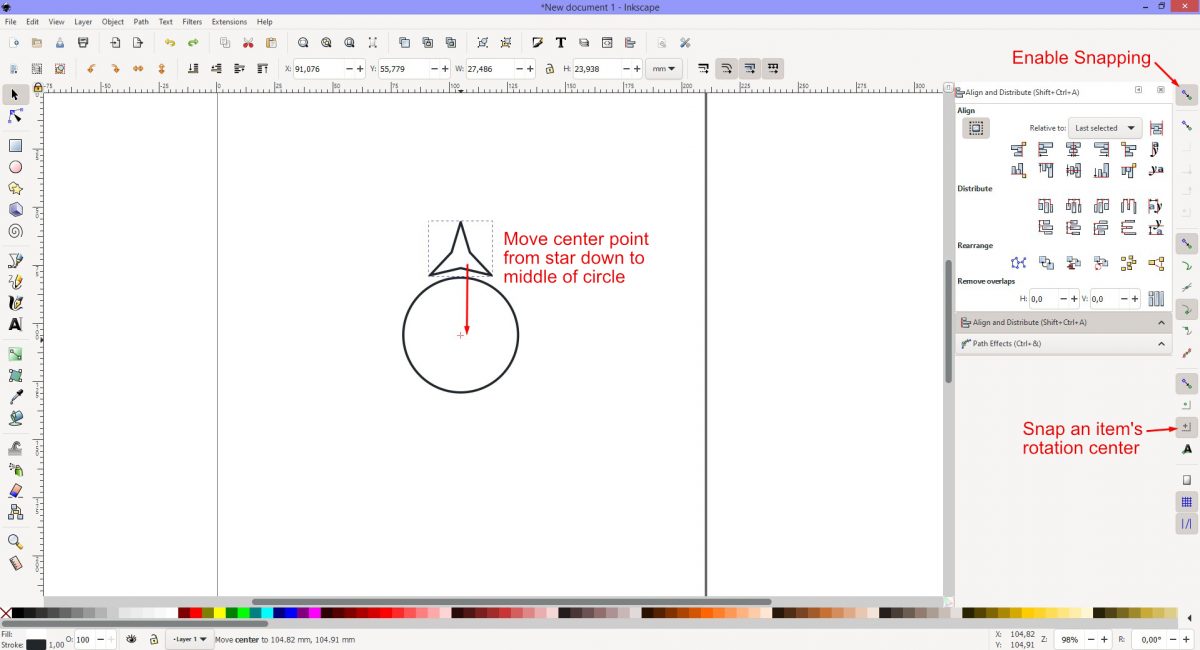
The star is ready to be duplicated and rotated. Double click the star shape so that the rotation handles become active. Now, we will use a combination of keys while clicking to create and shift the duplicates.
The Spacebar will duplicate while the Ctrl key will keep spacing accurate. The sequence is as follows:
Select the top right rotational handle. Next click + drag while holding down Ctrl and tap the Spacebar once. The duplicate will be created as you drag and tap the Spacebar together. Click + drag the handle and tap the Spacebar each time to create a new duplicate. Keep holding down Ctrl to shift the position.
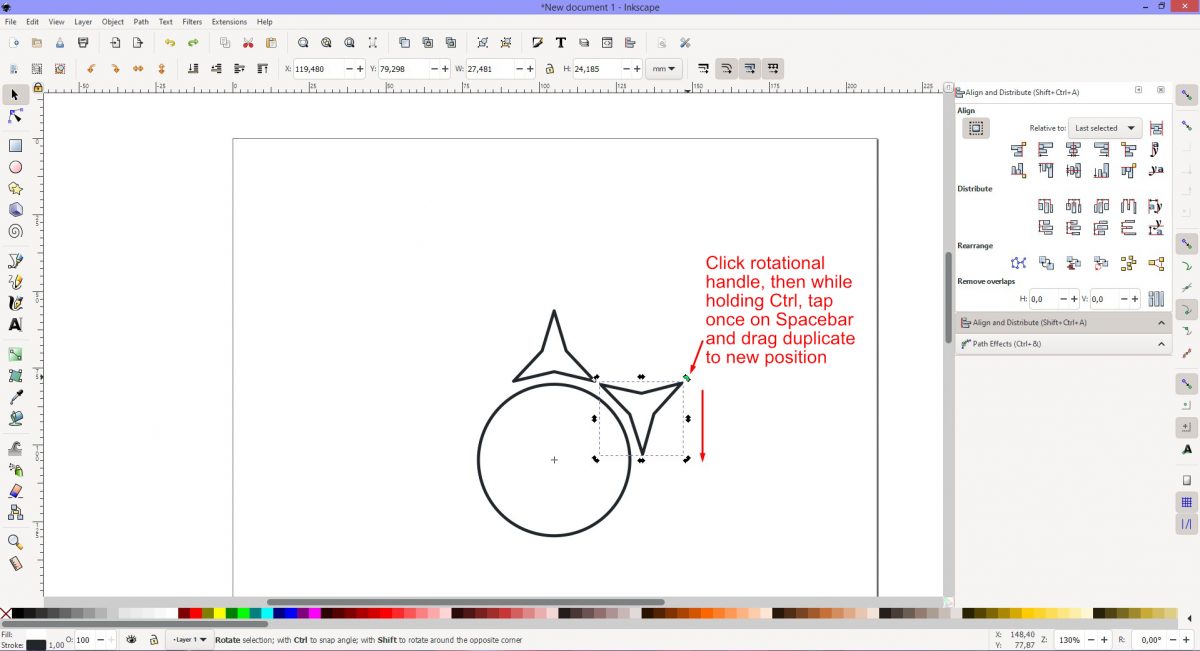
Carry on with the sequence of click + drag, holding Ctrl and tapping the Spacebar until the rotation is complete. It's as easy as that.
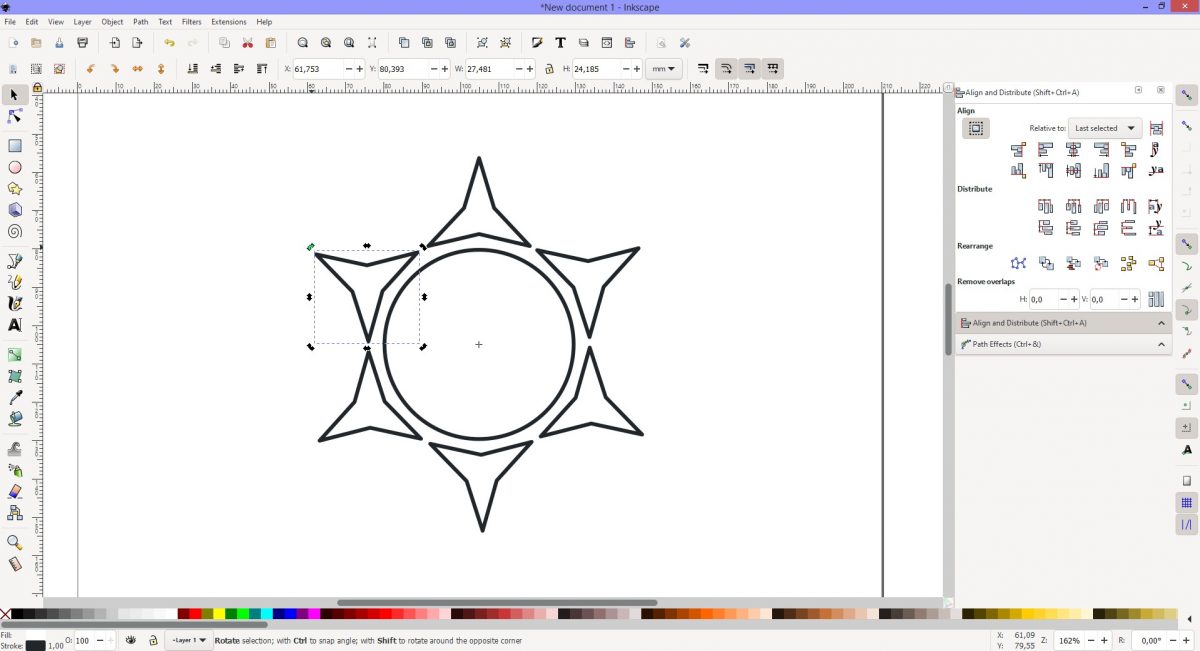
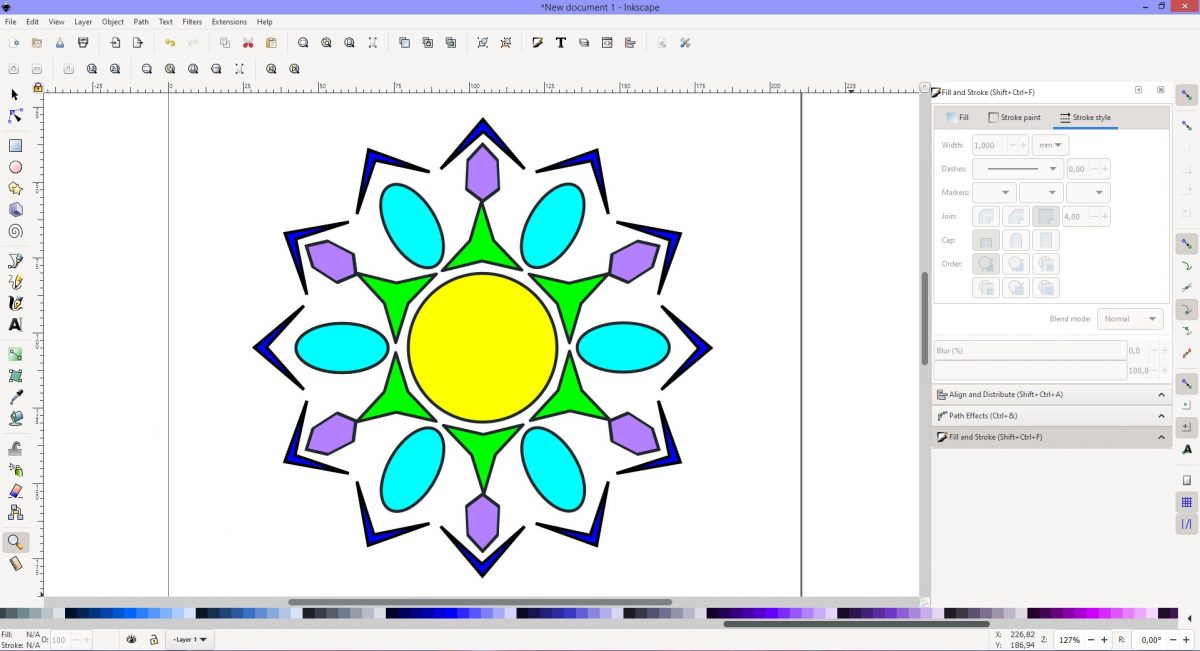
You can add more shapes to the design by using the same method. To keep the design accurate and consistent, group everything and rotate. This is to place the next shape correctly. Add another shape using the sequence in Step 3. Inkscape will adjust the spacing accordingly as long as Ctrl is held down.
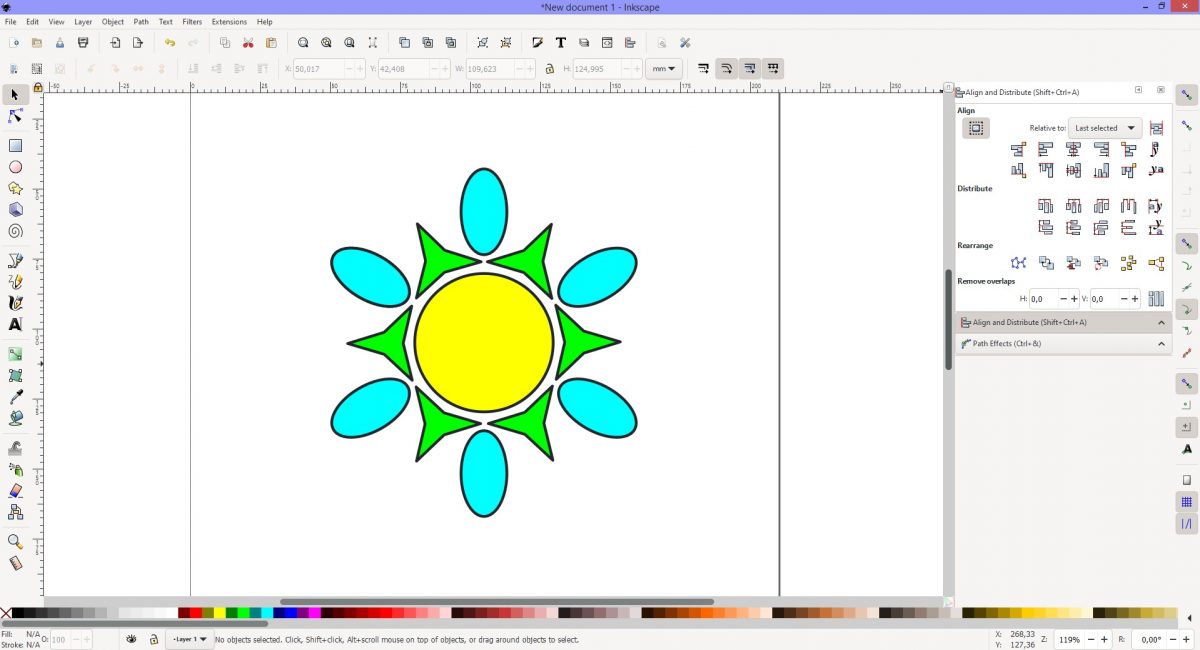
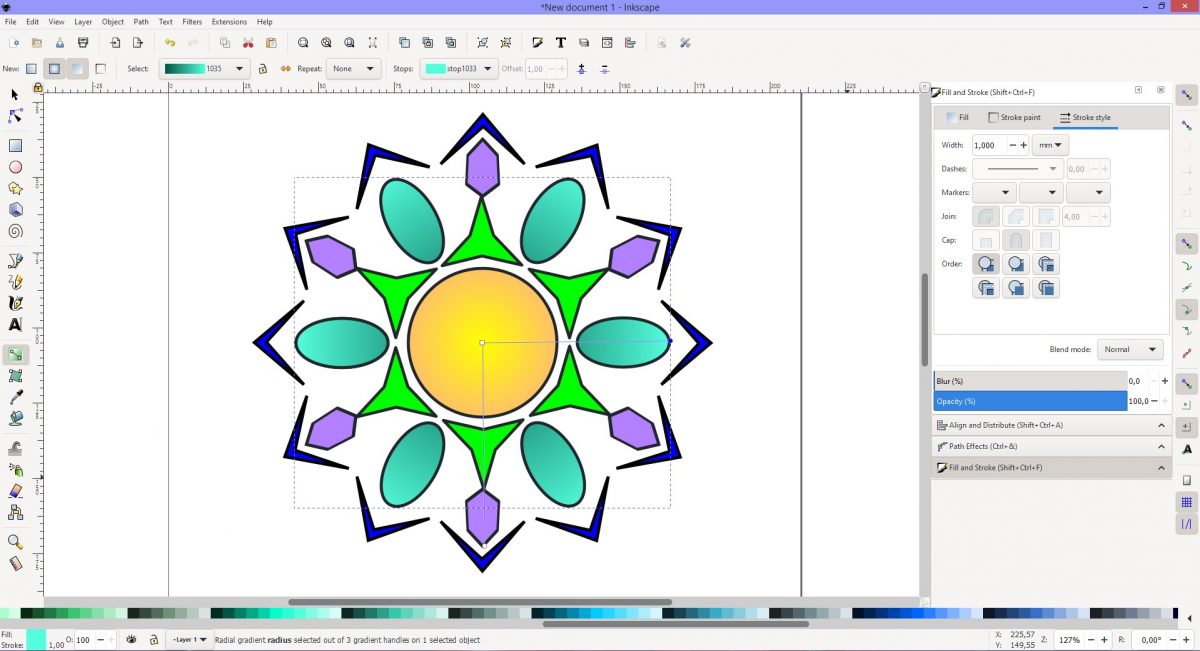
Have fun playing with shapes and create a unique design. Adding a gradient gives more depth to the design. We have an awesome tutorial on creating gradients in Inkscape to help you get started.
If you enjoyed this tutorial you may also like our other Inkscape tutorials on creating a marble effect, using the gradient mesh tool, and making an SVG in Inkscape.
You will learn how to duplicate around a circle using the stars and polygons tool. Begin by opening Inkscape and, depending on your version, selecting New document.
Step 1 - Draw and adjust the shapes
For visual reference we will use a circle as the center shape. There is no need to have a center shape but you may want it as part of a design. On the left hand side click on Create circles, ellipses and arcs. Next, Ctrl + click and drag out a uniform circle.
Adjust the size and color if needed. We kept a white solid fill and black stroke for now. Change the circle to a path. Do this by clicking on Path at the top of the screen then selecting Object to Path.
We want to add a star shape that will go around the circle. Click on Create stars and polygons on the left hand side. Adjust the amount for the Corners at the top of the screen to what you want. On the shape are two small diamonds. These change the shape of the object so you can adjust these if needed. Convert the star object to a path as well.
Step 2 - Align objects and adjust center point
To get off to a good starting point, we need to align the objects correctly. If not already open, click the Object menu then Align and Distribute. The panel will open on the side. Make sure that Relative to on the top right shows as Last Selected. In this specific order, select the star shape then Shift + click to the select the circle. As the circle is the last selected the star will align to it.
Under the Align and Distribute panel click on Center on Vertical Axis. Next, click on the lower icon Align bottom edges of objects to the top edge of the anchor.
We will be moving the center point of the star. This will allow us to rotate the shape. To accurately move the center point, click on Enable Snapping on the top right hand side.
Then further down the right panel click on Snap an item's rotation center. When moving the star's rotation point, it will snap to the center of the circle.
Double click the star so the rotation handles show. In the middle you will see crosshairs. Click + drag the crosshairs down to the middle of the circle and you will notice it snap to the center.
Step 3 - Duplicate the star around the circle
The star is ready to be duplicated and rotated. Double click the star shape so that the rotation handles become active. Now, we will use a combination of keys while clicking to create and shift the duplicates.
The Spacebar will duplicate while the Ctrl key will keep spacing accurate. The sequence is as follows:
Select the top right rotational handle. Next click + drag while holding down Ctrl and tap the Spacebar once. The duplicate will be created as you drag and tap the Spacebar together. Click + drag the handle and tap the Spacebar each time to create a new duplicate. Keep holding down Ctrl to shift the position.
Carry on with the sequence of click + drag, holding Ctrl and tapping the Spacebar until the rotation is complete. It's as easy as that.
Step 4 - Experiment with other shapes
You can add more shapes to the design by using the same method. To keep the design accurate and consistent, group everything and rotate. This is to place the next shape correctly. Add another shape using the sequence in Step 3. Inkscape will adjust the spacing accordingly as long as Ctrl is held down.
Have fun playing with shapes and create a unique design. Adding a gradient gives more depth to the design. We have an awesome tutorial on creating gradients in Inkscape to help you get started.
If you enjoyed this tutorial you may also like our other Inkscape tutorials on creating a marble effect, using the gradient mesh tool, and making an SVG in Inkscape.
Related Tutorials
Illustrator Tutorials
How to Duplicate Objects Around a Circle in Illustrator
Discover how to quickly duplicate objects around a circle in Adobe Illustrator.
Affinity Tutorials
How to Repeat Objects Around a Circle in Affinity Designer
In this tutorial, learn how to Duplicate or Repeat an Object around a Circle in Affinity Designer.
Inkscape Tutorials
How to Curve Text in Inkscape
Discover how to easily curve and transform your text in Inkscape with 5 easy steps.
Inkscape Tutorials
How to Convert a JPEG to SVG in Inkscape
Learn how to convert a JPEG to SVG in Inkscape in 3 quick steps!
Inkscape Tutorials
How to Crop an Image in Inkscape
Learn how to crop an image in Inkscape with this beginner step by step tutorial
Inkscape Tutorials
How to Use the Bezier Curve Tool in Inkscape
In this tutorial, learn how to create lines and curves in Inkscape with the Bezier Curve Tool!