By Design Bundles
Silhouette Tutorials16 min
How to Change Patterns on SVG Files in Silhouette Studio
Swapping out a pattern on SVG files is an option many buyers look for. These files can be for use with patterned or printed vinyl. We will look at how to modify patterns on SVG files in Silhouette Studio.
**Uploading SVG files requires a Business or Designer Edition Upgrade.
In this tutorial, we will be using this messy bun SVG. We've already uploaded our pattern into Silhouette Studio. If you need guidance with this process we do have this tutorial on importing patterns to Silhouette. Open Silhouette Studio to get started.
SVG files with patterns may need a little editing to prepare the file. You would want to do this for layering HTV. Open the SVG file in Silhouette Studio by clicking File then Open. You can also drag and drop the file onto the canvas.
If the items are still grouped, right click the SVG and select Ungroup. Click on the pattern to select then delete it. The area where the pattern was placed is not subtracted out. So when you layer the design, the pieces would be layered on top of each other.
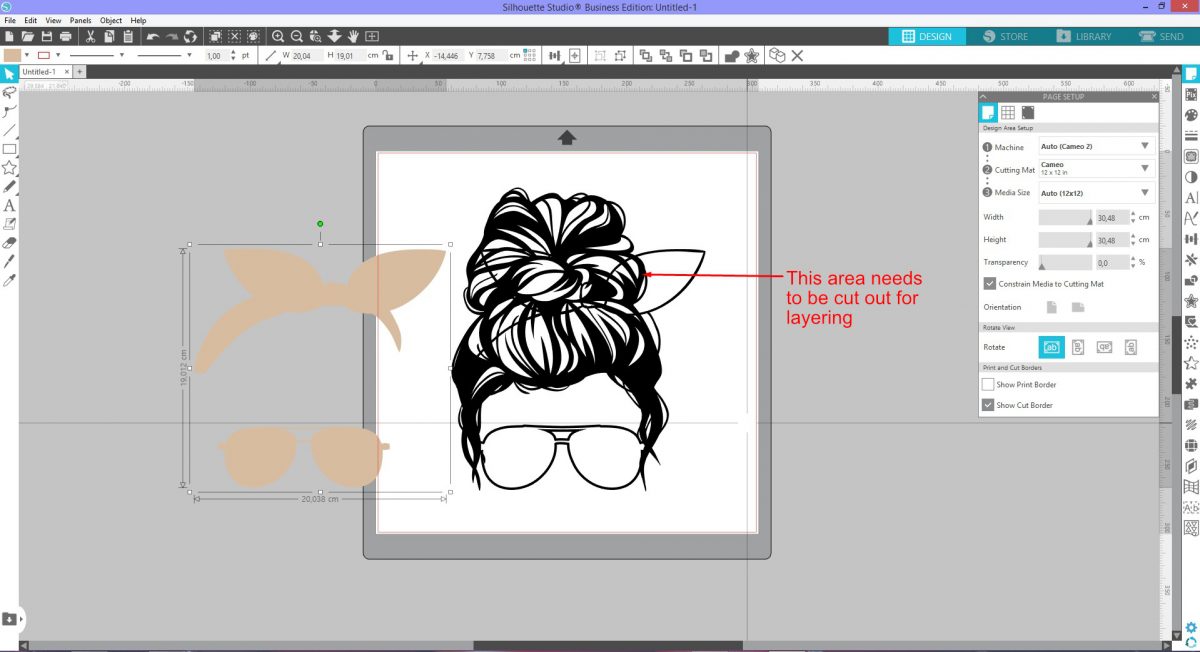
We want the pieces to fit together like a puzzle. Select both of the tan pieces and press Ctrl + left to make duplicates. These duplicates will be shifted to the left. Shift + click to select the original tan bow and sunglasses. Right click and select Group.
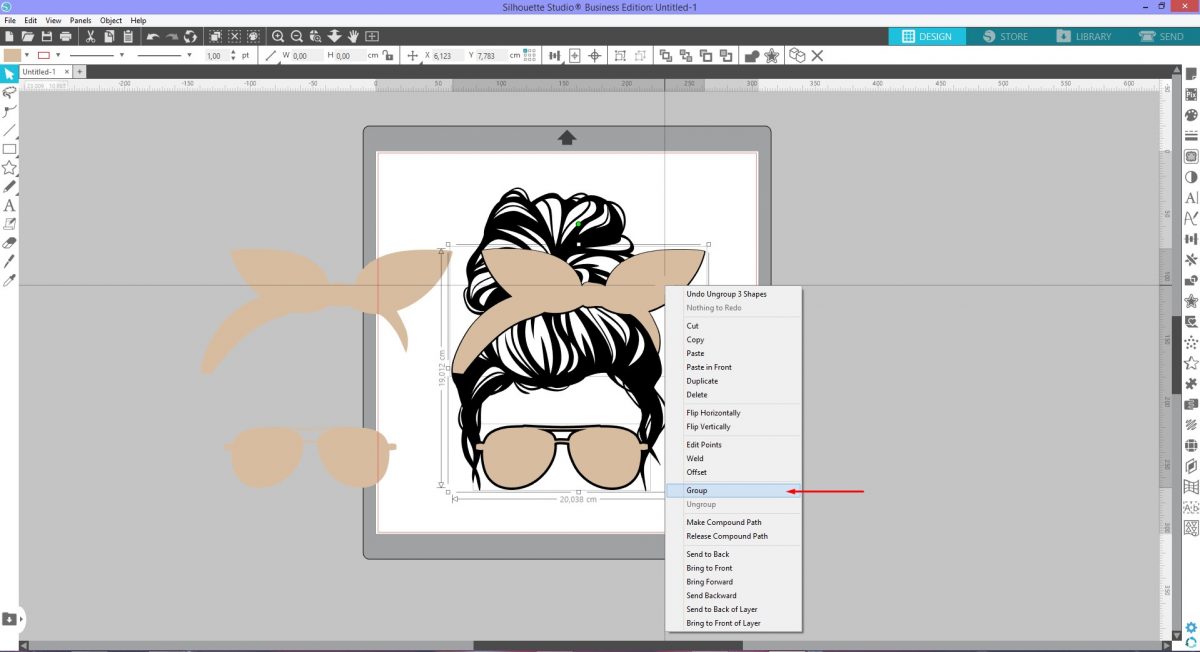
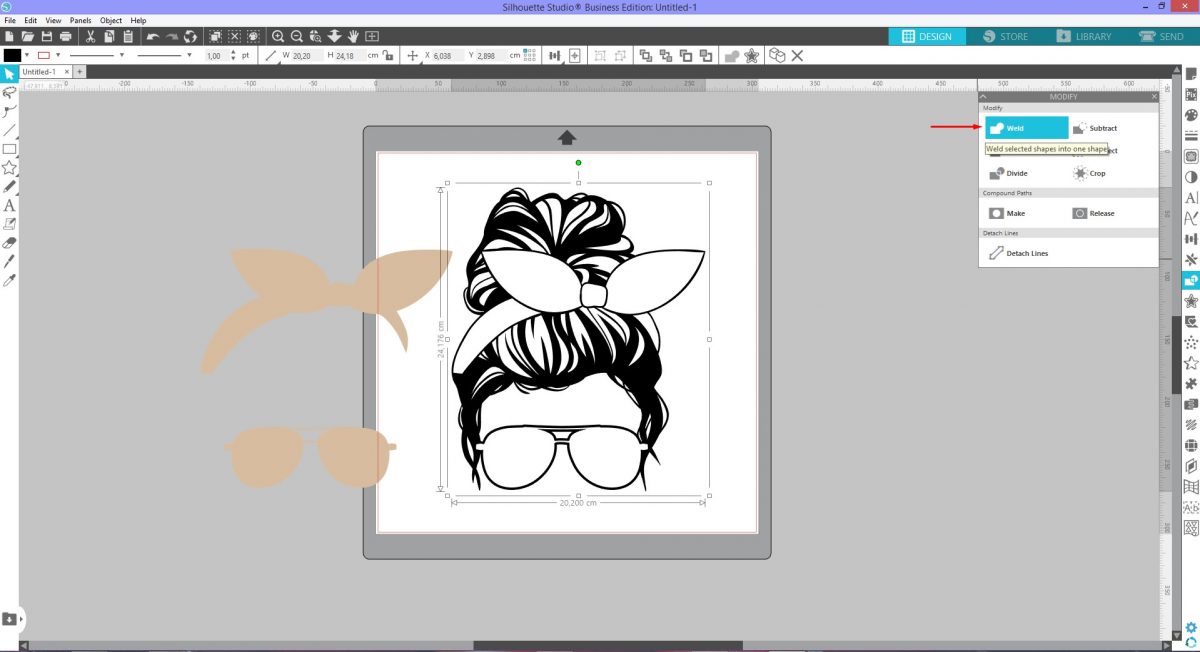
Next, we will be using the modify panel. Open the Modify panel on the right hand side. Select the tan objects and the Messy bun SVG then click on Subtract. The shape of the tan objects will be removed. Click + drag a selection box around the Messy bun SVG then click Weld under the Modify panel.
If nothing happens when clicking Weld, click away from the SVG to deselect. Reselect and click Weld again.
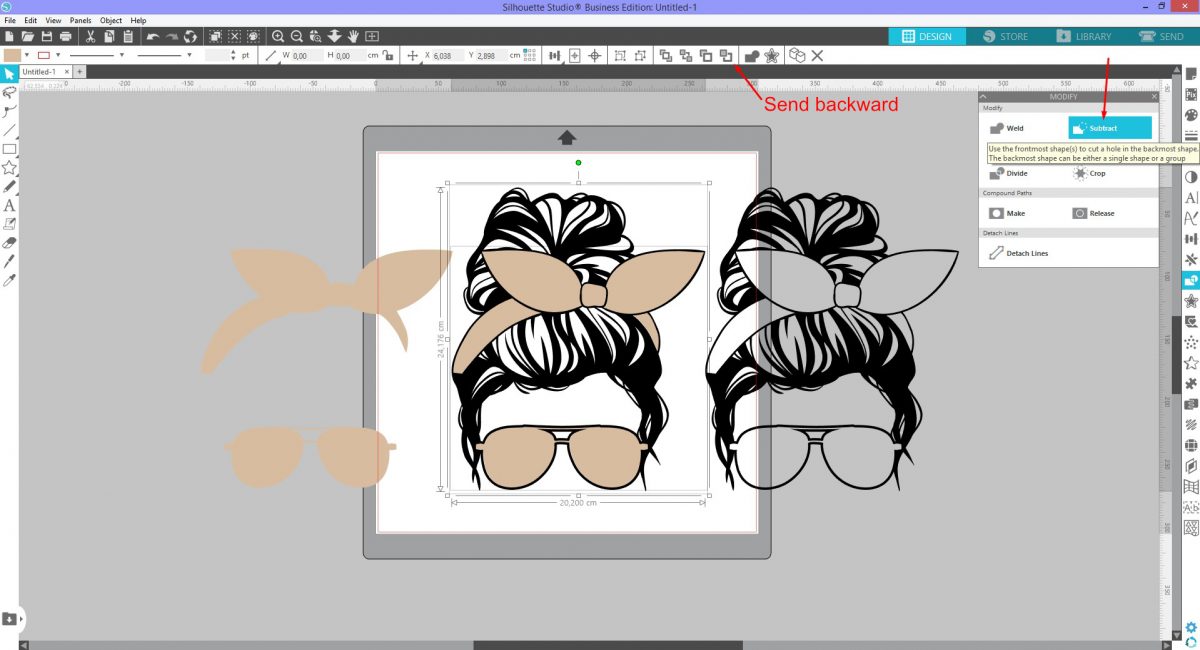
Duplicate the Messy bun SVG with Ctrl + right arrow. Select both tan pieces, right click and Group them. Then press Ctrl + right arrow again. This will create a duplicate of the tan objects and place them over the SVG.
With these new tan objects selected, click on Send Backward. This will move the objects behind the bow outline. Select both the Messy bun SVG and tan objects then click Subtract. The outline of the bow is subtracted.
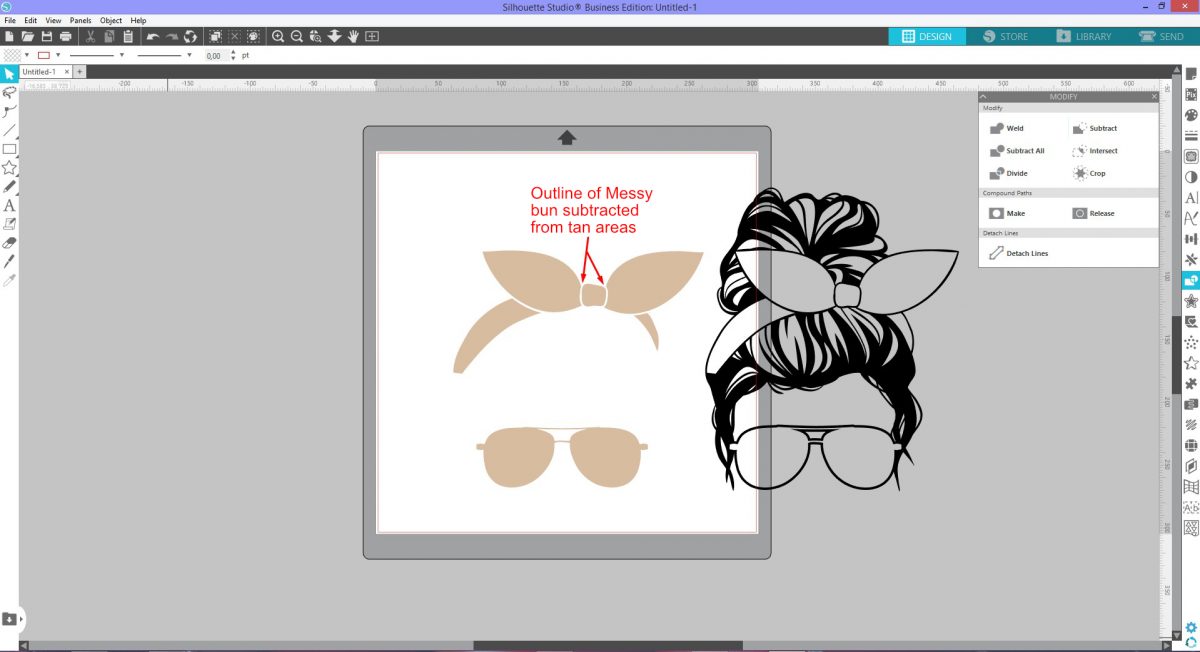
While still selected, right click and Group the subtracted objects. You can delete the tan objects on the left side as they are no longer needed.
Click on the Messy bun SVG and press Ctrl + left arrow. A duplicate will be accurately placed over the tan objects. Delete the SVG on the right. The base design is now ready. The solid tan objects would be your material such as glitter or patterned HTV.
A new pattern can be added for projects that use printable vinyl. In Silhouette we can add a new pattern in one of two ways.
The Fill panel has a selection of patterns available but you can also add your own. Once the pattern has been loaded, click on the Fill panel on the right hand side. Under the Patterns panel, scroll down to the bottom to find the newly added pattern.
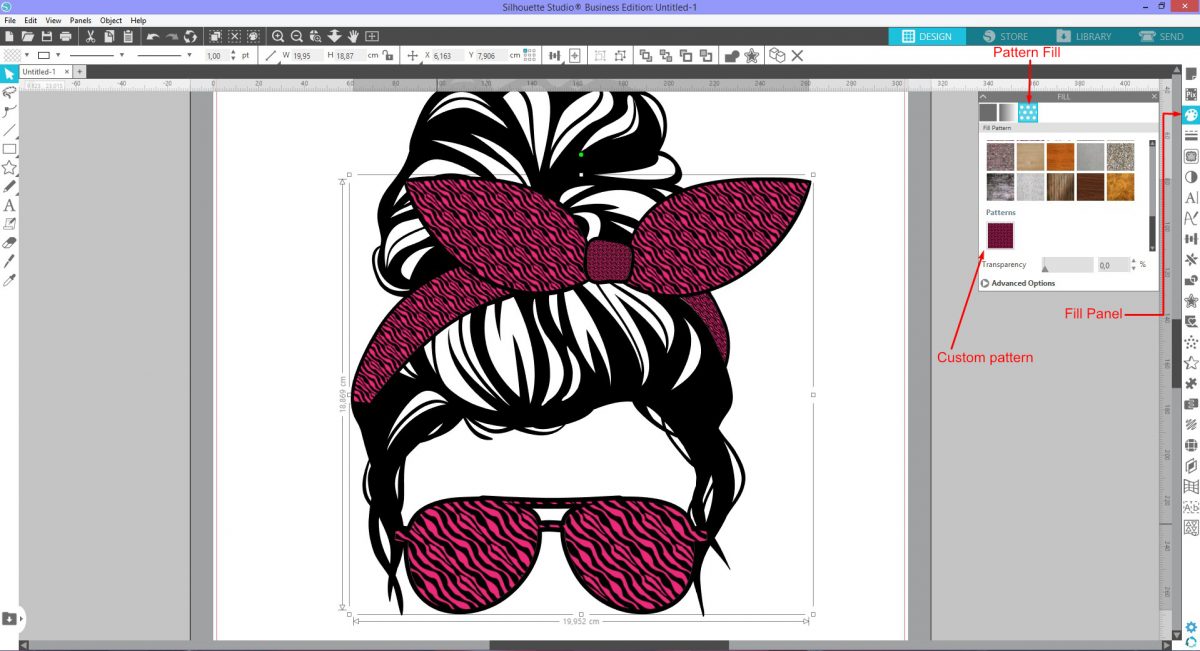
As you will notice, the pattern changes size according to where it is placed.
To have more control over how the pattern is applied we will use the Modify panel. Drag and drop a selected pattern onto the canvas. Be careful not to drop the pattern over the Messy bun SVG as it will become a pattern fill.
Adjust the size of the pattern if needed and position over the design. Click on the button at the top Send to back so the pattern is behind the design. Open the Modify panel then select both the tan objects and pattern. Click on Crop and the pattern will be adjusted.
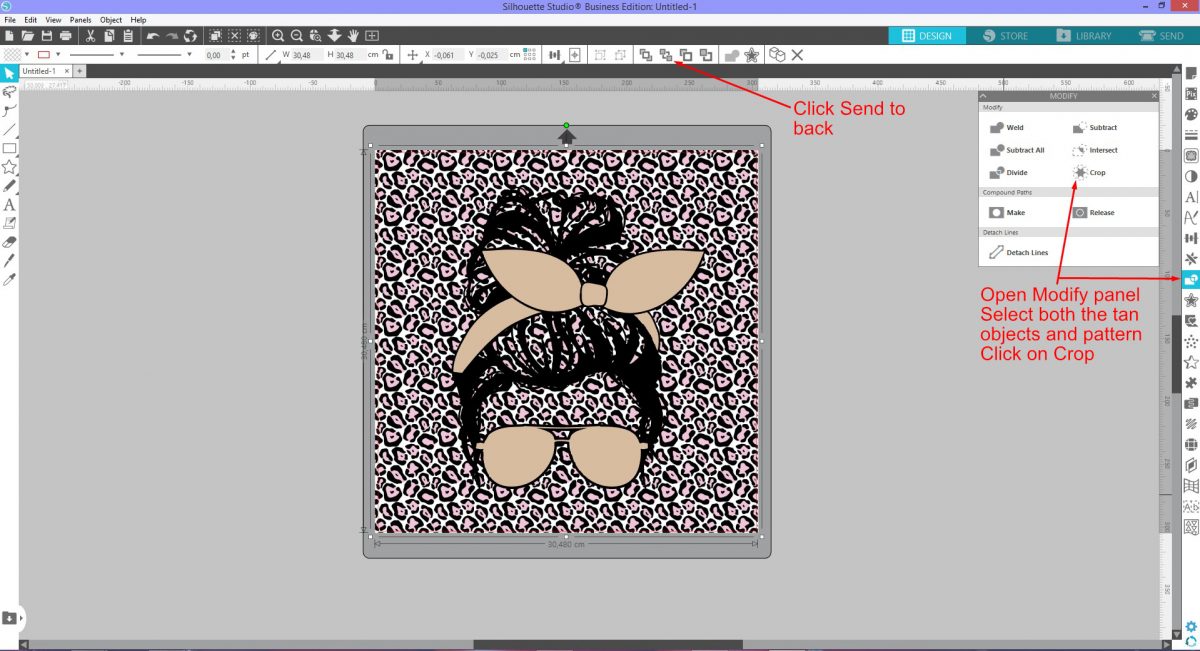
When Crop is applied, the pattern will break up into individual objects. While still selected, right click and Group.
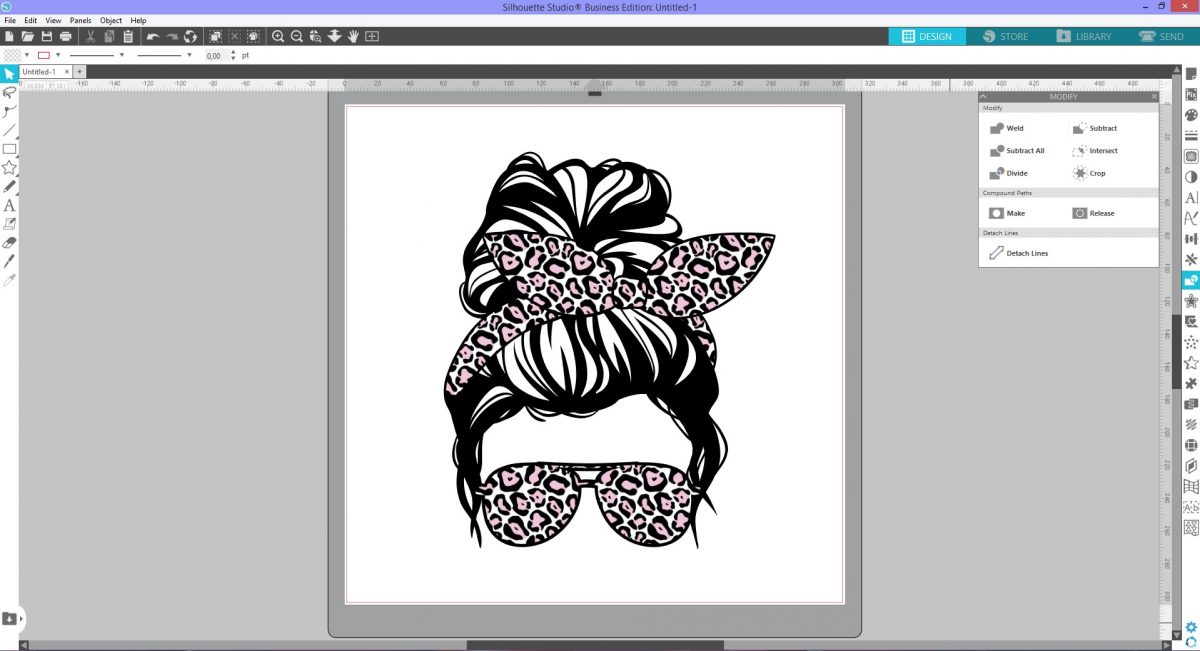
The pattern fill is best for printed projects as the pattern itself won't be cut out. However, you can adjust the pattern so the individual parts can be cut out.
Clipart patterns are mostly used for printed materials. If you are using a SVG pattern then you can give this step a miss.
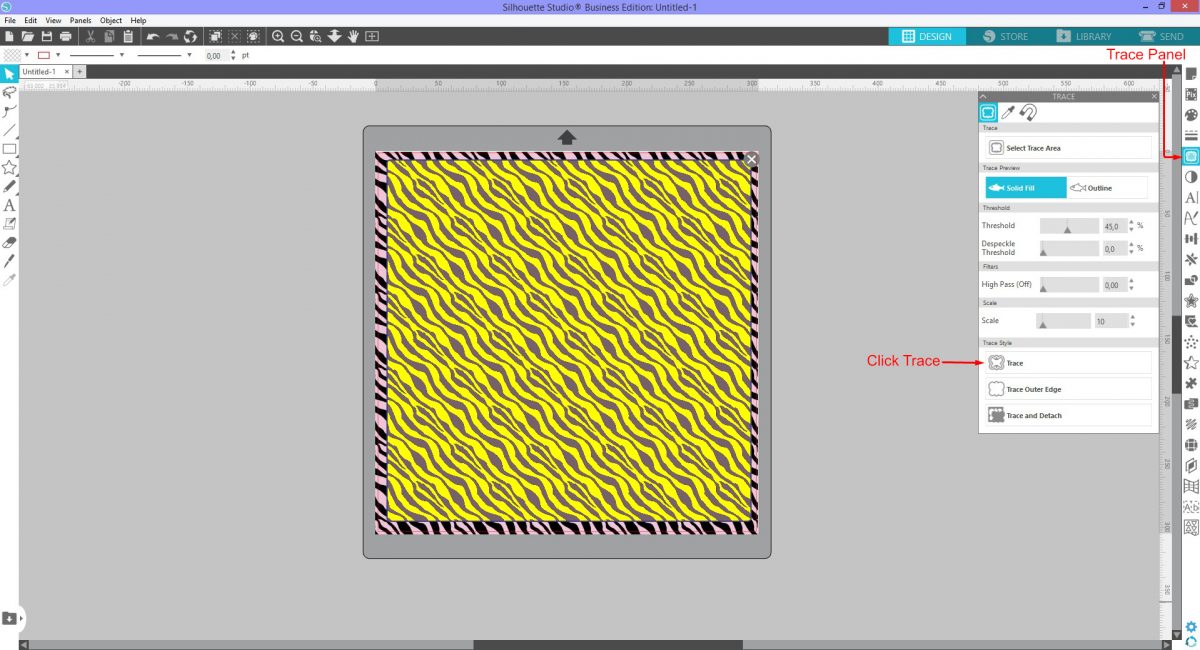
Bring in a pattern and resize if needed. Click on the Trace panel to open the menu options. Click on Select trace area and click + drag out the trace area. You don't need to trace the entire pattern.
Adjust the Threshold and Scale if needed. For this pattern we only needed to change the Threshold so that all of the Zebra lines were selected in yellow. Next, click on Trace.
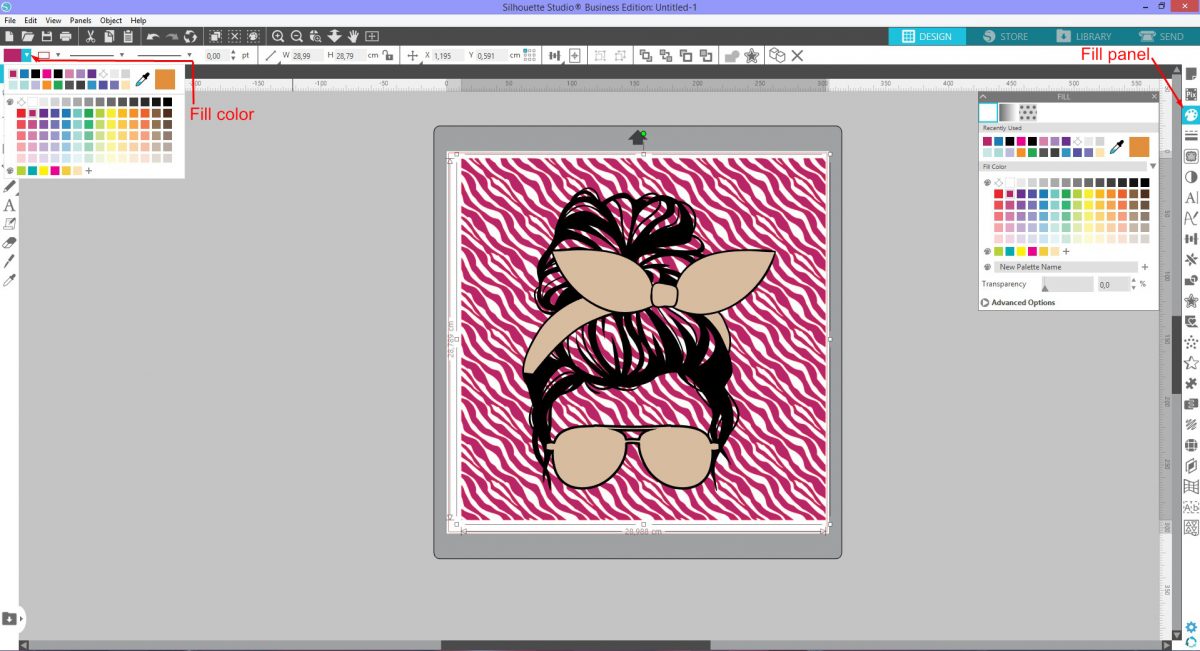
Separate the traced area by moving the pattern to one side and deleting it. Use the Fill panel on the right hand side or the fill option at the top. Fill with a color of your choice and click Send to Back.
Select both the pattern and tan objects then click Crop under the Modify panel. Right click and Group the cropped objects.
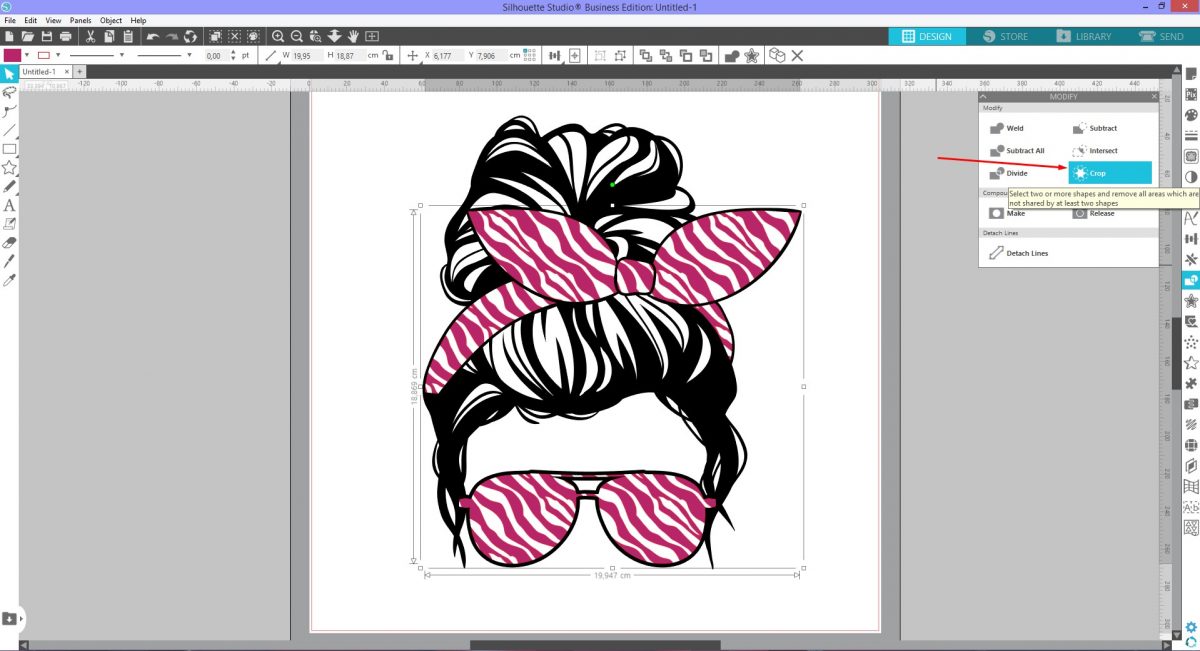
You can separate the pattern from the SVG and cut each one using different materials.
If you liked this tutorial you may also like our other tutorials on using advanced color settings in Silhouette, filling text with images, and using image effects in Silhouette Studio.
**Uploading SVG files requires a Business or Designer Edition Upgrade.
In this tutorial, we will be using this messy bun SVG. We've already uploaded our pattern into Silhouette Studio. If you need guidance with this process we do have this tutorial on importing patterns to Silhouette. Open Silhouette Studio to get started.
Step 1 - Prepare the Base File
SVG files with patterns may need a little editing to prepare the file. You would want to do this for layering HTV. Open the SVG file in Silhouette Studio by clicking File then Open. You can also drag and drop the file onto the canvas.
If the items are still grouped, right click the SVG and select Ungroup. Click on the pattern to select then delete it. The area where the pattern was placed is not subtracted out. So when you layer the design, the pieces would be layered on top of each other.
We want the pieces to fit together like a puzzle. Select both of the tan pieces and press Ctrl + left to make duplicates. These duplicates will be shifted to the left. Shift + click to select the original tan bow and sunglasses. Right click and select Group.
Next, we will be using the modify panel. Open the Modify panel on the right hand side. Select the tan objects and the Messy bun SVG then click on Subtract. The shape of the tan objects will be removed. Click + drag a selection box around the Messy bun SVG then click Weld under the Modify panel.
If nothing happens when clicking Weld, click away from the SVG to deselect. Reselect and click Weld again.
Duplicate the Messy bun SVG with Ctrl + right arrow. Select both tan pieces, right click and Group them. Then press Ctrl + right arrow again. This will create a duplicate of the tan objects and place them over the SVG.
With these new tan objects selected, click on Send Backward. This will move the objects behind the bow outline. Select both the Messy bun SVG and tan objects then click Subtract. The outline of the bow is subtracted.
While still selected, right click and Group the subtracted objects. You can delete the tan objects on the left side as they are no longer needed.
Click on the Messy bun SVG and press Ctrl + left arrow. A duplicate will be accurately placed over the tan objects. Delete the SVG on the right. The base design is now ready. The solid tan objects would be your material such as glitter or patterned HTV.
Step 2 - Add a New Pattern
A new pattern can be added for projects that use printable vinyl. In Silhouette we can add a new pattern in one of two ways.
Add a Pattern from the Fill Panel
The Fill panel has a selection of patterns available but you can also add your own. Once the pattern has been loaded, click on the Fill panel on the right hand side. Under the Patterns panel, scroll down to the bottom to find the newly added pattern.
As you will notice, the pattern changes size according to where it is placed.
Use the Modify Panel to Apply a Pattern
To have more control over how the pattern is applied we will use the Modify panel. Drag and drop a selected pattern onto the canvas. Be careful not to drop the pattern over the Messy bun SVG as it will become a pattern fill.
Adjust the size of the pattern if needed and position over the design. Click on the button at the top Send to back so the pattern is behind the design. Open the Modify panel then select both the tan objects and pattern. Click on Crop and the pattern will be adjusted.
When Crop is applied, the pattern will break up into individual objects. While still selected, right click and Group.
The pattern fill is best for printed projects as the pattern itself won't be cut out. However, you can adjust the pattern so the individual parts can be cut out.
Step 3 - Create a Cut Out from a Pattern
Clipart patterns are mostly used for printed materials. If you are using a SVG pattern then you can give this step a miss.
Bring in a pattern and resize if needed. Click on the Trace panel to open the menu options. Click on Select trace area and click + drag out the trace area. You don't need to trace the entire pattern.
Adjust the Threshold and Scale if needed. For this pattern we only needed to change the Threshold so that all of the Zebra lines were selected in yellow. Next, click on Trace.
Separate the traced area by moving the pattern to one side and deleting it. Use the Fill panel on the right hand side or the fill option at the top. Fill with a color of your choice and click Send to Back.
Select both the pattern and tan objects then click Crop under the Modify panel. Right click and Group the cropped objects.
You can separate the pattern from the SVG and cut each one using different materials.
If you liked this tutorial you may also like our other tutorials on using advanced color settings in Silhouette, filling text with images, and using image effects in Silhouette Studio.
Related Tutorials
Silhouette Tutorials
How to use SVG Files in Silhouette Studio
In this tutorial, learn how to upload and use SVG file in Silhouette Studio.
Silhouette Tutorials
How to Reinstall Silhouette Studio on to Your Computer
If you need to reinstall Silhouette Studio on your PC, this tutorial will help you out.
Silhouette Tutorials
How to Use Your Silhouette Studio Library on More Than One Computer
Learn how to access your Silhouette Studio Design Edition library on up to 3 different devices!
Silhouette Tutorials
How to Import Patterns Into the Silhouette Studio Library
In this tutorial, learn how to import patterns to Silhouette Studio in 3 Easy Steps!
Silhouette Tutorials
How to Bulk Import Files into Silhouette Studio Library
In this tutorial you will learn how to bulk import files into the Silhouette Studio Library.
Silhouette Tutorials
Filling Text with Digital Patterns and Papers in Silhouette Studio
Filling text with digital patterns and papers in Silhouette Studio is so easy with our tutorial.