By Design Bundles
Stipple Tool Basics in Silhouette Curio
The Stipple tool feature for the Silhouette Curio uses tiny dots to create designs.This feature is available in the free basic edition and higher. Stippling can be done with the Stippling tool or a pen marker. It can also be applied to pretty much any design or photo. In this tutorial you will learn the Stipple Tool basics for the Silhouette Curio.
For this tutorial we be using an inspirational svg created by WinterWolfeSVG. We have a wonderful range of Believe SVGsfor you to browse through.
Step 1 - Adjust Page setup and import design
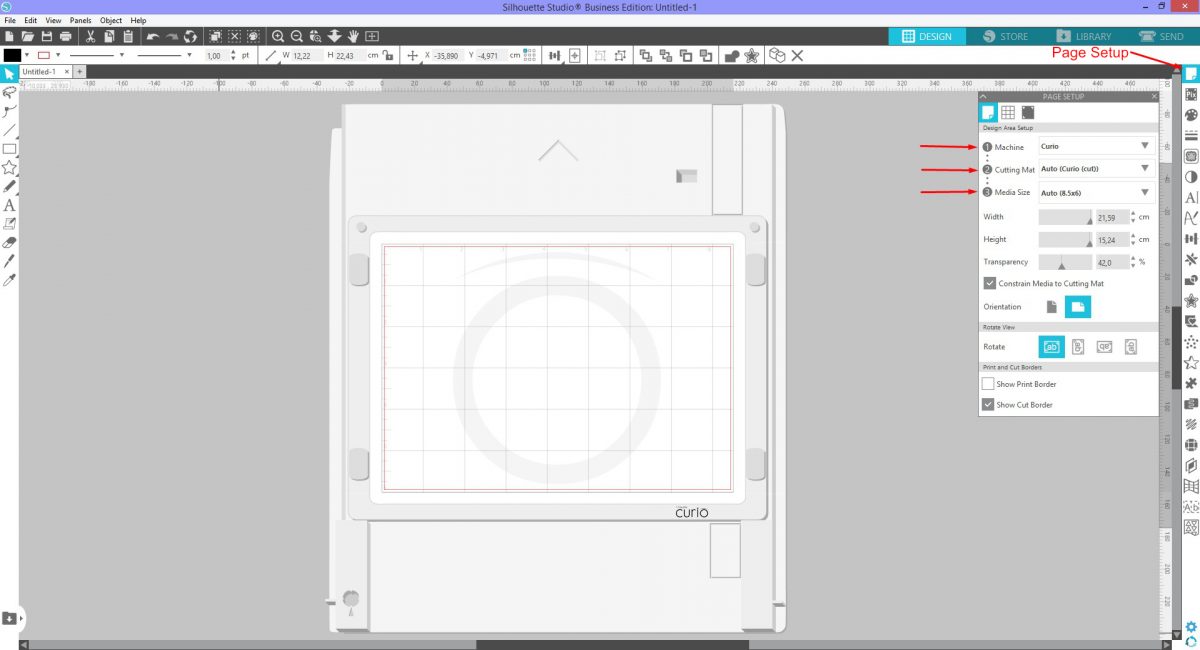
By default, the Cameo mat is selected when opening Silhouette Studio. We need to change this to show the Curio mat. On the right side panel at the top click on Page Setup.

Under the Page Setup panel, change the Machine to Curio. This should automatically adjust the Cutting Mat and Media size for the machine. Your screen will also change to show the Curio mat. If you are using a larger mat it can be adjusted under the Cutting Mat option.
To import your file go to the File menu at the top and click on Open. Locate your file and click Ok to import. Alternatively, drag and drop your design onto the mat.

Before adding a stipple fill, for this design we need to remove the current fill and add a stroke. The Fill and Stroke can be adjusted top left of the screen or on the right side panel.

Step 2 - Use the Stipple Tool
Now that the design is ready, we can use the Stipple Tool. The Stipple effect can be applied as an outline and/or a fill. On the right hand side click on the Stipple tool that looks like a dotted star.
Apply a Stipple Outline
With the Stipple Panel open, click the first icon at the top. Beneath that tick the box next to Stipple Edge. Next, adjust the spacing to your liking.This increases or decreases the spacing between the dots.

Apply a Stipple Fill with the Outline
Lower down the panel are the options for the Stipple Fill. You can use this with or without an outline. There are numerous fill options available. It is a good thing to note that, depending on the fill area, not all fill designs will work.

Select a fill and adjust the Grid and Stipple spacing, Scale factor, Angle and Offset.
With Grid Spacing the designs are spaced with Grids and these grids are increased or decreased.
Stipple Spacing determines how close or how far the dots are spaced from each other.
The Scale Factor sizes the fill designs.In our example below we used the Heart Stipple Fill. As it was decreased the hearts became smaller. Increasing the number increased the size.
The Angle is as the name suggests, this changes the angle of the fill.
The Offset option adjusts the distance from the edge of the designwhere the pattern starts.
The Stipple Size provides a quick visual. This is to show how the design will look with your type of tool selected. For example, if using a pen with a point of 2.00, then you can view this with the Stipple Size.
We adjusted our settings as seen in the image below.

Step 3 - Print or Stipple your design
You have the option to print your stipple design instead of going through the Stippling process itself. This might be more favorable if there is a time constraint.To Print be sure to tick the box next to Print Stipple.
If you want to use a different color, the Color Line needs to be changed and not the Fill. This is because there is no solid fill color applied.

Once you are happy with the result, click on the Send button top left. At the bottom of the send panel click on the machines icon to select your Curio. Next, choose your material. We went with Cardstock, set the Action to Stipple and chose the Pen as our Tool. This will draw the design while the stipple tool will make indentations.

Clicking on the More option beneath the cut settings will bring up another menu. This menu will tell you at the bottom how many platforms are required.

Add your platforms and place the material on your cutting mat. Make sure the Pen is placed in the carriage the corresponds with your screen. Insert into the machine and once all is ready, click Send. It may take awhile for the process to be completed depending on the design and fill.
Once completed, you can now admire your beautifully stippled design. We hope you enjoyed following this tutorial. We have more excellent tutorials for you to check out such as how to use the sketch tooland how to trace with the stipple tool for the Silhouette Curio.