By Design Bundles
How to Crop an Image in Inkscape
Today we will show you how to crop an image in Inkscape. The process uses a non-destructive clipping mask applied to your image with a variety of shapes. This feature is so versatile you can also crop a group of objects for creative purposes. So let’s jump in and get started with these helpful tips.
To show you how to crop in Inkscape with a clipping mask, we will be using this fall watercolor clipart and a crystal SVG. Check out this collection of watercolor clipart images for more creative options.
Unlike traditional cropping, in Inscape the page isn’t automatically cropped to the design. We will also show you how to fix this.
Looking for more design ideas? Design Bundles offers an unbelievable collection of FREE Design Resources for all your project needs.
Step 1 - Use the Image Import Option
Whether opening an image or using drag and drop, you will need to use the Image Import window.
Open Inkscape, and, depending on your version, create a new document. You can go to File > Open to open the image. Alternatively, go to File > Import or drag and drop the image into Inkscape. We chose to Import the file.
When an image is uploaded, you will get the “png bitmap image import” window. Adjust the settings if needed, but we left as is and clicked Ok.

We also opened the SVG file by going to File > Open. The file consists of multiple elements, but we only want to use one image. Select what you want, and then right click > Copy.
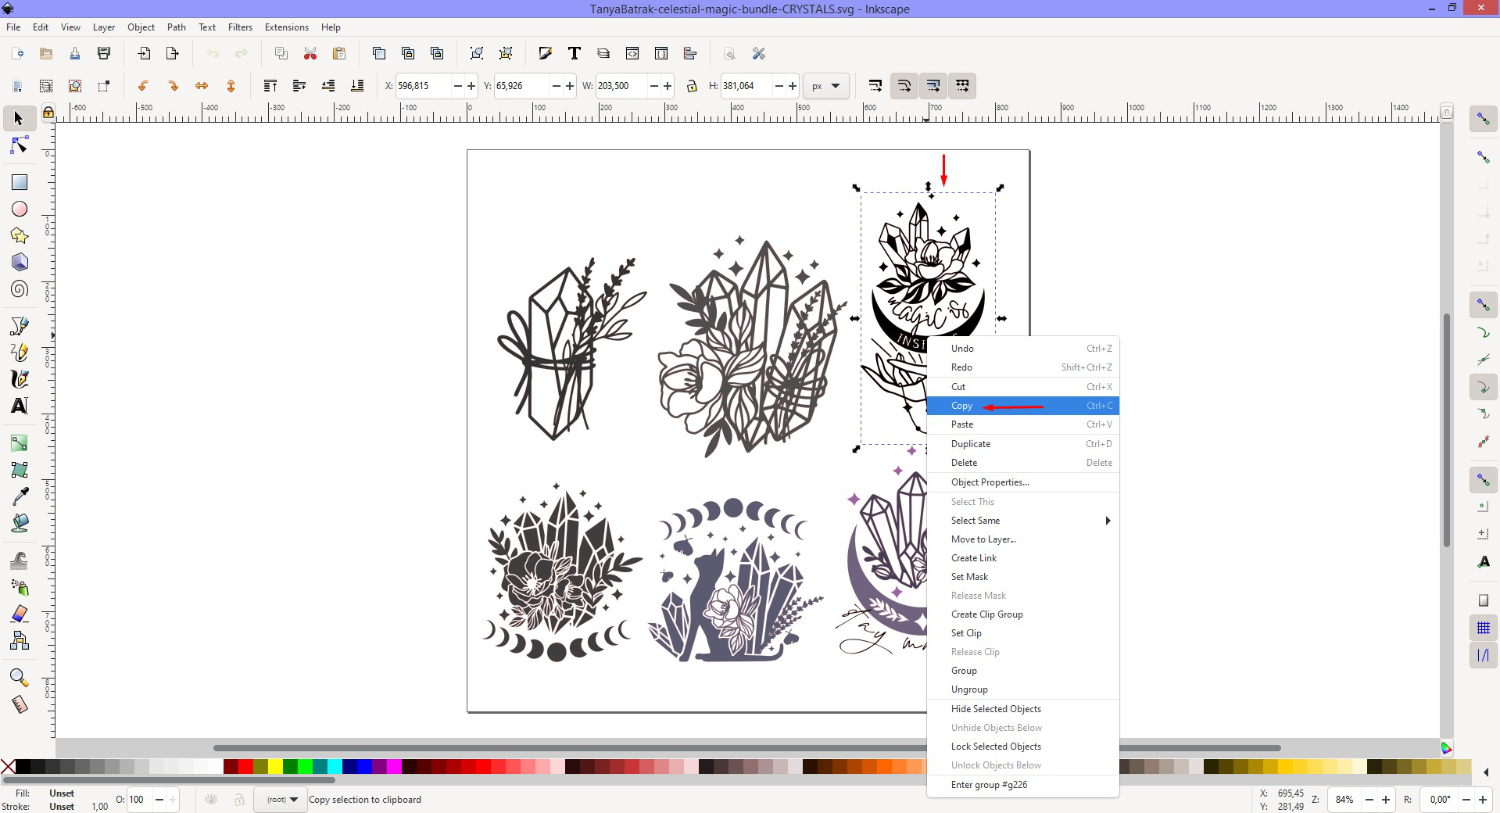
Go back to the PNG document, right click > Paste. We now have both files in one document. Resize the image as needed for this project. You can follow our guide on how to resize an image in Inkscape if you need more information.

Step 2 - Crop PNG Image with the Shape Tool
On the left-side toolbar there is a selection of shape tools to choose from. These shapes can be a typical square, circle or any shape of your choice. For the top PNG image we will use a square.
Create a Square
Now, before adding a square, open the Fill and Stroke Panel. Go to Object > Fill and Stroke. Then select the Create rectangles and squares tool on the left side. While holding Ctrl, click + drag a square out over the PNG image.
Under the Fill tab, click on RGB and lower the Alpha (A) option in order to see the image beneath.

Go to the Stroke Paint tab and click on the X to remove the stroke from the square.

Resize the PNG Image
For this image, we want to keep the cute mushroom and crop out the rest. First, make sure that the square is on top of the PNG image. Do this by clicking on Raise selection to top. You can also go to Object > Raise to Top.

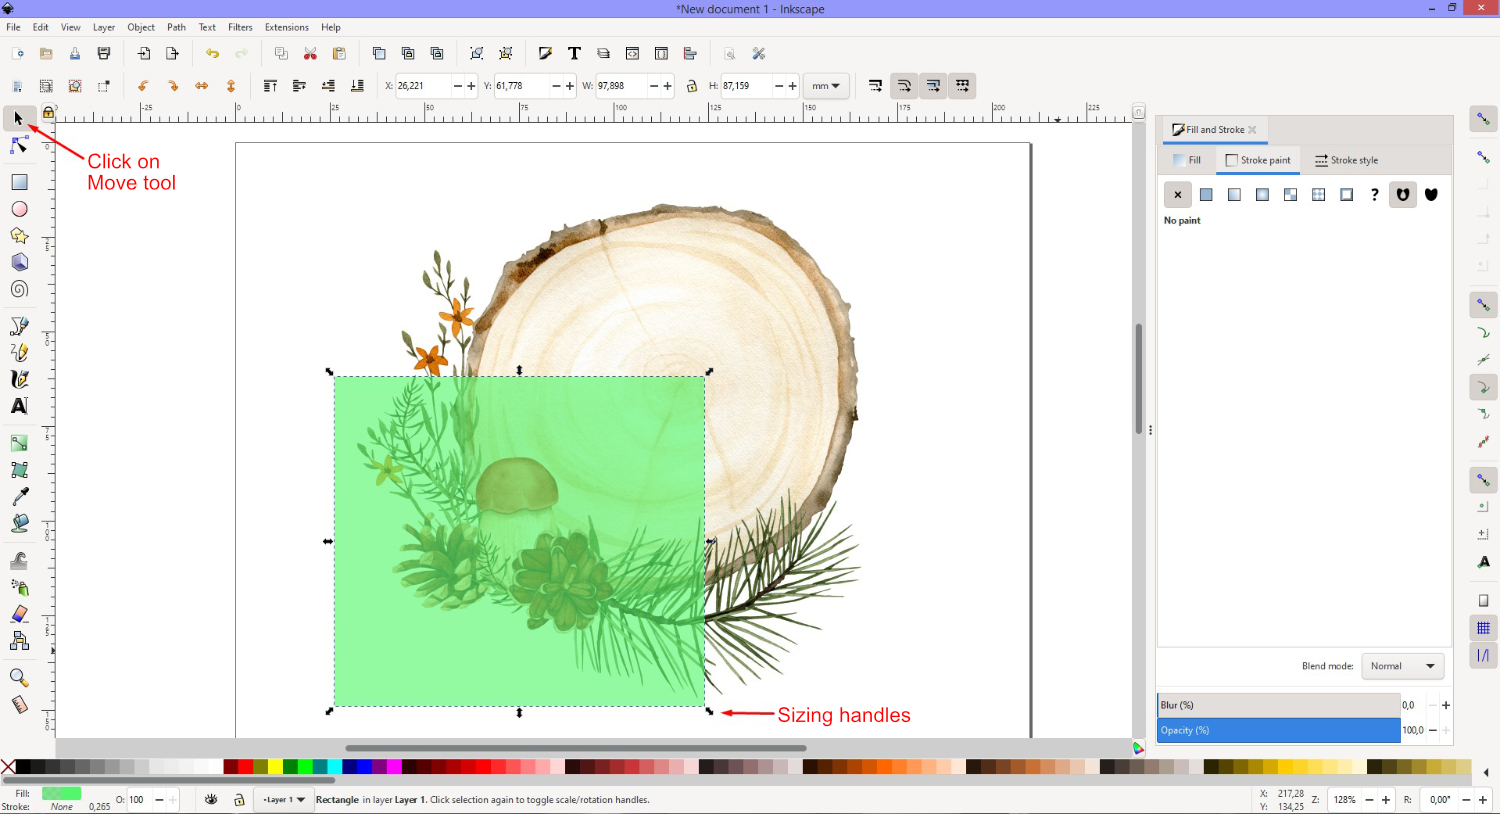
On the left toolbar, at the top, click on the Move tool then click back on the square. The sizing handles will be visible. You can then click + drag in to resize the square. We also repositioned it over the mushroom.
Crop PNG Image with Clipping Mask
Make sure to select both the PNG image and the square. Then go to Object > Clip > Set.

You will be left with the area that the rectangle covered as seen in the image below.

If you are not happy with the placement of the crop, you can undo it. Go back to Object > Clip > Release Clip. The PNG image and square will separate and can be edited however you choose.
Step 3 - Crop SVG with Bezier Curve
Shape tools can also be used to crop a SVG file, but some elements may be too close to one another. Another option is to ungroup the objects and move the elements around. As you can see in the image below, it can be time consuming to select and move each one.

Draw a Bezier Curve Path
For this example we chose to use the Bezier Curve Tool to create a clipping mask. Click on the Bezier Curve tool to select, then click + drag your mouse to place nodes.
Draw around the design until you come back to the first node. Now, click to close the path. For this masking option, we don't need to add a Fill.

Crop with the Clipping Mask
Be sure to select both the SVG and the Bezier Curve path then go to Object > Clip > Set. Everything that was enclosed in the path will be kept.

Clean up the Cropped Image
If we zoom in, we can see a small area that we don’t want in the cropped result. Another area also needs to be adjusted. We can’t ungroup the SVG because it will release and possibly lose the clipping mask.

The awesome thing about a clipping mask is that you can keep adjusting it. Go back to Objects > Clip > Release. Alternatively, right click > Release Clip.
Select the mask then click on the “Edit paths by nodes” on the left-side toolbar. You can also double click on the mask to activate the nodes. We then made some small adjustments so the mask wasn’t overlapping on any part of the design.

The clipping mask was applied again and the image below is the result.

Step 4 - Crop Multiple Objects Together
Now what if you wanted to crop multiple areas in one go? The clipping mask also works with more than one object.
One important thing to note, even though different areas are cropped, they still work together as a whole design. This means that you won’t be able to separate them. So this optional step is more for a bit of creative fun.
In the example below, we selected three different areas. This time we used the Create circles, ellipses and arcs tool. Remember to make sure that all of the objects used for clipping are placed above the image or SVG.

We selected all three of the shapes, right clicked > Group. The clipping mask will not work unless these shapes are grouped. Next, we set the clipping mask. Here we have the result of cropping different areas at once.

Step 5 - Fit Page Size to Cropped Image
As mentioned before, the clipping mask only crops the image. The page size won't change to fit the cropped image. To fix this we need to adjust the document properties. For this step, we deleted the SVG and kept the cropped PNG.
At the top go to File > Document Properties. In the window that opens on the right, make sure that Page is selected. Go down the options until you get to “Resize page to content”. Now click on the drop arrow to open the options.

Further down click on the “Resize page to drawing or selection”. The image below shows the result of resizing the canvas to the design.

Both the PNG and SVG files were easily cropped using a clipping mask. You also learned how to crop a grouped selection. Since it’s non-destructive, you can go back and tweak the mask whenever needed.
We hope that you enjoyed learning how to crop an image in Inkscape.